
让网站通过Https访问
Prerequisites
Before you begin, you should have some configuration already taken care of.
We will be operating as a non-root user with sudo privileges in this guide. You can set one up by following steps 1-4 in our Ubuntu 14.04 initial server setup guide.
You are also going to need to have Apache installed. If you don't already have that up and running, you can quickly fix that by typing:
sudo apt-get update

sudo apt-get install apache2
Step One — Activate the SSL Module
SSL support actually comes standard in the Ubuntu 14.04 Apache package. We simply need to enable it to take advantage of SSL on our system.
Enable the module by typing:
sudo a2enmod ssl
After you have enabled SSL, you'll have to restart the web server for the change to be recognized:
sudo service apache2 restart
With that, our web server is now able to handle SSL if we configure it to do so.
Step Two — Create a Self-Signed SSL Certificate
Let's start off by creating a subdirectory within Apache's configuration hierarchy to place the certificate files that we will be making:
sudo mkdir /etc/apache2/ssl
Now that we have a location to place our key and certificate, we can create them both in one step by typing:
sudo openssl req -x509 -nodes -days 365 -newkey rsa:2048 -keyout /etc/apache2/ssl/apache.key -out /etc/apache2/ssl/apache.crt
Let's go over exactly what this means.
- openssl: This is the basic command line tool provided by OpenSSL to create and manage certificates, keys, signing requests, etc.
- req: This specifies a subcommand for X.509 certificate signing request (CSR) management. X.509 is a public key infrastructure standard that SSL adheres to for its key and certificate managment. Since we are wanting to create a new X.509 certificate, this is what we want.
- -x509: This option specifies that we want to make a self-signed certificate file instead of generating a certificate request.
- -nodes: This option tells OpenSSL that we do not wish to secure our key file with a passphrase. Having a password protected key file would get in the way of Apache starting automatically as we would have to enter the password every time the service restarts.
- -days 365: This specifies that the certificate we are creating will be valid for one year.
- -newkey rsa:2048: This option will create the certificate request and a new private key at the same time. This is necessary since we didn't create a private key in advance. The
rsa:2048tells OpenSSL to generate an RSA key that is 2048 bits long. - -keyout: This parameter names the output file for the private key file that is being created.
- -out: This option names the output file for the certificate that we are generating.
When you hit "ENTER", you will be asked a number of questions.
The most important item that is requested is the line that reads "Common Name (e.g. server FQDN or YOUR name)". You should enter the domain name you want to associate with the certificate, or the server's public IP address if you do not have a domain name.
The questions portion looks something like this:
Country Name (2 letter code) [AU]:US

State or Province Name (full name) [Some-State]:New York

Locality Name (eg, city) []:New York City

Organization Name (eg, company) [Internet Widgits Pty Ltd]:Your Company

Organizational Unit Name (eg, section) []:Department of Kittens

Common Name (e.g. server FQDN or YOUR name) []:your_domain.com

Email Address []:your_email@domain.com
The key and certificate will be created and placed in your /etc/apache2/ssl directory.
Step Three — Configure Apache to Use SSL
Now that we have our certificate and key available, we can configure Apache to use these files in a virtual host file. You can learn more about how to set up Apache virtual hosts here.
Instead of basing our configuration file off of the 000-default.conf file in the sites-availablesubdirectory, we're going to base this configuration on the default-ssl.conf file that contains some default SSL configuration.
Open the file with root privileges now:
sudo nano /etc/apache2/sites-available/default-ssl.conf
With the comments removed, the file looks something like this:
<IfModule mod_ssl.c>

    <VirtualHost _default_:443>

        ServerAdmin webmaster@localhost

        DocumentRoot /var/www/html

        ErrorLog ${APACHE_LOG_DIR}/error.log

        CustomLog ${APACHE_LOG_DIR}/access.log combined

        SSLEngine on

        SSLCertificateFile /etc/ssl/certs/ssl-cert-snakeoil.pem

        SSLCertificateKeyFile /etc/ssl/private/ssl-cert-snakeoil.key

        <FilesMatch "\.(cgi|shtml|phtml|php)$">

                        SSLOptions +StdEnvVars

        </FilesMatch>

        <Directory /usr/lib/cgi-bin>

                        SSLOptions +StdEnvVars

        </Directory>

        BrowserMatch "MSIE [2-6]" \

                        nokeepalive ssl-unclean-shutdown \

                        downgrade-1.0 force-response-1.0

        BrowserMatch "MSIE [17-9]" ssl-unclean-shutdown

    </VirtualHost>

</IfModule>
This may look a bit complicated, but luckily, we don't need to worry about most of the options here.
We want to set the normal things we'd configure for a virtual host (ServerAdmin, ServerName, ServerAlias, DocumentRoot, etc.) as well as change the location where Apache looks for the SSL certificate and key.
In the end, it will look something like this. The entries in red were modified from the original file:
<IfModule mod_ssl.c>

    <VirtualHost _default_:443>

        ServerAdmin admin@example.com

        ServerName your_domain.com

        ServerAlias www.your_domain.com

        DocumentRoot /var/www/html

        ErrorLog ${APACHE_LOG_DIR}/error.log

        CustomLog ${APACHE_LOG_DIR}/access.log combined

        SSLEngine on

        SSLCertificateFile /etc/apache2/ssl/apache.crt

        SSLCertificateKeyFile /etc/apache2/ssl/apache.key

        <FilesMatch "\.(cgi|shtml|phtml|php)$">

                        SSLOptions +StdEnvVars

        </FilesMatch>

        <Directory /usr/lib/cgi-bin>

                        SSLOptions +StdEnvVars

        </Directory>

        BrowserMatch "MSIE [2-6]" \

                        nokeepalive ssl-unclean-shutdown \

                        downgrade-1.0 force-response-1.0

        BrowserMatch "MSIE [17-9]" ssl-unclean-shutdown

    </VirtualHost>

</IfModule>
Save and exit the file when you are finished.
Step Four — Activate the SSL Virtual Host
Now that we have configured our SSL-enabled virtual host, we need to enable it.
We can do this by typing:
sudo a2ensite default-ssl.conf
We then need to restart Apache to load our new virtual host file:
sudo service apache2 restart
This should enable your new virtual host, which will serve encrypted content using the SSL certificate you created.
Step Five — Test your Setup
Now that you have everything prepared, you can test your configuration by visiting your server's domain name or public IP address after specifying the https:// protocol, like this:
https://server_domain_name_or_IP
You will get a warning that your browser cannot verify the identity of your server because it has not been signed by one of the certificate authorities that it trusts.
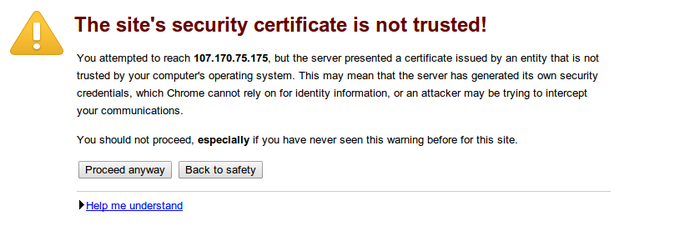
This is expected since we have self-signed our certificate. While our certificate will not validate our server for our users because it has had no interaction with a trusted certificate authority, it will still be able to encrypt communication.
Since this is expected, you can hit the "Proceed anyway" button or whatever similar option you have in your browser.
You will now be taken to content in the DocumentRoot that you configured for your SSL virtual host. This time your traffic is encrypted. You can check this by clicking on the lock icon in the menu bar:
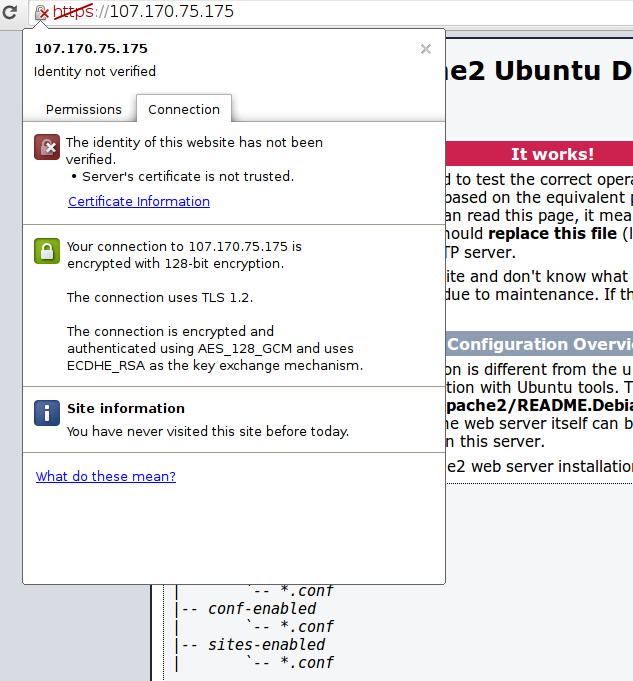
You can see in the middle green section that the connection is encrypted.
Conclusion
You should now have SSL enabled on your website. This will help to secure communication between visitors and your site, but it will warn each user that the browser cannot verify the validity of the certificate.
If you are planning on launching a public site and need SSL, you will be better off purchasing an SSL certificate from a trusted certificate authority.
If you want to learn more about how to configure Apache, click here. Check out this link for more ideas on how to secure your Linux server.
让网站通过Https访问的更多相关文章
- IIS7的网站通过https访问提示ssl_error_rx_record_too_long
IIS7的网站通过https访问,提示ssl_error_rx_record_too_long,如下图所示: 解决办法: 一.导入服务器的SSL证书至IIS 1.打开IIS,找到服务器证书 2.导入本 ...
- 网站用https访问的问题
网站挂到阿里云上, 可以http访问, 也可以https访问. 但是如果用https方式访问网站.发现接口报错. 因为接口只提供http方式. 在谷歌浏览器出现: Mixed Content: The ...
- 网站实现https访问
https协议 是一种通过计算机网络进行安全通信的传输协议.HTTPS经由HTTP进行通信,但利用SSL/TLS来加密数据包.HTTPS开发的主要目的,是提供对网站服务器的身份认证,保护交换数据的隐私 ...
- 网站申请HTTPS 访问
#生成证书和key openssl req -x509 -nodes -days 36500 -newkey rsa:2048 -keyout /opt/nginx/pdk.key -out /opt ...
- 使用免费SSL证书让网站支持HTTPS访问
参考掘金的文章,掘金的文章最详细. https://juejin.im/post/5a31cbf76fb9a0450b6664ee 先检查是否存在 EPEL 源: # 进入目录检查是否存在 EPEL ...
- centos7利用acme.sh获取Let's Encrypt的永久免费ssl证书并配置网站域名https访问
acme.sh介绍:https://github.com/Neilpang/acme.sh/wiki/%E8%AF%B4%E6%98%8E github:https://github.com/Neil ...
- handbook/CentOS/使用免费SSL证书让网站支持HTTPS访问.md
- ubuntu安装nginx和设置网站https访问
安装nginx 在控制台 输入 sudo apt-get install nginx 等待安装成功之后.可以打开浏览器.输入你的域名或者ip地址会出现"Welcome to nginx!&q ...
- 记一次免费让网站启用HTTPS的过程
写在前面 个人网站运行将近2个月了,期间根据酷壳的一篇教程如何免费的让网站启用HTTPS做了一次,中间遇到问题就放下了.昨天孙三苗问我网站地址说要添加友链,出于好奇想看他网站长什么样,顺道也加一下友链 ...
随机推荐
- 什么是bgp线路
https://www.douban.com/note/319956581/ BGP(边界网关协议)主要用于互联网AS(自治系统)之间的互联,BGP的最主要功能在于控制路由的传播和选择最好的路由.中国 ...
- python_分支循环
什么是分支+循环? --不同条件进行不同逻辑处理 -- 分支 --满足条件进行反复相同逻辑处理 -- 循环 分支的形式? -- if 条件: 执行体 else: 执 ...
- 无废话XML--XML细节
今天开始研究xml,其实在实际的开发中,我们参与到真正的XML开发并不是很多,最多写一个配置,但是我还是觉得很有必要把XML的知识整理一遍.作为基本的2种的数据交互载体(还有一个是json),基本的X ...
- docker入门(一)
1. Docker是什么? 官方的解释地址: Docker是一个开源的引擎,可以轻松的为任何应用创建一个轻量级的.可移植的.自给自足的容器.开发者在笔记本上编译测试通过的容器可以批量地在生产环境中部署 ...
- 【转】sed 学习笔记
一 . sed 简介 1 . 功能 sed 是一种流编辑器,所谓流编辑器是指能够对来自文件或者管道的输入流进行基本的文本转换的工具,比方说查找替换删除等. 2 . 最简单的运作机制 sed ...
- Node.js:上传文件,服务端如何获取文件上传进度
内容概述 multer是常用的Express文件上传中间件.服务端如何获取文件上传的进度,是使用的过程中,很常见的一个问题.在SF上也有同学问了类似问题<nodejs multer有没有查看文件 ...
- weighted_cross_entropy_with_logits
weighted_cross_entropy_with_logits 原创文章,请勿转载!!! weighted_cross_entropy_with_logits(targets, logits, ...
- C#之DataTable转List与List转Datatable
闲来无事,只有写代码啦,以下为DataTable转List与List转DataTable的两个方法,主要技术点用到了反射原理: /// <summary> /// 模型转换类 /// &l ...
- Django REST framework反向生成url
Django REST framework是一个基于Django的框架,REST framework又是怎么反向生成url的呢?? 在前面的例子中,知道在REST framework中有6种版本控制的 ...
- FindBugs简单应用
FindBugs是一种java代码的静态分析工具,无需开发人员费劲就能找出代码中可能存在的缺陷.FindBugs 不注重样式或者格式,它试图只寻找缺陷或者潜在的性能问题. 第一步,http://sou ...