
【KAWAKO】TVM-tflite模型编译与优化
前言
TVM的编译与优化主要有两种方法,一种是通过tvmc命令行,另一种是通过python。
tvmc编译出来的模型,在后面c++推理的时候读取不进来,可能是我使用的c++方法与tvmc的模型对应不上导致的,因此本文暂时不讲这种方法,其使用方法可以在官方文档中找到。
python方法虽然不如tvmc灵活,但也挺简单的,本文将对该方法进行讲解。官方文档。
准备模型
本次使用的是DTLN第二阶段的模型,模型结构如下
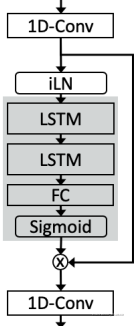
其包含两个输入、两个输出:
输入分别为(1,1,640)的主输入,和(1,2,128,2)的LSTM状态输入。
输出分别为(1,1,640)的主输出,和(1,2,128,2)的LSTM状态输出。
版本问题
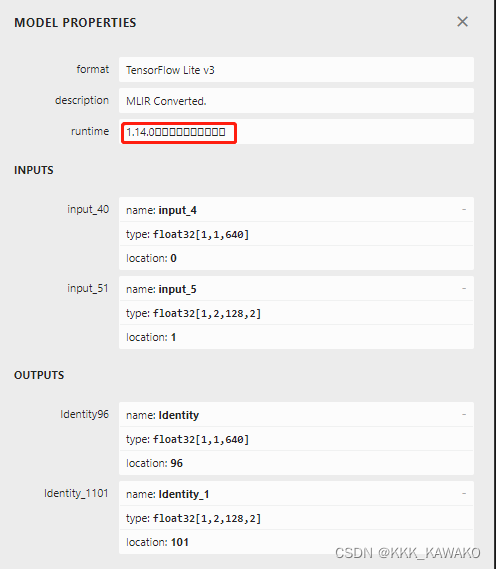
使用netron查看网络结构,在“model properties”中可以看到“runtime”版本。
一开始我使用 tensorflow 2.5.0,转出来的tflite模型的runtime版本为2.0,使用该模型在后面的步骤中会发生错误。
后来我把tensorflow降级到2.4.0,转出来的tflite模型的runtime版本为1.14.0,该模型在后面的步骤中未发生错误。
精度问题
使用int8精度的模型在后面的步骤中会发生错误,使用float精度的模型未发生错误。
加载tflite模型
tflite_model_file = "float16_2.tflite"

tflite_model_buf = open(tflite_model_file, "rb").read()

import tflite

tflite_model = tflite.Model.GetRootAsModel(tflite_model_buf, 0)
注:我的tflite版本为2.1.0
编译模型
from tvm import relay, transform

input_1 = ["input_5", (1,2,128,2), "float32"]

input_2 = ["input_4", (1,1,640), "float32"]

mod, params = relay.frontend.from_tflite(

        tflite_model,

        shape_dict={input_1[0]: input_1[1], input_2[0]: input_2[1]},

        dtype_dict={input_1[0]: input_1[2], input_2[0]: input_2[2]},

    )

target = "llvm"

with transform.PassContext(opt_level=3):

    lib = relay.build(mod, target, params=params)
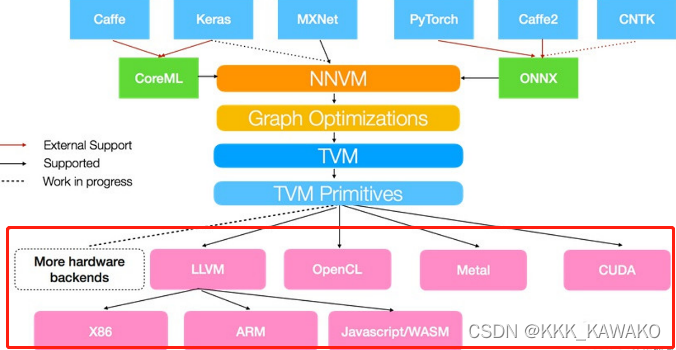
target是可以根据情况自行更改,参考这篇博客中的这张图。
opt_level是优化等级,从tvmc compiler -h命令中看到其选择范围为0~3。

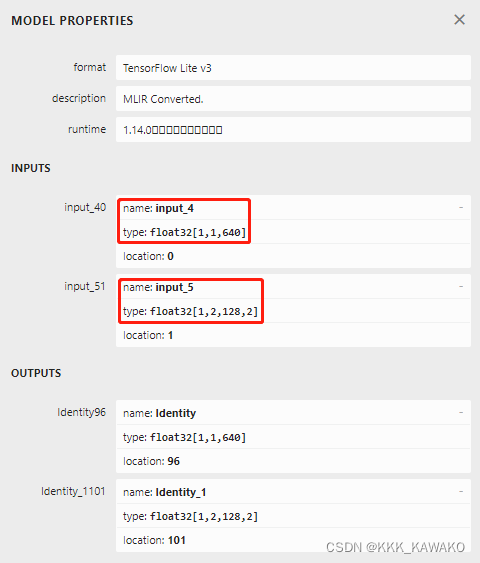
从netron中可以看到模型两个输入的名字和维度。
在python上运行模型进行测试
加载输入数据
import numpy as np

input_state = np.load("input_states.npy")

inputs = np.load("input.npy")
运行四连
创建模型执行器 → 输入数据 → 运行 → 得到输出
import tvm

from tvm import te

from tvm.contrib import graph_executor as runtime

# Create a runtime executor module

module = runtime.GraphModule(lib["default"](tvm.cpu()))

# Feed input data

module.set_input(input_1[0], tvm.nd.array(input_state))

module.set_input(input_2[0], tvm.nd.array(inputs))

# Run

import time

times = 100000

a = time.time()

for i in range(times):

    module.run()

print(1000*(time.time()-a)/times)

# Get output

tvm_output_0 = module.get_output(0).numpy()

tvm_output_1 = module.get_output(1).numpy()
优化(Autotune)
加载各种库
import tvm.auto_scheduler as auto_scheduler

from tvm.autotvm.tuner import XGBTuner

from tvm import autotvm
创建TVM runner
number = 10

repeat = 1

min_repeat_ms = 0  # since we're tuning on a CPU, can be set to 0

timeout = 10  # in seconds

# create a TVM runner

runner = autotvm.LocalRunner(

    number=number,

    repeat=repeat,

    timeout=timeout,

    min_repeat_ms=min_repeat_ms,

    enable_cpu_cache_flush=True,

)
设置一些tuning的参数
tuning_option = {

    "tuner": "xgb",

    "trials": 1500,

    "early_stopping": 100,

    "measure_option": autotvm.measure_option(

        builder=autotvm.LocalBuilder(build_func="default"), runner=runner

    ),

    "tuning_records": "model-autotuning.json",

}
开始autotune,autotune会将结果记录在上面设置的"tuning_records"中。
# begin by extracting the tasks from the onnx model

tasks = autotvm.task.extract_from_program(mod["main"], target=target, params=params)

# Tune the extracted tasks sequentially.

for i, task in enumerate(tasks):

    prefix = "[Task %2d/%2d] " % (i + 1, len(tasks))

    tuner_obj = XGBTuner(task, loss_type="rank")

    tuner_obj.tune(

        n_trial=min(tuning_option["trials"], len(task.config_space)),

        early_stopping=tuning_option["early_stopping"],

        measure_option=tuning_option["measure_option"],

        callbacks=[

            autotvm.callback.progress_bar(tuning_option["trials"], prefix=prefix),

            autotvm.callback.log_to_file(tuning_option["tuning_records"]),

        ],

    )
根据"tuning_records"中的autotune结果,重新编译模型
with autotvm.apply_history_best(tuning_option["tuning_records"]):

    with tvm.transform.PassContext(opt_level=3, config={}):

        lib = relay.build(mod, target=target, params=params)
将模型导出为so文件,待后续c++推理使用
lib.export_library("./model_autotune.so")
注:
autotune使用的算法可以自行修改,候选算法可以在tvm工程下的“gallery/how to/tune_with_autotvm”中找到。
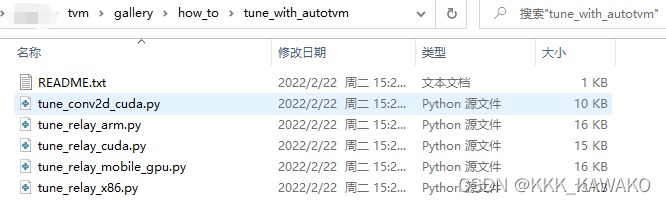
根据自己的平台选择相应的文件,在里面找到类似下图这样的(各个平台可选择的算法不同)
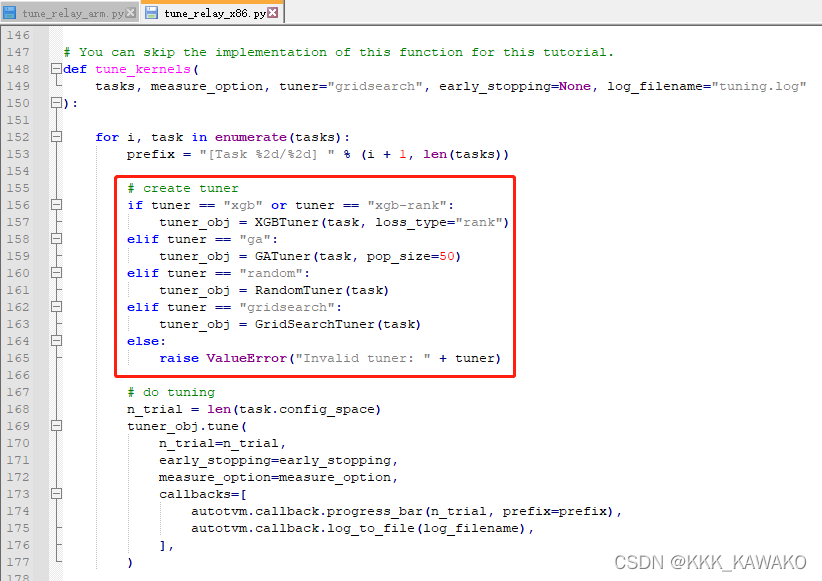
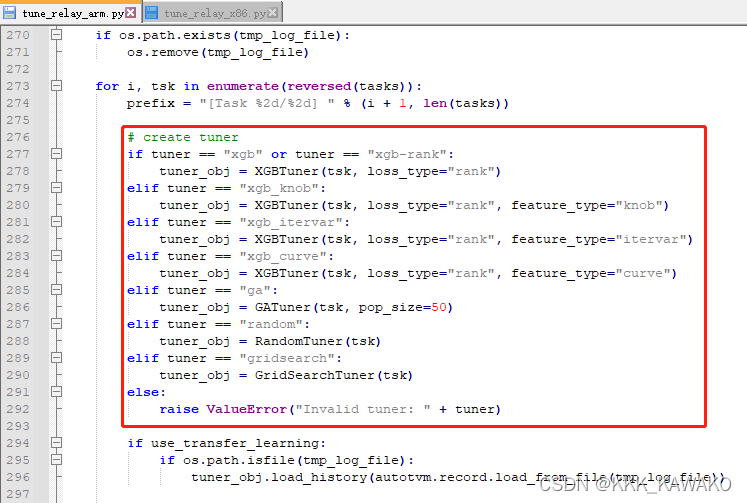
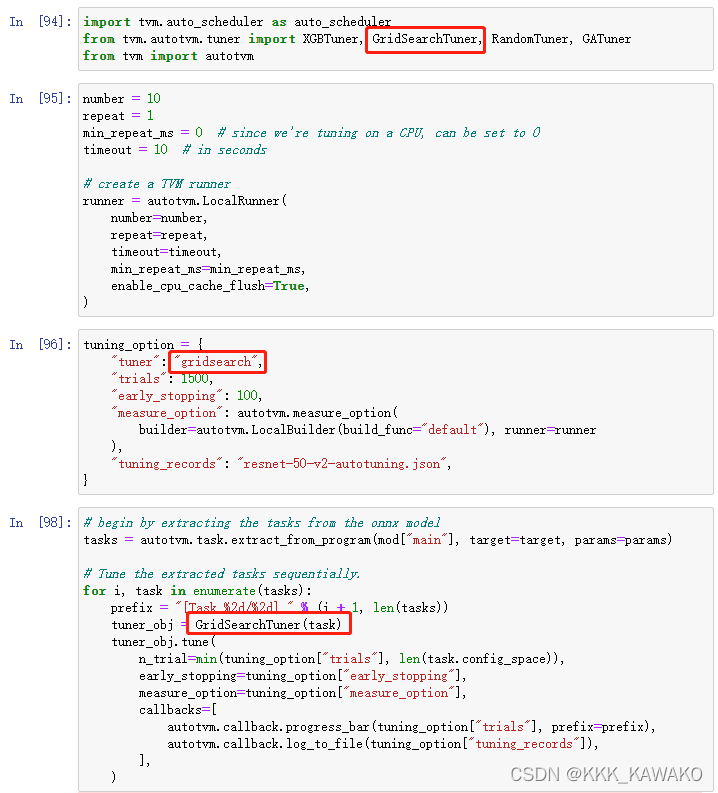
选择自己想使用的算法,将对应的字符串(如“gridsearch”)替换到前面tuning_option中的“tuner”里,然后从tvm.autotvm.tuner中将对应的函数import进来(如from tvm.autotvm.tuner import GridSearchTuner),最后在for i, task in enumerate(tasks):的循环中替换掉Tuner的函数(如tuner_obj = GridSearchTuner(task))。
【KAWAKO】TVM-tflite模型编译与优化的更多相关文章
- TVM将深度学习模型编译为WebGL
使用TVM将深度学习模型编译为WebGL TVM带有全新的OpenGL / WebGL后端! OpenGL / WebGL后端 TVM已经瞄准了涵盖各种平台的大量后端:CPU,GPU,移动设备等.这次 ...
- 使用Apache TVM将机器学习编译为WASM和WebGPU
使用Apache TVM将机器学习编译为WASM和WebGPU TLDR 在Apache TVM深度学习编译器中引入了对WASM和WebGPU的支持.实验表明,在将模型部署到Web时,TVM的WebG ...
- TVM在ARM GPU上优化移动深度学习
TVM在ARM GPU上优化移动深度学习 随着深度学习的巨大成功,将深度神经网络部署到移动设备的需求正在迅速增长.与在台式机平台上所做的类似,在移动设备中使用GPU可以提高推理速度和能源效率.但是,大 ...
- jvm-java内存模型与锁优化
java内存模型与锁优化 参考: https://blog.csdn.net/xiaoxiaoyusheng2012/article/details/53143355 https://blog.csd ...
- CUDA上的量化深度学习模型的自动化优化
CUDA上的量化深度学习模型的自动化优化 深度学习已成功应用于各种任务.在诸如自动驾驶汽车推理之类的实时场景中,模型的推理速度至关重要.网络量化是加速深度学习模型的有效方法.在量化模型中,数据和模型参 ...
- java编译期优化
java语言的编译期其实是一段不确定的操作过程,因为它可以分为三类编译过程: 1.前端编译:把.java文件转变为.class文件 2.后端编译:把字节码转变为机器码 3.静态提前编译:直接把*.ja ...
- JVM内存模型和性能优化 转
JVM内存模型和性能优化 JVM内存模型优点 内置基于内存的并发模型: 多线程机制 同步锁Synchronization 大量线程安全型库包支持 基于内存的并发机制,粒度灵活控制,灵活度高于 ...
- java编译期优化与执行期优化技术浅析
java语言的"编译期"是一段不确定的过程.由于它可能指的是前端编译器把java文件转变成class字节码文件的过程,也可能指的是虚拟机后端执行期间编译器(JIT)把字节码转变成机 ...
- 数值类型中JDk的编译期检查和编译期优化
byte b1 = 5;//编译期检查,判断是否在byte范围内 byte b2 = 5+4;//编译期优化,相当于b2=9 byte b3 = 127;//编译通过,在byte范围内 byte b4 ...
- JavaSe: String的编译期优化
Java的编译期优化 因为工作的原因,经常会在没有源码的情况下,对一些产品的代码进行阅读.有时在解决Bug时,在运行环境下会直接去看class文件的字节码,来确定运行中版本是否正确的. 在看字节码时, ...
随机推荐
- IIS部署WebApi跨域不生效
在IIS8.5上部署了WebApi程序,但是跨域不生效检查了前端和后端都没有问题. 后面才发现在应用程序池中需要设置为集成模式.经典模式下不能正常使用
- 关于解决Failed on cp file to /system - Cross-device link 报错
前言 在adb shell中移动 android_server时候遇到了这个报错 解决办法 采用 cp 命令代替 mv 命令
- TKE 超级节点,Serverless 落地的最佳形态
陈冰心,腾讯云产品经理,负责超级节点迭代与客户拓展,专注于 TKE Serverless 产品演进. 背景 让人又爱又恨的 Serverless Serverless 炙手可热,被称为云原生未来发展的 ...
- 打印菱形-java
public class WeekendDemo01 { /** 打印菱形 * * * *** * ***** * *** * * */ public static void main(String[ ...
- 1.5.6 NN与2NN-hadoop-最全最完整的保姆级的java大数据学习资料
目录 1.5.6 NN与2NN 1.5.6.1 HDFS元数据管理机制 1.5.6.2 Fsimage与Edits文件解析 1.5.6.2.1 Fsimage文件内容 1.5.6.2.2 Edits文 ...
- 【机器学习】李宏毅——AE自编码器(Auto-encoder)
1.What 在自编码器中,有两个神经网络,分别为Encoder和Decoder,其任务分别是: Encoder:将读入的原始数据(图像.文字等)转换为一个向量 Decoder:将上述的向量还原成原始 ...
- python Modbus 进行通讯时抛出Modbus Error: Exception code = 2
源码: import modbus_tk from modbus_tk import modbus_tcp import modbus_tk.defines as cst PORT = 'com1' ...
- CTFshow——funnyrsa2
题目如下: 题目分析: 发现n很小,可以考虑yafu分解n,或者使用在线网站,例如:http://factordb.com/.即得p,q,r.因为常规rsa只有p和q,则phi = (p -1) * ...
- 1+X Web初级笔记查漏补缺+练习题
学习笔记: position:relative是相对定位,是相对于自身位置移动,但是占据原有空间 absolute是绝对定位,原有空间不保留会被其他元素挤占 绝对定位 absolute不占位置完全浮动 ...
- [ 赛后总结 ] CSP-J 2022
前言 今年没考好,估分 100+60+0+10=170pts ,大概能混个2=,没什么用. 这下好了,期中也砸了,已经排到全校 30 开外了,果然鱼和熊掌不可兼得,况且我双双落空,接下来怕是想搞也搞不 ...