[深度学习] tf.keras入门2-分类
目录
主要介绍基于tf.keras的Fashion MNIST数据库分类,
官方文档地址为:https://tensorflow.google.cn/tutorials/keras/basic_classification
文本分类类似,官网文档地址为https://tensorflow.google.cn/tutorials/keras/basic_text_classification
首先是函数的调用,对于tensorflow只有在版本1.2以上的版本才有tf.keras库。另外推荐使用python3,而不是python2。
# TensorFlow and tf.keras

import tensorflow as tf

from tensorflow import keras

# 其他库

import numpy as np

import matplotlib.pyplot as plt

#查看版本

print(tf.__version__)

#1.9.0
Fashion MNIST数据库
fashion mnist数据库是mnist数据库的一个拓展。目的是取代mnist数据库,类似MINST数据库,fashion mnist数据库为训练集60000张,测试集10000张的28X28大小的服装彩色图片。具体分类如下:
| 标注编号 | 描述 |
|---|---|
| 0 | T-shirt/top(T恤) |
| 1 | Trouser(裤子) |
| 2 | Pullover(套衫) |
| 3 | Dress(裙子) |
| 4 | Coat(外套) |
| 5 | Sandal(凉鞋) |
| 6 | Shirt(汗衫) |
| 7 | Sneaker(运动鞋) |
| 8 | Bag(包) |
| 9 | Ankle boot(踝靴) |
样本描述如下:
| 名称 | 描述 | 样本数量 | 文件大小 | 链接 |
|---|---|---|---|---|
train-images-idx3-ubyte.gz |
训练集的图像 | 60,000 | 26 MBytes | 下载 |
train-labels-idx1-ubyte.gz |
训练集的类别标签 | 60,000 | 29 KBytes | 下载 |
t10k-images-idx3-ubyte.gz |
测试集的图像 | 10,000 | 4.3 MBytes | 下载 |
t10k-labels-idx1-ubyte.gz |
测试集的类别标签 | 10,000 | 5.1 KBytes | 下载 |
单张图像展示代码:
#分类标签

class_names = ['T-shirt/top', 'Trouser', 'Pullover', 'Dress', 'Coat',

               'Sandal', 'Shirt', 'Sneaker', 'Bag', 'Ankle boot']

#单张图像展示,推荐使用python3

plt.figure()

plt.imshow(train_images[0])

#添加颜色渐变条

plt.colorbar()

#不显示网格线

plt.gca().grid(False)
效果图:

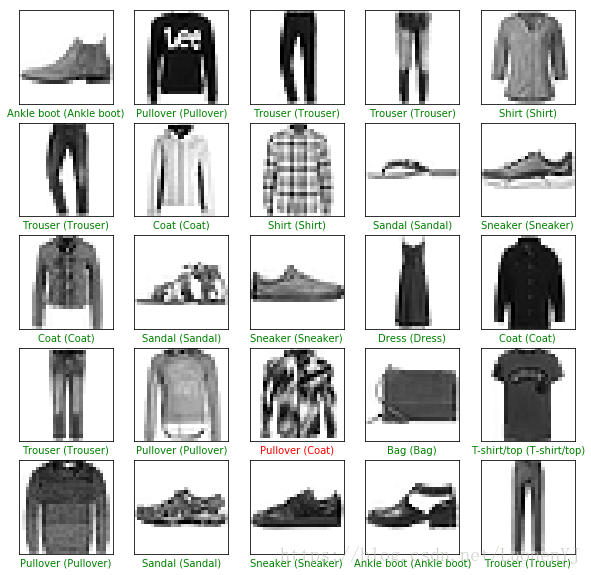
样本的展示代码:
#图像预处理

train_images = train_images / 255.0

test_images = test_images / 255.0

#样本展示

plt.figure(figsize=(10,10))

for i in range(25):

    plt.subplot(5,5,i+1)

    plt.xticks([])

    plt.yticks([])

    plt.grid('off')

    plt.imshow(train_images[i], cmap=plt.cm.binary)

    plt.xlabel(class_names[train_labels[i]])
效果图:

分类模型的建立
检测模型输入数据为28X28,1个隐藏层节点数为128,输出类别10类,代码如下:
#检测模型

model = keras.Sequential([

    keras.layers.Flatten(input_shape=(28, 28)),

    keras.layers.Dense(128, activation=tf.nn.relu),

    keras.layers.Dense(10, activation=tf.nn.softmax)

])
模型训练参数设置:
model.compile(optimizer=tf.train.AdamOptimizer(),

          loss='sparse_categorical_crossentropy', #多分类的对数损失函数

          metrics=['accuracy']) #准确度
模型的训练:
model.fit(train_images, train_labels, epochs=5)模型预测
预测函数:
predictions = model.predict(test_images)分类器是softmax分类器,输出的结果一个predictions是一个长度为10的数组,数组中每一个数字的值表示其所对应分类的概率值。如下所示:
predictions[0]

array([2.1840347e-07, 1.9169457e-09, 4.5915922e-08, 5.3185740e-08,

       6.6372898e-08, 2.6090498e-04, 6.5197796e-06, 4.7861701e-03,

       2.9425648e-06, 9.9494308e-01], dtype=float32)
对于predictions[0]其中第10个值最大,则该值对应的分类为class[9]ankle boot。
np.argmax(predictions[0]) #9

test_labels[0] #9
前25张图的分类效果展示:
#前25张图分类效果

plt.figure(figsize=(10,10))

for i in range(25):

    plt.subplot(5,5,i+1)

    plt.xticks([])

    plt.yticks([])

    plt.grid('off')

    plt.imshow(test_images[i], cmap=plt.cm.binary)

    predicted_label = np.argmax(predictions[i])

    true_label = test_labels[i]

    if predicted_label == true_label:

      color = 'green'

    else:

      color = 'red'

    plt.xlabel("{} ({})".format(class_names[predicted_label],

                                  class_names[true_label]),

                                  color=color)
效果图,绿色标签表示分类正确,红色标签表示分类错误:
对于单个图像的预测,需要将图像28X28的输入转换为1X28X28的输入,转换函数为np.expand_dims。函数使用如下:https://www.zhihu.com/question/265545749
#格式转换

img = (np.expand_dims(img,0))

print(img.shape) #1X28X28

predictions = model.predict(img)

prediction = predictions[0]

np.argmax(prediction) #9
总体代码
# TensorFlow and tf.keras

import tensorflow as tf

from tensorflow import keras

# 其他库

import numpy as np

import matplotlib.pyplot as plt

#查看版本

print(tf.__version__)

#1.9.0

fashion_mnist = keras.datasets.fashion_mnist

(train_images, train_labels), (test_images, test_labels) = fashion_mnist.load_data()

#分类标签

class_names = ['T-shirt/top', 'Trouser', 'Pullover', 'Dress', 'Coat',

               'Sandal', 'Shirt', 'Sneaker', 'Bag', 'Ankle boot']

#单张图像展示,推荐使用python3

plt.figure()

plt.imshow(train_images[0])

#添加颜色渐变条

plt.colorbar()

#不显示网格线

plt.gca().grid(False)

#图像预处理

train_images = train_images / 255.0

test_images = test_images / 255.0

#样本展示

plt.figure(figsize=(10,10))

for i in range(25):

    plt.subplot(5,5,i+1)

    plt.xticks([])

    plt.yticks([])

    plt.grid('off')

    plt.imshow(train_images[i], cmap=plt.cm.binary)

    plt.xlabel(class_names[train_labels[i]])

#检测模型

model = keras.Sequential([

    keras.layers.Flatten(input_shape=(28, 28)),

    keras.layers.Dense(128, activation=tf.nn.relu),

    keras.layers.Dense(10, activation=tf.nn.softmax)

])

model.compile(optimizer=tf.train.AdamOptimizer(),

          loss='sparse_categorical_crossentropy', #多分类的对数损失函数

          metrics=['accuracy']) #准确度

model.fit(train_images, train_labels, epochs=5)

predictions = model.predict(test_images)

#前25张图分类效果

plt.figure(figsize=(10,10))

for i in range(25):

    plt.subplot(5,5,i+1)

    plt.xticks([])

    plt.yticks([])

    plt.grid('off')

    plt.imshow(test_images[i], cmap=plt.cm.binary)

    predicted_label = np.argmax(predictions[i])

    true_label = test_labels[i]

    if predicted_label == true_label:

      color = 'green'

    else:

      color = 'red'

    plt.xlabel("{} ({})".format(class_names[predicted_label],

                                  class_names[true_label]),

                                  color=color)

#单个图像检测

img = test_images[0]

print(img.shape) #28X28

#格式转换

img = (np.expand_dims(img,0))

print(img.shape) #1X28X28

predictions = model.predict(img)

prediction = predictions[0]

np.argmax(prediction) #9
[深度学习] tf.keras入门2-分类的更多相关文章
- [深度学习] tf.keras入门1-基本函数介绍
目录 构建一个简单的模型 序贯(Sequential)模型 网络层的构造 模型训练和参数评价 模型训练 模型的训练 tf.data的数据集 模型评估和预测 基本模型的建立 网络层模型 模型子类函数构建 ...
- [深度学习] tf.keras入门4-过拟合和欠拟合
过拟合和欠拟合 简单来说过拟合就是模型训练集精度高,测试集训练精度低:欠拟合则是模型训练集和测试集训练精度都低. 官方文档地址为 https://tensorflow.google.cn/tutori ...
- [深度学习] tf.keras入门5-模型保存和载入
目录 设置 基于checkpoints的模型保存 通过ModelCheckpoint模块来自动保存数据 手动保存权重 整个模型保存 总体代码 模型可以在训练中或者训练完成后保存.具体文档参考:http ...
- [深度学习] tf.keras入门3-回归
目录 波士顿房价数据集 数据集 数据归一化 模型训练和预测 模型建立和训练 模型预测 总结 回归主要基于波士顿房价数据库进行建模,官方文档地址为:https://tensorflow.google.c ...
- 深度学习:Keras入门(一)之基础篇
1.关于Keras 1)简介 Keras是由纯python编写的基于theano/tensorflow的深度学习框架. Keras是一个高层神经网络API,支持快速实验,能够把你的idea迅速转换为结 ...
- 深度学习:Keras入门(一)之基础篇【转】
本文转载自:http://www.cnblogs.com/lc1217/p/7132364.html 1.关于Keras 1)简介 Keras是由纯python编写的基于theano/tensorfl ...
- 深度学习:Keras入门(一)之基础篇(转)
转自http://www.cnblogs.com/lc1217/p/7132364.html 1.关于Keras 1)简介 Keras是由纯python编写的基于theano/tensorflow的深 ...
- 深度学习:Keras入门(二)之卷积神经网络(CNN)
说明:这篇文章需要有一些相关的基础知识,否则看起来可能比较吃力. 1.卷积与神经元 1.1 什么是卷积? 简单来说,卷积(或内积)就是一种先把对应位置相乘然后再把结果相加的运算.(具体含义或者数学公式 ...
- 深度学习:Keras入门(二)之卷积神经网络(CNN)【转】
本文转载自:https://www.cnblogs.com/lc1217/p/7324935.html 说明:这篇文章需要有一些相关的基础知识,否则看起来可能比较吃力. 1.卷积与神经元 1.1 什么 ...
随机推荐
- 支持 Java 8/11/17/19 的框架,Solon v1.10.5 版本发布
Java 轻量级应用开发框架.可用来快速开发 Java 应用项目,主框架仅 0.1 MB. 相对于 Spring Boot 和 Spring Cloud 的项目: 启动快 5 - 10 倍. (更快) ...
- Java登录专题-----创建用户(一)
Java登录专题-----创建用户(一) 我来填坑了 创建用户 入参 应该包括: 用户姓名,用户密码,用户手机号,用户所属机构 用户版本号,角色id 出参: 没有 数据结构: JavaBean ...
- 在CentOs7虚拟机Linux离线安装mysql5.6(亲测可用)
在该博主博客的的基础上进一步改进:https://blog.csdn.net/zhousq8929/article/details/117223255 文章目录 1.在官网下载mysql-5.6.36 ...
- 齐博x2模型里边钩子的创建与使用
在模型里边的钩子创建与使用方法跟在控制器里边的钩子创建及使用方法是有所区别的在模型里边创建的钩子,你可以理解为执行一个函数,是无法调用模型里边的类的方法及属性的.比如系统文件\application\ ...
- 重新整理 .net core 实践篇 ———— linux 上线篇 [外篇]
前言 简单整理一个linux 简单上线. 这个是该系列的外篇,该系列继续更新.献给刚学的人. 正文 安装实例 dotnet new webapp -n AspNetCoreDemo -o firstw ...
- 三、docker镜像管理
一.docker镜像管理 1.1.镜像搜索-search 从docker镜像仓库模糊搜索镜像 用法: docker search 镜像关键字 [root@zutuanxue ~]# docker se ...
- 新建Maui工程运行到IiOS物理设备提示 Could not find any available provisioning profiles for iOS 处理办法
在构建 MAUI App 或 MAUI Blazor 时,您可能会收到以下 Could not find any available provisioning profiles for iOS. Pl ...
- Java安全之反序列化(1)
序列化与反序列化 概述 Java序列化是指把Java对象转换为字节序列的过程:这串字符可能被储存/发送到任何需要的位置,在适当的时候,再将它转回原本的 Java 对象,而Java反序列化是指把字节序列 ...
- 【题解】CF1722F L-shapes
题面传送门 其实这题根本不用搜索,有耐心即可. 可以发现,在 \(n\times m\) 范围内扫,可能合法的只有以下四种情况,其中蓝色代表示是 *,红色表示不能是 *,其中黄色五角星表示当前 \(i ...
- Nginx如何配置隐藏index.php文件
server { listen 80; #listen [::]:80 default_server ipv6only=on; server_name jiqing.dexin.com; index ...