Spring入门(二):SpringBoot之基础Web开发
接上回
现在,我们已经能自行完成SpringBoot的初级项目搭建了,接下来看如何实现一些Web开发中的基础功能。
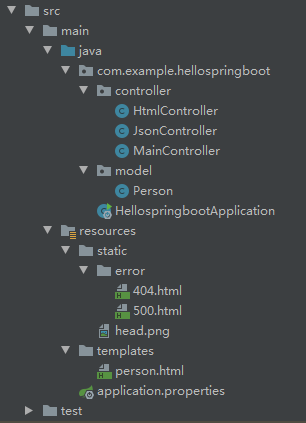
先看项目完整的目录结构:
1. 返回Json数据
创建model文件夹,并新建Person类,代码如下:
package com.example.hellospringboot.model;

public class Person {

    private int id = 0;

    private String name = "";

    public int getId() {

        return id;

    }

    public void setId(int id) {

        this.id = id;

    }

    public String getName() {

        return name;

    }

    public void setName(String name) {

        this.name = name;

    }

}
在controller文件夹下创建JsonController,代码如下:
package com.example.hellospringboot.controller;

import com.example.hellospringboot.model.Person;

import org.springframework.web.bind.annotation.GetMapping;

import org.springframework.web.bind.annotation.RequestMapping;

import org.springframework.web.bind.annotation.RestController;

@RestController

@RequestMapping("/json")

public class JsonController {

    @GetMapping("/person")

    public Person person(){

        Person person = new Person();

        person.setId(1);

        person.setName("祖斯特");

        return person;

    }

}
@RestController注解我们在上一节已经用过了,代表整个Controller请求方法仅返回纯数据,不包含Html页面信息
这种情况多见于前后端分离的情况,前端框架(如Vue)在拿到后端返回数据之后自行组织页面渲染
重启程序,访问地址 http://localhost:8080/json/person ,页面显示如下:
{"id":1,"name":"祖斯特"}
说明代码执行正确
2. 返回Html页面
接下来我们看如何返回完整的Html渲染页面
要实现这个功能,需要引入前端模板引擎,官方推荐Thymeleaf
我们在pom中加入其依赖配置:
    <dependencies>

        <dependency>

            <groupId>org.springframework.boot</groupId>

            <artifactId>spring-boot-starter-web</artifactId>

        </dependency>

        <!-- 引入thymeleaf依赖 -->

        <dependency>

            <groupId>org.springframework.boot</groupId>

            <artifactId>spring-boot-starter-thymeleaf</artifactId>

        </dependency>

        <dependency>

            <groupId>org.springframework.boot</groupId>

            <artifactId>spring-boot-starter-test</artifactId>

            <scope>test</scope>

        </dependency>

    </dependencies>
在controller文件夹下创建HtmlController类:
package com.example.hellospringboot.controller;

import com.example.hellospringboot.model.Person;

import org.springframework.stereotype.Controller;

import org.springframework.web.bind.annotation.GetMapping;

import org.springframework.web.bind.annotation.RequestMapping;

import org.springframework.web.servlet.ModelAndView;

@Controller

@RequestMapping("/html")

public class HtmlController {

    @GetMapping("/person")

    public ModelAndView person(){

        ModelAndView mv = new ModelAndView();

        Person person = new Person();

        person.setId(1);

        person.setName("祖斯特");

        mv.addObject("person", person);

        mv.setViewName("person");

        return mv;

    }

}
跟返回Json数据不同,HtmlController注解为@Controller,方法需要返回一个ModelAndView对象
mv.addObject 代表我们向前端Html模板提供绑定数据
mv.setViewName 代表我们要设定的Html模板,这里指定名称为:person
接下来我们在 resources/templates 路径下创建Thymeleaf模板文件 person.html
<!DOCTYPE html>

<html lang="en" xmlns:th="http://www.thymeleaf.org">

<head>

    <meta charset="UTF-8">

    <title>Person测试页面</title>

</head>

<body>

    <div>编号:<span th:text="${person.getId()}">默认编号</span></div>

    <div>姓名:<span th:text="${person.getName()}">默认名字</span></div>

</body>

</html>
Thymeleaf拥有优秀的设计理念,所有的模板文件即使没有后端程序也可以独立渲染(th标签不会引发异常),以供前端设计师查看效果
而 th:text="${xxx}" 代表程序执行时,标签的内容将动态替换为后端传过来的数据内容
重启程序,访问地址 http://localhost:8080/html/person ,页面显示如下:
编号:1姓名:祖斯特
3. 静态资源访问
# 应用名称

spring.application.name=hellospringboot

# 应用服务 WEB 访问端口

server.port=8080

# 使用static作为静态资源根路径,且不需要其他路径前缀

spring.mvc.static-path-pattern=/**

spring.web.resources.static-locations=classpath:/static/
之后我们在static下放入一张图片head.png测试效果
person.html 加个<img>标签验证下效果:
<!DOCTYPE html>

<html lang="en" xmlns:th="http://www.thymeleaf.org">

<head>

    <meta charset="UTF-8">

    <title>Person测试页面</title>

</head>

<body>

    <div>编号:<span th:text="${person.getId()}">默认编号</span></div>

    <div>姓名:<span th:text="${person.getName()}">默认名字</span></div>

    <div>

        <img src="/head.png">

    </div>

</body>

</html>
路径 src=/head.png 代表是static根路径
如果直接写 src=head.png 则为相对路径:static/html/head.png
需要注意这一点,大家可以自行尝试
访问地址 http://localhost:8080/html/person,页面显示效果如下:

4. 自定义错误页面
如果我们访问一个不存在的地址:http://localhost:8080/notexist,会弹出如下的错误页面:

SpringBoot已经为大家提供了自定义错误页面的方法,实现起来非常简单
我们在 resources/static 下创建文件夹 error,在error下创建 404.html 即可
<!DOCTYPE html>

<html lang="en">

<head>

    <meta charset="UTF-8">

    <title>页面不存在</title>

</head>

<body>

页面不存在!

</body>

</html>
重新启动程序,访问 http://localhost:8080/notexist ,效果如下:
页面不存在!
你可能感到困惑,这样岂不是要一个错误创建一个html文件?!
SpringBoot为我们提供了通配符支持,比如:4xx.html 可以代表401、402、403、404等所有400+的错误
以上。
关于 SpringBoot之基础Web开发 我们就介绍到这,下一节我们看如何实现SpringBoot和mysql数据库之间的交互,敬请期待。
Spring入门(二):SpringBoot之基础Web开发的更多相关文章
- 2.Python爬虫入门二之爬虫基础了解
1.什么是爬虫 爬虫,即网络爬虫,大家可以理解为在网络上爬行的一直蜘蛛,互联网就比作一张大网,而爬虫便是在这张网上爬来爬去的蜘蛛咯,如果它遇到资源,那么它就会抓取下来.想抓取什么?这个由你来控制它咯. ...
- Python爬虫入门二之爬虫基础了解
1.什么是爬虫 爬虫,即网络爬虫,大家可以理解为在网络上爬行的一直蜘蛛,互联网就比作一张大网,而爬虫便是在这张网上爬来爬去的蜘蛛咯,如果它遇到资源,那么它就会抓取下来.想抓取什么?这个由你来控制它咯. ...
- 转 Python爬虫入门二之爬虫基础了解
静觅 » Python爬虫入门二之爬虫基础了解 2.浏览网页的过程 在用户浏览网页的过程中,我们可能会看到许多好看的图片,比如 http://image.baidu.com/ ,我们会看到几张的图片以 ...
- SpringBoot起飞系列-Web开发(四)
一.前言 从今天你开始我们就开始进行我们的web开发,之前的一篇用SpringBoot起飞系列-使用idea搭建环境(二)已经说明了我们如何进行开发,当然这是搭建起步,接下来我们就开始进行详细的开发, ...
- springboot核心技术(三)-----web开发
web开发 1.简介 使用SpringBoot: 1).创建SpringBoot应用,选中我们需要的模块: 2).SpringBoot已经默认将这些场景配置好了,只需要在配置文件中指定少量配置就可以运 ...
- Spring Boot第五弹,WEB开发初了解~
持续原创输出,点击上方蓝字关注我吧 目录 前言 Spring Boot 版本 前提条件(必须注意) 添加依赖 第一个接口开发 如何自定义tomcat的端口? 如何自定义项目路径? JSON格式化 日期 ...
- Spring+Maven+Dubbo+MyBatis+Linner+Handlebars—Web开发环境搭建
本文主要分三部分,分别是:后台核心业务逻辑.桥梁辅助控制和前台显示页面. 本Web开发环境综合了多种工具,包括Maven包管理与编译工具.Dubbo分布式服务框架.MyBatis数据持久化工具.Lin ...
- Spring入门(二):自动化装配bean
Spring从两个角度来实现自动化装配: 组件扫描(component scanning):Spring会自动发现应用上下文中需要创建的bean. 自动装配(autowiring):Spring会自动 ...
- Spring Boot 系列(五)web开发-Thymeleaf、FreeMarker模板引擎
前面几篇介绍了返回json数据提供良好的RESTful api,下面我们介绍如何把处理完的数据渲染到页面上. Spring Boot 使用模板引擎 Spring Boot 推荐使用Thymeleaf. ...
随机推荐
- 017(Power Strings二刷)(KMP)
题目:http://ybt.ssoier.cn:8088/problem_show.php?pid=1466 题目思路:不知道大家在KMP算法里有没有看见这么个句子 while(j<len) 这 ...
- SpringBoot之MongoDB附件操作
前言 近期自己针对附件上传进一步学习,为了弥足项目中文件上传的漏洞,保证文件上传功能的健壮性和可用性,现在我将自己在这一块的心得总结如下: 一.pom.xml依赖的引入 <dependency& ...
- 你真的了解JAVA中对象和类、this、super和static关键字吗
作者:小牛呼噜噜 | https://xiaoniuhululu.com 计算机内功.JAVA底层.面试相关资料等更多精彩文章在公众号「小牛呼噜噜 」 目录 Java对象究竟是什么? 创建对象的过程 ...
- IDEA中web项目打成war包并在本地tomcat部署(超细版)
准备工作:相关软件及插件IDEA(2021.1.3).tomcat(8.5.50)且在IDEA中调用tomcat运行时没有任何错误的,如何下载安装百度都有详细的介绍,这里就不过多的介绍了,版本不同操作 ...
- Thread类的常用方法_sleep和创建多线程程序的第二种方式实现Runnable接口
public static void sleep(long millis);//使当前正在执行的线程以指定的毫秒数暂停(暂时停止执行). 毫秒数结束后线程继续执行 package com.yang.T ...
- GreatSQL特性介绍及前景展望 | 数据技术嘉年华2021分享PPT发布
欢迎来到 GreatSQL社区分享的MySQL技术文章,如有疑问或想学习的内容,可以在下方评论区留言,看到后会进行解答 GreatSQL社区原创内容未经授权不得随意使用,转载请联系小编并注明来源. 全 ...
- 聊聊Spring事务控制策略以及@Transactional失效问题避坑
大家好,又见面了. 在大部分涉及到数据库操作的项目里面,事务控制.事务处理都是一个无法回避的问题.比如,需要对SQL执行过程进行事务的控制与处理的时候,其整体的处理流程会是如下的示意: 首先是要开启事 ...
- LuoguP3690 【模板】Link Cut Tree (LCT)
勉强算是结了个大坑吧或者才开始 #include <cstdio> #include <iostream> #include <cstring> #include ...
- LuoguP2217 [HAOI2007]分割矩阵 (DP + memorized search)
int n,m,tim; int mp[N][N], sum[N][N]; double ave,dp[N][N][N][N][N]; inline double DP(int a,int b,int ...
- Redis 15 主从复制
参考源 https://www.bilibili.com/video/BV1S54y1R7SB?spm_id_from=333.999.0.0 版本 本文章基于 Redis 6.2.6 概述 主从复制 ...