SpringBoot之缓存
一、准备工作
首先整合使用Spring整合MyBatis。
SpringBoot整合MyBatis完后后,我们需要在pom.xml中添加缓存相关的依赖。
<!-- cache -->

        <dependency>

            <groupId>org.springframework.boot</groupId>

            <artifactId>spring-boot-starter-cache</artifactId>

        </dependency>
完整pom.xml
<?xml version="1.0" encoding="UTF-8"?>

<project xmlns="http://maven.apache.org/POM/4.0.0" xmlns:xsi="http://www.w3.org/2001/XMLSchema-instance"

         xsi:schemaLocation="http://maven.apache.org/POM/4.0.0 https://maven.apache.org/xsd/maven-4.0.0.xsd">

    <modelVersion>4.0.0</modelVersion>

    <parent>

        <groupId>org.springframework.boot</groupId>

        <artifactId>spring-boot-starter-parent</artifactId>

        <version>2.2.4.RELEASE</version>

        <relativePath/> <!-- lookup parent from repository -->

    </parent>

    <groupId>com.spring.boot.example</groupId>

    <artifactId>spring-boot-cache</artifactId>

    <version>0.0.1-SNAPSHOT</version>

    <name>spring-boot-cache</name>

    <description>Demo project for Spring Boot</description>

    <properties>

        <java.version>1.8</java.version>

    </properties>

    <dependencies>

        <!-- web依赖 -->

        <dependency>

            <groupId>org.springframework.boot</groupId>

            <artifactId>spring-boot-starter-web</artifactId>

        </dependency>

        <!--  mybatis -->

        <dependency>

            <groupId>org.mybatis.spring.boot</groupId>

            <artifactId>mybatis-spring-boot-starter</artifactId>

            <version>2.1.1</version>

        </dependency>

        <!-- MySQL驱动-->

        <dependency>

            <groupId>mysql</groupId>

            <artifactId>mysql-connector-java</artifactId>

        </dependency>

        <dependency>

            <groupId>org.springframework.boot</groupId>

            <artifactId>spring-boot-starter-test</artifactId>

            <scope>test</scope>

            <exclusions>

                <exclusion>

                    <groupId>org.junit.vintage</groupId>

                    <artifactId>junit-vintage-engine</artifactId>

                </exclusion>

            </exclusions>

        </dependency>

        <!-- cache -->

        <dependency>

            <groupId>org.springframework.boot</groupId>

            <artifactId>spring-boot-starter-cache</artifactId>

        </dependency>

        <dependency>

            <groupId>junit</groupId>

            <artifactId>junit</artifactId>

            <scope>test</scope>

        </dependency>

    </dependencies>

    <build>

        <plugins>

            <plugin>

                <groupId>org.springframework.boot</groupId>

                <artifactId>spring-boot-maven-plugin</artifactId>

            </plugin>

        </plugins>

    </build>

</project>
二、缓存
2.1简介
2.2 缓存注解简介

这里我们主要看三个注解。
| 注解 | 描述 | 参数 |
| @Cacheable |
执行前检查是否有缓存,有缓存则直接读取缓存。 没有缓存则执行方法,并缓存该方法的返回值。 |
value:指定当前数据存放位置,value标识cacheManager中具体cache key:cache中entity的key |
| @CacheEvict |
删除缓存,删除时可通过value和key指定需要删除的entity。 也可通过value和allEntites删除该cache(删除该cache下所有enetiy)。 |
value:指定是哪一个缓存,也可使用cacheNames key:指定cache中entity的key |
| @CachePut |
执行方法前不会检查是否有缓存缓存,每次都执行方法,方法结束将返回结果缓存。 可通过value,key指定缓存存放位置。 |
value:指定当前数据存放位置,value标识cacheManager中具体cache key:cache中entity的key |
三、实例
1)主要步骤:
3.1.1:配置好mybatis
3.1.2 springboot启动类添加 @EnableCaching注解开启缓存。
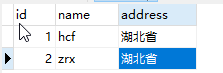
数据库中数据:
接口类及映射文件
package com.spring.boot.example.springboot.cache.mapper;

import com.spring.boot.example.springboot.cache.dao.User;

public interface UserMapper {

    User getUserById(Integer id);

}
UserMapper.xml
<?xml version="1.0" encoding="UTF-8" ?>

<!DOCTYPE mapper

        PUBLIC "-//mybatis.org//DTD Mapper 3.0//EN"

        "http://mybatis.org/dtd/mybatis-3-mapper.dtd">

<!-- 此处与接口类地址对应 -->

<mapper namespace="com.spring.boot.example.springboot.cache.mapper.UserMapper">

    <!-- 此处与接口方法名对应 指定参数类型与返回结果类型-->

    <select id="getUserById" parameterType="java.lang.Integer" resultType="com.spring.boot.example.springboot.cache.dao.User">

        select * from user where id = #{id}

    </select>

</mapper>
Service层,注入配置好的UserMapper.
同时在getUserById上添加了缓存注解,指定了缓存名称是userCache,缓存的key是传入的id。
package com.spring.boot.example.springboot.cache.service;

import com.spring.boot.example.springboot.cache.dao.User;

import com.spring.boot.example.springboot.cache.mapper.UserMapper;

import org.springframework.beans.factory.annotation.Autowired;

import org.springframework.cache.annotation.Cacheable;

import org.springframework.stereotype.Service;

@Service

public class UserService {

    @Autowired

    private UserMapper userMapper;

    @Cacheable(value = "userCache", key = "#id")

    public User getUserById(Integer id){

        System.out.println("没有读取缓存");

        User user = userMapper.getUserById(id);

        return user;

    }

}
Controller层注入UserService
package com.spring.boot.example.springboot.cache.controller;

import com.spring.boot.example.springboot.cache.service.UserService;

import com.spring.boot.example.springboot.cache.dao.User;

import org.springframework.beans.factory.annotation.Autowired;

import org.springframework.stereotype.Controller;

import org.springframework.web.bind.annotation.RequestMapping;

import org.springframework.web.bind.annotation.ResponseBody;

@Controller

public class UserController {

    @Autowired

    private UserService userService;

    @ResponseBody

    @RequestMapping("/getUserById")

    public User getUserById(Integer id){

        long startTime = System.currentTimeMillis();

        User user = userService.getUserById(id);

        long endTime = System.currentTimeMillis();

        System.out.println("耗时:" + (endTime - startTime) + "ms");

        return user;

    }

}
SpringBoot启动类添加@EnableCaching注解开启缓存。
package com.spring.boot.example.springboot.cache;

import org.mybatis.spring.annotation.MapperScan;

import org.springframework.boot.SpringApplication;

import org.springframework.boot.autoconfigure.SpringBootApplication;

import org.springframework.cache.annotation.EnableCaching;

@SpringBootApplication

//mybatis:扫描接口类,生成代理对象

@MapperScan("com.spring.boot.example.springboot.cache.mapper")

//开启缓存

@EnableCaching

public class SpringBootCacheApplication {

    public static void main(String[] args) {

        SpringApplication.run(SpringBootCacheApplication.class, args);

    }

}
我们访问Controller层的方法,看下返回结果和控制台输出。
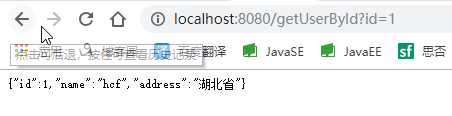
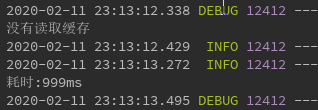
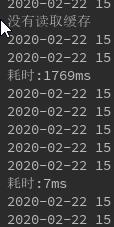
可以看到,第一次查询时没有缓存,直接查的数据库,然后返回,打印了了“没有读取缓存”的字样,耗时999ms。
我们再来访问一次
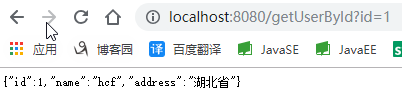
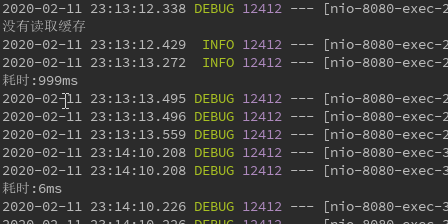
可以看到,第二次进入Service中getUserById方法,发现有缓存就直接读取的缓存,所以没有答应“没有读取缓存”的字样。
而且耗时只有6ms。
我们只配置添加了一个spring-boot-starter-cache的依赖,那缓存数据又存放在哪里在呢?
我们可以在application.properties中添加debug=true. 然后我们再启动项目。

启动过程中会弹出匹配了那些类,我们按下alt+shift+ctrl+N 查找名为SimpleCacheConfiguration的类。
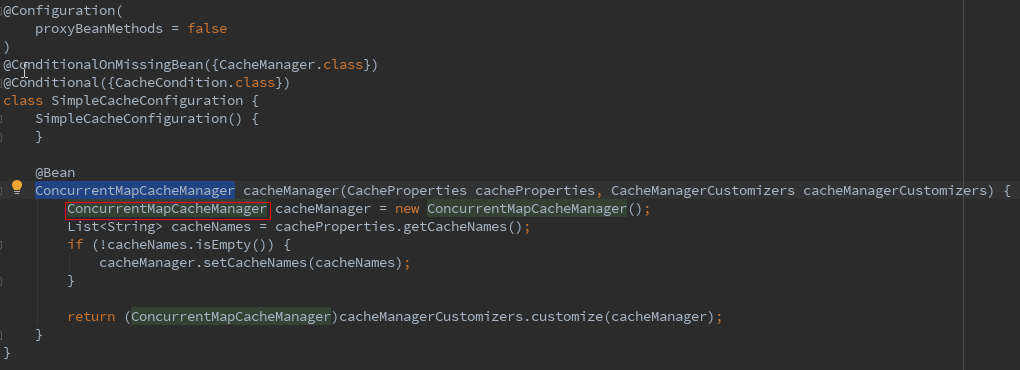
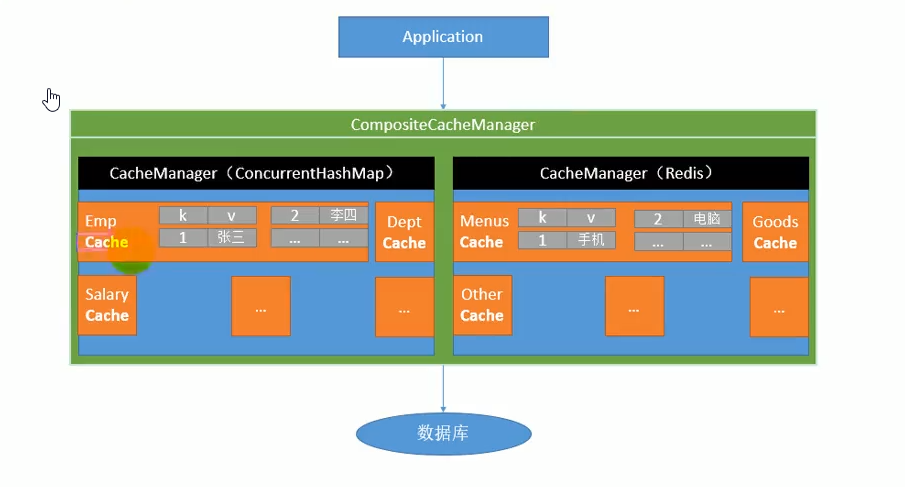
可以看到返回了一个ConcurrentMapCacheManager,结合前面的图,CacheManager管理了多个Cache。
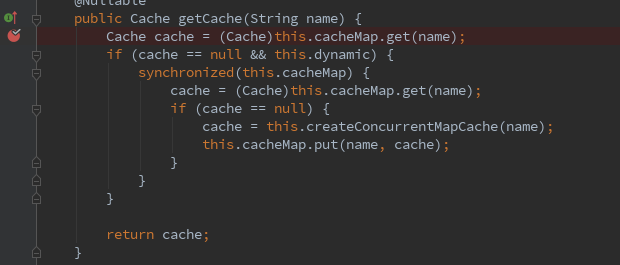
我们点进ConcurrentMapCacheManager看下,在ConcurrentMapCacheManager中我们看到一个方法,getCache,难道就是这个方法获取的缓存吗。
看下逻辑大概就是根据名称从cacheMpa中获取一个缓存,缓存为null就创建一个缓存,放入cacheMap,好像和缓存的逻辑一致。那我们就打个断点看一下。
重启项目,访问Controller方法,先将两个缓存都放入之后,我们在断点则看下cacheMap的值。

可以看到,userCache作为缓存名称,缓存的两个对象(entity)对应的key是我们再注解中指定的#id,值就是方法返回User对象。
默认情况下,缓存是存储在应用内部的map中。
我们再来看一下添加的spring-boot-starter-cache中有什么东西。
spring-boot-starter-cache中主要的依赖。
<dependencies>

    <dependency>

      <groupId>org.springframework.boot</groupId>

      <artifactId>spring-boot-starter</artifactId>

      <version>2.2.4.RELEASE</version>

      <scope>compile</scope>

    </dependency>

    <dependency>

      <groupId>org.springframework</groupId>

      <artifactId>spring-context-support</artifactId>

      <version>5.2.3.RELEASE</version>

      <scope>compile</scope>

    </dependency>

  </dependencies>
可以看到除了依赖了spring-boot-starter之外主要是spring-context-support。包括缓存的注解也是由spring-context-support提供的。
配置了spring-boot-cache-starter只是引入了spring支持的缓存。且缓存数据由存放在应用程序内部。
四、Rides缓存
使用默认的spring-boot-cache-starter缓存数据存放在应用内部,这样是不太好的,平常缓存主要是存放在redis中。下面我们来看下使用redis实现缓存。
在spring-boot中使用redis使用缓存十分简单,只需引入spring-boot-starter-data-redis即可。
spring-boot-redis-starter依赖了spring-context-support,相当于间接包含了spring-boot-cache-start。
之前没有配置redis的情况下,spring-boot自动匹配的SimpleCacheConfig。如果配置了了其他支持缓存的依赖,如redis。
那么spring-boot自动配置时会自动匹配上RedsiCacheConfig

此刻我们看下SimpleCacheConfig是没有匹配上的

我们来看下SprngBoot文档中说的,
如果尚未定义CacheManager类型的bean或名为CacheResolver的CacheResolver(请参阅cachingconfiguer),
则Spring Boot将尝试检测以下提供程序(按指示的顺序):

显然Redsi优先级高于Simple,会匹配上Reids,没有配置其他的则默认使用Simple。
接下来我们看下缓存存储在redis中的情况。还是使用上例。
添加redis依赖,去除之前的spring-cache-starter依赖。
     <dependency>

            <groupId>org.springframework.boot</groupId>

            <artifactId>spring-boot-starter-data-redis</artifactId>

        </dependency>
注:存储的对象是存放在redis中的,对象需要实现序列化接口。
Service层
@Service

public class UserService {

    @Autowired

    private UserMapper userMapper;

    @Cacheable(value = "userCache", key = "#id")

    public User getUserById(Integer id){

        System.out.println("没有读取缓存");

        User user = userMapper.getUserById(id);

        return user;

    }

}
Controller层
@Controller

public class UserController {

    @Autowired

    private UserService userService;

    @ResponseBody

    @RequestMapping("/getUserById")

    public User getUserById(Integer id){

        long startTime = System.currentTimeMillis();

        User user = userService.getUserById(id);

        long endTime = System.currentTimeMillis();

        System.out.println("耗时:" + (endTime - startTime) + "ms");

        return user;

    }

}
运行访问,然后查看redis数据。

可以看到,userCache就是注解中value指定的值,后面跟随的是id。
存储的内容有些奇怪,这时因为默认使用jdk的序列化方法,我们可能希望序列化的内容我们可以看懂。
这时可以自定义CacheManager实现。
添加一个配置类,自定义了cacheManager
@Configuration

public class CacheManagerConfig {

    @Bean

    public CacheManager jsonSerializableRedisCacheManager(RedisConnectionFactory redisConnectionFactory){

        RedisCacheConfiguration config = RedisCacheConfiguration.defaultCacheConfig()

                //设置10秒过期

                .entryTtl(Duration.ofSeconds(10))

                //设置key的序列化方式

                .serializeKeysWith(RedisSerializationContext.SerializationPair.fromSerializer(new StringRedisSerializer()))

                //设置值的序列化方式

                .serializeValuesWith(RedisSerializationContext.SerializationPair.fromSerializer(new GenericJackson2JsonRedisSerializer()));

        RedisCacheManager.RedisCacheManagerBuilder builder =

                RedisCacheManager.RedisCacheManagerBuilder.fromConnectionFactory(redisConnectionFactory);

        //返回构造的cacheManager

        return builder.transactionAware().cacheDefaults(config).build();

    }

}
指定cacheManger为我们定义的cacheManager
  @Cacheable(cacheManager = "jsonSerializableRedisCacheManager",value = "userCache", key = "#id")

    public User getUserById(Integer id){

        System.out.println("没有读取缓存");

        User user = userMapper.getUserById(id);

        return user;

    }
查看缓存的数据

如果超过10秒钟没有读取缓存,缓存将自动删除。
五、缓存注解
@Cacheable主要是看有没有缓存,有缓存则读取缓存,没有缓存则将方法返回值写入缓存。
@CachePut无论是否拥有缓存,都会执行方法,并将返回值写入缓存。
    @CachePut(cacheNames = "userCache",key = "#user.id")

    public User updateUserById(User user){

        System.out.println("into cachePut");

        userMapper.updateUserById(user);

        return user;

    }
使用cacheNames和value效果一样都是指定缓存值。
执行两次该方法

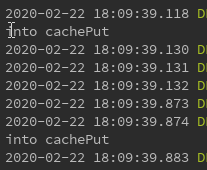
两次方法均进入了,而且将缓存更新了。

@CacheEvit,删除指定的缓存。
@CacheEvict(cacheNames = "userCache", key = "#id")

    public void deleteCache(Integer id){

    }
该方法只删了缓存,没有删除数据库中数据。
先让缓存中有多条数据。


删除缓存名为userCache下id为1的缓存。

有时需要删除缓存下所有缓存,例如删除缓存userCache下所有缓存,userCache::2/3/4
可以指定缓存名,然后指定allEntries=true(默认为false)
    @CacheEvict(cacheNames = "userCache", key = "#id" ,allEntries = true)

    public void deleteCache(Integer id){

    }
我们再执行一次看下缓存情况。


该缓存下所有内容已被删除。
有时需要删除多个缓存,比如删除缓存名为userCache下的缓存,同时删除名为addressCache下的缓存。
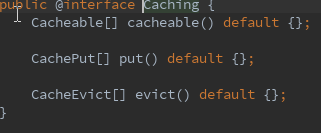
有时,需要指定同一类型的多个注释,可以使用@Caching。
@Caching下可以指定 多个同类型的@Cacheable、@CachePut和@CacheEvict注解。

注:其实也可以指定多个不同类型(多个@Cacheable,@CachePut,@CacheEvict同时存在于@Caching中),
但官方文档只说“需要指定同一类型的多个注释时可使用@Caching”,而且多种类型执行情况有些不可控。
建议只使用同一类型,实在需要多种类型,可以多定义几个方法聚合在一起实现。
多个缓存方法不能在内部聚合调用,缓存默认使用proxy,内部调用会导致切面失效。
解决方法:
1、在外部包含多个方法调用
例如缓存service中多个缓存的方法1、2、3.
现在需要聚合123,形成新的方法4,此时不能在service中创建方法4,然后再调用123。此时是内部调用会导致切面失效,缓存无法生效。
可以在controller中注入service,在controller中创建方法4,使用注入的service调用123.
2、使用aspectj。
具体可参阅:https://www.bbsmax.com/A/kvJ3L6895g/
例如:删除名为userCache、addressCache下所有缓存,
  @Caching(

            evict = {

                    @CacheEvict(cacheNames = "userCache", allEntries = true),

                    @CacheEvict(cacheNames = "addressCache", allEntries = true)

            }

    )

    public void deleteCache(Integer id){

    }
@Caching中可指定cacheable,put,evict。
SpringBoot之缓存的更多相关文章
- 带着新人学springboot的应用03(springboot+mybatis+缓存 下)
springboot+mybatis+缓存,基本的用法想必是会了,现在说一说内部大概的原理. 稍微提一下mybatis,只要导入了mybatis的依赖,那么有个自动配置类就会生效,你可以去mybati ...
- SpringBoot 与缓存
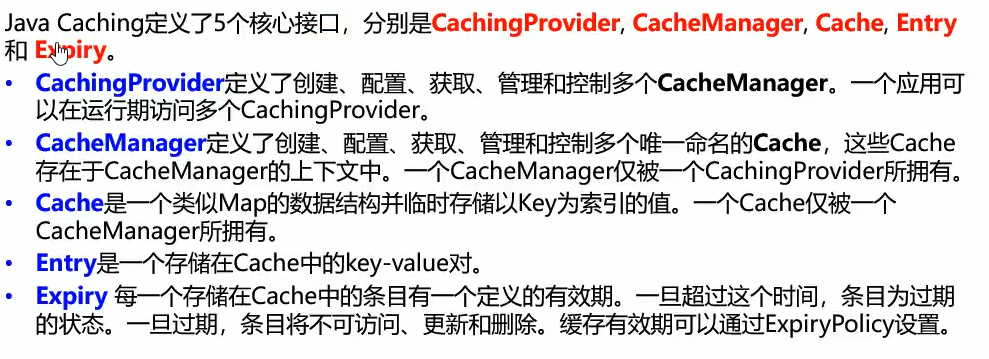
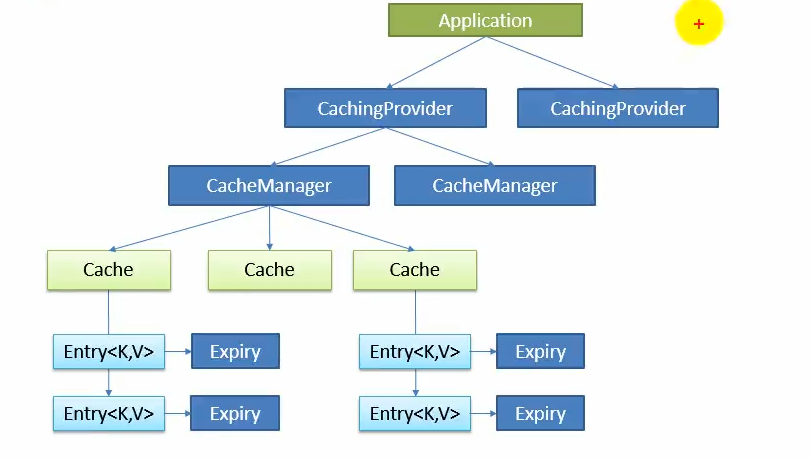
1. JSR107 Java Caching 定义了5个核心接口: CachingProvider:定义了创建,配置,获取,管理和控制多个CacheManager; CacheManager:定义了创 ...
- SpringBoot 整合缓存Cacheable实战详细使用
前言 我知道在接口api项目中,频繁的调用接口获取数据,查询数据库是非常耗费资源的,于是就有了缓存技术,可以把一些不常更新,或者经常使用的数据,缓存起来,然后下次再请求时候,就直接从缓存中获取,不需要 ...
- springboot redis 缓存对象
只要加入spring-boot-starter-data-redis , springboot 会自动识别并使用redis作为缓存容器,使用方式如下 gradle加入依赖 compile(" ...
- springboot~hazelcast缓存中间件
缓存来了 在dotnet平台有自己的缓存框架,在java springboot里当然了集成了很多,而且缓存的中间件也可以进行多种选择,向redis, hazelcast都是分布式的缓存中间件,今天主要 ...
- 带着新人学springboot的应用02(springboot+mybatis+缓存 中)
继续接着上一节,大家应该知道驼峰命名法吧!就是我们javabean中属性一般命名是lastName,userName这种类型的,而数据库中列名一般都是last_name,user_name这种的,要让 ...
- 带着新人学springboot的应用01(springboot+mybatis+缓存 上)
上一篇结束,第一次做一个这么长的系列,很多东西我也是没有说到,也许是还没有想到,哈哈哈,不过基本的东西还是说的差不多了的.假如以后碰到了不会的,随便查查资料配置一下就ok. 咳,还有大家如果把我前面的 ...
- SpringBoot Redis缓存 @Cacheable、@CacheEvict、@CachePut
文章来源 https://blog.csdn.net/u010588262/article/details/81003493 1. pom.xml <dependency> <gro ...
- springboot Redis 缓存
1,先整合 redis 和 mybatis 步骤一: springboot 整合 redis 步骤二: springboot 整合 mybatis 2,启动类添加 @EnableCaching 注解, ...
- SpringBoot学习笔记(6) SpringBoot数据缓存Cache [Guava和Redis实现]
https://blog.csdn.net/a67474506/article/details/52608855 Spring定义了org.springframework.cache.CacheMan ...
随机推荐
- Java之万年历
@(文章目录) 二.Java之万年历 2.1 要求 输入年份: 输入月份: 输出某年某月的日历. 2.2 思路 实现从控制台接收年和月,判断是否是闰年(判断是否是闰年:能被4整除但不能被100整除:或 ...
- 【2021 ICPC Asia Jinan 区域赛】 C Optimal Strategy推公式-组合数-逆元快速幂
题目链接 题目详情 (pintia.cn) 题目 题意 有n个物品在他们面前,编号从1自n.两人轮流移走物品.在移动中,玩家选择未被拿走的物品并将其拿走.当所有物品被拿走时,游戏就结束了.任何一个玩家 ...
- jointJS初使用随记
jointJs使用随记 1.下载与安装 前提:一个健康良好且干净的vue脚手架项目. 还是普遍的安装方式 yarn:yarn add jointjs npm:npm install jointjs 还 ...
- 不care工具,在大数据平台中Hive能自动处理SQL
摘要:有没有更简单的办法,可以直接将SQL运行在大数据平台? 本文分享自华为云社区<Hive执行原理>,作者: JavaEdge . MapReduce简化了大数据编程的难度,使得大数据计 ...
- Jquery_效果-隐藏显示、淡入淡出、滑动面板、简单的动画队列
1 <!DOCTYPE html> 2 <html lang="en"> 3 <head> 4 <meta charset="U ...
- 一个实战让你搞懂Dockerfile
摘要 在认识Dockerfile的基础功能之后,即一个用基础镜像来构建新镜像的文本文件,就需要在实际工作中使用其灵活便利的操作来提升我们的工作效率了,这里演示在Tomcat里运行一个程序的过程,以此来 ...
- FreeRTOS --(10)任务管理之任务延时
转载自 https://blog.csdn.net/zhoutaopower/article/details/107101723 在<FreeRTOS --(7)任务管理之入门篇>中讲过, ...
- 【Java分享客栈】SpringBoot线程池参数搜一堆资料还是不会配,我花一天测试换你此生明白。
一.前言 首先说一句,如果比较忙顺路点进来的,可以先收藏,有时间或用到了再看也行: 我相信很多人会有一个困惑,这个困惑和我之前一样,就是线程池这个玩意儿,感觉很高大上,用起来很fashion, ...
- python mysqldb 报错: ProgrammingError: must be real number, not str 解决
代码: sql = 'insert into book(book_name,book_desc,origin_price,publish_id,tag_id,book_img) values(%s,% ...
- 如何查看和修改Windows远程桌面端口
Windows远程桌面的默认端口为3389.基于安全性考虑,部分用户有修改默认端口的需要,以减少通过远程桌面恶意攻击和扫描主机的次数. 因此今天带大家一起学习下,如何查看和修改Windows远程桌面的 ...