
Spring+SpringMvc+Mybatis框架集成搭建教程三(框架整合测试程序开发)
框架整合测试程序开发
(1).在mysql数据库中创建t_user表,sql语句如下
CREATE TABLE `t_user` (

  `id` bigint(20) NOT NULL AUTO_INCREMENT,

  `user_name` varchar(255) DEFAULT NULL,

  `password` varchar(255) DEFAULT NULL,

  PRIMARY KEY (`id`)

) ENGINE=InnoDB AUTO_INCREMENT=3 DEFAULT CHARSET=utf8;
(2).在main文件夹下的java源文件夹下创建com.hafiz.www包,并在该包下依次创建:
controller包(存放控制器)、
exception包(存放自定义异常及全局异常处理器)、
mapper包(存放mybatis的mapper接口)、
po包(存放数据库表的实体类)、
service包(存放业务层接口),并在service包下创建
impl包(存放业务层实现)。
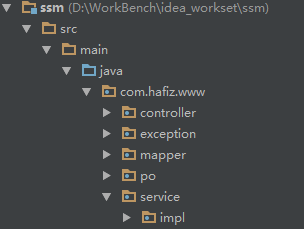
(3).在po包下面创建UserEntity.java类
package com.hafiz.www.po;

/**

 * Desc:用户表实体类

 * Created by hafiz.zhang on 2016/8/27.

 */

public class UserEntity {

    private Long id;            // 编号

    private String userName;    // 用户名

    private String password;    // 密码

    public Long getId() {

        return id;

    }

    public void setId(Long id) {

        this.id = id;

    }

    public String getUserName() {

        return userName;

    }

    public void setUserName(String userName) {

        this.userName = userName;

    }

    public String getPassword() {

        return password;

    }

    public void setPassword(String password) {

        this.password = password;

    }

}
(4).在mapper包下创建UserEntityMapper.java类
package com.hafiz.www.mapper;

import com.hafiz.www.po.UserEntity;

import java.util.List;

/**

 * Desc:用户表实体mapper接口类

 * Created by hafiz.zhang on 2016/8/27.

 */

public interface UserEntityMapper {

    /**

     * 查找所有的用户信息

     *

     * @return

     */

    List<UserEntity> getAllUsers();

}
(5).在resources文件下的mapper文件下创建UserEntityMapper.xml文件
<?xml version="1.0" encoding="UTF-8" ?>

<!DOCTYPE mapper PUBLIC "-//mybatis.org//DTD Mapper 3.0//EN" "http://mybatis.org/dtd/mybatis-3-mapper.dtd" >

<mapper namespace="com.hafiz.www.mapper.UserEntityMapper" >

  <resultMap id="BaseResultMap" type="com.hafiz.www.po.UserEntity" >

    <id column="id" property="id" jdbcType="INTEGER" />

    <result column="user_name" property="userName" jdbcType="VARCHAR" />

    <result column="password" property="password" jdbcType="VARCHAR" />

  </resultMap>

  <sql id="Base_Column_List" >

    id, user_name, password

  </sql>

 <select id="getAllUsers" resultMap="BaseResultMap">

   SELECT

    <include refid="Base_Column_List"/>

   FROM

    t_user

 </select>

</mapper>
(6).在service包下创建UserService.java类
package com.hafiz.www.service;

import com.hafiz.www.po.UserEntity;

import java.util.List;

/**

 * Desc:用户表相关的service接口

 * Created by hafiz.zhang on 2016/8/27.

 */

public interface UserService {

    /**

     * 获取所有的用户信息

     *

     * @return

     */

    List<UserEntity> getAllUsers();

}
(7).在service包下的impl包创建UserServiceImpl.java类
package com.hafiz.www.service.impl;

import com.hafiz.www.mapper.UserEntityMapper;

import com.hafiz.www.po.UserEntity;

import com.hafiz.www.service.UserService;

import org.springframework.beans.factory.annotation.Autowired;

import org.springframework.stereotype.Service;

import java.util.List;

/**

 * Desc:用户表相关的servie接口实现类

 *

 * Created by hafiz.zhang on 2016/8/27.

 */

@Service

public class UserServiceImpl implements UserService {

    @Autowired

    private UserEntityMapper mapper;

    @Override

    public List<UserEntity> getAllUsers() {

        return mapper.getAllUsers();

    }

}
(8).在controller包下创建UserController.java类
package com.hafiz.www.controller;

import com.hafiz.www.po.UserEntity;

import com.hafiz.www.service.UserService;

import org.springframework.beans.factory.annotation.Autowired;

import org.springframework.stereotype.Controller;

import org.springframework.web.bind.annotation.RequestMapping;

import org.springframework.web.bind.annotation.RequestMethod;

import org.springframework.web.bind.annotation.ResponseBody;

import java.util.List;

/**

 * Desc:用户信息控制器

 * Created by hafiz.zhang on 2016/8/27.

 */

@Controller

@RequestMapping("/user")

public class UserController {

    @Autowired

    private UserService userService;

    @RequestMapping(value = "/all", method = RequestMethod.GET)

    @ResponseBody

    public List<UserEntity> getAllUsers(){

        List<UserEntity> list = userService.getAllUsers();

        return list;

    }

}
(9).在exception包下创建全局异常处理器CustomExceptionResolver.java类(该类必须实现HandlerExceptionResolver接口)
package com.hafiz.www.exception;

import org.springframework.web.servlet.HandlerExceptionResolver;

import org.springframework.web.servlet.ModelAndView;

import javax.servlet.http.HttpServletRequest;

import javax.servlet.http.HttpServletResponse;

/**

 * Desc:全局异常处理器

 * Created by hafiz.zhang on 2016/8/27.

 */

public class CustomExceptionResolver implements HandlerExceptionResolver {

    @Override

    public ModelAndView resolveException(HttpServletRequest request, HttpServletResponse response,

                                         Object handler, Exception ex) {

        //handler就是处理器适配器要执行的处理器(只有method方法)

        //1.解析出异常类型

        CustomException exception = null;

        //如果该异常类型是系统自定义的异常,直接取出异常信息,在错误页面展示

        if(ex instanceof CustomException){

            exception = (CustomException)ex;

        }

        else{

            //如果该异常类型不是系统自定义的异常,构造一个自定义的异常类型(信息为“未知错误”)

            exception = new CustomException("未知错误,请于管理员联系");

        }

        ModelAndView modelAndView = new ModelAndView();

        //将错误信息传到页面

        modelAndView.addObject("message", exception.getMessage());

        //指定错误页面

        modelAndView.setViewName("error");

        return modelAndView;

    }

}
(10)在exception包下创CustomException.java建自定义异常类
package com.hafiz.www.exception;

/**

 * Desc:自定义异常类

 * Created by hafiz.zhang on 2016/8/27.

 */

public class CustomException extends Exception{

    private String message;

    public CustomException(String message) {

        super(message);

        this.message = message;

    }

    public String getMessage() {

        return message;

    }

    public void setMessage(String message) {

        this.message = message;

    }

}
(11).在webapp下的WEB-INF文件夹下创建jsp文件夹,并在该文件夹下创建error.jsp用来显示捕获的异常信息
<%@ page contentType="text/html;charset=UTF-8" language="java" %>

<html>

<head>

    <title>错误页面</title>

</head>

<body>

    ${message}

</body>

</html>
到此为止,我们就完成了测试框架整合结果的程序。
Spring+SpringMvc+Mybatis框架集成搭建教程三(框架整合测试程序开发)的更多相关文章
- Spring+SpringMvc+Mybatis框架集成搭建教程
一.背景 最近有很多同学由于没有过SSM(Spring+SpringMvc+Mybatis , 以下简称SSM)框架的搭建的经历,所以在自己搭建SSM框架集成的时候,出现了这样或者那样的问题,很是苦恼 ...
- Spring+SpringMvc+Mybatis框架集成搭建教程二(依赖配置及框架整合)
依赖导入以及框架整合 (1).打开项目的pom.xml文件,声明依赖 <project xmlns="http://maven.apache.org/POM/4.0.0" x ...
- Spring+SpringMVC+Mybatis环境的搭建(使用Intellij IDEA)
前言:本文主要介绍利用IDEA如何搭建SSM环境,并使用mybatis的逆向生成功能,根据数据表生成对应mapper接口和sql映射文件.具体步骤如下. 开发环境: IDEA 14.1.7 maven ...
- Spring+SpringMVC+Mybatis+Shiro环境搭建之IDEA下搭建Maven项目
运行IntelliJ IDEA 2016.3.2(64)编译器新建项目 在弹出的窗体中选择maven,然后勾选要建的maven模板--这里选webApp 然后填入相应的maven项目组信息(Gro ...
- Spring+SpringMvc+Mybatis框架集成搭建教程一(项目创建)
一.框架搭建环境 Spring 4.2.6.RELEASE SpringMvc 4.2.6.RELEASE Mybatis 3.2.8 Maven 3.3.9 Jdk 1.7 Idea 15.04 二 ...
- Spring+SpringMvc+Mybatis框架集成搭建教程四(项目部署及测试)
在IDEA中将项目部署到本地Tomcat下进行运行并验证整合结果 (1).点击如下图所示的下拉按钮,弹出Edit Configurations...后点击该项. (2).跳出如下界面后,点击红框内的& ...
- Spring+SpringMvc+Mybatis框架集成搭建教程五(项目源码发布到GitHub)
一.背景 我们做完了上面的四步操作以后,来把我们写好的项目提交到自己的GitHub仓库进行版本管理,具体步骤如下. 二.提交步骤 1.首先你要保证你已经有GitHub的账号和密码(没有可以去githu ...
- Spring+SpringMVC+Mybatis(SSM)框架集成搭建
Spring+SpringMVC+Mybatis框架集成搭建教程 一.背景 最近有很多同学由于没有过SSM(Spring+SpringMvc+Mybatis , 以下简称SSM)框架的搭建的经历,所以 ...
- SSM框架——Spring+SpringMVC+Mybatis的搭建教程
一:概述 SSM框架在项目开发中经常使用到,相比于SSH框架,它在仅几年的开发中运用的更加广泛. Spring作为一个轻量级的框架,有很多的拓展功能,最主要的我们一般项目使用的就是IOC和AOP. S ...
随机推荐
- VMware Workstation中网络连接之桥接、NAT和Host-only
在Windows XP系统中,安装好VMware Workstation虚拟机软件以后,我们可以查看一下"网络连接"窗口: 在窗口中多出了两块网卡: VMware Network ...
- thinkphp where条件语句整理
ThinkPHP运算符 与 SQL运算符 对照表 TP运算符 SQL运算符 例子 实际查询条件 eq = $map['id'] = array('eq',100); 等效于:$map['id'] = ...
- C++标准库:std_map作为一个关联数组
摘要:std::map作为一个容器存在一个典型应用就是作为关联数组来作用.在诸如Java等等语言中,关联数组广泛存在.std::map是一个容器,在它的概念框架中存在两个词:键和值,std::map把 ...
- Android开发环境的演变
之前安装过eclipse,给我的感觉是,好生麻烦.刚开始自己装花了好多时间.隐约还记得有两个小tips: 1)打开时出现 “failed to load the JNI shared library ...
- 解决:笔记本安装mint18时,安装界面显示不全
近日在给自己的笔记本安装mint18时,安装界面显示不全,就是安装时到了分区界面后看不到下一步. 很无奈.... 于是胡乱摸索,得到解决的办法. 按住键盘上的ALT键,用鼠标向上拖动安装的界面,最好是 ...
- 【bzoj1076】 SCOI2008—奖励关
http://www.lydsy.com/JudgeOnline/problem.php?id=1076 (题目链接) 题意 一个奖励,K次抛出宝物的机会,每次抛出都等概率的抛出n个物品中的一个,每个 ...
- 【poj1694】 An Old Stone Game
http://poj.org/problem?id=1694 (题目链接) 题意 一棵树,现在往上面放石子.对于一个节点x,只有当它的直接儿子都放满石子时,才能将它直接儿子中的一个石子放置x上,并回收 ...
- RabbitMQ Lazy Queue 延迟加载
Lazy Queue 在著名的单例设计模式中就有懒汉式的实现方式,也就是只有在你需要的时候我才去加载. 这让博主想到了以前上学的时候,每到了假期的假期作业,在假期的时候是从来不做的.只有在快开学老师要 ...
- CSS DIV自动适应高度
当div需要设定自适应高度时,可用到的css属性,min-height:200px;代表的是当div的内容超出了200px时,就会自动适应高度,兼容所有浏览器(IE6除外),如果是IE6则需要设置&q ...
- oracle---触发器总结
一.触发器简介 触发器的定义就是说某个条件成立的时候,触发器里面所定义的语句就会被自动的执行.因此触发器不需要人为的去调用,也不能调用.然后,触发器的触发条件其实在你定义的时候就已经设定好了.这里面需 ...