FastDFS 环境搭建
原文地址:FastDFS 环境搭建
博客地址:http://www.extlight.com
一、前言
最近闲下来,整理了一下笔记,今天就分享一下 FastDFS 环境搭建吧。
二、介绍
2.1 FastDFS 定义
FastDFS 是用 C 语言编写的一款开源的分布式文件系统。FastDFS 为互联网量身定制,充分考虑了冗余备份、负载均衡、线性扩容等机制,并注重高可用、高性能等指标,使用 FastDFS 很容易搭建一套高性能的文件服务器集群提供文件上传、下载等服务。
2.2 FastDFS 架构

FastDFS 架构包括 Tracker Server 和 Storage Server。客户端请求 Tracker Server 进行文件上传、下载,通过 Tracker Server 调度最终由 Storage Server 完成文件上传和下载。
Tracker Server 作用是负载均衡和调度,通过 Tracker Server 在文件上传时可以根据一些策略找到 Storage server 提供文件上传服务。可以将 tracker 称为追踪服务器或调度服务器。
Storage Server 作用是文件存储,客户端上传的文件最终存储在 Storage 服务器上,Storage Server 没有实现自己的文件系统而是利用操作系统 的文件系统来管理文件。可以将 storage 称为存储服务器。
三、安装
本次测试使用 ip 为 192.168.10.110 的 CentOS 7 系统的虚拟机
3.1 安装 libfastcommon
libfastcommon 是 FastDFS 官方提供的,其包含了 FastDFS 运行所需要的一些基础库。
git clone https://github.com/happyfish100/libfastcommon.git

cd libfastcommon

./make.sh

./make.sh install
3.2 安装 FastDFS
git clone https://github.com/happyfish100/fastdfs.git

cd fastdfs

./make.sh

./make.sh install
安装 FastDFS 成功后,会在如下目录中生成相应的文件。
- /etc/fdfs 生成配置文件:
[root@fastdfs fdfs]# pwd

/etc/fdfs

[root@fastdfs fdfs]# ll

total 24

-rw-r--r--. 1 root root 1461 Oct 16 22:26 client.conf.sample

-rw-r--r--. 1 root root 7978 Oct 16 22:26 storage.conf.sample

-rw-r--r--. 1 root root  105 Oct 16 22:26 storage_ids.conf.sample

-rw-r--r--. 1 root root 7441 Oct 16 22:26 tracker.conf.sample
我们需要将“.simple”缀后删除,这些配置文件才能生效。
或者进入到 fdfs/conf 目录中,如下:
[root@fastdfs conf]# pwd

/root/fastdfs/conf

[root@fastdfs conf]# ll

total 84

-rw-r--r--. 1 root root 23981 Oct 16 22:19 anti-steal.jpg

-rw-r--r--. 1 root root  1461 Oct 16 22:19 client.conf

-rw-r--r--. 1 root root   955 Oct 16 22:19 http.conf

-rw-r--r--. 1 root root 31172 Oct 16 22:19 mime.types

-rw-r--r--. 1 root root  7978 Oct 16 22:19 storage.conf

-rw-r--r--. 1 root root   105 Oct 16 22:19 storage_ids.conf

-rw-r--r--. 1 root root  7441 Oct 16 22:19 tracker.conf

[root@fastdfs conf]#
该目录也生成好 FastDFS 运行时所需要的配置文件,我们也可以将这些文件一并拷贝到 /etc/fdfs 中。
- /usr/bin 中生成对应的执行命令:
[root@fastdfs bin]# pwd

/usr/bin

[root@fastdfs bin]# ll fdfs*

-rwxr-xr-x. 1 root root  317632 Oct 16 22:26 fdfs_appender_test

-rwxr-xr-x. 1 root root  317408 Oct 16 22:26 fdfs_appender_test1

-rwxr-xr-x. 1 root root  304264 Oct 16 22:26 fdfs_append_file

-rwxr-xr-x. 1 root root  304008 Oct 16 22:26 fdfs_crc32

-rwxr-xr-x. 1 root root  304320 Oct 16 22:26 fdfs_delete_file

-rwxr-xr-x. 1 root root  305048 Oct 16 22:26 fdfs_download_file

-rwxr-xr-x. 1 root root  304648 Oct 16 22:26 fdfs_file_info

-rwxr-xr-x. 1 root root  322560 Oct 16 22:26 fdfs_monitor

-rwxr-xr-x. 1 root root 1112112 Oct 16 22:26 fdfs_storaged

-rwxr-xr-x. 1 root root  327576 Oct 16 22:26 fdfs_test

-rwxr-xr-x. 1 root root  326784 Oct 16 22:26 fdfs_test1

-rwxr-xr-x. 1 root root  454944 Oct 16 22:26 fdfs_trackerd

-rwxr-xr-x. 1 root root  305248 Oct 16 22:26 fdfs_upload_appender

-rwxr-xr-x. 1 root root  306272 Oct 16 22:26 fdfs_upload_file
四、配置
首先创建 4 个目录:
mkdir -p /data/fastdfs/tracker

mkdir -p /data/fastdfs/storage

mkdir -p /data/fastdfs/client

mkdir -p /data/fastdfs/tmp
这些目录用于存放 fastDFS 服务产生的数据文件和日志。
为了简化步骤,进入到 fdfs/conf 目录,将里边的所有文件复制到 /etc/fdfs 中:
cp /root/fastdfs/conf/* /etc/fdfs
4.1 配置 Tracker Server
修改 tracker.conf 文件:vim /etc/fdfs/tracker.conf
port=22122

base_path=/data/fastdfs/tracker
启动 Tracker Server 服务:
/usr/bin/fdfs_trackerd /etc/fdfs/tracker.conf start
检测启动情况:
[root@fastdfs fdfs]# ps -ef | grep tracker

root       2136      1  0 23:55 ?        00:00:00 /usr/bin/fdfs_trackerd /etc/fdfs/tracker.conf start

root       2147   1294  0 23:55 pts/0    00:00:00 grep --color=auto tracker
4.2 配置 Storage Server
修改 storage.conf 文件:vim /etc/fdfs/storage.conf
port=23000

base_path=/data/fastdfs/storage

store_path0=/data/fastdfs/storage

tracker_server=192.168.10.110:22122

group_name=light

http.server_port=80
注意:tracker_server 中,ip 为本机 ip,端口为 tracker.conf 中设置的值
启动 Storage Server 服务:
/usr/bin/fdfs_storaged /etc/fdfs/storage.conf start
检测启动情况:
[root@fastdfs fdfs]# ps -ef | grep storage

root       2155      1 10 00:00 ?        00:00:01 /usr/bin/fdfs_storaged /etc/fdfs/storage.conf start

root       2167   1294  0 00:00 pts/0    00:00:00 grep --color=auto storage
4.3 配置 client
此步骤的配置是为了测试
修改 client.conf 文件:vim /etc/fdfs/client.conf
base_path=/data/fastdfs/client

tracker_server=192.168.10.110:22122
五、测试
准备图片,名为 test.jpg
[root@fastdfs ~]# pwd

/root

[root@fastdfs ~]# ll

total 52

drwxr-xr-x. 11 root root   270 Oct 16 22:19 fastdfs

drwxr-xr-x.  6 root root   147 Oct 16 22:22 libfastcommon

-rw-r--r--.  1 root root 49608 Oct 17 01:51 test.jpg
通过 fdfs 命令上传该图片:
/usr/bin/fdfs_test /etc/fdfs/client.conf upload /root/test.jpg
最终,图片会被上传到 /data/fastdfs/storage/data/ 目录中。
运行结果如下图:
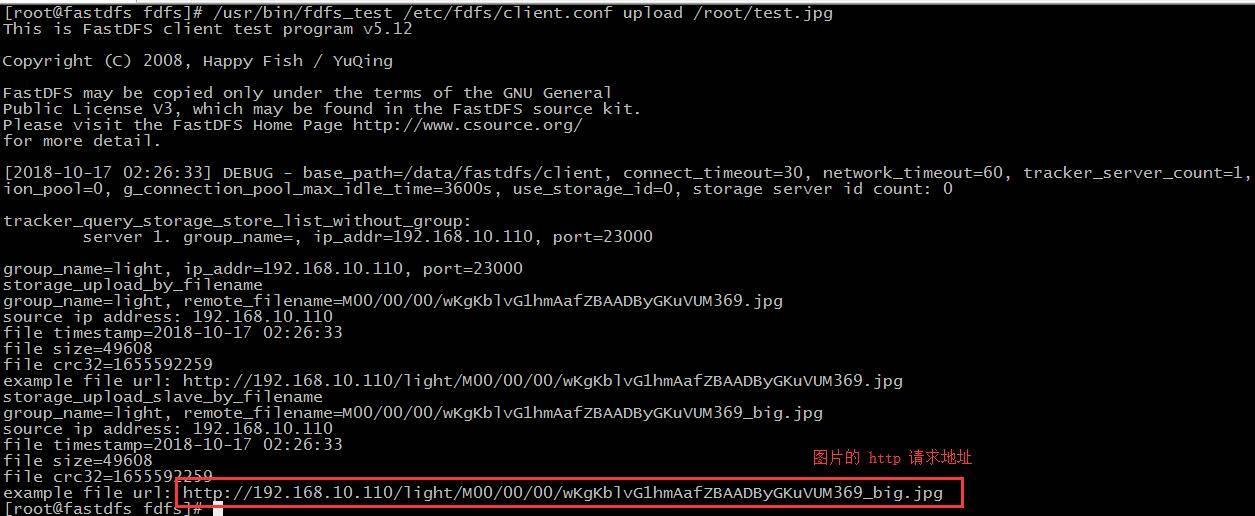
不过目前该图片无法通过浏览器访问,因为我们还没有设置 web 服务器将外部请求与本地文件系统中的目录的映射关联。最简单的实现方式就是整合 nginx 服务器来实现 http 访问请求,该功能将在下篇文章介绍。
FastDFS 环境搭建的更多相关文章
- Fastdfs环境搭建
环境准备 使用的系统软件 名称 说明 centos 7.x libfatscommon FastDFS分离出的一些公用函数包 FastDFS FastDFS本体 fastdfs-nginx-modul ...
- Docker下FastDFS环境搭建
本文使用docker进行搭建. #拉取镜像docker pull delron/fastdfs#创建tracker容器docker create --network=host --name trac ...
- 【FastDFS】小伙伴们说在CentOS 8服务器上搭建FastDFS环境总报错?
写在前面 在[冰河技术]微信公众号的[分布式存储]专题中,我们分别搭建了单节点FastDFS环境和高可用FastDFS集群环境.但是,之前的环境都是基于CentOS 6.8服务器进行搭建的.很多小伙伴 ...
- 在CentOS 8服务器上搭建FastDFS环境
什么是FastDFS? 这里,我就摘录下百度百科上对于FastDFS的描述. FastDFS是一个开源的轻量级分布式文件系统,它对文件进行管理,功能包括:文件存储.文件同步.文件访问(文件上传.文件下 ...
- 分布式存储 CentOS6.5虚拟机环境搭建FastDFS-5.0.5集群(转载-2)
原文:http://www.cnblogs.com/PurpleDream/p/4510279.html 分布式存储 CentOS6.5虚拟机环境搭建FastDFS-5.0.5集群 前言: ...
- FastDFS:搭建文件管理系统
文章转自:https://www.cnblogs.com/chiangchou/p/fastdfs.html#_label1 一.FastDFS介绍 FastDFS开源地址:https://githu ...
- FastDFS+Nginx搭建Java分布式文件系统
一.FastDFS FastDFS是用c语言编写的一款开源的分布式文件系统.FastDFS为互联网量身定制,充分考虑了冗余备份.负载均衡.线性扩容等机制,并注重高可用.高性能等指标,使用FastDFS ...
- FastDfs单机版搭建
详细的最新版fastdfs单机版搭建 前言 目前项目是tomcat单机部署的,图片.视频也是上传到tomcat目录下,关键是此项目的主要内容还就是针对图片.视频的,这让我非常担忧:文件服务器的应用是必 ...
- .NET Core系列 : 1、.NET Core 环境搭建和命令行CLI入门
2016年6月27日.NET Core & ASP.NET Core 1.0在Redhat峰会上正式发布,社区里涌现了很多文章,我也计划写个系列文章,原因是.NET Core的入门门槛相当高, ...
随机推荐
- javascript--- document.write()和 innerHTML的区别
document.write是直接写入到页面的内容流,如果在写之前没有调用document.open, 浏览器会自动调用open.每次写完关闭之后重新调用该函数,会导致页面被重写. innerHTML ...
- vEthernet(默认交换机) 无法访问网络
VMware 开启虚拟机 最近公司由无线网转为有线时,我用VMware Workstation Pro装的几个系统,其中一个 ubuntu无法访问网页,在ubuntu运行ifconfig -a ,直接 ...
- MinGW的gdb调试
MinGW(Minimalist GNU for Windows)提供了一套简单方便的Windows下的基于GCC程序开发环境.MinGW收集了一系列免费的Windows是用的头文件和库文件: ...
- python 抓取request信息,各种cookie,user-agent类的信息,只调试到http可以抓取,https貌似不行。
import pcap # 安装的是pypcap,本博客有安装方法,不过也比较乱,试试吧.import dpktimport socketimport datetime def sniffer(str ...
- Memcached 扩展常用方法
保存数据 向memcached保存数据的方法有 add replace set 它们的使用方法都相同: $add = $memcached->add( '键', '值', '期限' ); $re ...
- slice,Array.prototype.slice,Array.protyotype.slice.call
slice 特点:基于当前数组中的一或多个项创建一个新数组.[原数组不会被修改] 返回结果:返回一个从开始到结束(不包括结束)选择的数组的一部分浅拷贝到一个新数组对象. 语法: arr.slice() ...
- 看黑客如何远程黑掉一辆汽车 - BlackHat 2015 黑帽大会总结 day 1
0x00 序 今天是Black Hat 2015第一天,九点钟开场.开场介绍是由Black Hat创始人Jeff Moss讲的.随后又请来了Stanford law school的Jennifer G ...
- 阿里java面试题
引言 其实本来真的没打算写这篇文章,主要是LZ得记忆力不是很好,不像一些记忆力强的人,面试完以后,几乎能把自己和面试官的对话都给记下来.LZ自己当初面试完以后,除了记住一些聊过的知识点以外,具体的内容 ...
- 互评Beta版本——王者荣耀交流协会的PSP DAILY作品
基于NABCD评论,及改进建议 1)N(Need 需求) 开发本软件有利于我们记录PSP,省时省力.方便快捷.这样我们能充份的利用时间. 2)A(Approach 做法) 王者荣耀交流协会进行了网上调 ...
- UnicodeDammit
UnicodeDammit 是BS内置库, 主要用来猜测文档编码. 编码自动检测 功能可以在Beautiful Soup以外使用,检测某段未知编码时,可以使用这个方法: from bs4 import ...