lnmt
1.nginx安装与配置
1.1安装nginx
//创建系统用户nginx

[root@localhost ~]# useradd -r -M -s /sbin/nologin nginx

//安装依赖环境

[root@localhost ~]# yum -y install pcre-devel openssl openssl-devel gd-devel gcc gcc-c++

[root@localhost ~]# yum -y groups mark install 'Development Tools'

//创建日志存放目录

[root@localhost ~]# mkdir -p /var/log/nginx

[root@localhost ~]# chown -R nginx.nginx /var/log/nginx

//下载nginx

[root@localhost src]# wget http://nginx.org/download/nginx-1.12.0.tar.gz

[root@localhost src]# ls

debug  kernels  nginx-1.12.0.tar.gz

//编译安装

[root@localhost src]# tar xf nginx-1.12.0.tar.gz -C /usr/local/

[root@localhost src]# cd /usr/local/

[root@localhost local]# ls

bin  etc  games  include  lib  lib64  libexec  nginx-1.12.0  sbin  share  src

[root@localhost local]# cd nginx-1.12.0/

[root@localhost nginx-1.12.0]# ./configure \

--prefix=/usr/local/nginx \

--user=nginx \

--group=nginx \

--with-debug \

--with-http_ssl_module \

--with-http_realip_module \

--with-http_image_filter_module \

--with-http_gunzip_module \

--with-http_gzip_static_module \

--with-http_stub_status_module \

--http-log-path=/var/log/nginx/access.log \

--error-log-path=/var/log/nginx/error.log

[root@localhost nginx-1.12.0]# make && make install
1.2nginx安装后的配置
//配置环境变量

[root@localhost ~]# echo 'export PATH=/usr/local/nginx/sbin:$PATH' > /etc/profile.d/nginx.sh

[root@localhost ~]# . /etc/profile.d/nginx.sh

//启动nginx

[root@localhost ~]# nginx

[root@localhost ~]# ss -antl

State       Recv-Q Send-Q         Local Address:Port                        Peer Address:Port

LISTEN      0      128                        *:80                                     *:*

LISTEN      0      128                        *:22                                     *:*

LISTEN      0      100                127.0.0.1:25                                     *:*

LISTEN      0      25                         *:514                                    *:*

LISTEN      0      128                       :::22                                    :::*

LISTEN      0      100                      ::1:25                                    :::*

LISTEN      0      25                        :::514                                   :::*
//网站访问

2.mysql安装与配置
2.1安装mysql
//安装依赖包

[root@localhost ~]# yum -y install ncurses-devel openssl-devel openssl cmake mariadb-devel

//创建用户和组

[root@localhost ~]# groupadd -r -g 306 mysql

[root@localhost ~]# useradd -r -M -s /sbin/nologin -g 306 -u 306 mysql

//下载二进制格式的mysql软件包

[root@localhost ~]# cd /usr/src/

[root@localhost src]# wget https://downloads.mysql.com/archives/get/file/mysql-5.7.22-linux-glibc2.12-x86_64.tar.gz

//解压软件至/usr/local/

[root@localhost src]# ls

debug  kernels  mysql-5.7.22-linux-glibc2.12-x86_64.tar.gz

[root@localhost src]# tar xf mysql-5.7.22-linux-glibc2.12-x86_64.tar.gz -C /usr/local/

[root@localhost src]# cd /usr/local/

[root@localhost local]# ls

bin  games    lib    libexec                              nginx         sbin   src

etc  include  lib64  mysql-5.7.22-linux-glibc2.12-x86_64  nginx-1.12.0  share

[root@localhost local]# ln -sv mysql-5.7.22-linux-glibc2.12-x86_64/ mysql

"mysql" -> "mysql-5.7.22-linux-glibc2.12-x86_64/"

[root@localhost local]# ls

bin  games    lib    libexec  mysql-5.7.22-linux-glibc2.12-x86_64  nginx-1.12.0  share

etc  include  lib64  mysql    nginx                                sbin          src

//修改目录/usr/local/mysql的属主属组

[root@localhost ~]# chown -R mysql.mysql /usr/local/mysql

[root@localhost ~]# ll /usr/local/mysql -d

lrwxrwxrwx 1 mysql mysql 36 Aug 14 16:00 /usr/local/mysql -> mysql-5.7.22-linux-glibc2.12-x86_64/

//添加环境变量

[root@localhost ~]# ls /usr/local/mysql

bin  COPYING  docs  include  lib  man  README  share  support-files

[root@localhost ~]# echo 'export PATH=/usr/local/mysql/bin:$PATH' > /etc/profile.d/mysql.sh

[root@localhost ~]# . /etc/profile.d/mysql.sh

[root@localhost ~]# echo $PATH

/usr/local/mysql/bin:/usr/local/sbin:/usr/local/bin:/usr/sbin:/usr/bin:/root/bin

//建立数据存放目录

[root@localhost mysql]# mkdir /opt/data

[root@localhost mysql]# chown -R mysql.mysql /opt/data/

[root@localhost mysql]# ll /opt/

total 0

drwxr-xr-x 2 mysql mysql 6 Aug 14 16:54 data

//初始化数据库

[root@localhost ~]# /usr/local/mysql/bin/mysqld --initialize --user=mysql --datadir=/opt/data/

2020-01-08T01:17:10.279568Z 0 [Warning] TIMESTAMP with implicit DEFAULT value is deprecated. Please use --explicit_defaults_for_timestamp server option (see documentation for more details).

2020-01-08T01:17:10.746049Z 0 [Warning] InnoDB: New log files created, LSN=45790

2020-01-08T01:17:10.804979Z 0 [Warning] InnoDB: Creating foreign key constraint system tables.

2020-01-08T01:17:10.899793Z 0 [Warning] No existing UUID has been found, so we assume that this is the first time that this server has been started. Generating a new UUID: 98673ab3-31b4-11ea-bcca-000c2900526e.

2020-01-08T01:17:10.900504Z 0 [Warning] Gtid table is not ready to be used. Table 'mysql.gtid_executed' cannot be opened.

2020-01-08T01:17:10.901585Z 1 [Note] A temporary password is generated for root@localhost: RD8RvivKwK%+

[root@localhost ~]# echo 'RD8RvivKwK%+' > /root/pass

[root@localhost ~]# cat /root/pass

RD8RvivKwK%+
2.2mysql配置
//配置mysql

[root@localhost ~]# ln -sv /usr/local/mysql/include/ /usr/local/include/mysql

‘/usr/local/include/mysql’ -> ‘/usr/local/mysql/include/’

[root@localhost ~]# echo '/usr/local/mysql/lib' > /etc/ld.so.conf.d/mysql.conf

[root@localhost ~]# ldconfig

//生成配置文件

[root@localhost ~]# cat > /etc/my.cnf <<EOF

[mysqld]

basedir = /usr/local/mysql

datadir = /opt/data

socket = /tmp/mysql.sock

port = 3306

pid-file = /opt/data/mysql.pid

user = mysql

skip-name-resolve

EOF

//配置服务启动脚本

[root@localhost ~]# cp -a /usr/local/mysql/support-files/mysql.server /etc/init.d/mysqld

[root@localhost ~]# sed -ri 's#^(basedir=).*#\1/usr/local/mysql#g' /etc/init.d/mysqld

[root@localhost ~]# sed -ri 's#^(datadir=).*#\1/opt/data#g' /etc/init.d/mysqld

//启动mysql

[root@localhost ~]# service mysqld start

Starting MySQL.Logging to '/opt/data/localhost.localdomain.err'.

 SUCCESS!

[root@localhost ~]# ss -antl

State       Recv-Q Send-Q         Local Address:Port                        Peer Address:Port

LISTEN      0      128                        *:80                                     *:*

LISTEN      0      128                        *:22                                     *:*

LISTEN      0      100                127.0.0.1:25                                     *:*

LISTEN      0      25                         *:514                                    *:*

LISTEN      0      128                       :::22                                    :::*

LISTEN      0      100                      ::1:25                                    :::*

LISTEN      0      25                        :::514                                   :::*

LISTEN      0      80                        :::3306                                  :::*

//修改密码

//使用临时密码登录

[root@localhost ~]# cat /root/pass

RD8RvivKwK%+

[root@localhost ~]# mysql -uroot -p'RD8RvivKwK%+'

mysql: [Warning] Using a password on the command line interface can be insecure.

Welcome to the MySQL monitor.  Commands end with ; or \g.

Your MySQL connection id is 3

Server version: 5.7.22

Copyright (c) 2000, 2018, Oracle and/or its affiliates. All rights reserved.

Oracle is a registered trademark of Oracle Corporation and/or its

affiliates. Other names may be trademarks of their respective

owners.

Type 'help;' or '\h' for help. Type '\c' to clear the current input statement.

mysql>

//设置新密码

mysql> set password = password('123456');

Query OK, 0 rows affected, 1 warning (0.00 sec)

mysql> quit

Bye
3.部署tomcat
3.1java环境安装
//安装jdk环境

[root@localhost ~]# yum -y install java-1.8.0-openjdk java-1.8.0-openjdk-devel

//查看安装的版本

[root@localhost ~]# java -version

openjdk version "1.8.0_232"

OpenJDK Runtime Environment (build 1.8.0_232-b09)

OpenJDK 64-Bit Server VM (build 25.232-b09, mixed mode)
3.2tomcat部署
//下载tomcat
[root@localhost ~]# cd /usr/src/
[root@localhost src]# wget http://mirror.bit.edu.cn/apache/tomcat/tomcat-9/v9.0.24/bin/apache-tomcat-9.0.30.tar.gz
//解压部署
[root@localhost src]# ls
apache-tomcat-9.0.30.tar.gz debug kernels mysql-5.7.22-linux-glibc2.12-x86_64.tar.gz nginx-1.12.0.tar.gz
[root@localhost src]# tar xf apache-tomcat-9.0.30.tar.gz -C /usr/local/
[root@localhost src]# cd /usr/local/
[root@localhost local]# ls
apache-tomcat-9.0.30 etc include lib64 mysql nginx sbin src
bin games lib libexec mysql-5.7.22-linux-glibc2.12-x86_64 nginx-1.12.0 share
[root@localhost local]# ln -s apache-tomcat-9.0.30/ tomcat
[root@localhost local]# ls
apache-tomcat-9.0.30 games lib64 mysql-5.7.22-linux-glibc2.12-x86_64 sbin tomcat
bin include libexec nginx share
etc lib mysql nginx-1.12.0 src
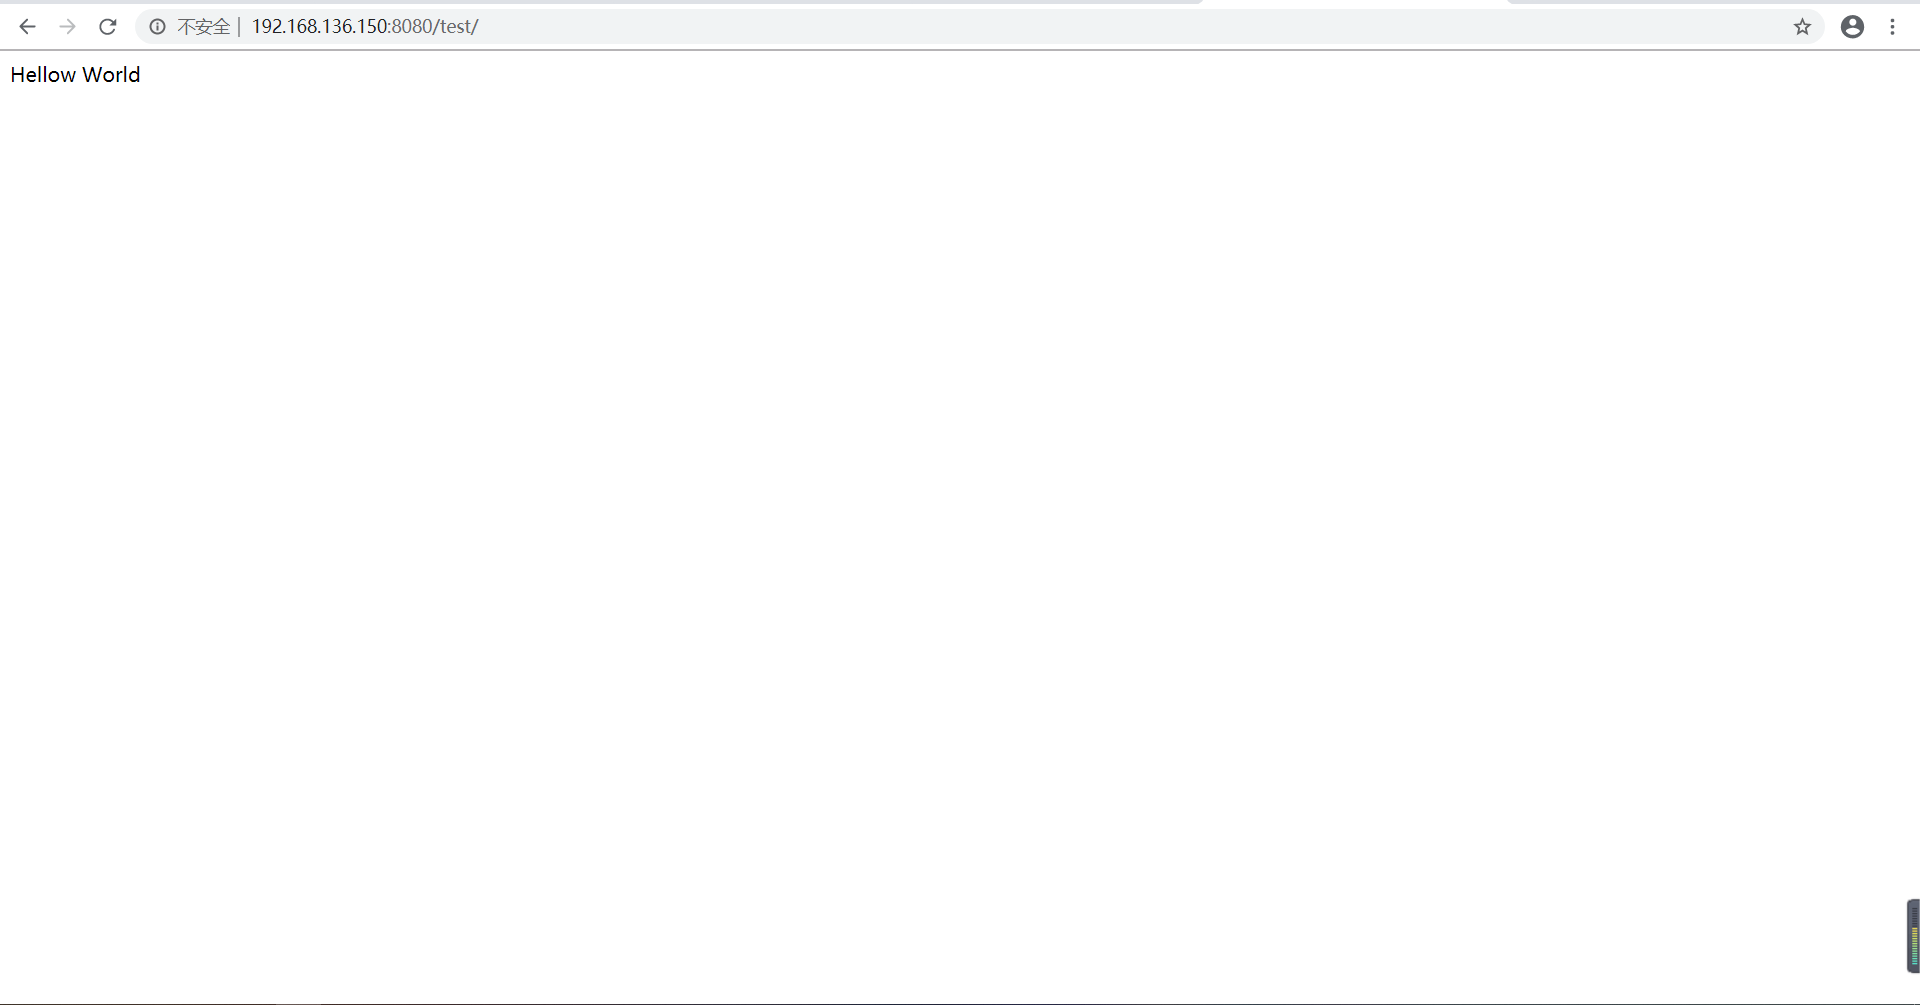
//写一个hello world的java页面
[root@localhost ~]# vim index.jsp
<html>
<head>
<title>test page</title>
</head>
<body>
<%
out.println("Hellow World");
%>
</body>
</html>
[root@localhost ~]# mkdir /usr/local/tomcat/webapps/test
[root@localhost ~]# cp index.jsp /usr/local/tomcat/webapps/test/
//启动tomcat
[root@localhost ~]# /usr/local/tomcat/bin/catalina.sh start
Using CATALINA_BASE: /usr/local/tomcat
Using CATALINA_HOME: /usr/local/tomcat
Using CATALINA_TMPDIR: /usr/local/tomcat/temp
Using JRE_HOME: /usr
Using CLASSPATH: /usr/local/tomcat/bin/bootstrap.jar:/usr/local/tomcat/bin/tomcat-juli.jar
Tomcat started.
[root@localhost ~]# ss -antl
State Recv-Q Send-Q Local Address:Port Peer Address:Port
LISTEN 0 128 *:80 *:*
LISTEN 0 128 *:22 *:*
LISTEN 0 100 127.0.0.1:25 *:*
LISTEN 0 25 *:514 *:*
LISTEN 0 100 :::8080 :::*
LISTEN 0 128 :::22 :::*
LISTEN 0 100 ::1:25 :::*
LISTEN 0 25 :::514 :::*
LISTEN 0 1 ::ffff:127.0.0.1:8005 :::*
LISTEN 0 100 :::8009 :::*
LISTEN 0 80 :::3306 :::*
//网站访问
4.nginx反向代理
4.1全部反代至tomcat
//修改配置文件

[root@localhost ~]# vim /usr/local/nginx/conf/nginx.conf

...

        #access_log  logs/host.access.log  main;

        location / {

            proxy_pass http://127.0.0.1:8080;

        }

        #error_page  404              /404.html;

....

[root@localhost ~]# nginx -t

nginx: the configuration file /usr/local/nginx/conf/nginx.conf syntax is ok

nginx: configuration file /usr/local/nginx/conf/nginx.conf test is successful

[root@localhost ~]# nginx -s stop

[root@localhost ~]# nginx

[root@localhost ~]# ss -antl

State       Recv-Q Send-Q         Local Address:Port                        Peer Address:Port

LISTEN      0      128                        *:80                                     *:*

LISTEN      0      128                        *:22                                     *:*

LISTEN      0      100                127.0.0.1:25                                     *:*

LISTEN      0      25                         *:514                                    *:*

LISTEN      0      100                       :::8080                                  :::*

LISTEN      0      128                       :::22                                    :::*

LISTEN      0      100                      ::1:25                                    :::*

LISTEN      0      25                        :::514                                   :::*

LISTEN      0      1           ::ffff:127.0.0.1:8005                                  :::*

LISTEN      0      100                       :::8009                                  :::*

LISTEN      0      80                        :::3306                                  :::*
//网站访问


4.2动静分离
//修改配置文件

[root@localhost test]# vim /usr/local/nginx/conf/nginx.conf

...

      #access_log  logs/host.access.log  main;

        location / {

            root   html;

            index  index.html index.htm;

        }

        location ~* \.(jsp|do)$ {

            proxy_pass http://127.0.0.1:8080;

}

        #error_page  404              /404.html;

...

[root@localhost html]# ls

1.jpg  50x.html  index.html

[root@localhost test]# nginx -s stop

[root@localhost test]# nginx

[root@localhost test]# ss -antl

State       Recv-Q Send-Q         Local Address:Port                        Peer Address:Port

LISTEN      0      128                        *:80                                     *:*

LISTEN      0      128                        *:22                                     *:*

LISTEN      0      100                127.0.0.1:25                                     *:*

LISTEN      0      25                         *:514                                    *:*

LISTEN      0      100                       :::8080                                  :::*

LISTEN      0      128                       :::22                                    :::*

LISTEN      0      100                      ::1:25                                    :::*

LISTEN      0      25                        :::514                                   :::*

LISTEN      0      1           ::ffff:127.0.0.1:8005                                  :::*

LISTEN      0      100                       :::8009                                  :::*

LISTEN      0      80                        :::3306                                  ::
//网站访问


5.部署jenkins
//下载jenkins

[root@localhost ~]# ls

anaconda-ks.cfg  index.jsp  jenkins.war  pass

//部署jenkins

[root@localhost ~]# cp jenkins.war /usr/local/tomcat/webapps/

[root@localhost ~]# cd /usr/local/tomcat/webapps/

[root@localhost webapps]# ls

docs  examples  host-manager  jenkins  jenkins.war  manager  ROOT  test

[root@localhost webapps]# cd jenkins

[root@localhost jenkins]# ls

bootstrap             help                         LogFileOutputStream.class      META-INF

ColorFormatter.class  images                       Main.class                     robots.txt

css                   JNLPMain.class               MainDialog$1$1.class           scripts

dc-license.txt        jsbundles                    MainDialog$1.class             WEB-INF

executable            LogFileOutputStream$1.class  MainDialog.class               winstone.jar

favicon.ico           LogFileOutputStream$2.class  Main$FileAndDescription.class
//网站访问

lnmt的更多相关文章
- Tomcat相关的LNMT和LAMT
Tomcat相关的LNMT和LAMT LNMT:Linux Nginx MySQL Tomcat Client (http) --> nginx (reverse proxy)(http) -- ...
- Tomcat负载均衡、调优核心应用进阶学习笔记(三):LNMT nginx+tomcat、LAMT apache+tomcat、session会话保持、不错的站点
文章目录 LNMT nginx+tomcat LAMT apache+tomcat 基于mod_proxy 单节点 配置基于mod_proxy的负载均衡 基于mod_jk(需要编译安装) 单节点 配置 ...
- 09 . Nginx配置LNMP和LNMT架构
安装LNMP架构 环境清单 list CentOS7.3 proxysql-2.0.12-1-centos7.x86_64.rpm mysql-5.7.23-1.el7.x86_64.rpm-bund ...
- 手动部署LNMT(Nginx+Tomcat)并实现Nginx反向代理Tomcat
一.什么是Tomcat? 在弄清楚Tomcat之前要先了解什么是J2EE:从整体上讲,J2EE 是使用 Java 技术开发企业级应用的工业标准,它是 Java 技术不断适应和促进企业级应用过程中的产物 ...
- LNMT(Linux+Nginx+MySQL+Tomcat)常见性能参数调优
- 10.1、LNMT架构
Java环境安装包下载路径: https://www.oracle.com/technetwork/java/javase/downloads/jdk8-downloads-2133151.htm ...
- tomcat安装配置.md
tomcat 安装 安装jdk jdk我使用的是oracle的,如果下载请在oracle的官网上下载.或者你也可以使用openjdk,官网在http://openjdk.java.net/. # ta ...
- tomcat学习笔记2
LNMT在网站架构中的实现过程: Client --> http --> Nginx --> reverse_proxy (http) --> tomcat (http con ...
- PHP环境配置综合篇
1.WNMP: http://www.wnmp.com.cn/ En: https://www.getwnmp.org/ 2.xampp:https://www.apachefriends.o ...
随机推荐
- 使用SFTP连接Centos
1.centos已经配置好了SFTP,直接使用root用户连接就可以,模式选SFTP即可. 2.虽然端口号没有填写,默认端口号是22 3.可能还是会遇到无法访问的问题,可以进行iptables防火墙的 ...
- JS:JS中常见的 “函数名 is not a function” 错误
js中常见的错误,例如Uncaught TypeError: x is not a function 其原因除了函数本身有错之外,还有一种很奇怪的情况:函数本身没有错,但是运行时就是不能正常运行.这种 ...
- html无卡顿动画实现——requestAnimationFrame
<!DOCTYPE html> <html lang="en" xmlns="http://www.w3.org/1999/xhtml"> ...
- id、css命名规范
main热点:hot新闻:news下载:download子导航:subnav菜单:menu子菜单:submenu搜索:search友情链接:friendlink页脚:footer版权:copyrigh ...
- 为什么文件无法用wps打开,甚至wps.exe本身都无法打开?
原因: 我的wps.exe在目录 programme installation 中 如果我把目录改成 programmeInstallation 那么就会变成打不开的情况. 解决方法就是改回去. 怎么 ...
- ElementUI的Table-column_render-header自定义表头
ElementUI的Table表格,官方网站上提供了很多样式,但是在日常开发中还会碰到各种情况,显然官方提供的是不能满足需求的.那么,我们就根据自己的需求对table进行改造. 先丢出关于Table的 ...
- Unity踩坑记录
最近开始学习Unity,因为会一点儿C#,Delphi,Python,三种都是半桶水都算不上的级别. 首先排除了Python,其次delphi是我最喜欢的,奈何它目前我能了解到的引擎都很老了,dilp ...
- VMware安装centos7与配置网络
自己想搭建个虚机学习下k8s,使用VMware安装centos7,上不了网,折腾了很久才连上.发现网上很多教程都是错误的或者不明确的,这边写下自己的配置记录 首先安装centos7系统就不赘述了,这边 ...
- 曼孚科技:数据标注,AI背后的百亿市场
1. 两年前,来自山东农村的王磊成为了一位数据标注员.彼时的他,工作内容非常简单且枯燥:识别图片中人的性别. 然而,一段时间之后,他注意到分配给他的任务开始变得越来越复杂:从识别性别到年龄,从框选 ...
- java实现判断两个二叉树是否相同
1.定义树节点类:节点值.左节点.右节点.构造器 2.先判断树是否为空的情况 3.树不为空时,判断节点所指的值是否相等,若相等,则递归判断节点的左右节点是否相同,相同则返回true /** * Def ...