java架构之路-(dubbo专题)dubbo的基本使用
今天我们来说一下dubbo的基本使用,没有什么高阶的知识,真的超级简单易懂。
Dubbo核心功能解释
dubbo 阿里开源的一个SOA服务治理框架,从目前来看把它称作是一个RPC远程调用框架更为贴切。单从RPC框架来说,功能较完善,支持多种传输和序列化方案。所以想必大家已经知道他的核心功能了:就是远程调用。太多的理论知识我就不说了,这是他的官网http://dubbo.apache.org/en-us/,有时间的自己去看看吧,我们就直接上代码吧~!
基于代码的方式(最简单的实例)
先说一下我们的场景,就是我们有一个用户服务,对外提供一个接口,可以根据我们的用户ID来查找我们的用户对象,然后一个一个client服务想调用我们的用户服务的查找接口,就这么简单的一个例子我们来看一下。
首先加入我们的maven依赖
<!-- https://mvnrepository.com/artifact/org.apache.dubbo/dubbo -->

<dependency>

    <groupId>org.apache.dubbo</groupId>

    <artifactId>dubbo</artifactId>

    <version>2.7.3</version>

</dependency>
用户服务:
我们先建立一个用户对象,并且给予序列化,必须序列化,不然会报错,后面会说为什么需要实例化。
package com.simple.bean;

import java.io.Serializable;

public class UserBean implements Serializable {

    private Integer id;

    private String nama;

    private Integer age;

    public Integer getId() {

        return id;

    }

    public void setId(Integer id) {

        this.id = id;

    }

    public String getNama() {

        return nama;

    }

    public void setNama(String nama) {

        this.nama = nama;

    }

    public Integer getAge() {

        return age;

    }

    public void setAge(Integer age) {

        this.age = age;

    }

    @Override

    public String toString() {

        return "UserBean{" +

                "id=" + id +

                ", nama='" + nama + '\'' +

                ", age=" + age +

                '}';

    }

    public UserBean(Integer id, String nama, Integer age) {

        this.id = id;

        this.nama = nama;

        this.age = age;

    }

}
建立一个简单的UserService,并且给予实现类。
package com.simple.service;

import com.simple.bean.UserBean;

public interface UserService {

    UserBean getUserById(Integer id);

}
package com.simple.service;

import com.simple.bean.UserBean;

public class UserServiceImpl implements UserService {

    @Override

    public UserBean getUserById(Integer id) {

        return new UserBean(1, "张三", 18);

    }

}
前面都是准备工作,我们接下来看一下我们如何将我们的服务暴露出去,并给与其它服务调用。
package com.simple;

import com.simple.service.UserService;

import com.simple.service.UserServiceImpl;

import org.apache.dubbo.config.ApplicationConfig;

import org.apache.dubbo.config.ProtocolConfig;

import org.apache.dubbo.config.RegistryConfig;

import org.apache.dubbo.config.ServiceConfig;

import java.io.IOException;

public class ASimpleDubboServer {

    public static void main(String[] args) throws IOException {

        //开始暴露服务

        ApplicationConfig applicationConfig = new ApplicationConfig("simple-app");//设置服务名称

        ProtocolConfig protocolConfig = new ProtocolConfig();//远程调用配置

        protocolConfig.setName("dubbo");

        protocolConfig.setPort(-1);

        RegistryConfig registryConfig = new RegistryConfig(RegistryConfig.NO_AVAILABLE);//注册中心配置,RegistryConfig.NO_AVAILABLE为不使用注册中心

        ServiceConfig serviceConfig = new ServiceConfig();//设置服务

        serviceConfig.setInterface(UserService.class);//给予接口

        serviceConfig.setRef(new UserServiceImpl());//给予实例

        serviceConfig.setRegistry(registryConfig);

        serviceConfig.setProtocol(protocolConfig);

        serviceConfig.setApplication(applicationConfig);

        serviceConfig.export();

        System.out.println("服务已经暴露成功");

        System.in.read();//禁止程序运行结束

    }

}
我们再来看一下我们的调用端代码。
package com.simleclient;

import com.simple.service.UserService;

import org.apache.dubbo.config.ApplicationConfig;

import org.apache.dubbo.config.ReferenceConfig;

public class ASimleClientApplication {

    public static void main(String[] args) {

        ApplicationConfig applicationConfig = new ApplicationConfig("client-app");//设置服务名称,不一定要和服务端一致

        ReferenceConfig referenceConfig =  new ReferenceConfig();//设置实例配置

        referenceConfig.setApplication(applicationConfig);

        referenceConfig.setInterface(UserService.class);

        referenceConfig.setUrl("dubbo://192.168.138.1:20880/com.simple.service.UserService");//给予URL

        UserService userService = (UserService)referenceConfig.get();//开始调用

        System.out.println("userService.getUserById(1) = " + userService.getUserById(1));

    }

}
这里代码还是比较多的,比较复杂的,但是便于我们的理解和记忆。记住两个位置的关键代码。
①.服务端:ApplicationConfig、ProtocolConfig、RegistryConfig、ServiceConfig这四个是必须的。
②.调用方:ApplicationConfig、ReferenceConfig。
也不用背,后面的spring会简单很多,springBoot会更简单。我们先来看一下spring xml的配置方式是怎么做的。
Spring配置
首先,我们建立两个xml文件,一个是consumer.xml,一个是provide.xml。看一下具体的实现和上面的基本是一个道理的。
consumer.xml
<?xml version="1.0" encoding="UTF-8"?>

<beans xmlns="http://www.springframework.org/schema/beans"

       xmlns:xsi="http://www.w3.org/2001/XMLSchema-instance"

       xmlns:dubbo="http://dubbo.apache.org/schema/dubbo"

       xsi:schemaLocation="http://www.springframework.org/schema/beans http://www.springframework.org/schema/beans/spring-beans.xsd

       http://dubbo.apache.org/schema/dubbo http://dubbo.apache.org/schema/dubbo/dubbo.xsd">

    <dubbo:application name="spring-dubbo"/>

    <dubbo:registry address="N/A"/>

    <dubbo:reference id="userService" interface="com.spring.service.UserService" url="dubbo://127.0.0.1:20880"/>

</beans>
provide.xml
<?xml version="1.0" encoding="UTF-8"?>

<beans xmlns="http://www.springframework.org/schema/beans"

       xmlns:xsi="http://www.w3.org/2001/XMLSchema-instance"

       xmlns:dubbo="http://dubbo.apache.org/schema/dubbo"

       xsi:schemaLocation="http://www.springframework.org/schema/beans http://www.springframework.org/schema/beans/spring-beans.xsd

       http://dubbo.apache.org/schema/dubbo http://dubbo.apache.org/schema/dubbo/dubbo.xsd">

    <dubbo:application name="spring-dubbo"/>

    <dubbo:registry address="N/A"/>

    <dubbo:protocol name="dubbo" port="-1"/>

    <dubbo:service interface="com.spring.service.UserService" ref="userService"/>

    <bean id="userService" class="com.spring.service.UserServiceImpl"></bean>

</beans>
服务端启动类
package com.spring;

import org.springframework.context.support.ClassPathXmlApplicationContext;

import java.io.IOException;

public class SpringServer {

    public static void main(String[] args) throws IOException {

        new ClassPathXmlApplicationContext("provide.xml");

        System.in.read();

    }

}
请求类
package com.spring;

import com.spring.service.UserService;

import org.springframework.context.support.ClassPathXmlApplicationContext;

public class SpringClient {

    public static void main(String[] args) {

        ClassPathXmlApplicationContext context =

                new ClassPathXmlApplicationContext("consumer.xml");

        UserService userService = context.getBean(UserService.class);

        System.out.println(userService.getUserById(1));

    }

}
说完了源代码连接的方式,再来看spring的,简直超级简单的。每次启动会报出一个端口冲突的错误,别在意,会自动生成20880后面的端口,在启动时添加-Ddubbo.application.qos.enable=false参数即可。
springboot配置
①.添加依赖
<dependency>

    <groupId>org.apache.dubbo</groupId>

    <artifactId>dubbo-spring-boot-starter</artifactId>

    <version>2.7.4.1</version>

</dependency>
②.写注解,在启动类加入@EnableDubbo注解
package com.server;

import org.apache.dubbo.config.spring.context.annotation.EnableDubbo;

import org.springframework.boot.SpringApplication;

import org.springframework.boot.autoconfigure.SpringBootApplication;

@EnableDubbo

@SpringBootApplication

public class CDubboServerApplication {

    public static void main(String[] args) {

        SpringApplication.run(CDubboServerApplication.class, args);

        System.out.println("服务已开启");

    }

}
在你的服务给予sevice直接,注解需要引用dubbo包下的service,并且加入@Component引用为Bean
package com.server.service;

import com.server.bean.UserBean;

import org.apache.dubbo.config.annotation.Service;

import org.springframework.stereotype.Component;

@Component

@Service

public class UserServiceImpl implements UserService {

    @Override

    public UserBean getUserById(Integer id) {

        return new UserBean(1, "张三", 18);

    }

}
③.写配置
dubbo.application.name=bootServer

dubbo.registry.address=zookeeper://192.168.138.129:2181

dubbo.protocol.name=dubbo

dubbo.protocol.port=-1
调用方配置
dubbo.application.name=bootClient

dubbo.registry.address=zookeeper://192.168.138.129:2181
springboot比起spring来会更简单,接下来我们看一下一些高级的配置。
高级配置
这里的配置太多,太多了,我只挑几个用的比较多来说一下吧。
## 只引用服务,但不提供服务

dubbo.registry.register=false

## 调用方不会验证服务端是否启动,而持续重连

dubbo.registry.check=false
服务的分组和版本控制。
@Service(group = "",version = "")
如果调用失败,重试次数
@Service(group = "",version = "",retries = 2)
调用策略
@Service(group = "",version = "",retries = 2,loadbalance = "roundrobin")

//random=随机

//roundrobin=轮询

//leastactive=最少调用

//consistenthash=hash散列
超时时间
@Service(group = "",version = "",retries = 2,loadbalance = "roundrobin",timeout = 2000)
上述的配置也可以用配置文件来统一配置
dubbo.provider.version=

dubbo.provider.group=

dubbo.provider.loadbalance=

dubbo.provider.retries=

dubbo.provider.timeout=

## provider独有的线程数

dubbo.provider.threads=

## 线程模型

dubbo.provider.threadpool=

## fixed 固定

## cached 缓存

## limited

## eager
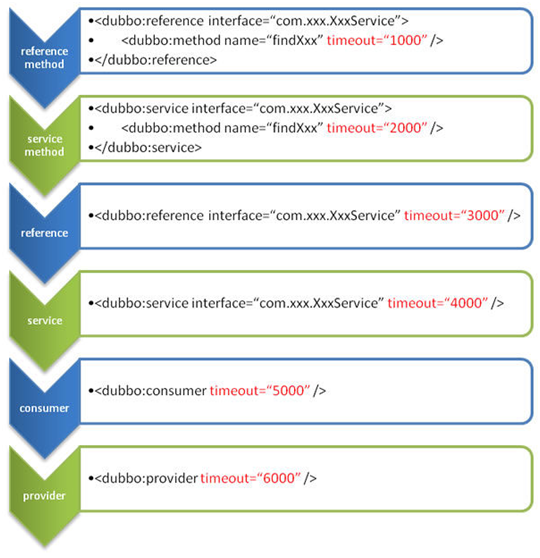
这些配置都是双向可配置的,就是说,服务方和调用方都可以配置的,一般的参数都是在服务端配置,在客户端使用,比如我们的超时时间,你配置了2秒钟,配置在服务端,你客户端也是需要遵循这个两秒钟超时时间的。
超时时间是按照
总结:
今天说了dubbo的基本使用和一些简单的配置,都是一些基础,还是很好理解的。
java架构之路-(dubbo专题)dubbo的基本使用的更多相关文章
- [转帖]java架构之路-(面试篇)JVM虚拟机面试大全
java架构之路-(面试篇)JVM虚拟机面试大全 https://www.cnblogs.com/cxiaocai/p/11634918.html 下文连接比较多啊,都是我过整理的博客,很多答案都 ...
- java架构之路-(netty专题)netty的基本使用和netty聊天室
上次回顾: 上次博客,我们主要说了我们的IO模型,BIO同步阻塞,NIO同步非阻塞,AIO基于NIO二次封装的异步非阻塞,最重要的就是我们的NIO,脑海中应该有NIO的模型图. Netty概念: Ne ...
- java架构之路-(Redis专题)Redis的主从、哨兵和集群
我们使用的redis,单机的绝对做不到高可用的,万一单机的redis宕机了,就没有备用的了,我们可以采用集群的方式来保证我们的高可用操作. 主从架构 大致就是这样的,一个主节点,两个从节点(一般两个就 ...
- java架构之路-(Redis专题)SpringBoot连接Redis超简单
上次我们搭建了Redis的主从架构,哨兵架构以及我们的集群架构,但是我们一直还未投入到实战中去,这次我们用jedis和springboot两种方式来操作一下我们的redis 主从架构 如何配置我上次已 ...
- java架构之路-(Redis专题)聊聊大厂那些redis
上几次说了redis的主从,哨兵,集群配置,但是内部的选举一直没说,先来简单说一下选举吧. 集群选举 redis cluster节点间采取gossip协议进行通信,也就是说,在每一个节点间,无论主节点 ...
- java架构之路-(Redis专题)redis面试助力满分+
1.Redis支持的数据类型? 答:五种,在第一节redis相关的博客我就说过,String,Hash,List,Set,zSet,也就是我们的字符串,哈希,列表,集合,有序集合五种.结构图如下. 2 ...
- java架构之路-(微服务专题)初步认识微服务与nacos初步搭建
历史演变: 以前我们都是一个war包,包含了很多很多的代码,反正我开始工作的时候做的就是这样的项目,一个金融系统,代码具体多少行记不清楚了,内部功能超多,但是实际能用到的不多,代码冗余超大,每次部署大 ...
- java架构之路-(MQ专题)RabbitMQ安装和基本使用
RabbitMQ安装 我这里安装是使用阿里云的CentOS7.5来安装的,使用CentOS版本低于7的可能会报错. 1.安装rabbitmq所需要的依赖包 输入$ yum install build- ...
- java架构之路-(MQ专题)RocketMQ从入坑到集群详解
这次我们来说说我们的RocketMQ的安装和参数配置,先来看一下我们RocketMQ的提出和应用场景吧. 早在2009年,阿里巴巴的淘宝第一次提出了双11购物狂欢节,但是在2009年,服务器无法承受到 ...
随机推荐
- MCLS Notes
MainToolbar View Button Click Event handle àMainToolbar.xaml.cs OnConnect() functionàService.Messeng ...
- 微软 的 github的 weiapi dotnet的 也有了 作为菜 只有欣赏的额
step one 猛戳 dotnet-apiweb
- Python学习,第四课 - 字符串相关操作
这次主要说说Python中字符串的使用方法详解 capitalize 首字母大写 print('chengshou'.capitalize()) #输出结果:Chengshou title 修改成标题 ...
- MAVEN报错Cannot access alimaven / idea data注解不好使
BUG 记录 报错页面的代码和截图: Cannot access alimaven (maven.aliyun.com/nexus/conte…..... 解决方法: 报错页面的代码和截图: JAR ...
- 关于DockerFile组件,java8新特性的AWT组件,
前段时间由于公司业务开发了App产品,产品用CocosCreator打出来的App, 用的时候,发现获取验证码,获取不到值,折腾了几天,一开始欢迎安装的jdk有问题,但是几次验证不是jdk的问题, 最 ...
- Spring初识、新建工程
1.spring与三层架构的关系: spring负责管理项目中的所有对象,是一个一站式的框架,容器中的对象决定了spring的功能. 2.spring核心架构 Spring框架主要由六个模块组成,在开 ...
- hive安装启动错误总结
错误一: Exception in thread "main" java.lang.NoClassDefFoundError: jline/console/completer/Ar ...
- C++ 中库函数bsearch的简单研究(含示例)
/**//*bsearch函数声明如下: void *bsearch(const void *key, const void *base, size_t *nelem, ...
- 在4K屏下以超过VMWare默认的最高分辨率运行Linux系统
前言 4K 屏,有其优点也有其弊端.优点就是分辨率高,字体和图标看起来如丝一般顺滑:缺点就是字体和图标小,费眼睛.解决这个缺点的方法也很简单粗暴,就是将系统的显示比例放大.在高分屏不很普及的时候,无论 ...
- 使用stringstream打破字符与其他类型之间的隔阂
考虑这样一个问题:给您一行各位数字,计算它们的和.数字之间用空格隔开.只能使用字符串. 一般考虑使用getchar,但这对于不熟悉 ASCLL 码的同学十分困难.C++的sstream头文件中提供了十 ...