
RemoteViews 整理
前言
RemoteViews表面意思就是远程的view,这个就很难理解了,远程的view。但是英语是抽象,remote本身就是偏僻的,偏远的意思。
所以remoteViews 就是地方view,天高皇帝远,要管理地方的view就需要下达圣旨了。
用途:一般就是通知栏与桌面小部件。
通知栏好理解,微信通知经常见到。
桌面小部件,这个无论是苹果还是按照,都有这个东西。
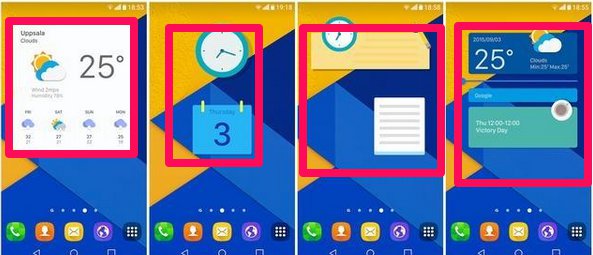
这些就是系统自带的,然后我们也可以自己开发,但是这东西用的并不多,也有特定的app专门做这个,可以把桌面定制的吊炸天。
正文
如果说起这个remoteView,就必须提到一个巡按,这个巡按的名字就叫做pendingIntent。古时候,有些君主会留一个巡按在某一个地方,如果发生了一些大事,就要禀报一下。
remoteView 天高皇帝远,皇帝就要派一个自己人去体察民情,反馈和禀报。因为无法通过findViewById去直接控制地方,所以呢,当remoteView去上任的时候呢,一般都会带上pendingIntent。
pendingIntent 走的时候呢,一般要带上一个intent。比如皇帝派下去一个pendingIntent 和 remoteView 去上任,remoteView 年轻力壮,怕自己不在了,所以走得时候下了一封密旨给pendingIntent。
当用户点击的时候,pendingIntent就带上intent发给中央,留下老皇帝触发用户点击通知栏事件后续要做的事情,大概就是这么一个理。
notification
remoteView 其中一个应用就是通知栏。在通知栏的api(android 不同版本有不同的api,比如说android4.4的api就是19)中,因为api的变换,导致了需要根据不同版本去书写不同的code,美其名曰:兼容。
简单的通知就是这样:
public void createNotify(View view) {

	Intent resultIntent = new Intent(this, MainActivity.class);

	TaskStackBuilder stackBuilder = TaskStackBuilder.create(this);

	stackBuilder.addParentStack(MainActivity.class);

	stackBuilder.addNextIntent(resultIntent);

	PendingIntent resultPendingIntent = stackBuilder.getPendingIntent(0, PendingIntent.FLAG_UPDATE_CURRENT);

	NotificationManager notificationManager = (NotificationManager)getSystemService(Context.NOTIFICATION_SERVICE);

        /*

	 使用Builder构造器来创建Notification对象

	*/

	Notification notification = new NotificationCompat.Builder(this, "defult")

			//指定通知的标题内容

			.setContentTitle("Hello Word")

			//设置通知的内容

			.setContentText("This is just text")

			//指定通知被创建的时间

			.setWhen(System.currentTimeMillis())

			//设置通知的小图标

			.setSmallIcon(R.drawable.ic_launcher_foreground)

			//设置通知的大图标

			.setLargeIcon(BitmapFactory.decodeResource(getResources(), R.drawable.ic_launcher_background))

			//添加点击跳转通知跳转

			.setContentIntent(resultPendingIntent)

			//实现点击跳转后关闭通知

			.setAutoCancel(true)

			.build();

			//id 固定只能是通知到这个通知块,可更新

			notificationManager.notify(1, notification);

}
效果:
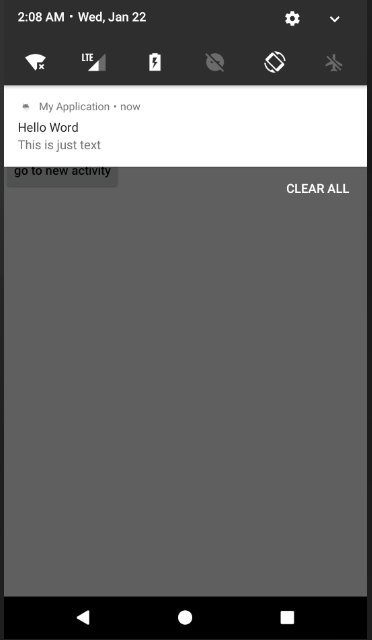
然后定制是这样的:
我们需要制定界面:
<?xml version="1.0" encoding="utf-8"?>

<LinearLayout

    xmlns:android="http://schemas.android.com/apk/res/android"

    android:layout_width="match_parent"

    android:layout_height="80dp"

    >

    <ImageView

        android:layout_width="80dp"

        android:layout_height="match_parent"

        android:id="@+id/icon"

        android:src="@color/colorPrimary"

        />

    <LinearLayout

        android:layout_width="match_parent"

        android:layout_height="match_parent"

        android:orientation="vertical"

        >

        <TextView

            android:layout_width="match_parent"

            android:layout_height="wrap_content"

            android:text="title"

            android:textSize="20dp"

            android:id="@+id/title"

            android:layout_marginLeft="20dp"

            android:gravity="center|left"

            />

        <TextView

            android:layout_width="match_parent"

            android:layout_height="match_parent"

            android:text="content"

            android:textSize="18dp"

            android:id="@+id/content"

            android:layout_marginLeft="40dp"

            android:gravity="center|left"

            />

    </LinearLayout>

</LinearLayout>
然后通过remoteViews 来建立他们之间的沟通。
其实简单来说,我们的通知消息就是一个app,通过remoteViews 实现了我们app和通知栏app之间的沟通。
下面是实现code:
public void createCustomNotify(View view) {

	Intent resultIntent = new Intent(this, MainActivity.class);

	TaskStackBuilder stackBuilder = TaskStackBuilder.create(this);

	stackBuilder.addParentStack(MainActivity.class);

	stackBuilder.addNextIntent(resultIntent);

	PendingIntent resultPendingIntent = stackBuilder.getPendingIntent(0, PendingIntent.FLAG_UPDATE_CURRENT);

	NotificationManager notificationManager = (NotificationManager)getSystemService(Context.NOTIFICATION_SERVICE);

   /*

	 使用Builder构造器来创建Notification对象

	*/

	RemoteViews remoteView =new RemoteViews(getPackageName(),R.layout.notification_layout);

	remoteView.setImageViewResource(R.id.icon,R.drawable.ic_launcher_foreground);

	remoteView.setTextViewText(R.id.title,"标题");

	remoteView.setTextViewText(R.id.content,"内容");

	Notification notification = new NotificationCompat.Builder(this, "defult")

			.setContent(remoteView)

			//指定通知被创建的时间

			.setWhen(System.currentTimeMillis())

			//设置通知的小图标

			.setSmallIcon(R.drawable.ic_launcher_foreground)

			//设置通知的大图标

			.setLargeIcon(BitmapFactory.decodeResource(getResources(), R.drawable.ic_launcher_background))

			//添加点击跳转通知跳转

			.setContentIntent(resultPendingIntent)

			.setShowWhen(true)

			//实现点击跳转后关闭通知

			.setAutoCancel(true)

			.build();

	//id 固定只能是通知到这个通知块,可更新

	notificationManager.notify(2, notification);

}
效果:
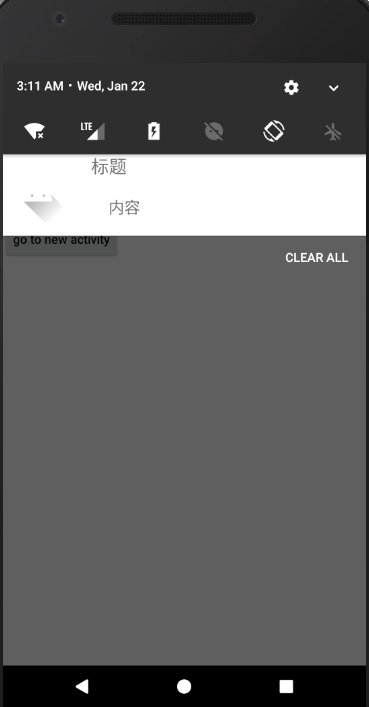
非常不好看哈。
如果是这样的自定义,只是界面上的花哨,我们可以点击图片后然后执行一些东西这样才能体现定义。
remoteViews 比如说通知通过intent,然后会用startActivity 去执行intent,所以打开了。
然后同样自定义的同样可以通过intent,在这里,假如自定义layout上有多个的事件,单纯去startActivity效果就无法实现了。
但是如果我们能监听到这个intent那么很多问题就简单了。
创建广播监听:
public class myBroadcastReceiver extends BroadcastReceiver {

    public  static  final  String actionImage="imageCallback";

    @Override

    public void onReceive(Context context, Intent intent) {

        String action = intent.getAction();

        if (actionImage.equals(actionImage))

        {

            Toast.makeText(context,"do this",Toast.LENGTH_SHORT).show();

        }

    }

}
然后再去创建监听:
private void init()

{

	myBroadcastReceiver = new myBroadcastReceiver();

	IntentFilter intentFilter = new IntentFilter(myBroadcastReceiver.actionImage);

	registerReceiver(myBroadcastReceiver, intentFilter);

}
最后只有设置绑定,也就是说用户点击某些事件后。
    public void createCustomNotify(View view) {

        Intent resultIntent = new Intent(this, MainActivity.class);

        TaskStackBuilder stackBuilder = TaskStackBuilder.create(this);

        stackBuilder.addParentStack(MainActivity.class);

        stackBuilder.addNextIntent(resultIntent);

        PendingIntent resultPendingIntent = stackBuilder.getPendingIntent(0, PendingIntent.FLAG_UPDATE_CURRENT);

        NotificationManager notificationManager = (NotificationManager)getSystemService(Context.NOTIFICATION_SERVICE);

       /*

         使用Builder构造器来创建Notification对象

        */

        RemoteViews remoteView =new RemoteViews(getPackageName(),R.layout.notification_layout);

        remoteView.setImageViewResource(R.id.icon,R.drawable.ic_launcher_foreground);

        remoteView.setTextViewText(R.id.title,"标题");

        remoteView.setTextViewText(R.id.content,"内容");

        Intent imageIntent=new Intent(myBroadcastReceiver.actionImage);

        PendingIntent imagePintent=PendingIntent.getBroadcast(this,0,imageIntent,0);

        remoteView.setOnClickPendingIntent(R.id.icon,imagePintent);

        Notification notification = new NotificationCompat.Builder(this, "defult")

                .setContent(remoteView)

                //指定通知被创建的时间

                .setWhen(System.currentTimeMillis())

                //设置通知的小图标

                .setSmallIcon(R.drawable.ic_launcher_foreground)

                //设置通知的大图标

                .setLargeIcon(BitmapFactory.decodeResource(getResources(), R.drawable.ic_launcher_background))

                //添加点击跳转通知跳转

                .setContentIntent(resultPendingIntent)

                .setShowWhen(true)

                //实现点击跳转后关闭通知

                .setAutoCancel(true)

                .build();

        //id 固定只能是通知到这个通知块,可更新

        notificationManager.notify(2, notification);

    }
关键部分就是:
// 实例化一个intent

Intent imageIntent=new Intent(myBroadcastReceiver.actionImage);

// 绑定intent,并且以广播的形式执行

PendingIntent imagePintent=PendingIntent.getBroadcast(this,0,imageIntent,0);

// 在icon 点击的时候触发

remoteView.setOnClickPendingIntent(R.id.icon,imagePintent);
效果:
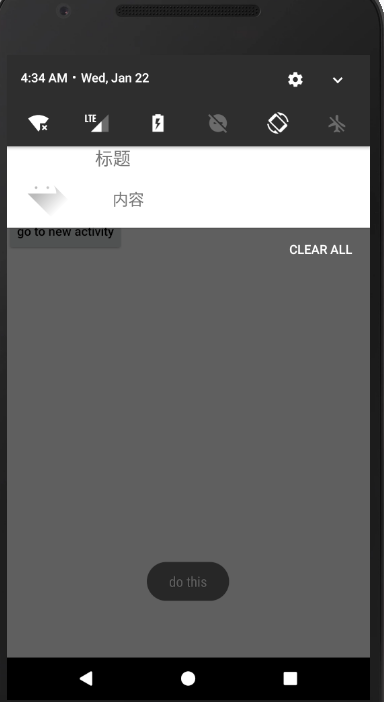
总之就是这个套路了,但是到了android 8 套路就换了,多了一个notificationChannel。
notificationChannel 这个东西用来做啥的呢?
我理解是频道的意思,比如说通知,用户可以更好的管理,接收还是不接受通知。
这东西就是来管理通知的,以前通知过于分散,设置一个id就是一个通知,然后用户不想要要一个一个去取消,同样开发者也麻烦。
    @RequiresApi(api = Build.VERSION_CODES.O)

    public void createNotificationChannel(String id, String name, int importance, String desc, String groupId) {

        if (mNotificationManager.getNotificationChannel(id) != null) return;

        NotificationChannel notificationChannel = new NotificationChannel(id, name, importance);

        notificationChannel.enableLights(true);

        notificationChannel.enableVibration(true);

        notificationChannel.setLightColor(Color.RED);

        notificationChannel.setLockscreenVisibility(Notification.VISIBILITY_PRIVATE);

        notificationChannel.setShowBadge(true);

        notificationChannel.setBypassDnd(true);

        notificationChannel.setVibrationPattern(new long[]{100, 200, 300, 400});

        notificationChannel.setDescription(desc);

        notificationChannel.setGroup(groupId);

//      notificationChannel.setSound();

        mNotificationManager.createNotificationChannel(notificationChannel);

    }
上述中关键部分就两个一个是创建:
NotificationChannel notificationChannel = new NotificationChannel(id, name, importance);

mNotificationManager.createNotificationChannel(notificationChannel);
然后加入进去。中间的基本都是设置了,比如设置分为一个组setGroup,给一些描述setDescription等,必须这个id 注册后才能用于通知中。
Notification notification = new NotificationCompat.Builder(this, "defult")
上面这个defult设置为上面注册的id就行。
然后还有一个关键点:
Notification notification = new NotificationCompat.Builder(this, "defult")
可以设置角标,这就非常好了。在android 我们看到很少有应用可以有角标,基本上看到的只有qq,微信这些霸主才可以。实际上android 系统本身并没有开发,到了8才开发,但是腾讯和这些手机商有一些XXX,所以能拿到手机应用的角标。
到了8后,就不需要了,google本身就支持了。
总结
RemoteViews 不是一种远程view,而是一种远程控制view的方式。
RemoteViews 整理的更多相关文章
- dotNET跨平台相关文档整理
一直在从事C#开发的相关技术工作,从C# 1.0一路用到现在的C# 6.0, 通常情况下被局限于Windows平台,Mono项目把我们C#程序带到了Windows之外的平台,在工作之余花了很多时间在M ...
- UWP学习目录整理
UWP学习目录整理 0x00 可以忽略的废话 10月6号靠着半听半猜和文字直播的补充看完了微软的秋季新品发布会,信仰充值成功,对UWP的开发十分感兴趣,打算后面找时间学习一下.谁想到学习的欲望越来越强 ...
- SQL Server 常用内置函数(built-in)持续整理
本文用于收集在运维中经常使用的系统内置函数,持续整理中 一,常用Metadata函数 1,查看数据库的ID和Name db_id(‘DB Name’),db_name('DB ID') 2,查看对象的 ...
- kafka学习笔记:知识点整理
一.为什么需要消息系统 1.解耦: 允许你独立的扩展或修改两边的处理过程,只要确保它们遵守同样的接口约束. 2.冗余: 消息队列把数据进行持久化直到它们已经被完全处理,通过这一方式规避了数据丢失风险. ...
- JAVA程序员常用软件整理下载
********为了大家学习方便,特意整理软件下载如下:*************Java类软件:-------------------------------JDK7.0:http://pan.ba ...
- js数组学习整理
原文地址:js数组学习整理 常用的js数组操作方法及原理 1.声明数组的方式 var colors = new Array();//空的数组 var colors = new Array(3); // ...
- GJM : C#设计模式汇总整理——导航 【原创】
感谢您的阅读.喜欢的.有用的就请大哥大嫂们高抬贵手"推荐一下"吧!你的精神支持是博主强大的写作动力以及转载收藏动力.欢迎转载! 版权声明:本文原创发表于 [请点击连接前往] ,未经 ...
- 整理下.net分布式系统架构的思路
最近看到有部分招聘信息,要求应聘者说一下分布式系统架构的思路.今天早晨正好有些时间,我也把我们实际在.net方面网站架构的演化路线整理一下,只是我自己的一些想法,欢迎大家批评指正. 首先说明的是.ne ...
- 安卓GreenDao框架一些进阶用法整理
大致分为以下几个方面: 一些查询指令整理 使用SQL语句进行特殊查询 检测表字段是否存在 数据库升级 数据库表字段赋初始值 一.查询指令整理 1.链式执行的指令 return mDaoSession. ...
随机推荐
- P4075 [SDOI2016]模式字符串
总结 P4075 [SDOI2016]模式字符串 题目描述 给出n个结点的树结构T,其中每一个结点上有一个字符,这里我们所说的字符只考虑大写字母A到Z,再给出长度为m的模式串s,其中每一位仍然是A到z ...
- WPF 释放嵌入资源
资源文件名称:默认命名空间.文件名 || 默认命名空间.文件夹名.文件名 /// <summary> /// 提取文件 /// </summary> /// <param ...
- Android studio中修改xml文件无效问题
昨天遇到的这个问题,在修改布局xml文件后保存,但运行时布局却并没有被修改,也就是说我的修改无效,今天参照了这篇文章中的方法终于解决了: https://blog.csdn.net/l_o_s/art ...
- 跨站请求伪造(Cross-site request forgery), 简称为 XSRF
跨站请求伪造(Cross-site request forgery), 简称为 XSRF,是 Web 应用中常见的一个安全问题.前面的链接也详细讲述了 XSRF 攻击的实现方式. 当前防范 XSRF ...
- Cloud开发动态列的简单账表
业务场景:客户需要根据过滤条件的不同显示不同的列.如下方式可以实现动态的列名. using System;using System.Collections.Generic;using System.L ...
- 9Front fqa 目录
9Front System 9Front 常见问答(fqa) 注意! 9front dash1 手册是由 9front 用户编写的. 这些用户有能做的,有不能写的:那些不能写的写了这本电子杂志.-- ...
- C#中怎样在ToolStripMenuItem下再添加子级菜单
场景 在右键菜单ContextMenuStrip下添加子菜单选项可以通过 ContextMenuStrip menuStrip ToolStripMenuItem mnuChartOption = n ...
- laravel中{{}}和{!! !!}的区别
1.{{}}和{!! !!} 中{{}}支持转义 一段html代码只是被当成普通的字符串输出 ,{!! !!} 不支持转移 一段html代码可以被正常的解析 1.2具体什么意思呢我们上代码演 ...
- R语言函数化编程笔记2
R语言函数化编程笔记2 我学过很多的编程语言,可以我写的代码很啰嗦,一定是我太懒了.或许是基础不牢地动山摇 1.为什么要学函数 函数可以简化编程语言,减少重复代码或者说面向对象的作用 2.函数 2.1 ...
- 2020牛客寒假算法基础集训营1 I-nico和niconiconi
#include <bits/stdc++.h> #define dbg(x) cout << #x << "=" << x < ...