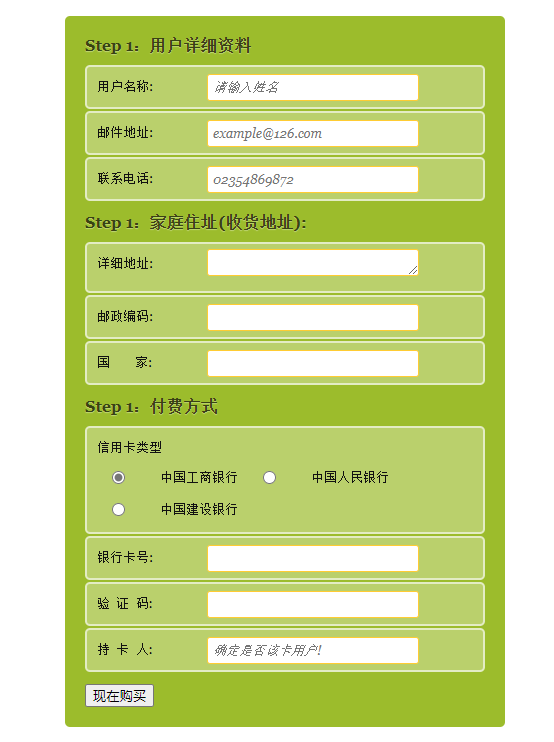
表单设计——《HTML5 CSS3从入门到精通》

<!DOCTYPE html>

<html lang="en">

<head>

    <meta charset="UTF-8">

    <meta name="viewport" content="width=device-width, initial-scale=1.0">

    <title>表单设计</title>

    <style type="text/css">

        html,body,h1,form,fieldset,legend,ol,li{

            margin:0px;

            padding:0px;

        }

        body{

            background: #fff;

            color:#111;

            font-family: Georgia, 'Times New Roman', Times, serif;

            padding:20px;

        }

    form#payment{

        background: #9cbc2c;

        border-radius: 5px;

        padding: 20px;

        width:400px;

        margin:0 auto;

    }

    form#payment fieldset{

        border:none;

        margin-bottom: 10px;

    }

    form#payment fieldset:last-of-type{

        margin-bottom: 0px;

    }

    form#payment legend{

        color:#384313;

        font-size: 16px;

        font-weight: bold;

        padding-bottom: 10px;

        text-shadow: 0 1px 1px #c0d576;

    }

    form#payment>fieldset>legend:before{

        counter-increment: fieldsets;

        content:"Step "counter(fieldsets)":";

    }

    form#payment fieldset fieldset legend{

        color:#111;

        font-size:13px;

        font-weight: normal;

        padding-bottom: 0;

    }

    form#payment ol li{

        background:#b9cf6a;

        background: rgba(255,255,255,.3);

        border-color:#e3ebc3;

        border-color:rgba(255,255,255,.6);

        border-style:solid;

        border-width: 2px;

        border-radius: 5px;

        line-height: 30px;

        list-style:none;

        padding:5px 10px;

        margin-bottom:2px;

    }

    form#payment ol ol li{

        background: none;

        border:none;

        float:left;

    }

    form#payment label{

        float:left;

        font-size:13px;

        width:110px;

    }

    form#payment fieldset fieldset label{

        background: none no-repeat left 50%;

        line-height: 20px;

        padding:0 0 0 30px;

        width:auto;

    }

    form#payment fieldset fieldset label:hover{

        cursor:pointer;

    }

    form#payment input:not([type=radio]),form#payment textarea{

        background: #fff;

        border:#fc3 solid 1px;

        border-radius: 3px;

        font:italic 13px Georgia,"Times New Roman",Times,serif;

        outline:none;

        padding:5px;

        width:200px;

    }

    form#payment input:not([type=submit]):focus,form#payment textarea:focus{

        background:#eaeaea;

        border:#f00 solid 1px;

    }

    form#payment input[type="radio"]{

        float:left;

        margin-right: 5px;

    }

    </style>

</head>

<body>

    <form action="" id="payment">

        <fieldset>

            <legend>用户详细资料</legend>

            <ol>

                <li>

                    <label for="name">用户名称:</label>

                    <input type="text" id="name" name="name" placeholder="请输入姓名" required  autofocus>

                </li>

                <li>

                    <label for="email">邮件地址:</label>

                    <input type="email" id="email" name="email" placeholder="example@126.com" required  autofocus>

                </li>

                <li>

                    <label for="tel">联系电话:</label>

                    <input type="tel" id="tel" name="tel" placeholder="02354869872" required  autofocus>

                </li>

            </ol>

        </fieldset>

        <fieldset>

            <legend>家庭住址(收货地址):</legend>

            <ol>

                <li>

                    <label for="address">详细地址:</label>

                    <textarea name="address" id="address" rows="1" required></textarea>

                </li>

                <li>

                    <label for="postcode">邮政编码:</label>

                    <input type="text" id="postcode" name="postcode" required>

                </li>

                <li>

                    <label for="country">国        家:</label>

                    <input type="text" id="country" name="country" required>

                </li>

            </ol>

        </fieldset>

        <fieldset>

            <legend>付费方式</legend>

            <ol>

                <li>

                    <fieldset>

                        <legend>信用卡类型</legend>

                        <ol>

                            <li>

                                <input type="radio" id="visa" name="cardtype">

                                <label for="visa">中国工商银行</label>

                            </li>

                            <li>

                                <input type="radio" id="amex" name="cardtype">

                                <label for="amex">中国人民银行</label>

                            </li>

                            <li>

                                <input type="radio" id="mastercard" name="cardtype">

                                <label for="mastercard">中国建设银行</label>

                            </li>

                        </ol>

                    </fieldset>

                </li>

                <li>

                    <label for="cardnumber">银行卡号:</label>

                    <input type="number" required  id="cardnumber" name="cardnumber">

                </li>

                <li>

                    <label for="secure">验  证  码:</label>

                    <input type="number" required  id="secure" name="secure" required>

                </li>

                <li>

                    <label for="namecard">持  卡  人:</label>

                    <input type="text" required  id="namecard" name="namecard" placeholder="确定是否该卡用户!">

                </li>

            </ol>

        </fieldset>

        <fieldset>

            <button type="submit">现在购买</button>

        </fieldset>

    </form>

</body>

</html>
form#payment>fieldset>legend:before{
counter-increment: fieldsets; content:"Step "counter(fieldsets)":"; }表单设计——《HTML5 CSS3从入门到精通》的更多相关文章
- HTML5+CSS3从入门到精通随书光盘 ISO 镜像视频教程
HTML5+CSS3从入门到精通(清华社“视频大讲堂”大系)通过基础知识+中小实例+综合案例的方式,讲述了用HTML5+ CSS3设计构建网站的必备知识,相对于权威指南.高级程序设计.开发指南同类图书 ...
- HTML5+CSS3从入门到精通 中文pdf版
HTML5+CSS3从入门到精通是通过基础知识+中小实例+综合案例的方式,讲述了用HTML5+ CSS3设计构建网站的必备知识,相对于专业指南.高级程序设计.开发指南同类图书,本书是一本适合快速入手的 ...
- 2019.4.25 表格表单与HTML5 && CSS3
目录 表格 标签 属性 表格间距离 表格的内边距 表格的边框 样式 边框合并 行合并 列合并 display 表单 标签 属性 提交的网址 请求方式 input相关 扩大响应范围 字符 密码 单选框 ...
- HTML5 & CSS3编程入门经典 ((美)Rob Larsen) pdf扫描版
HTML和CSS是构建网页所需要了解的两种核心编程语言,拉尔森编著的这本<HTML5&CSS3编程入门经典>详细介绍了这两种语言. <HTML5&CSS3编程入门经典 ...
- UX设计秘诀之注册表单设计,细节决定成败
以下内容由摹客团队翻译整理,仅供学习交流,摹客iDoc是支持智能标注和切图的产品协作设计神器. 说实话,现实生活中,又有多少人会真正喜欢填写表格?显然,并不多.因为填写表单这样的网页或App服务,并非 ...
- 表单和HTML5
1.form表单 <form action="" method=""> </form> action: 规定当提交表单时,向何处发送表单 ...
- SpreadJS V13.0发布,聚焦表单设计与数据交互,让您的工作效率突飞猛进!
纯前端表格控件SpreadJS,是一款成功应用于华为.招商银行.天弘基金.苏宁易购等国内外知名企业的前端开发工具,其带来的价值不仅体现在帮助开发人员在其Web应用程序中快速构建 Web Excel . ...
- JQ表单选择器和CSS3表单选择器
JQ表单选择器和CSS3表单选择器 JQ表单选择器 为了使用户能够更加灵活地操作表单,jQuery中加入了表单选择器,利用这个选择器能极其方便的获取到表单的某个或者某类型的元素.表单选择器的介绍如图: ...
- HTML表单设计(上)
1,表单标记<form>...</form> <form>...</form>定义表单的开始位置和结束位置,表单提交时的内容就是<form> ...
- SNF软件开发机器人-子系统-表单-表单设计
表单设计 在我们做程序时总要对表单的内容进行设计,然而对控件位置等信息的调整总是麻烦的,还常常容易出错.SNF软件机器人完美的解决了这个问题. 1.效果展示: 2.使用说明: (1)打开页面,选中开发 ...
随机推荐
- 鸿蒙HarmonyOS实战-ArkUI组件(Popup)
一.Popup Popup组件通常用于在屏幕上弹出一个对话框或者浮动窗口.这个组件通常和其他组件一起用于用户界面的交互和反馈. Popup组件可以包含任何类型的组件或内容,比如文本.按钮.输入框.图片 ...
- Mysql之GTID
一.GTID Mysql5.6引入GTID(Global Transaction IDs),多线程复制: 由服务器的UUID和事务ID号组成唯一标识某一个主机的某个事务的ID号: 每一个事务首部都有G ...
- centos8 \CentOS 9 Stream rpm 安装mysql8.0.28
centos8 rpm 安装mysql8.0.28 检查 检测系统是否自带安装 MySQL 命令如下: rpm -qa | grep mysql 如果如下存在已安装的包,就需要卸载 mysql80-c ...
- ImportError: Cannot load backend 'TkAgg' which requires the 'tk' interactive framework, as 'headless' is currently running
MMdetection多卡训练常遇到的两个错误,百度无果,没解决,去github里mmdetection的issue模块搜索了一下找到正解. 这里记录一下,方便后者. 1️⃣ ImportError: ...
- 如何实现数据库数据到Abp vnext实体对象的同步?以及代码生成工具
在采用了EF Core的Code First方式下,如果你在数据库中直接添加了新表或存储过程,你需要在项目代码中手动反向工程这些数据库的更改,以保持Code First的代码与数据库同步.这种情况可以 ...
- 痞子衡嵌入式:在i.MXRT1xxx系列上用NAND型启动设备时可用两级设计缩短启动时间
大家好,我是痞子衡,是正经搞技术的痞子.今天痞子衡给大家分享的是在i.MXRT1xxx系列上用NAND型启动设备时可用两级设计缩短启动时间. 去年痞子衡写过一篇骚操作文章 <借助i.MXRT10 ...
- MD5前端vue加密
Vue 前端md5加密用户注册时将加密后的密码发送给后端存储当登陆的时候,再将加密后的密码和数据库中加密的密码相匹配.npm: https://www.npmjs.com/package/crypto ...
- 力扣904(Java)-水果成篮(中等)
题目: 你正在探访一家农场,农场从左到右种植了一排果树.这些树用一个整数数组 fruits 表示,其中 fruits[i] 是第 i 棵树上的水果 种类 . 你想要尽可能多地收集水果.然而,农场的主人 ...
- 力扣419(java)-甲板上的战舰(中等)
题目: 给你一个大小为 m x n 的矩阵 board 表示甲板,其中,每个单元格可以是一艘战舰 'X' 或者是一个空位 '.' ,返回在甲板 board 上放置的 战舰 的数量. 战舰 只能水平或者 ...
- 力扣168(java)-Excel表列名称(简单)
题目: 给你一个整数 columnNumber ,返回它在 Excel 表中相对应的列名称. 例如: A -> 1B -> 2C -> 3...Z -> 26AA -> ...
