Android 自定义带动画的柱状图
功能分析
假设要使用柱状图展示用户一周的数据,通用的做法是对接三方图表SDK或者自己通过代码绘制。
1、三方SDK通常包体较大,且定制性差,对特定的UI需求兼容性差;
2、自己绘制,比较复杂,而且要考虑各种兼容适配;
今天,我们使用一种简单的方式,来制作柱状图,不仅代码简单,而且支持UI样式、动画自定义,更难得的是可以自由扩展
如何实现?
另辟蹊径。
统计图表里,无非就是一个个表示数据的柱子而已。根据数值的大小,展示不同的高度柱子即可。
我们可使用ProgressBar组件表示柱子,其progress值对应实际的数值大小;
然后根据真实数据条数,创建对应数量的ProgressBar组件,加入到容器组件中,就可以实现柱状图了。
1. 自定义柱子
ProgressBar通常只有横向线条、圆圈样式,没有垂直的样式。
查看其样式源码,不难发现,progressDrawable是用来绘制进度条的,其实现是个layer-list
<style name="Widget.ProgressBar.Horizontal">

        <item name="indeterminateOnly">false</item>

        <item name="progressDrawable">@drawable/progress_horizontal</item>

        <item name="indeterminateDrawable">@drawable/progress_indeterminate_horizontal</item>

        <item name="minHeight">20dip</item>

        <item name="maxHeight">20dip</item>

        <item name="mirrorForRtl">true</item>

</style>
<layer-list xmlns:android="http://schemas.android.com/apk/res/android">

    <item android:id="@android:id/background">

    ...
据此,我们完全可自定义progressDrawable,来实现纵向线条绘制,里面也可任意定义线条的颜色等样式属性。
下面,我们制作两种纵向线条绘制drawable:
progress_vertical_shade_drawable.xml 【案例中深色线条样式,用于表示数值较大的线条效果。请在顶部gif图上查看】
<?xml version="1.0" encoding="utf-8"?>

<layer-list xmlns:android="http://schemas.android.com/apk/res/android">

    <item android:id="@android:id/background">

        <shape>

            <solid android:color="#00E3DBF0" />

            <corners

                android:bottomLeftRadius="0dp"

                android:bottomRightRadius="0dp"

                android:topLeftRadius="0dp"

                android:topRightRadius="0dp" />

        </shape>

    </item>

    <item android:id="@android:id/progress">

        <scale

            android:scaleWidth="0%"

            android:scaleHeight="100%"

            android:scaleGravity="bottom">

            <shape>

                <!--这里是设置填充颜色和方向-->

                <gradient

                    android:angle="270"

                    android:endColor="#D2D1E6"

                    android:centerColor="#C0B3EA"

                    android:startColor="#C0B3EA"

                    android:type="linear" />

                <corners

                    android:bottomLeftRadius="8dp"

                    android:bottomRightRadius="8dp"

                    android:topLeftRadius="8dp"

                    android:topRightRadius="8dp" />

            </shape>

        </scale>

    </item>

</layer-list>
progress_vertical_tint_drawable.xml【案例中浅色线条样式,用于表示数值较小的线条效果。请在顶部gif图上查看】
<?xml version="1.0" encoding="utf-8"?>

<layer-list xmlns:android="http://schemas.android.com/apk/res/android">

    <item android:id="@android:id/background">

        <shape>

            <solid android:color="#00E3DBF0" />

            <corners

                android:bottomLeftRadius="0dp"

                android:bottomRightRadius="0dp"

                android:topLeftRadius="0dp"

                android:topRightRadius="0dp" />

        </shape>

    </item>

    <item android:id="@android:id/progress">

        <scale

            android:scaleWidth="0%"

            android:scaleHeight="100%"

            android:scaleGravity="bottom">

            <shape>

                <!--这里是设置填充颜色和方向-->

                <gradient

                    android:angle="270"

                    android:endColor="#E3DBF0"

                    android:centerColor="#E3DBF0"

                    android:startColor="#E3DBF0"

                    android:type="linear" />

                <corners

                    android:bottomLeftRadius="8dp"

                    android:bottomRightRadius="8dp"

                    android:topLeftRadius="8dp"

                    android:topRightRadius="8dp" />

            </shape>

        </scale>

    </item>

</layer-list>
我们找个布局测试一下:
堪称完美。
2. 自定义柱子组件
写过RecyclerView的大佬们,都知道列表item要单独定义出来的意义。
我们的柱子,不仅要展示颜色条,还要展示文本,添加动画、绑定数据等。
所以,我们单独写一个柱子组件,来做这些事情
DayView.java
package com.qxc.muyu.main.view;

import android.animation.AnimatorSet;

import android.animation.ObjectAnimator;

import android.animation.ValueAnimator;

import android.content.Context;

import android.graphics.drawable.Drawable;

import android.util.AttributeSet;

import android.view.LayoutInflater;

import android.view.View;

import android.view.animation.LinearInterpolator;

import android.widget.ProgressBar;

import android.widget.RelativeLayout;

import android.widget.TextView;

import androidx.core.content.ContextCompat;

import androidx.interpolator.view.animation.FastOutSlowInInterpolator;

import com.qxc.muyu.R;

public class DayView extends RelativeLayout {

    TextView tv_title;

    TextView tv_text;

    ProgressBar pb;

    public DayView(Context context) {

        super(context);

        initView(context);

    }

    public DayView(Context context, AttributeSet attrs) {

        super(context, attrs);

        initView(context);

    }

    void initView(Context context) {

        View view = LayoutInflater.from(context).inflate(R.layout.view_statis_day, this);

        tv_title = view.findViewById(R.id.tv_title);

        tv_text = view.findViewById(R.id.tv_text);

        pb = view.findViewById(R.id.pb);

    }

    public void setData(String title, String text, int maxProgress, int progress, int styleProgressBar, boolean hasAnim) {

        tv_title.setText(title);

        tv_text.setText(text);

        pb.setMax(maxProgress);

        int drawableId = styleProgressBar == 1 ? R.drawable.progress_vertical_shade_drawable : R.drawable.progress_vertical_tint_drawable;

        Drawable customDrawable = ContextCompat.getDrawable(getContext(), drawableId);

        pb.setProgressDrawable(customDrawable);

        if (hasAnim) {

            startAnim(0, progress, 500);

        } else {

            pb.setProgress(progress);

        }

    }

    public void startAnim(int from, int to, int duration) {

        ObjectAnimator alphaTitle = ObjectAnimator.ofFloat(tv_title, "alpha", 0, 1);

        alphaTitle.setInterpolator(new LinearInterpolator());

        ObjectAnimator alphaText = ObjectAnimator.ofFloat(tv_text, "alpha", 0, 1);

        alphaText.setInterpolator(new LinearInterpolator());

        ValueAnimator animProgress = ValueAnimator.ofFloat(from, to);

        animProgress.setInterpolator(new FastOutSlowInInterpolator());

        animProgress.addUpdateListener(new ValueAnimator.AnimatorUpdateListener() {

            @Override

            public void onAnimationUpdate(ValueAnimator animation) {

                try {

                    float animatedValue = (float) animation.getAnimatedValue();

                    pb.setProgress((int) animatedValue);

                } catch (Exception ex) {

                    ex.printStackTrace();

                }

            }

        });

        AnimatorSet set = new AnimatorSet();

        set.play(alphaTitle).with(alphaText).with(animProgress);

        set.setDuration(duration);

        set.start();

    }

}
其布局文件:
view_statis_day.xml
<?xml version="1.0" encoding="utf-8"?>
<RelativeLayout xmlns:android="http://schemas.android.com/apk/res/android"
android:layout_width="match_parent"
android:layout_height="match_parent"
android:layout_weight="1"
android:layout_marginLeft="5dp"
android:layout_marginRight="5dp"
android:background="@drawable/shape_week_bg">
<TextView
android:id="@+id/tv_title"
android:layout_width="wrap_content"
android:layout_height="wrap_content"
android:layout_alignParentBottom="true"
android:layout_centerHorizontal="true"
android:text=""
android:layout_marginBottom="10dp"
android:letterSpacing="0.05"
android:textColor="@color/colorBlack"
android:textSize="11sp" />
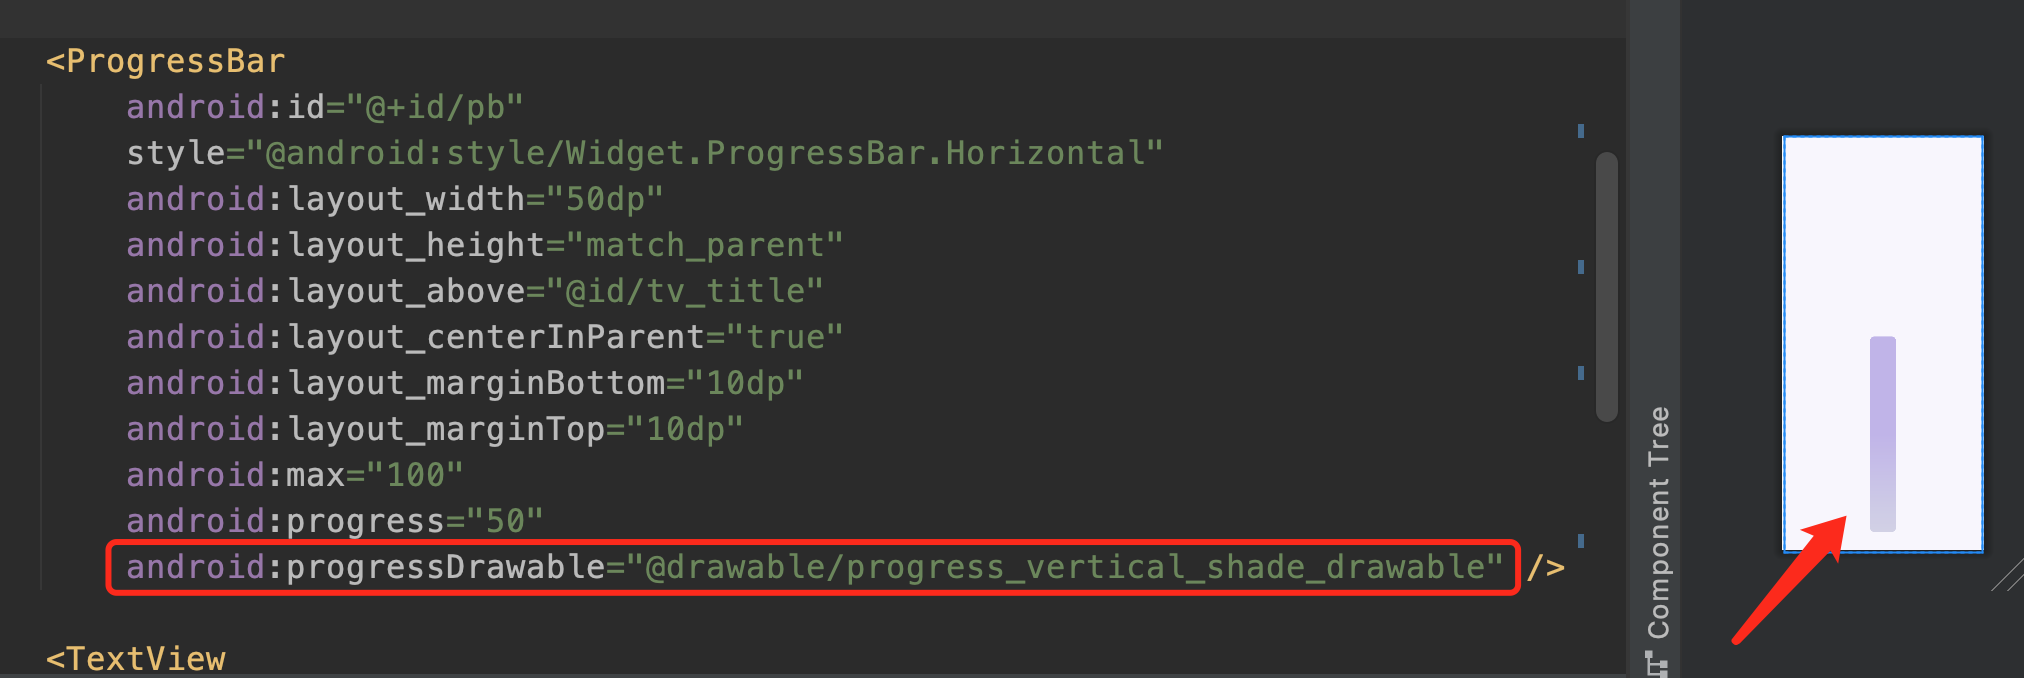
<ProgressBar
android:id="@+id/pb"
style="@android:style/Widget.ProgressBar.Horizontal"
android:layout_width="50dp"
android:layout_height="match_parent"
android:layout_above="@id/tv_title"
android:layout_centerInParent="true"
android:layout_marginBottom="10dp"
android:layout_marginTop="10dp"
android:max="100"
android:progress="50"
android:progressDrawable="@drawable/progress_vertical_shade_drawable" />
<TextView
android:id="@+id/tv_text"
android:layout_width="wrap_content"
android:layout_height="wrap_content"
android:layout_alignBottom="@id/pb"
android:layout_centerHorizontal="true"
android:layout_marginBottom="10dp"
android:letterSpacing="0.05"
android:text=""
android:textColor="@color/colorBlack"
android:textSize="12sp"/>
</RelativeLayout>
3. 自定义容器组件
有了一个个柱子,我们的柱子对象是不是需要管理起来,我们就需要一个容器,来放置这些柱子。
假设,我们有一周的数据,展示7个柱子就可以了,使用LinearLayout作为容器就行;
假设,我们要展示一个月的数据,使用RecyclerView、SrcollView作为容器都可以,因为都支持滑动;
更多的场景,大佬们请自个思考吧,怕想多了,伤我脑仁
如题,本案例中我们选择LinearLayout作为容器。
实现逻辑:
- 接收外界数据
- 遍历数据,动态创建、添加柱子组件
WeekView.java
package com.qxc.muyu.main.view;

import android.content.Context;

import android.util.AttributeSet;

import android.view.LayoutInflater;

import android.view.View;

import android.widget.LinearLayout;

import android.widget.RelativeLayout;

import com.qxc.muyu.R;

import java.util.Collections;

import java.util.List;

public class WeekView extends RelativeLayout {

    LinearLayout ll_week;

    boolean hasAnim = true;

    public WeekView(Context context) {

        super(context);

        initView(context);

    }

    public WeekView(Context context, AttributeSet attrs) {

        super(context, attrs);

        initView(context);

    }

    void initView(Context context) {

        View view = LayoutInflater.from(context).inflate(R.layout.view_statis_week, this);

        ll_week = view.findViewById(R.id.ll_week);

    }

    //接收外界数据,动态创建 & 加载数据条对象

    public void setData(List<String> titles, List<Integer> numbers) {

        if (titles == null || numbers == null || numbers.size() == 0 || titles.size() != numbers.size()) {

            return;

        }

        ll_week.removeAllViews();

        int max = Collections.max(numbers);

        for (int i = 0; i < numbers.size(); i++) {

            String title = titles.get(i);

            int num = numbers.get(i);

            String text = formatNumber(num);

            DayView dayView = new DayView(getContext());

            int styleProgressBar = max / 2 > num ? 2 : 1;

            dayView.setData(title, text, max, num, styleProgressBar, hasAnim);

            LinearLayout.LayoutParams params = new LinearLayout.LayoutParams(0, LayoutParams.MATCH_PARENT, 1);

            ll_week.addView(dayView,params);

        }

    }

    private String formatNumber(int num) {

        if (num < 1000) {

            return String.valueOf(num);

        } else if (num < 10000) {

            double value = num / 1000.0;

            return String.format("%.2fk", value);

        } else if (num < 100000000) {

            double value = num / 10000.0;

            return String.format("%.2f万", value);

        } else {

            double value = num / 100000000.0;

            return String.format("%.2f亿", value);

        }

    }

}

其布局文件(只有一个容器,简单的都没法说)

view_statis_week.xml

```js

<?xml version="1.0" encoding="utf-8"?>

<LinearLayout xmlns:android="http://schemas.android.com/apk/res/android"

    android:layout_width="match_parent"

    android:layout_height="match_parent"

    android:orientation="horizontal"

    android:paddingLeft="5dp"

    android:paddingRight="5dp"

    android:id="@+id/ll_week"

    android:background="@drawable/shape_week_bg">

</LinearLayout>
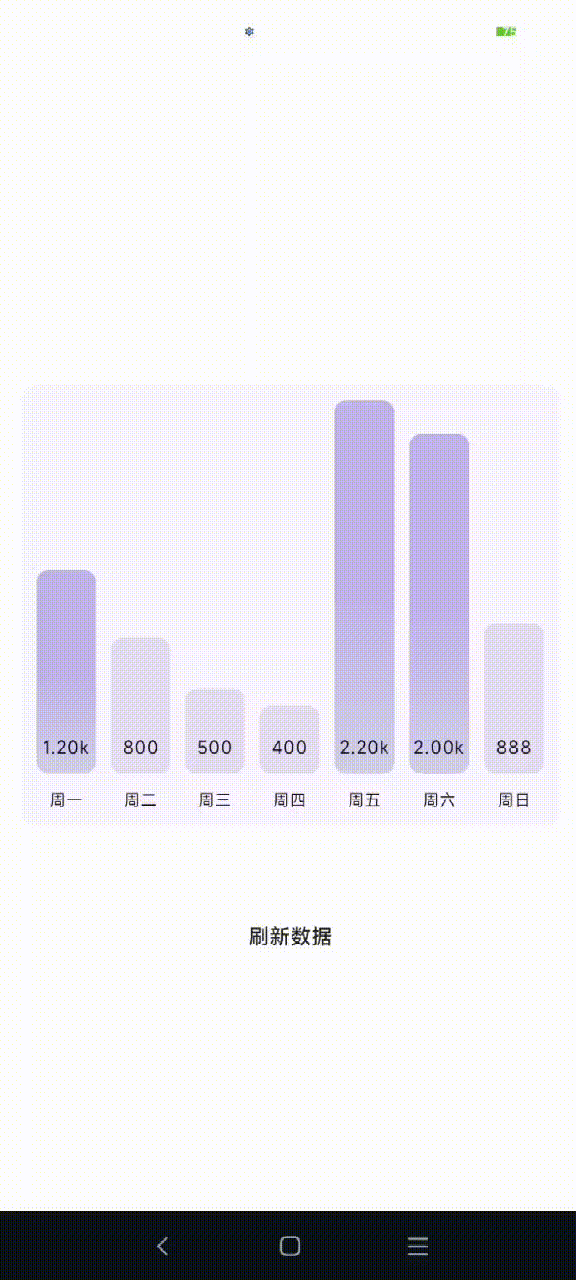
至此,周数据柱形图表功能已写完了。
4. 如何使用
在页面布局中,使用我们的自定义组件:
<?xml version="1.0" encoding="utf-8"?>

<RelativeLayout xmlns:android="http://schemas.android.com/apk/res/android"

    xmlns:app="http://schemas.android.com/apk/res-auto"

    xmlns:tools="http://schemas.android.com/tools"

    android:layout_width="match_parent"

    android:layout_height="match_parent"

    android:background="#ffffff"

    android:paddingLeft="15dp"

    android:paddingTop="50dp"

    android:paddingRight="15dp">

    <com.qxc.muyu.main.view.WeekView

        android:id="@+id/week"

        android:layout_width="match_parent"

        android:layout_height="300dp"

        android:layout_centerInParent="true" />

    <Button

        android:id="@+id/btn"

        android:layout_width="200dp"

        android:layout_height="50dp"

        android:layout_below="@id/week"

        android:layout_centerHorizontal="true"

        android:layout_marginTop="50dp"

        android:background="#00000000"

        android:text="刷新数据" />

</RelativeLayout>
代码中,给自定义组件设置数据:
WeekView weekView = view.findViewById(R.id.week);

        Button btn = view.findViewById(R.id.btn);

        List<String> titles = new ArrayList<>();

        titles.add("周一");

        titles.add("周二");

        titles.add("周三");

        titles.add("周四");

        titles.add("周五");

        titles.add("周六");

        titles.add("周日");

        List<Integer> numbers = new ArrayList<>();

        numbers.add(1200);

        numbers.add(800);

        numbers.add(500);

        numbers.add(400);

        numbers.add(2200);

        numbers.add(2000);

        numbers.add(888);

        btn.setOnClickListener(new View.OnClickListener() {

            @Override

            public void onClick(View v) {

                weekView.setData(titles, numbers);

            }

        });
就是这么简单,UI样式想怎么调都行,好用到飞起,简直了,哈哈~
Android 自定义带动画的柱状图的更多相关文章
- 自定义带动画的Toast
一.style样式: 1. // 移动和透明渐变结合的动画 <style name="anim_view"> <item name="@ ...
- Android 自定义波浪动画 --"让进度浪起来~"
原文链接:http://www.jianshu.com/p/0e25a10cb9f5 一款效果不错的动画,实现也挺简单的,推荐阅读学习~ -- 由 傻小孩b 分享 waveview <Andro ...
- Android 自定义帧动画
Android 自定义帧动画 Android L : Android Studio 帧动画 和gif图片类似,顺序播放准本好的图片文件:图片资源在xml文件中配置好 将图片按照预定的顺序一张张切换,即 ...
- Android 自定义带刻度的seekbar
自定义带刻度的seekbar 1.布局 <span style="font-family:SimHei;font-size:18px;"><com.imibaby ...
- Android自定义窗口动画
第一步,设置出现和消失的xml 1.在res/anim下创建enter_anim.xml,设置窗口出现的动画 <?xml version="1.0" encoding=&qu ...
- 实例源码--Android自定义Gallery动画效果
相关文档与源码: 下载源码 技术要点: 1.自定义控件的使用 2.Gallery控件的使用实例 3.详细的源码注释 ...... 详细介绍: 1.自定义控件的使用 本套源码通过自定义控件的方式,继 ...
- Android自定义带标题边框的Layout
今天工作中又碰到个小问题,项目需要用到像Java Swing的JPanel一样带标题边框的布局,Android里没有类似控件,想到这个也不难,自己画了一个,是继承LinearLayout的一个自定义布 ...
- Android 自定义PopupWindow动画效果
public class RollActivity extends Activity { private View view; private Button btn; private PopupWin ...
- Android -- 自定义带进度条的按钮
1. 实现了一个带进度条的按钮,完成后显示提示信息,并设置按钮为不可再次被点击
- Android 自定义带回调的Dialog 及EditText相关
import android.app.Activity; import android.content.Context; import android.text.Editable; import ...
随机推荐
- Redis 5集群部署
1.redis特点 (1)基于内存 (2)可持久化数据 (3)具有丰富的数据结构类型,适应非关系型数据的存储需求 (4)支持绝大多数主流开发语言,如C.C++.Java.Python.R.JavaSc ...
- Oracle中ALTER TABLE的五种用法(二)
首发微信公众号:SQL数据库运维 原文链接:https://mp.weixin.qq.com/s?__biz=MzI1NTQyNzg3MQ==&mid=2247485212&idx=1 ...
- python教程6.5-excel处理模块
第三方开源模块安装 创建文件 打开已有文件 写数据 选择表 保存表 遍历表 按行遍历 按列遍历 遍历指定行列 遍历指定第几列数据 删除表 设置单元格样式 字体 对齐 设置行高列宽
- 题解:CF1956A Nene's Game
这道题其实挺有意思,多测里面还套了个多测. 思路就是用向量模拟删除过程,具体请看代码里的注释. #include <bits/stdc++.h> using namespace std; ...
- UE4 C++调用C# DLL(DllExport方法)
之前看见园子里一篇C++调用C#的文章,参考后拿UE试一下.刚开始尝试了C# dll > CLR C++ DLL > Native C++ DLL的做法, 原生环境下是可以的,但是到UE4 ...
- JDK源码阅读-------自学笔记(八)(数组演示冒泡排序和二分查找)
冒泡排序 算法 比较相邻的元素.如果第一个比第二个大,就交换他们两个 对每一对相邻元素作同样的工作,从开始第一对到结尾的最后一对.在这一点,最后的元素应该会是最大的数 针对所有的元素重复以上的步骤,除 ...
- apisix~升级原始插件的方法
扩展apisix原始插件 当apisix提供的插件不能满足我们要求时,我们可能需要将它的plugin进行个性化扩展,例如一个jwt认证插件jwt-auth,它本身具有验证jwt有效性功能,支持rs25 ...
- Ceph配置与认证授权
目录 Ceph配置与认证授权 1. 为什么现在不采用修改配置文件的方式了呢? 2. Ceph元变量 3. 使用命令行修改配置 3.1 全部修改(使用服务名) 3.2 部分修改(修改进程) 3.3 临时 ...
- Java21 GA新特性-虚拟线程详解
本文转载至:虚拟线程 - VirtualThread源码透视 - throwable - 博客园 (cnblogs.com) 一. 前提 JDK19于2022-09-20发布GA版本,该版本提供了虚拟 ...
- Linux中根据关键字获取某一行的行号
[root@localhost ~]# cat test.txt 123213 ehualu.server ehualu.docker 10.0.0.10 ehualu.server ehualu.d ...