黑马-Spring与数据库
Spring与数据库
Spring与jdbc
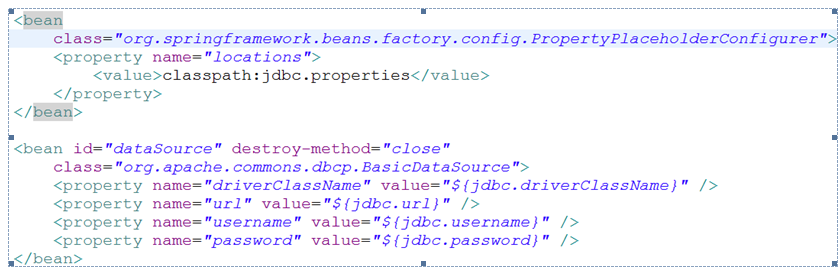
引入dataSource
在客户端

模板编程
类的结构图, 真正干活的是JdbcTemplate(底层实现,操作 excute方法)
JdbcTemplate 构造函数 有DataSource参数 继承JdbcAccessor抽象类 抽象类有方法setDataSource(DataSource)

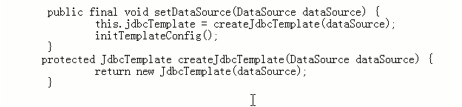
JdbcDaoSupport 抽象类 (不能被实例化 只能用来继承) 有setDataSource ,setDataSource创建了JdbcTemplate对象,DataSource最终赋值给了 JdbcTemplate
有setTemplate方法

JdbcAccessor抽象类 方法setDataSource(DataSource)


方案一
继承JdbcDaoSupport 两种选择 1.注入DataSource 2.注入JdbcTemplate
1.注入DataSource(setDataSource), 执行 利用JdbcDaoSupport getJdbcTemplate 执行JdbcTemplate的excute方法


2注入JdbcTemplate(JdbcSupport有setDatasource方法) 建立jdbcTemplate bean,注入DataSource(继承自JdbcAccesor的setDataSource方法)
方案二
继承Jdbctemplate 注入(1.JdbcTemplate继承JdbcAccessor 的 setDataSourc 2.利用JdbcTemplate本身构造器) , 执行利用 JdbcTemplate excute方法
1.
2.


方案三
私有属性 JdbcTemplate ,提供set方法 注入,执行 this.jdbTemplate.excute

spring与jdbc的查询
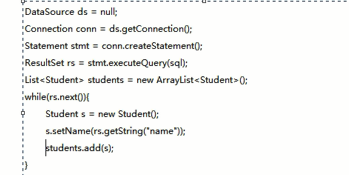
原Jdbc查询操作

<?xml version="1.0" encoding="UTF-8"?>
<beans xmlns="http://www.springframework.org/schema/beans"
xmlns:xsi="http://www.w3.org/2001/XMLSchema-instance"
xsi:schemaLocation="http://www.springframework.org/schema/beans
http://www.springframework.org/schema/beans/spring-beans-2.5.xsd">
<!--
按照指定的路径加载配置文件
-->
<bean
class="org.springframework.beans.factory.config.PropertyPlaceholderConfigurer">
<property name="locations">
<value>classpath:jdbc.properties</value>
</property>
</bean> <bean id="dataSource" destroy-method="close"
class="org.apache.commons.dbcp.BasicDataSource">
<property name="driverClassName" value="${jdbc.driverClassName}" />
<property name="url" value="${jdbc.url}" />
<property name="username" value="${jdbc.username}" />
<property name="password" value="${jdbc.password}" />
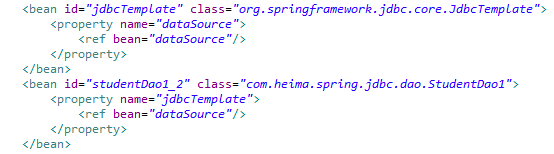
</bean> <bean id="jdbcTemplate" class="org.springframework.jdbc.core.JdbcTemplate">
<property name="dataSource">
<ref bean="dataSource"/>
</property>
</bean> <bean id="studentDao1_1" class="com.itheima09.spring.jdbc.dao.StudentDao1">
<property name="dataSource">
<ref bean="dataSource"/>
</property>
</bean>
<bean id="studentDao1_2" class="com.itheima09.spring.jdbc.dao.StudentDao1">
<property name="jdbcTemplate">
<ref bean="jdbcTemplate"/>
</property>
</bean>
<bean id="studentDao2_1" class="com.itheima09.spring.jdbc.dao.StudentDao2">
<property name="dataSource">
<ref bean="dataSource"/>
</property>
</bean>
<bean id="studentDao2_2" class="com.itheima09.spring.jdbc.dao.StudentDao2">
<constructor-arg index="0" ref="dataSource"></constructor-arg>
</bean>
<bean id="studentDao3" class="com.itheima09.spring.jdbc.dao.StudentDao3">
<property name="jdbcTemplate">
<ref bean="jdbcTemplate"/>
</property>
</bean>
</beans>
jdbc-xml
@Test

    public void testStuent() throws Exception{

        ApplicationContext context = new ClassPathXmlApplicationContext("applicationContext-jdbc.xml");

        StudentDao3 studentDao3=(StudentDao3)context.getBean("studentDao3");

        studentDao3.queryStudent();

    }
test
Spring的声明式事务处理
概念
程序员不再负责处理事务,事务处理交给spring容器来做。
具体的详解
程序员负责两个内容:
1、 对表的crud操作:目标类的目标方法
2、 告诉spring容器什么样的目标方法采用什么样的事务策略
Spring容器负责:(切面)
负责事务的处理
实现原理
采用了aop技术来实现的。
事务的架构
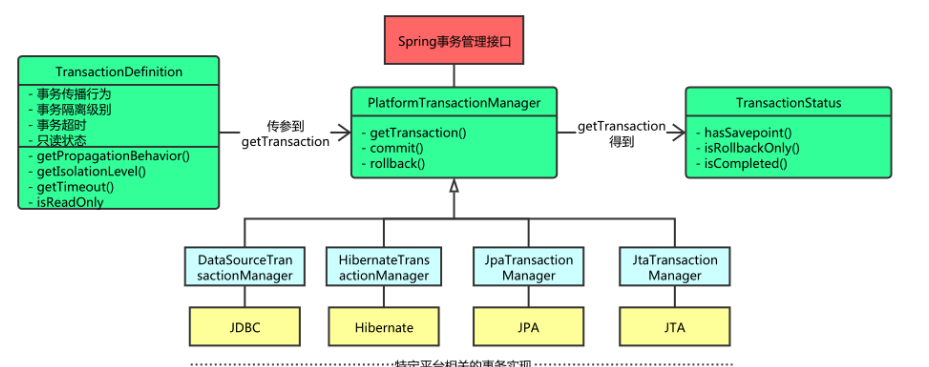
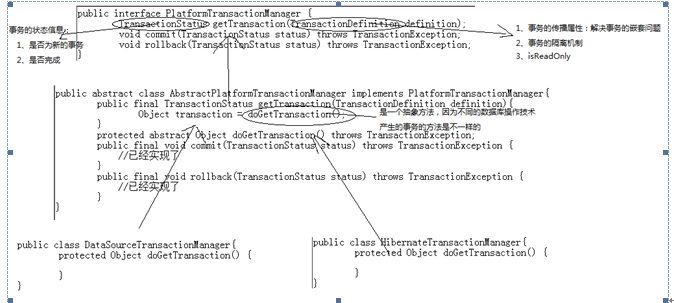
PlatFormTransactionManager 顶级接口
AbstractPlatformTransactionManager 抽象接口 实现commit 和rollback方法 getTransaction
DataSourceTransactionManager 继承AbstractPlatformTransactionManager 实现doGetTransaction 方法
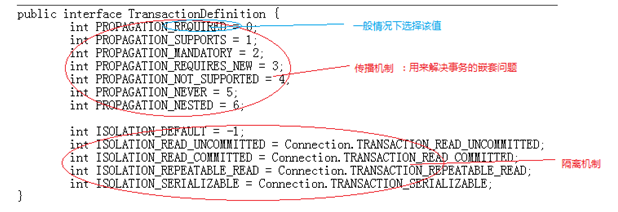
事务的定义
事务的状态
说明:通过spring的事务处理架构,再通过配置文件具体的实现事务的类,就可以让spring容器知道是什么样的技术来操作数据库,通过对事务状态的判断,通过事务的定义就可以知道具体的目标方法采用什么样的事务策略来处理了。
<?xml version="1.0" encoding="UTF-8"?>

<beans xmlns="http://www.springframework.org/schema/beans"

       xmlns:aop="http://www.springframework.org/schema/aop"

       xmlns:tx="http://www.springframework.org/schema/tx"

       xmlns:xsi="http://www.w3.org/2001/XMLSchema-instance"

       xsi:schemaLocation="http://www.springframework.org/schema/beans

           http://www.springframework.org/schema/beans/spring-beans-2.5.xsd

           http://www.springframework.org/schema/aop

           http://www.springframework.org/schema/aop/spring-aop-2.5.xsd

           http://www.springframework.org/schema/tx

           http://www.springframework.org/schema/tx/spring-tx-2.5.xsd">

    <!--

        引入dataSource

        把dao层和service层的类导入进来

     -->

    <bean

        class="org.springframework.beans.factory.config.PropertyPlaceholderConfigurer">

        <property name="locations">

            <value>classpath:jdbc.properties</value>

        </property>

    </bean>

      <bean id="dataSource" destroy-method="close"

        class="org.apache.commons.dbcp.BasicDataSource">

        <property name="driverClassName" value="${jdbc.driverClassName}" />

        <property name="url" value="${jdbc.url}" />

        <property name="username" value="${jdbc.username}" />

        <property name="password" value="${jdbc.password}" />

    </bean>

    <bean id="studentDao" class="com.itheima09.spring.jdbc.transaction.dao.StudentDaoImpl">

        <property name="dataSource">

            <ref bean="dataSource"/>

        </property>

    </bean>

    <bean id="studentService" class="com.itheima09.spring.jdbc.transaction.service.StudentServiceImpl">

        <property name="studentDao">

            <ref bean="studentDao"/>

        </property>

    </bean>

    <!--

        事务管理器

          告诉spring容器要采用什么样的技术处理事务

     -->

    <bean id="transactionManager" class="org.springframework.jdbc.datasource.DataSourceTransactionManager">

        <property name="dataSource">

            <ref bean="dataSource"/>

        </property>

    </bean>

    <!--

        配置声明的事务策略

          id  唯一标示

          transaction-manager  事务管理器

     -->

    <tx:advice id="tx" transaction-manager="transactionManager">

        <tx:attributes>

            <!--

                以save开头的方法,采用的传播属性是默认值,隔离机制是默认值,是读写事务

             -->

            <tx:method

                name="save*"

                propagation="REQUIRED"

                isolation="DEFAULT"

                read-only="false"/>

        </tx:attributes>

    </tx:advice>

    <aop:config>

        <aop:pointcut

            expression="execution(* com.itheima09.spring.jdbc.transaction.service.*.*(..))"

            id="perform"/>

        <aop:advisor advice-ref="tx" pointcut-ref="perform"/>

    </aop:config>

</beans>
applicationContext.xml
Spring与hibernate
组成
1、 hibernate的配置文件
2、 持久化类和映射文件
3、 Dao层和service层所有的类
4、 Spring的配置文件
5、 客户端
Spring的配置文件
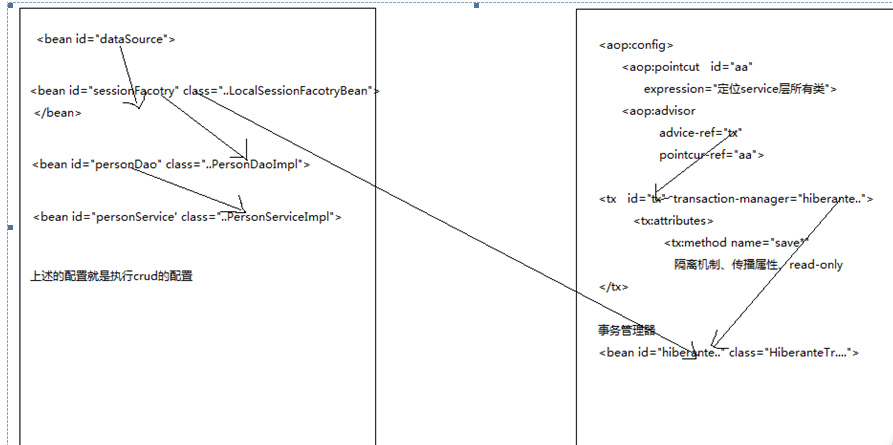
seessionFactory 产生session 进行crud操作 同时,hibernate 需要sessionFactory 通过session 开启事务
<?xml version="1.0" encoding="UTF-8"?>

<beans xmlns="http://www.springframework.org/schema/beans"

    xmlns:aop="http://www.springframework.org/schema/aop" xmlns:tx="http://www.springframework.org/schema/tx"

    xmlns:xsi="http://www.w3.org/2001/XMLSchema-instance"

    xsi:schemaLocation="http://www.springframework.org/schema/beans

           http://www.springframework.org/schema/beans/spring-beans-2.5.xsd

           http://www.springframework.org/schema/aop

           http://www.springframework.org/schema/aop/spring-aop-2.5.xsd

           http://www.springframework.org/schema/tx

           http://www.springframework.org/schema/tx/spring-tx-2.5.xsd">

    <!-- 引入dataSource 把dao层和service层的类导入进来 -->

    <bean

        class="org.springframework.beans.factory.config.PropertyPlaceholderConfigurer">

        <property name="locations">

            <value>classpath:jdbc.properties</value>

        </property>

    </bean>

    <bean id="dataSource" destroy-method="close"

        class="org.apache.commons.dbcp.BasicDataSource">

        <property name="driverClassName" value="${jdbc.driverClassName}" />

        <property name="url" value="${jdbc.url}" />

        <property name="username" value="${jdbc.username}" />

        <property name="password" value="${jdbc.password}" />

    </bean>

    <bean id="sessionFactory"

        class="org.springframework.orm.hibernate3.LocalSessionFactoryBean">

        <property name="dataSource">

            <ref bean="dataSource" />

        </property>

        <!-- 导入映射文件所在的路径 -->

        <property name="mappingDirectoryLocations">

            <list>

                <value>classpath:com/itheima09/spring/hibernate/transaction/domain

                </value>

            </list>

        </property>

        <!-- 其他配置 -->

        <property name="hibernateProperties">

            <props>

                <prop key="hibernate.dialect">org.hibernate.dialect.MySQL5Dialect</prop>

                <prop key="hbm2ddl.auto">update</prop>

            </props>

        </property>

    </bean>

    <bean id="sessionFactory2"

        class="org.springframework.orm.hibernate3.LocalSessionFactoryBean">

        <property name="configLocation">

            <value>classpath:hibernate.cfg.xml</value>

        </property>

    </bean>

    <bean id="personDao"

        class="com.itheima09.spring.hibernate.transaction.dao.PersonDaoImpl">

        <property name="sessionFactory">

            <ref bean="sessionFactory" />

        </property>

    </bean>

    <bean id="personService"

        class="com.itheima09.spring.hibernate.transaction.service.PersonServiceImpl">

        <property name="personDao">

            <ref bean="personDao" />

        </property>

    </bean>

    <!-- 配置事务管理器 -->

    <bean id="transactionManager" class="org.springframework.orm.hibernate3.HibernateTransactionManager">

        <property name="sessionFactory">

            <ref bean="sessionFactory"/>

        </property>

    </bean>

    <tx:advice id="tx" transaction-manager="transactionManager">

        <tx:attributes>

            <tx:method name="save*"

                    isolation="DEFAULT"

                    propagation="REQUIRED"

                    read-only="false"/>

        </tx:attributes>

    </tx:advice>

    <aop:config>

        <aop:pointcut

            expression="execution(* com.itheima09.spring.hibernate.transaction.service.*.*(..))"

            id="perform" />

        <aop:advisor advice-ref="tx" pointcut-ref="perform" />

    </aop:config>

</beans>
applicationContext.xml
关于session
从上图可以看出,程序员使用sessionFactory产生session,从而进行crud的操作
Spring容器利用sessionFactory产生session,进行事务的操作,所以spring容器产生
的session和程序员用的session肯定是同一个session,所以在spring声明式事务处理的
时候,session必须由当前线程产生
hibernate 回调函数
package com.heima.spring.hibernate.callback;

import org.hibernate.Session;

public interface HibernateCallback {

    public Object doInHibernate(Session session);

}
HibernateCallback
package com.heima.spring.hibernate.callback;

import java.util.List;

import org.hibernate.Session;

import org.hibernate.SessionFactory;

import org.hibernate.Transaction;

public class SpringHibernateCore {

    private SessionFactory sessionFactory;

    public void setSessionFactory(SessionFactory sessionFactory) {

        this.sessionFactory = sessionFactory;

    }

    public Object doExecute(HibernateCallback action){

        Object obj=null;

        Session session = sessionFactory.openSession();

        Transaction transaction = session.beginTransaction();

        obj=action.doInHibernate(session);

        transaction.commit();

        return  obj;

    }

    public List find(final String hql){

        return (List)this.doExecute(new

                HibernateCallback() {

                    public Object doInHibernate(Session session)

                        {

                            return session.createQuery(hql).list();

                        }

        });

    }

}
SpringHibernateCore
package com.heima.spring.hibernate.callback;

import java.util.List;

import com.heima.spring.hibernate.transaction.domain.Person;

public class PersonDaoCallback extends SpringHibernateCore{

    public void querPerson(){

        List<Person> pList=this.find("from Person");

        System.out.println(pList.size());

    }

}
PersonDaoCallback
黑马-Spring与数据库的更多相关文章
- Spring 链接数据库
一.前言 Spring 现在是我们在做 JavaWeb 开发中,用的最主流的框架.以后是不是我们暂时不知道,但现在是.废话不多我就介绍 Spring 中.链接数据库的三种方式: git源码地址 需要的 ...
- 8.spring:事务管理(上):Spring的数据库编程、编程式事务管理
Spring的数据库编程 Spring框架提供了JDBC模板模式------>JdbcTemplate 简化了开发,在开发中并不经常是使用 实际开发更多使用的是Hibernate和MyBatis ...
- Spring的数据库编程浅入浅出——不吹牛逼不装逼
Spring的数据库编程浅入浅出——不吹牛逼不装逼 前言 上文书我写了Spring的核心部分控制反转和依赖注入,后来又衔接了注解,在这后面本来是应该写Spring AOP的,但我觉得对于初学者来说,这 ...
- Spring(四)Spring与数据库编程
Spring最重要的功能毫无疑问就是操作数据.数据库的百年城是互联网编程的基础,Spring为开发者提供了JDBC模板模式,那就是它自身的JdbcTemplate.Spring还提供了Transact ...
- 【Spring】Spring的数据库开发 - 2、Spring JdbcTemplate的常用方法(execute、update、query)
Spring JdbcTemplate的常用方法 文章目录 Spring JdbcTemplate的常用方法 execute() update() query() 简单记录-Java EE企业级应用开 ...
- 【Spring】Spring的数据库开发 - 1、Spring JDBC的配置和Spring JdbcTemplate的解析
Spring JDBC 文章目录 Spring JDBC Spring JdbcTemplate的解析 Spring JDBC的配置 简单记录-Java EE企业级应用开发教程(Spring+Spri ...
- Spring的数据库开发
Spring JDBC框架操作mysql数据库 Spring中的JDBC为我们省去连接和关闭数据库的代码,我们着重关注对数据库的操作.Sprin ...
- Spring 实现数据库读写分离
随着互联网的大型网站系统访问量的增高,数据库访问压力方面不断的显现而出,所以许多公司在数据库层面采用读写分离技术,也就是一个master,多个slave.master负责数据的实时更新或实时查询,而s ...
- Spring 操作数据库
试了一下spring的JdbcTemplate觉得很好用.首先增加一个连接到mysql数据库的dataSource <bean id="dataSource2" class= ...
随机推荐
- JavaScript -基础- 函数与对象(三)数组对象
一.数组对象 1.创建方式 1)创建方式一 var arr=[1,2,3]; 2)创建方式二 var arr2=new Array(1,2,3); 注意: 数组中可以存储任何数据类型.方法类型(Jav ...
- Hibernate多对多映射(双向关联)实例详解——真
一个学生可以选多门课 一门课程有多个学生上 实现步骤: 一.学生 (1)数据库创建学生数据表students,包含id,name字段 设置id字段为主键,类型:bigint,自增 设置name字段,类 ...
- Centos7安装RabbitMQ解决Erlang依赖报错
通过yum等软件仓库都可以直接安装RabbitMQ,但版本一般都较为保守. RabbitMQ官网提供了新版的rpm包(http://www.rabbitmq.com/download.html),但是 ...
- AngularJS2.0教程(一)快速上手之基础知识
Why Angular2 Angular1.x显然非常成功,那么,为什么要剧烈地转向Angular2? 性能的限制 AngularJS当初是提供给设计人员用来快速构建HTML表单的一个内部工具.随着时 ...
- jquery 正则表达式
- L305 发邮件15分钟
发个邮件-不用那么纠结-把事情讲清楚就好-限制在15分钟写完-长的邮件25分钟-难点是讲清楚细节-比如软件调试bug-DFM-这里有些专业词汇 发现问题:发给客户的There are some qua ...
- MySQL:基础知识
基础知识 一.软件的生命周期 软件定义 软件开发 软件使用与维护 二.数据(Data) 1.定义 描述客观事物特征或性质的某种符号,经过数字化处理存储在计算机 2.数据独立性 物理独立性:指用户的应用 ...
- ob 函数的使用
ob 函数的使用1. 页面静态化 $id = isset($_GET['id'])?$_GET['id']-0:0; $filename = "html/".date(" ...
- finfo_file
本文实例讲述了PHP使用finfo_file()函数检测上传图片类型的实现方法.分享给大家供大家参考,具体如下: 在输入输出中,文件的交互必不可少,比如文件的上传什么的.这里我们来解决一个小问题, ...
- centos安装pip扩展包
1.安装 epel-release扩展yum源# yum install -y epel-release# yum clean all# yum makecache2.安装setuptools# yu ...