
Redis(十一):哨兵模式架构设计分析
业务最初的应用场景中,我们也许使用单机redis就可以应付业务要求,但并非一直可行。
比如单机的读写能力问题,单机的可用性问题,单机的数据安全性问题。这些都是许多互联网应用经常会遇到的问题,也基本上都有一套理论去解决它,只是百花齐放。
哨兵是Redis中解决高可用问题的解决方案之一,我们就一起来看看 Redis是如何实现的吧!不过此方案,仅提供思路供参考,不要以此为标准方案。
前面介绍的主从复制功能,可以说已经一定程度上解决了数据安全性问题问题,即有了备份数据,我们可以可以做读写分离了。只是,可用性问题还未解决,即当 master 宕机或出现其他故障时,整个写服务就不可用了。解决方法是,手动操作,要么重启master使其恢复服务,要么把master切换为其他slave机器。
如果服务的可用性需要人工介入的话,那就算不得高可用了,所以我们需要一个自动处理机制。这就是哨兵模式。
一、哨兵系统介绍
哨兵系统要解决的问题核心,自然是高可用问题。而如何解决,则是其设计问题。而最终呈现给用户的,应该一个个的功能单元,即其提供的能力。如下:
监控(Monitoring): Sentinel 会不断地检查你的主服务器和从服务器是否运作正常。
提醒(Notification): 当被监控的某个 Redis 服务器出现问题时, Sentinel 可以通过 API 向管理员或者其他应用程序发送通知。
自动故障迁移(Automatic failover): 当一个主服务器不能正常工作时, Sentinel 会开始一次自动故障迁移操作, 它会将失效主服务器的其中一个从服务器升级为新的主服务器, 并让失效主服务器的其他从服务器改为复制新的主服务器;
配置提供者: Sentinel充当客户端服务发现的授权来源:客户端连接到Sentinels,以询问负责给定服务的当前Redis主服务器的地址。 如果发生故障转移,Sentinels将报告新地址。(这也是客户端接入入口)
哨兵系统的架构图如下:
(一)服务端架构

(二)请求处理流程图
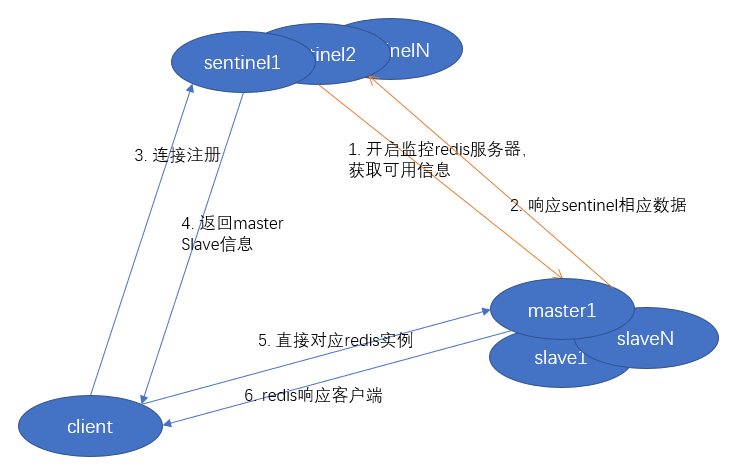
二、哨兵系统搭建步骤
哨兵可以搭建在 redis服务所在机器,也可以在单独的机器实例上搭建。
1. 有多个在运行的 redis master/slave 实例;
主从服务的搭建,slaveof 设置,请参照主从配置篇。
2. 编写哨兵配置文件;
# Example sentinel.conf

# 定义sentinel 服务端口号

port

# 针对 使用端口映射的方式的启动,指定ip:port

# sentinel announce-ip <ip>

# sentinel announce-port <port>

# 工作目录定义

dir /tmp

# 要监视的redis master 定义, 可配置多个 master-name 不同即可

# sentinel monitor <master-name> <ip> <redis-port> <quorum>

sentinel monitor mymaster 127.0.0.1

# 定义master/slave 的密码,要求同一主从服务所有密码必须保持一致

# sentinel auth-pass <master-name> <password>

# 定义master 不可达持续多少毫秒后开始定义为节点下线,默认30s

sentinel down-after-milliseconds mymaster

# sentinel parallel-syncs <master-name> <numslaves>

# 在故障转移期间同时与新的master同步的slave数量

sentinel parallel-syncs mymaster

# 定义进行故障转移的超时时间,默认3分钟

sentinel failover-timeout mymaster

# 发生故障转移时调用的通知脚本,被调用时会传递两个参数: eventType, eventDescription

# sentinel notification-script mymaster /var/redis/notify.sh

# master 变更时调用脚本配置

# 调用时会传递如下参数

# <master-name> <role> <state> <from-ip> <from-port> <to-ip> <to-port>

# sentinel client-reconfig-script mymaster /var/redis/reconfig.sh
3. 启动哨兵节点;
    # 使用 redis-sentinel 程序启动, 这个程序不一定会有,需要自己编译

    redis-sentinel /path/to/sentinel.conf

    # 使用 redis-server 程序启动, 一定可用

    # 测试时可以加上   --protected-mode no, 在不设置密码情况下访问redis

    redis-server /path/to/sentinel.conf --sentinel
4. 验证哨兵运行情况
        通过redis-cli 连接到sentinel 服务内部:

        redis-cli -p    # 连接到sentinel

        info sentinel         # 查看哨兵信息

        SENTINEL slaves mymaster    # 查看master下的slave服务器情况

        SENTINEL sentinels mymaster    # 查看master的哨兵服务器列表

        SENTINEL get-master-addr-by-name mymaster    # 获取master地址信息
5. 故障模拟
将master节点关闭后,等待一段时间,再获取master地址看看。master已经切换了。
SENTINEL get-master-addr-by-name mymaster # 获取master地址信息
三、哨兵实现高可用的运行原理
1. Sentinel 的定时任务
- 每个 Sentinel 以每秒钟一次的频率向它所知的主服务器、从服务器以及其他 Sentinel 实例发送一个 PING 命令。
- 如果一个实例(instance)距离最后一次有效回复 PING 命令的时间超过 down-after-milliseconds 选项所指定的值, 那么这个实例会被 Sentinel 标记为主观下线。 一个有效回复可以是: +PONG 、 -LOADING 或者 -MASTERDOWN 。
- 如果一个主服务器被标记为主观下线, 那么正在监视这个主服务器的所有 Sentinel 要以每秒一次的频率确认主服务器的确进入了主观下线状态。
- 如果一个主服务器被标记为主观下线, 并且有足够数量的 Sentinel (至少要达到配置文件指定的数量)在指定的时间范围内同意这一判断, 那么这个主服务器被标记为客观下线。
- 在一般情况下, 每个 Sentinel 会以每 10 秒一次的频率向它已知的所有主服务器和从服务器发送 INFO 命令。 当一个主服务器被 Sentinel 标记为客观下线时, Sentinel 向下线主服务器的所有从服务器发送 INFO 命令的频率会从 10 秒一次改为每秒一次。
- 当没有足够数量的 Sentinel 同意主服务器已经下线, 主服务器的客观下线状态就会被移除。 当主服务器重新向 Sentinel 的 PING 命令返回有效回复时, 主服务器的主观下线状态就会被移除。
2. 自动发现 Sentinel 和从服务器
一个 Sentinel 可以与其他多个 Sentinel 进行连接, 各个 Sentinel 之间可以互相检查对方的可用性, 并进行信息交换。
Sentinel 可以通过发布与订阅功能来自动发现正在监视相同主服务器的其他 Sentinel , 这一功能是通过向pub/sub频道 sentinel:hello 发送信息来实现的。
Sentinel 可以通过询问主服务器来获得所有从服务器的信息。
- 每个 Sentinel 会以每两秒一次的频率, 通过发布与订阅功能, 向被它监视的所有主服务器和从服务器的 sentinel:hello 频道发送一条信息, 信息中包含了 Sentinel 的 IP 地址、端口号和运行 ID (runid)。
- 每个 Sentinel 都订阅了被它监视的所有主服务器和从服务器的 sentinel:hello 频道, 查找之前未出现过的 sentinel (looking for unknown sentinels)。 当一个 Sentinel 发现一个新的 Sentinel 时, 它会将新的 Sentinel 添加到一个列表中, 这个列表保存了 Sentinel 已知的, 监视同一个主服务器的所有其他 Sentinel 。
- Sentinel 发送的信息中还包括完整的主服务器当前配置(configuration)。 如果一个 Sentinel 包含的主服务器配置比另一个 Sentinel 发送的配置要旧, 那么这个 Sentinel 会立即升级到新配置上。
- 在将一个新 Sentinel 添加到监视主服务器的列表上面之前, Sentinel 会先检查列表中是否已经包含了和要添加的 Sentinel 拥有相同运行 ID 或者相同地址(包括 IP 地址和端口号)的 Sentinel , 如果是的话, Sentinel 会先移除列表中已有的那些拥有相同运行 ID 或者相同地址的 Sentinel , 然后再添加新 Sentinel 。
3. 故障转移
一次故障转移操作由以下步骤组成:
- 发现主服务器已经进入客观下线状态。
- 对我们的当前纪元进行自增(详情请参考 Raft leader election ), 并尝试在这个纪元中当选。
- 如果当选失败, 那么在设定的故障迁移超时时间的两倍之后, 重新尝试当选。 如果当选成功, 那么执行以下步骤。
- 选出一个从服务器,并将它升级为主服务器。
- 向被选中的从服务器发送
SLAVEOF NO ONE命令,让它转变为主服务器。 - 通过发布与订阅功能, 将更新后的配置传播给所有其他 Sentinel , 其他 Sentinel 对它们自己的配置进行更新。
- 向已下线主服务器的从服务器发送 SLAVEOF 命令, 让它们去复制新的主服务器。
- 当所有从服务器都已经开始复制新的主服务器时, 领头 Sentinel 终止这次故障迁移操作。
每当一个 Redis 实例被重新配置(reconfigured) —— 无论是被设置成主服务器、从服务器、又或者被设置成其他主服务器的从服务器 —— Sentinel 都会向被重新配置的实例发送一个 CONFIG REWRITE 命令, 从而确保这些配置会持久化在硬盘里。
Sentinel 使用以下规则来选择新的主服务器:
- 在失效主服务器属下的从服务器当中, 那些被标记为主观下线、已断线、或者最后一次回复 PING 命令的时间大于五秒钟的从服务器都会被淘汰。
- 在失效主服务器属下的从服务器当中, 那些与失效主服务器连接断开的时长超过 down-after 选项指定的时长十倍的从服务器都会被淘汰。
- 在经历了以上两轮淘汰之后剩下来的从服务器中, 我们选出复制偏移量(replication offset)最大的那个从服务器作为新的主服务器; 如果复制偏移量不可用, 或者从服务器的复制偏移量相同, 那么带有最小运行 ID 的那个从服务器成为新的主服务器。
四、客户端使用哨兵系统
哨兵系统搭建好之后,就可以提供服务了。那么,如何提供服务呢?从最前面的两张架构图中,我们可以看到,sentinel 差不多是作为一个配置中心或者存在的,它只会为客户端提供master/slave的相关信息,而并不会直接代替redis实例进行存取操作。所以,哨兵模式,需要客户端做更多的工作,原来的直接连接redis变为间接从sentinel获取信息,再连接,还要维护可能的信息变更。
当然,这种工作一般是要交给sdk做的,实现原理也差不多,我们就以 jedis 作为切入点,详解下客户端如何使用sentinel.
1. 引入pom依赖
        <dependency>

            <groupId>redis.clients</groupId>

            <artifactId>jedis</artifactId>

            <version>2.9.0</version>

        </dependency>
2. 单元测试
public class RedisSentinelTest {

    @Test

    public void testSentinel() throws Exception {

        // 池化基础信息配置

        JedisPoolConfig jedisPoolConfig = new JedisPoolConfig();

        jedisPoolConfig.setMaxTotal(10);

        jedisPoolConfig.setMaxIdle(5);

        jedisPoolConfig.setMinIdle(5);

        // 哨兵连接信息配置

        String masterName = "mymaster";

        Set<String> sentinels = new HashSet<>();

        sentinels.add("127.0.0.1:26379");

        sentinels.add("127.0.0.1:26378");

        sentinels.add("127.0.0.1:26377");

        // 在redis需要使用密码访问时,传入即可

        String password = null;

        // 使用 JedisSentinelPool 封装哨兵的访问细节

        JedisSentinelPool pool = new JedisSentinelPool(masterName, sentinels, jedisPoolConfig, password);

        Jedis jedis = pool.getResource();

        String key = "key1";

        String value = "Value1";

        jedis.set(key, value);

        System.out.println("set a value to Redis over. " + key + "->" + value);

        value = jedis.get("key1");

        System.out.println("get a value from Redis over. " + key + "->" + value);

        pool.close();

    }

}
3. sentinel 处理过程解析
jedis的sdk中已经将哨兵封装得和普通的redis实例请求差不多了,所以,我们需要深入理解下其处理过程。
首先是在初始化 JedisSentinelPool 时,其会与sentinel列表中选择一个与其建立连接:
    // redis.clients.jedis.JedisSentinelPool#JedisSentinelPool

  public JedisSentinelPool(String masterName, Set<String> sentinels) {

    this(masterName, sentinels, new GenericObjectPoolConfig(), Protocol.DEFAULT_TIMEOUT, null,

        Protocol.DEFAULT_DATABASE);

  }

  public JedisSentinelPool(String masterName, Set<String> sentinels,

      final GenericObjectPoolConfig poolConfig, int timeout, final String password,

      final int database) {

    this(masterName, sentinels, poolConfig, timeout, timeout, password, database);

  }

  public JedisSentinelPool(String masterName, Set<String> sentinels,

      final GenericObjectPoolConfig poolConfig, final int timeout, final int soTimeout,

      final String password, final int database) {

    this(masterName, sentinels, poolConfig, timeout, soTimeout, password, database, null);

  }

  public JedisSentinelPool(String masterName, Set<String> sentinels,

      final GenericObjectPoolConfig poolConfig, final int connectionTimeout, final int soTimeout,

      final String password, final int database, final String clientName) {

    this.poolConfig = poolConfig;

    this.connectionTimeout = connectionTimeout;

    this.soTimeout = soTimeout;

    this.password = password;

    this.database = database;

    this.clientName = clientName;

    // 从sentinel中获取master信息,关键

    HostAndPort master = initSentinels(sentinels, masterName);

    // 初始化连接池,非本文重点

    initPool(master);

  }

  private HostAndPort initSentinels(Set<String> sentinels, final String masterName) {

    HostAndPort master = null;

    boolean sentinelAvailable = false;

    log.info("Trying to find master from available Sentinels...");

    // 依次遍历 sentinels, 直到找到一个可用的sentinel

    for (String sentinel : sentinels) {

      final HostAndPort hap = HostAndPort.parseString(sentinel);

      log.fine("Connecting to Sentinel " + hap);

      Jedis jedis = null;

      try {

        jedis = new Jedis(hap.getHost(), hap.getPort());

        // 向sentinel发送命令请求: SENTINEL get-master-addr-by-name mymaster, 获取master地址信息

        List<String> masterAddr = jedis.sentinelGetMasterAddrByName(masterName);

        // connected to sentinel...

        sentinelAvailable = true;

        if (masterAddr == null || masterAddr.size() != 2) {

          log.warning("Can not get master addr, master name: " + masterName + ". Sentinel: " + hap

              + ".");

          continue;

        }

        master = toHostAndPort(masterAddr);

        log.fine("Found Redis master at " + master);

        break;

      } catch (JedisException e) {

        // resolves #1036, it should handle JedisException there's another chance

        // of raising JedisDataException

        log.warning("Cannot get master address from sentinel running @ " + hap + ". Reason: " + e

            + ". Trying next one.");

      } finally {

        if (jedis != null) {

          jedis.close();

        }

      }

    }

    if (master == null) {

      if (sentinelAvailable) {

        // can connect to sentinel, but master name seems to not

        // monitored

        throw new JedisException("Can connect to sentinel, but " + masterName

            + " seems to be not monitored...");

      } else {

        throw new JedisConnectionException("All sentinels down, cannot determine where is "

            + masterName + " master is running...");

      }

    }

    log.info("Redis master running at " + master + ", starting Sentinel listeners...");

    // 为每个 sentinel, 建立一个监听线程, 监听 sentinel 的 +switch-master 信息

    // 当master发生变化时,重新初始化连接池

    for (String sentinel : sentinels) {

      final HostAndPort hap = HostAndPort.parseString(sentinel);

      MasterListener masterListener = new MasterListener(masterName, hap.getHost(), hap.getPort());

      // whether MasterListener threads are alive or not, process can be stopped

      masterListener.setDaemon(true);

      masterListeners.add(masterListener);

      masterListener.start();

    }

    return master;

  }

    // 每个 sentinel 监听线程事务处理流程如下

    // redis.clients.jedis.JedisSentinelPool.MasterListener#run

    @Override

    public void run() {

      running.set(true);

      while (running.get()) {

        j = new Jedis(host, port);

        try {

          // double check that it is not being shutdown

          if (!running.get()) {

            break;

          }

            // SUBSCRIBE +switch-master

          j.subscribe(new JedisPubSub() {

            @Override

            public void onMessage(String channel, String message) {

              log.fine("Sentinel " + host + ":" + port + " published: " + message + ".");

              String[] switchMasterMsg = message.split(" ");

                // 格式为: masterName xx xx masterHost masterPort

              if (switchMasterMsg.length > 3) {

                if (masterName.equals(switchMasterMsg[0])) {

                  initPool(toHostAndPort(Arrays.asList(switchMasterMsg[3], switchMasterMsg[4])));

                } else {

                  log.fine("Ignoring message on +switch-master for master name "

                      + switchMasterMsg[0] + ", our master name is " + masterName);

                }

              } else {

                log.severe("Invalid message received on Sentinel " + host + ":" + port

                    + " on channel +switch-master: " + message);

              }

            }

          }, "+switch-master");

        } catch (JedisConnectionException e) {

          if (running.get()) {

            log.log(Level.SEVERE, "Lost connection to Sentinel at " + host + ":" + port

                + ". Sleeping 5000ms and retrying.", e);

            try {

              Thread.sleep(subscribeRetryWaitTimeMillis);

            } catch (InterruptedException e1) {

              log.log(Level.SEVERE, "Sleep interrupted: ", e1);

            }

          } else {

            log.fine("Unsubscribing from Sentinel at " + host + ":" + port);

          }

        } finally {

          j.close();

        }

      }

    }
从上面流程我们也就可以看出客户端是如何处理 sentinel 和 redis 的关系的了。简单来说就是通过 sentinel get-master-addr-by-name xxx, 获取master地址信息,然后连接过去就可以了。在master发生变化时,通过pub/sub订阅sentinel信息,从而进行连接池的重置。
这个连接池又是如何处理的呢?我们可以简单看一下:
    // redis.clients.jedis.JedisSentinelPool#initPool

  private void initPool(HostAndPort master) {

    if (!master.equals(currentHostMaster)) {

      currentHostMaster = master;

      if (factory == null) {

        factory = new JedisFactory(master.getHost(), master.getPort(), connectionTimeout,

            soTimeout, password, database, clientName, false, null, null, null);

        initPool(poolConfig, factory);

      } else {

        factory.setHostAndPort(currentHostMaster);

        // although we clear the pool, we still have to check the

        // returned object

        // in getResource, this call only clears idle instances, not

        // borrowed instances

        internalPool.clear();

      }

      log.info("Created JedisPool to master at " + master);

    }

  }

  // redis.clients.util.Pool#initPool

  public void initPool(final GenericObjectPoolConfig poolConfig, PooledObjectFactory<T> factory) {

    if (this.internalPool != null) {

      try {

        closeInternalPool();

      } catch (Exception e) {

      }

    }

    this.internalPool = new GenericObjectPool<T>(factory, poolConfig);

  }
当要向redis写入数据时,会先从连接池里获取一个连接实例,其池化框架使用的是 GenericObjectPool 的通用能力,调用 JedisFactory 的 makeObject() 方法进行创建 :
  // redis.clients.jedis.JedisSentinelPool#getResource

  @Override

  public Jedis getResource() {

    while (true) {

      // 调用父类方法获取实例

      Jedis jedis = super.getResource();

      jedis.setDataSource(this);

      // get a reference because it can change concurrently

      final HostAndPort master = currentHostMaster;

      final HostAndPort connection = new HostAndPort(jedis.getClient().getHost(), jedis.getClient()

          .getPort());

      // host:port 比对,如果master未变化,说明获取到了正确的连接,返回

      if (master.equals(connection)) {

        // connected to the correct master

        return jedis;

      }

      // 如果master 发生了切换,则将当前连接释放,继续尝试获取master连接

      else {

        returnBrokenResource(jedis);

      }

    }

  }

  // redis.clients.util.Pool#getResource

  public T getResource() {

    try {

      return internalPool.borrowObject();

    } catch (NoSuchElementException nse) {

      throw new JedisException("Could not get a resource from the pool", nse);

    } catch (Exception e) {

      throw new JedisConnectionException("Could not get a resource from the pool", e);

    }

  }

    // org.apache.commons.pool2.impl.GenericObjectPool#borrowObject()

    @Override

    public T borrowObject() throws Exception {

        return borrowObject(getMaxWaitMillis());

    }

    // org.apache.commons.pool2.impl.GenericObjectPool#borrowObject(long)

    public T borrowObject(final long borrowMaxWaitMillis) throws Exception {

        assertOpen();

        final AbandonedConfig ac = this.abandonedConfig;

        if (ac != null && ac.getRemoveAbandonedOnBorrow() &&

                (getNumIdle() < 2) &&

                (getNumActive() > getMaxTotal() - 3) ) {

            removeAbandoned(ac);

        }

        PooledObject<T> p = null;

        // Get local copy of current config so it is consistent for entire

        // method execution

        final boolean blockWhenExhausted = getBlockWhenExhausted();

        boolean create;

        final long waitTime = System.currentTimeMillis();

        while (p == null) {

            create = false;

            p = idleObjects.pollFirst();

            if (p == null) {

                // 没有获取到连接时,主动创建一个

                p = create();

                if (p != null) {

                    create = true;

                }

            }

            if (blockWhenExhausted) {

                if (p == null) {

                    if (borrowMaxWaitMillis < 0) {

                        p = idleObjects.takeFirst();

                    } else {

                        p = idleObjects.pollFirst(borrowMaxWaitMillis,

                                TimeUnit.MILLISECONDS);

                    }

                }

                if (p == null) {

                    throw new NoSuchElementException(

                            "Timeout waiting for idle object");

                }

            } else {

                if (p == null) {

                    throw new NoSuchElementException("Pool exhausted");

                }

            }

            if (!p.allocate()) {

                p = null;

            }

            if (p != null) {

                try {

                    // 确保激活当前数据库

                    factory.activateObject(p);

                } catch (final Exception e) {

                    try {

                        destroy(p);

                    } catch (final Exception e1) {

                        // Ignore - activation failure is more important

                    }

                    p = null;

                    if (create) {

                        final NoSuchElementException nsee = new NoSuchElementException(

                                "Unable to activate object");

                        nsee.initCause(e);

                        throw nsee;

                    }

                }

                if (p != null && (getTestOnBorrow() || create && getTestOnCreate())) {

                    boolean validate = false;

                    Throwable validationThrowable = null;

                    try {

                        validate = factory.validateObject(p);

                    } catch (final Throwable t) {

                        PoolUtils.checkRethrow(t);

                        validationThrowable = t;

                    }

                    if (!validate) {

                        try {

                            destroy(p);

                            destroyedByBorrowValidationCount.incrementAndGet();

                        } catch (final Exception e) {

                            // Ignore - validation failure is more important

                        }

                        p = null;

                        if (create) {

                            final NoSuchElementException nsee = new NoSuchElementException(

                                    "Unable to validate object");

                            nsee.initCause(validationThrowable);

                            throw nsee;

                        }

                    }

                }

            }

        }

        updateStatsBorrow(p, System.currentTimeMillis() - waitTime);

        return p.getObject();

    }

    /**

     * Attempts to create a new wrapped pooled object.

     * <p>

     * If there are {@link #getMaxTotal()} objects already in circulation

     * or in process of being created, this method returns null.

     *

     * @return The new wrapped pooled object

     *

     * @throws Exception if the object factory's {@code makeObject} fails

     */

    private PooledObject<T> create() throws Exception {

        int localMaxTotal = getMaxTotal();

        // This simplifies the code later in this method

        if (localMaxTotal < 0) {

            localMaxTotal = Integer.MAX_VALUE;

        }

        // Flag that indicates if create should:

        // - TRUE:  call the factory to create an object

        // - FALSE: return null

        // - null:  loop and re-test the condition that determines whether to

        //          call the factory

        Boolean create = null;

        while (create == null) {

            synchronized (makeObjectCountLock) {

                final long newCreateCount = createCount.incrementAndGet();

                if (newCreateCount > localMaxTotal) {

                    // The pool is currently at capacity or in the process of

                    // making enough new objects to take it to capacity.

                    createCount.decrementAndGet();

                    if (makeObjectCount == 0) {

                        // There are no makeObject() calls in progress so the

                        // pool is at capacity. Do not attempt to create a new

                        // object. Return and wait for an object to be returned

                        create = Boolean.FALSE;

                    } else {

                        // There are makeObject() calls in progress that might

                        // bring the pool to capacity. Those calls might also

                        // fail so wait until they complete and then re-test if

                        // the pool is at capacity or not.

                        makeObjectCountLock.wait();

                    }

                } else {

                    // The pool is not at capacity. Create a new object.

                    makeObjectCount++;

                    create = Boolean.TRUE;

                }

            }

        }

        if (!create.booleanValue()) {

            return null;

        }

        final PooledObject<T> p;

        try {

            // 调用指定factory的 makeObject() 方法

            p = factory.makeObject();

        } catch (final Exception e) {

            createCount.decrementAndGet();

            throw e;

        } finally {

            synchronized (makeObjectCountLock) {

                makeObjectCount--;

                makeObjectCountLock.notifyAll();

            }

        }

        final AbandonedConfig ac = this.abandonedConfig;

        if (ac != null && ac.getLogAbandoned()) {

            p.setLogAbandoned(true);

        }

        createdCount.incrementAndGet();

        allObjects.put(new IdentityWrapper<T>(p.getObject()), p);

        return p;

    }

  // 使用 JedisFactory 创建一个连接到 master

  // redis.clients.jedis.JedisFactory#makeObject

  @Override

  public PooledObject<Jedis> makeObject() throws Exception {

    final HostAndPort hostAndPort = this.hostAndPort.get();

    final Jedis jedis = new Jedis(hostAndPort.getHost(), hostAndPort.getPort(), connectionTimeout,

        soTimeout, ssl, sslSocketFactory, sslParameters, hostnameVerifier);

    try {

      jedis.connect();

      // 如果存在密码设置,则进行 auth xxx 操作

      // redis 配置: requirepass xxx

      if (null != this.password) {

        jedis.auth(this.password);

      }

      if (database != 0) {

        jedis.select(database);

      }

      if (clientName != null) {

        jedis.clientSetname(clientName);

      }

    } catch (JedisException je) {

      jedis.close();

      throw je;

    }

    return new DefaultPooledObject<Jedis>(jedis);

  }

  // redis.clients.jedis.JedisFactory#activateObject

  @Override

  public void activateObject(PooledObject<Jedis> pooledJedis) throws Exception {

    final BinaryJedis jedis = pooledJedis.getObject();

    if (jedis.getDB() != database) {

      jedis.select(database);

    }

  }
获取到client连接后,主可以任意地通过网络io与真实redis进行交互了。哨兵也不会成为性能问题了。
五、几点思考
哨兵模式的出现,仅为了解决单机的高可用问题,而并不会解决单机容量问题(集群模式会处理这个问题)。在当前的互联网环境中,应用面也许没有那么广。但思路是值得借鉴的。
Sentinel 在配置时只需配置master地址即可,其slave信息,sentinel信息,都是通过master来推断的。所以,一定要确保在启动时master是可用的,否则系统本身必须无法启动。看起来是个脆弱的协议。
Sentinel 的动态切换信息会写到配置文件中去,而这个文件最初又是由管理员写的,即动态配置与静态混合在一起。容易让人混淆,且容易改错。看起来并不是那么完美。(也许设计者有其考虑吧)
如果redis中设置了密码,则要求必须保持全部一致,这在一定程度上会有些误会。
redis Sentinel 本质上是一个对等集群系统,提供服务注册及选主服务,连接任意节点结果都是一样的,节点间保持通过pub/sub两两通信。
redis 本身就是一款高性能和高性价比的缓存产品。而sentinel为了解决一个高可用问题,带来的额外支出并不小,这也必然会影响我们的选择!
市面上有很多做故障检测和切换的工具,如nginx、keepalived、zookeeper,但都无法做到自动选主功能,因为这是应用相关性强的服务,只能是应用自身实现。但为什么不把高可用选主等功能融合到redis的服务中呢?毕竟这种功能的抽离,并没有太多地复用性。看市面很多产品,高可用都是其自身实现的一个功能,只需做好必要配置即可,无需其他负担。redis的哨兵架构倒是特立独行了。
Redis(十一):哨兵模式架构设计分析的更多相关文章
- Redis-Sentinel Redis的哨兵模式
Redis-Sentinel Redis的哨兵模式Redis Sentinel 模式简介Redis-Sentinel是官方推荐的高可用解决方案,当redis在做master-slave的高可用方案时, ...
- redis的哨兵模式
我是在一台服务器上安装了三个redis 一主两从 想安装gcc gcc-c++ make tcl lrzsz yum -y install gcc gcc-c++ make tcl lrzsz ...
- redis主从+redis的哨兵模式
三台机器分布 192.168.189.129 // master的角色 192.168.189.130 // slave1的角色 192.168.189.131 // salve2的角色 ...
- redis主从+哨兵模式(借鉴)
三台机器分布 192.168.189.129 // master的角色 192.168.189.130 // slave1的角色 192.168.189.131 // salve2的角色 ...
- Redis进阶:Redis的哨兵模式搭建
Redis进阶:Redis的哨兵模式搭建 哨兵机制介绍 单机版的Redis存在性能瓶颈,Redis通过提高主从复制实现读写分离,提高了了Redis的可用性,另一方便也能实现数据在多个Redis直接的备 ...
- Redis sentinel 哨兵模式集群方案配置
第一个方案是创建 redis cluster,第二种方案就是用哨兵模式来进行主从替换以及故障恢复.兵模式集群方案配置 一.sentinel介绍 Sentinel作用: 1):Master状态检测 2) ...
- Redis sentinel 哨兵模式
一.sentinel介绍 Sentinel作用: 1):Master状态检测 2):如果Master异常,则会进行Master-Slave切换,将其中一个Slave作为Master,将之前的Maste ...
- Redis 5 配置 Redis sentinel(哨兵模式)
先了解一下哨兵都 做了什么工作:Redis 的 Sentinel 系统用于管理多个 Redis 服务器(instance), 该系统执行以下三个任务: * 监控(Monitoring): Sentin ...
- Redis 16 哨兵模式
参考源 https://www.bilibili.com/video/BV1S54y1R7SB?spm_id_from=333.999.0.0 版本 本文章基于 Redis 6.2.6 概述 主从切换 ...
随机推荐
- LeetCode No.97,98,99
No.97 IsInterleave 交错字符串 题目 给定三个字符串 s1, s2, s3, 验证 s3 是否是由 s1 和 s2 交错组成的. 示例 输入: s1 = "aabcc&qu ...
- 导入import的多种形式
参考资料:anaconda官方资料 一.module(模块) 比如fibo是个模块(.py文件),其中有fib.fib2等函数 第一种形式:import fibo 在当前的符号表中,这并不会直接进入到 ...
- npm基本语法
npm -version 查看npm版本 npm install <name> 安装node.js的依赖包 npm install <name> @3.0.6 安装版本为3 ...
- mysql远程导出
D:\phpStudy\PHPTutorial\MySQL\bin>mysqldump -h192.168.1.1 -u用户名 -p密码 --default-character-set=utf8 ...
- [LC] 121. Best Time to Buy and Sell Stock
Say you have an array for which the ith element is the price of a given stock on day i. If you were ...
- 微软要冷落windows是天方夜谭还是势在必行
自从90年代开始,微软就统治着PC桌面市场,真正意义上地改变了世界,在很长一段时间内,Windows就和阳光.空气.水.电能一样,成为生活必需品,无处不在,又让人感觉不到其存在,正因如此,微软的市值于 ...
- 图形学创世纪——写在SIGGRAPH 40年的边上
40年的边上" title="图形学创世纪--写在SIGGRAPH 40年的边上"> 前言: SIGGRAPH是由ACM SIGGRAPH(美国计算机协会计算机图形 ...
- 使用fastai完成图像分类
by Wenqi Sun 1 min read Categories Deep Learning Tags Fastai CNN Application 1. 使用现有数据集进行分类 图像数据为Oxf ...
- vue-cli多页面应用常遇到的问题
1.TypeError: webpack.optimize.OccurenceOrderPlugin is not a constructor 此问题出现在webpack 3中,解决办法很简单,将oc ...
- Win32双缓冲画图原理
网上有许多文章讲述了如何使用Visual C++程序实现双缓冲,都是用C++面向对象语言写的,可能对很多没有接触过面向对象语言的C语言初学者来说理解起来有些困难,并且有些好心人也只是把源代码贴上去,不 ...