【线上测试之后的应用】基于MySQL+MHA+Haproxy构建高可用负载均衡数据库集群(详解)
这里我们先介绍一下MHA是什么,其次就是它的应用与测试,同时为了大家呈现了数据备份案例,最后总结了使用情况以及注意事项和解决办法
一、MHA 概述
MHA(Master High Availability)是可以在MySQL上使用的一套高可用方案、所编写的语言为Perl
从名字上我们可以看到、MHA的目的就是为了维护Master的高可用、也是是一套相对比较成熟的MySQL高可用解决方案
在MySQL故障进行切换的时候、MHA可做到10-30秒之间自动完成故障切换工作、选择一个最优的从库作为新的Master
在这个故障切换的同时、MHA也可以在最大程度上保证数据的一致性、以此来达到数据库的高可用性和数据的一致性
MHA在故障切换的过程中、会试图从异常的Master保存binlog、以此来确保数据不丢失
这里存在一个问题、如果Master无法通过SSH访问了、那么MHA也就没办法保存binlog了、故障确实转移了、新的Master也确实选举出来了但是有些数据也丢失了
所以使用MySQL的半同步复制就可以降低数据丢失的风险、MHA可以与半同步结合、如果只有一个Slave收到了最新的binlog、那么MHA可将最新的binlog应用到其它的节点、以此来保证数据的一致性
部署MHA最少需要三台节点、一主两从、其中一台为Master、另外两个从作为备选Master、在不出于成本考虑的情况下、生产环境最好是一主三从、因为一台Master出现异常还有两台Slave节点可读
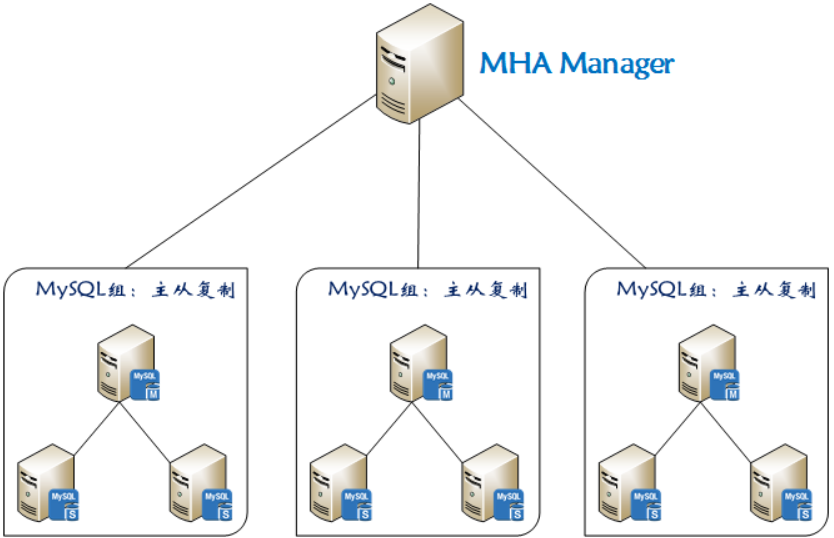
1)MHA 组成结构
MHA的组成分为两部分、分别为:管理节点(MHA Manager)与 数据节点(MHA Node)
MHA-Manager:可部署在单个节点上、它会定时去检测集群中的节点、当发现Master故障它就会自动将拥有最新数据的Slave提升为新的Master、然后将其它所有Slave指向新的Master
MHA-Node:  需要部署在每台MySQL节点上、MHA-Node具备中继日志清理、中继日志对比、binlog数据保存等功能
2)MHA 工作原理
MHA两大核心功能:Master宕机后自动切换到新的Master、故障切换的时候保证整个MySQL集群的数据丢失尽可能最小
1、如果Master出现了异常、MHA则尝试从异常的Master上保存binlog文件
2、查找最新更新的Slave、因为这台Slave具有用于恢复的所有中继日志
3、查找到以后选择它作为新的Master、并应用中继日志到其它的Slave节点、同时也会激活虚拟IP
4、应用成功以后、最后让其它的Slave节点连接最新的Master并进行数据复制
3)MHA 常用工具
1、MHA-Manager 所带工具
masterha_manger                #启动MHA
masterha_stop                  #停止MHA
masterha_check_ssh             #检查SSH远程情况
masterha_check_repl            #检查主从复制情况
masterha_check_status          #检测MHA运行状态
masterha_master_monitor        #检测master是否宕机
masterha_master_switch         #手动进行故障切换
masterha_secondary_check       #多网线路检查Master节点
masterha_conf_host             #添加或删除配置的server信息
2、MHA-Node 所带工具
purge_relay_logs            #清除无用的中继日志
save_binary_logs            #保存宕机master的binlog数据
filter_mysqlbinlog             #过滤掉不必要的ROLLBACK事件
apply_diff_relay_logs        #对比中继日志的差异、并将差异的事件应用至其它的slave
4)MHA 配置文件详解
[server default]
#默认区域、也是全局范围、如果MySQL节点中有相同的地方、则参数可定义于此、比如binlog位置相同

manager_workdir = /etc/mha/conf
#MHA的工作目录、里面存放着配置文件、日志文件、脚本等

manager_log = /etc/mha/logs/ms1.log
#定义MHA日志所存储的目录

remote_workdir = /opt
#故障转移发生之后、MHA则会在MySQL节点上保存binlog文件、而这个目录就是存储binlog文件的、默认为/var/tmp

report_script = /etc/mha/script/send_report
#故障转移发生之后、如果需要查看故障转移报告、则可调用此脚本、但里面有些参数还需调整

shutdown_script = /etc/mha/script/power_manager
#设置Master出现故障之后关机、用于防止脑裂

master_ip_failover_script = /etc/mha/script/ms1_ip_failover
#定义Master出现故障之后的自动转移脚本、里面有些参数还需调整

secondary_check_script = /usr/local/bin/masterha_secondary_check -s 10.2.3.12 -s 10.2.3.13
#默认为单线路检查、即Manager to Master、此项为定义多线路检查Master状态、如果Manager到Master之间的监控出现问题、则Manager尝试从10.2.3.12或10.2.3.13登录到Master

user = mha
#定义MHA管理用户、这个用户需要在所有MySQL节点中存在

password = abc-123
#定义MHA管理用户的密码

repl_user = slave
#定义MySQL主从复制用户、这个用户也需要在所有MySQL节点中存在

repl_password = abc-123
#定义主从复制用户的密码

ping_type = connect
#定义MHA的检查类型、默认为select、从0.56开始也引入了insert类型、这里我定义为connect

ping_interval = 3
#定义检查间隔、默认为3秒

[server1]
#本地区域、在这里所定义的只针对在这个区域的MySQL节点生效

ssh_user = root
#定义MySQL节点上的SSH用户、如果所有MySQL节点的远程用户一样、则可将其写入默认区域

ssh_port = 22
#定义SSH的端口、如果所有MySQL节点的远程端口一样、则可将其写入默认区域

hostname = 10.2.3.11
#定义MySQL节点的IP地址

port = 3635
#定义MySQL端口

master_binlog_dir = /usr/local/mysql/binlog
#定义MySQL存储binlog的位置、如果所有MySQL节点存储binlog的位置相同、则可将其写入默认区域

[server2]
ssh_user = root
ssh_port = 22
hostname = 10.2.3.12
port = 3635

candidate_master = 1
#设置候选Master、即发生故障转移之后将此节点提升为新的Master、即使这个节点不是集群中事件最新的Slave

check_repl_delay = 0
#触发故障切换后在选择新的Master时将会忽略复制延迟、可以与 candidate_master = 1 配合使用、说的通俗一点就是故障转移之后、下一个Master一定是我

master_binlog_dir = /usr/local/mysql/binlog

[server3]
ssh_user = root
ssh_port = 22
hostname = 10.2.3.13
port = 3635
master_binlog_dir = /usr/local/mysql/binlog

[server3]
ssh_user = root
ssh_port = 22
hostname = 10.2.3.14
port = 3635

no_master = 1
#如果此项等于1、则相当于设置了这个MySQL节点永远不会成为Master、这对于不同SSH端口的MySQL节点非常有效、下面我会说到

master_binlog_dir = /usr/local/mysql/binlog
二、MySQL+MHA+Haproxy 部署
1)整体架构

2)服务器信息
| 主机 | 地址 | 系统 | 角色 | 端口 |
| node1 | 10.2.3.11 | CentOS-7.5 | Master | 3635 |
| node2 | 10.2.3.12 | CentOS-7.5 | Slave-1 | 3635 |
| node3 | 10.2.3.13 | CentOS-7.5 | Slave-2 | 3635 |
| node4 | 10.2.3.14 | CentOS-7.5 | Slave-3 | 3635 |
| node5 | 10.2.3.15 | CentOS-7.5 | Manager | Null |
| node6 | 10.2.3.16 | CentOS-7.5 | Proxy | 9999 |
3)安装MySQL
1、下载软件包
[root@node1 ~]# wget -c https://downloads.mysql.com/archives/get/file/mysql-5.7.27.tar.gz
[root@node1 ~]# wget -c https://nchc.dl.sourceforge.net/project/boost/boost/1.59.0/boost_1_59_0.tar.gz
2、安装相应的依赖包
[root@node1 ~]# yum -y install ncurses ncurses-devel cmake libaio libaio-devel pcre pcre-devel \
zlib zlib-devel bison bison-devel libverto libverto-devel libstdc++ libstdc++-devel \
dbus dbus-devel libss libss-devel gcc gcc-c++ autoconf m4 libgcc e2fsprogs perl-Data-Dumper
3、为MySQL创建运行用户与组
[root@node1 ~]# groupadd mysql
[root@node1 ~]# useradd -M -s /sbin/nologin mysql -g mysql
4、解压boost工具、并移动到指定位置即可、无需编译安装
[root@node1 ~]# tar xf boost_1_59_0.tar.gz
[root@node1 ~]# mv boost_1_59_0 /usr/local/boost
5、编译安装MySQL
[root@node1 ~]# tar xf mysql-5.7.27.tar.gz -C /usr/src/
[root@node1 ~]# cd /usr/src/mysql-5.7.27/
[root@node1 mysql-5.7.27]# cmake -DCMAKE_INSTALL_PREFIX=/usr/local/mysql \
-DMYSQL_DATADIR=/usr/local/mysql/data \
-DSYSCONFDIR=/etc \
-DDEFAULT_CHARSET=utf8 \
-DDEFAULT_COLLATION=utf8_general_ci \
-DWITH_EXTRA_CHARSETS=all \
-DENABLED_LOCAL_INFILE=ON \
-DWITH_DEBUG=0 \
-DWITH_BOOST=/usr/local/boost \
-DWITH_FEDERATED_STORAGE_ENGINE=1 \
-DMYSQL_UNIX_ADDR=/usr/local/mysql/tmp/mysql.sock
make -j 8 && make install -j 8 && cd ~
6、编译安装完成以后、创建对应的目录、并调整相应的参数
[root@node1 ~]# mkdir /usr/local/mysql/pid
[root@node1 ~]# mkdir /usr/local/mysql/logs
[root@node1 ~]# mkdir /usr/local/mysql/socket
[root@node1 ~]# mkdir /usr/local/mysql/tmp
[root@node1 ~]# mkdir /usr/local/mysql/ibtmp
[root@node1 ~]# mkdir /usr/local/mysql/binlog
[root@node1 ~]# mkdir /usr/local/mysql/relaylog
[root@node1 ~]# mkdir /usr/local/mysql/outcsv/
[root@node1 ~]# mkdir /usr/local/mysql/ibdata
[root@node1 ~]# mkdir /usr/local/mysql/undolog
[root@node1 ~]# mkdir /usr/local/mysql/redolog
[root@node1 ~]# chown -R mysql:mysql /usr/local/mysql
[root@node1 ~]# chmod -R 750 /usr/local/mysql/outcsv
[root@node1 ~]# echo 'export PATH=/usr/local/mysql/bin:$PATH' >> /etc/profile
[root@node1 ~]# source /etc/profile
7、定义MySQL配置文件
[root@node1 ~]# cat > /etc/my.cnf << EOF
[client]
port = 3635
socket = /usr/local/mysql/socket/mysql.sock

[mysqld]
user = mysql
port = 3635
federated
skip_ssl
bind_address = 0.0.0.0
max_connections = 3600
max_connect_errors = 200
autocommit = ON
skip-name-resolve
symbolic-links = 0
skip-external-locking
log_timestamps = system
explicit_defaults_for_timestamp = ON
transaction_isolation = read-committed
binlog_gtid_simple_recovery = ON
show_compatibility_56 = ON
transaction_write_set_extraction = OFF
socket = /usr/local/mysql/socket/mysql.sock
pid-file = /usr/local/mysql/pid/mysql.pid
log-error = /usr/local/mysql/logs/mysql_error.log
secure-file-priv = /usr/local/mysql/outcsv
innodb_tmpdir = /usr/local/mysql/ibtmp
basedir = /usr/local/mysql
datadir = /usr/local/mysql/data
tmpdir = /usr/local/mysql/tmp

character-set-server = utf8
init_connect = SET NAMES utf8
collation-server = utf8_general_ci

slow_query_log = ON
long_query_time = 1
min_examined_row_limit = 960
log_slow_admin_statements = ON
log_slow_slave_statements = ON
log_queries_not_using_indexes = OFF
slow_query_log_file = /usr/local/mysql/logs/mysql_slow.log

back_log = 360
tmp_table_size = 64M
max_allowed_packet = 64M
max_heap_table_size = 64M
sort_buffer_size = 1M
join_buffer_size = 1M
read_buffer_size = 2M
read_rnd_buffer_size = 2M
thread_cache_size = 64
thread_stack = 256K
query_cache_size = 32M
query_cache_limit = 2M
query_cache_min_res_unit = 2K
table_open_cache = 4096
open_files_limit = 65535
connect_timeout = 9
interactive_timeout = 21600
wait_timeout = 21600

innodb_data_file_path = ibdata1:12M;ibdata:12M:autoextend
innodb_autoextend_increment = 12
innodb_data_home_dir = /usr/local/mysql/ibdata

innodb_undo_tablespaces = 4
innodb_undo_logs = 128
innodb_max_undo_log_size = 1G
innodb_undo_log_truncate = ON
innodb_purge_rseg_truncate_frequency = 10
innodb_undo_directory = /usr/local/mysql/undolog

innodb_log_file_size = 128M
innodb_log_buffer_size = 16M
innodb_log_files_in_group = 3
innodb_flush_log_at_trx_commit = 2
innodb_flush_log_at_timeout = 1
innodb_flush_method = O_DIRECT
innodb_log_group_home_dir = /usr/local/mysql/redolog

innodb_temp_data_file_path = ibtmp1:12M:autoextend:max:5G
innodb_fast_shutdown = 0

default-storage-engine = InnoDB
innodb_buffer_pool_size = 2G
table_open_cache_instances = 8
innodb_buffer_pool_chunk_size = 256MB
innodb_page_size = 16k
innodb_sort_buffer_size = 1MB
innodb_file_per_table = ON
innodb_large_prefix = ON
innodb_purge_threads = 8
innodb_page_cleaners = 8
innodb_read_io_threads = 8
innodb_write_io_threads = 8
innodb_thread_concurrency = 16
innodb_flush_neighbors = 0
innodb_lru_scan_depth = 1024
innodb_lock_wait_timeout = 60
innodb_print_all_deadlocks = ON
innodb_deadlock_detect = ON
innodb_strict_mode = ON
innodb_buffer_pool_load_at_startup = ON
innodb_buffer_pool_dump_at_shutdown = ON
EOF
8、对MySQL进行初始化
[root@node1 ~]# /usr/local/mysql/bin/mysqld --initialize-insecure --user=mysql --basedir=/usr/local/mysql --datadir=/usr/local/mysql/data
[root@node1 ~]# echo $?
0
9、将MySQL添加为系统服务
[root@node1 ~]# cp /usr/local/mysql/support-files/mysql.server /usr/local/mysql/bin/mysql.sh
[root@node1 ~]# chmod +x /usr/local/mysql/bin/mysql.sh
[root@node1 ~]# cat > /usr/lib/systemd/system/mysql.service << EOF
[Unit]
Description=MySQL
After=network.target

[Service]
User=mysql
Group=mysql
Type=forking
PrivateTmp=false
LimitNOFILE=65535
ExecStart=/usr/local/mysql/bin/mysql.sh start
ExecStop=/usr/local/mysql/bin/mysql.sh stop

[Install]
WantedBy=multi-user.target
EOF
10、启动MySQL并为root用户设置密码
[root@node1 ~]# systemctl start mysql
[root@node1 ~]# systemctl enable mysql
[root@node1 ~]# netstat -anput | grep mysql
tcp        0      0 0.0.0.0:3635            0.0.0.0:*               LISTEN      34411/mysqld
[root@node1 ~]# mysql -e"update mysql.user set authentication_string=password('abc-123') where user='root';flush privileges;"
4)部署主从复制
1、创建相应的用户
提示:下面创建的用户依次为:程序连接用户、MHA管理用户、中继日志清理用户、主从复制用户、这些用户需要在所有的MySQL节点上创建
[root@node1 ~]# mysql -uroot -pabc-123 -P3635 2> /dev/null -e"grant all privileges on *.* to 'mds'@'10.2.3.%' identified by 'abc-123';"
[root@node1 ~]# mysql -uroot -pabc-123 -P3635 2> /dev/null -e"grant all privileges on *.* to 'mha'@'10.2.3.%' identified by 'abc-123';"
[root@node1 ~]# mysql -uroot -pabc-123 -P3635 2> /dev/null -e"grant all privileges on *.* to 'purge'@'127.0.0.1' identified by 'abc-123';"
[root@node1 ~]# mysql -uroot -pabc-123 -P3635 2> /dev/null -e"grant replication slave on *.* to 'slave'@'10.2.3.%' identified by 'abc-123';"
2、复制对应的命令
提示:因为在检查与转移的过程中需要调用MySQL的命令、所以这里需要将其复制到对应的地方、这些命令也需要在所有的MySQL节点上执行
[root@node1 ~]# cp /usr/local/mysql/bin/mysql /usr/local/bin/
[root@node1 ~]# cp /usr/local/mysql/bin/mysqlbinlog /usr/local/bin/
[root@node1 ~]# cp /usr/local/mysql/bin/mysqladmin /usr/local/bin/
3、定义Master 的配置文件
server-id = 11
sync_binlog = 0
expire_logs_days = 6
max_binlog_size = 512M
max_binlog_cache_size = 8M
binlog_format = row
log-slave-updates = true
log_bin = /usr/local/mysql/binlog/mysql-bin
log_bin_index = /usr/local/mysql/binlog/mysql-bin.index
配置完成以后重启MySQL、并查看相应的参数、因为后面的Slave节点需要用到
[root@node1 ~]# systemctl restart mysql
[root@node1 ~]# mysql -uroot -pabc-123 -P3635 2> /dev/null -e"show master status;"
+------------------+----------+--------------+------------------+-------------------+
| File             | Position | Binlog_Do_DB | Binlog_Ignore_DB | Executed_Gtid_Set |
+------------------+----------+--------------+------------------+-------------------+
| mysql-bin.000001 |      154 |              | mysql            |                   |
+------------------+----------+--------------+------------------+-------------------+
4、定义Slave-1 的配置文件
server-id = 12
sync_binlog = 0
expire_logs_days = 6
max_binlog_size = 512M
max_binlog_cache_size = 8M
binlog_format = row
log-slave-updates = true
log_bin = /usr/local/mysql/binlog/mysql-bin
log_bin_index = /usr/local/mysql/binlog/mysql-bin.index
sync_relay_log = 0
sync_relay_log_info = 0
relay_log_purge = OFF
relay_log_recovery = ON
max_relay_log_size = 512M
master_info_repository = table
relay_log_info_repository = table
relay-log = /usr/local/mysql/relaylog/mysql-relay
relay-log-index = /usr/local/mysql/relaylog/mysql-relay.index
5、定义Slave-2 的配置文件
server-id = 13
sync_binlog = 0
expire_logs_days = 6
max_binlog_size = 512M
max_binlog_cache_size = 8M
binlog_format = row
log-slave-updates = true
log_bin = /usr/local/mysql/binlog/mysql-bin
log_bin_index = /usr/local/mysql/binlog/mysql-bin.index
sync_relay_log = 0
sync_relay_log_info = 0
relay_log_purge = OFF
relay_log_recovery = ON
max_relay_log_size = 512M
master_info_repository = table
relay_log_info_repository = table
relay-log = /usr/local/mysql/relaylog/mysql-relay
relay-log-index = /usr/local/mysql/relaylog/mysql-relay.index
6、定义Slave-3 的配置文件
server-id = 14
sync_binlog = 0
expire_logs_days = 6
max_binlog_size = 512M
max_binlog_cache_size = 8M
binlog_format = row
log-slave-updates = true
log_bin = /usr/local/mysql/binlog/mysql-bin
log_bin_index = /usr/local/mysql/binlog/mysql-bin.index
sync_relay_log = 0
sync_relay_log_info = 0
relay_log_purge = OFF
relay_log_recovery = ON
max_relay_log_size = 512M
master_info_repository = table
relay_log_info_repository = table
relay-log = /usr/local/mysql/relaylog/mysql-relay
relay-log-index = /usr/local/mysql/relaylog/mysql-relay.index
7、配置完成以后重启服务并向Master进行同步
[root@node2 ~]# systemctl restart mysql
[root@node2 ~]# mysql -uroot -pabc-123 -P3635 2> /dev/null -e"change master to master_host='10.2.3.11',master_port=3635,master_user='slave',master_password='abc-123',master_log_file='mysql-bin.000001',master_log_pos=154;"
[root@node2 ~]# mysql -uroot -pabc-123 -P3635 2> /dev/null -e"start slave;"
[root@node2 ~]# mysql -uroot -pabc-123 -P3635 2> /dev/null -e"show slave status\G" | head -13
*************************** 1. row ***************************
               Slave_IO_State: Waiting for master to send event
                  Master_Host: 10.2.3.11
                  Master_User: slave
                  Master_Port: 3635
                Connect_Retry: 60
              Master_Log_File: mysql-bin.000001
          Read_Master_Log_Pos: 1017
               Relay_Log_File: mysql-relay.000002
                Relay_Log_Pos: 1183
        Relay_Master_Log_File: mysql-bin.000001
             Slave_IO_Running: Yes
            Slave_SQL_Running: Yes
5)部署Haproxy
1、下载软件包
[root@haproxy ~]# wget -c http://www.haproxy.org/download/1.5/src/haproxy-1.5.19.tar.gz
2、创建运行用户并安装依赖包
[root@haproxy ~]# useradd -M -s /sbin/nologin ha
[root@haproxy ~]# yum -y install bzip2-devel pcre-devel zlib-devel gcc gcc-c++ openssl openssl-devel
3、编译安装Haproxy
[root@haproxy ~]# tar xf haproxy-1.5.19.tar.gz -C /usr/src/
[root@haproxy ~]# cd /usr/src/haproxy-1.5.19/
[root@haproxy haproxy-1.5.19]# make -j 8 TARGET=linux2628 ARCH=x86_64 PREFIX=/usr/local/haproxy
[root@haproxy haproxy-1.5.19]# make install PREFIX=/usr/local/haproxy && cd
4、创建相应的存储目录并复制模板文件
[root@haproxy ~]# mkdir /usr/local/haproxy/pid
[root@haproxy ~]# mkdir /usr/local/haproxy/conf
[root@haproxy ~]#
[root@haproxy ~]# cp /usr/src/haproxy-1.5.19/examples/haproxy.cfg /usr/local/haproxy/conf/
[root@haproxy ~]# cp /usr/local/haproxy/conf/haproxy.cfg /usr/local/haproxy/conf/haproxy.cfg.bak
5、定义Haproxy配置文件
提示1:底部的三台节点均为Slave、这样才可达到读负载均衡的效果、算法定义轮询、而类型一定要为TCP
提示2:如果不对日志进行切割、那么在Haproxy的配置文件当中建议将日志选项去掉、否则硬盘会被撑爆
[root@haproxy ~]# vim /usr/local/haproxy/conf/haproxy.cfg
global
daemon
uid 1000
gid 1000
nbproc 1
maxconn 6500
ulimit-n 65535
pidfile /usr/local/haproxy/pid/haproxy.pid

defaults
log global
mode tcp
retries 3
timeout connect 3s
timeout client 60s
timeout server 60s
option redispatch
option abortonclose

listen status
bind 10.2.3.15:80
mode http
log global
stats refresh 3s
stats uri /mds
stats hide-version
stats auth mds:mds-123
stats realm Welcome to Haproxy Manager Page

listen ms1
bind 10.2.3.15:9999
mode tcp
log global
balance roundrobin
server Slave1 10.2.3.12:3635 check inter 3000 rise 2 fall 3 weight 3
server Slave2 10.2.3.13:3635 check inter 3000 rise 2 fall 3 weight 3
server Slave3 10.2.3.14:3635 check inter 3000 rise 2 fall 3 weight 3
6、将Haproxy添加为系统服务
[root@haproxy ~]# cat >> /usr/lib/systemd/system/haproxy.service << EOF
[Unit]
Description=Haproxy
After=network.target

[Service]
LimitNOFILE=65535
Type=forking
ExecStart=/usr/local/haproxy/sbin/haproxy -f /usr/local/haproxy/conf/haproxy.cfg

[Install]
WantedBy=multi-user.target
EOF
7、启动Haproxy并将其设置为开启自启
[root@haproxy ~]# systemctl start haproxy
[root@haproxy ~]# systemctl status haproxy
● haproxy.service - Haproxy
Loaded: loaded (/usr/lib/systemd/system/haproxy.service; enabled; vendor preset: disabled)
Active: active (running) since 三 2020-01-15 15:00:54 CST; 2min 29s ago
Main PID: 1359 (haproxy)
CGroup: /system.slice/haproxy.service
└─1359 /usr/local/haproxy/sbin/haproxy -f /usr/local/haproxy/conf/haproxy.cfg

1月 15 15:00:54 haproxy systemd[1]: Starting Haproxy...
1月 15 15:00:54 haproxy systemd[1]: Started Haproxy.

[root@haproxy ~]# systemctl enable haproxy
[root@haproxy ~]# netstat -anput | grep haproxy
tcp        0      0 10.2.3.15:9999          0.0.0.0:*               LISTEN      1359/haproxy
tcp        0      0 10.2.3.15:80            0.0.0.0:*               LISTEN      1359/haproxy
8、在客户端测试连接Haproxy
注意:连接所使用的用户为程序连接用户、这个用户我们在上面已经创建过了、因为要做读的负载均衡所以每台MySQL节点上都要有这个用户
[root@client ~]# mysql -umds -pabc-123 -h10.2.3.15 -P9999
Welcome to the MariaDB monitor.  Commands end with ; or \g.
Your MySQL connection id is 11
Server version: 5.7.27-log Source distribution

Copyright (c) 2000, 2018, Oracle, MariaDB Corporation Ab and others.

Type 'help;' or '\h' for help. Type '\c' to clear the current input statement.

MySQL [(none)]> show databases;
+--------------------+
| Database           |
+--------------------+
| information_schema |
| mysql              |
| performance_schema |
| sys                |
+--------------------+
4 rows in set (0.02 sec)

MySQL [(none)]>
9、查看Haproxy建立连接的端口
如下所示我们可以看到、Haproxy与一台客户端进行了TCP连接、在这个时候也与一台MySQL进行了TCP连接、10.2.3.14为MySQL节点、10.2.3.16为测试客户端
[root@haproxy ~]# netstat -anput | grep haproxy
tcp        0      0 10.2.3.15:9999          0.0.0.0:*               LISTEN      1359/haproxy
tcp        0      0 10.2.3.15:80            0.0.0.0:*               LISTEN      1359/haproxy
tcp        0      0 10.2.3.15:9999          10.2.3.16:59796         ESTABLISHED 1359/haproxy
tcp        0      0 10.2.3.15:14001         10.2.3.14:3635          ESTABLISHED 1359/haproxy
10、查看MySQL建立连接的端口
10.2.3.15为Haproxy服务器、可以看到MySQL与其进行了连接、但这并不是固定的、因为算法选择了轮询、所以如果后面还有客户端连接、那Haproxy就不一定是与这台MySQL进行连接了、有可能是10.2.3.14
[root@node4 ~]# netstat -anput | grep mysql
tcp        0      0 0.0.0.0:3635            0.0.0.0:*               LISTEN      3816/mysqld
tcp        0      0 10.2.3.14:3635          10.2.3.15:14001         ESTABLISHED 3816/mysqld
tcp        0      0 10.2.3.14:7489          10.2.3.11:3635          ESTABLISHED 3816/mysqld
主从复制也有了、负载均衡也有了、下面就来看一下高可用吧!
6)部署 MHA
1、配置免密登录
在MHA-Manager上执行:
[root@manager ~]# ssh-keygen -t dsa > /dev/null
[root@manager ~]# ssh-copy-id -i .ssh/id_dsa.pub -p 22 10.2.3.11
[root@manager ~]# ssh-copy-id -i .ssh/id_dsa.pub -p 22 10.2.3.12
[root@manager ~]# ssh-copy-id -i .ssh/id_dsa.pub -p 22 10.2.3.13
[root@manager ~]# ssh-copy-id -i .ssh/id_dsa.pub -p 22 10.2.3.14
在Master上执行:
[root@node1 ~]# ssh-keygen -t dsa > /dev/null
[root@node1 ~]# ssh-copy-id -i .ssh/id_dsa.pub -p 22 10.2.3.12
[root@node1 ~]# ssh-copy-id -i .ssh/id_dsa.pub -p 22 10.2.3.13
[root@node1 ~]# ssh-copy-id -i .ssh/id_dsa.pub -p 22 10.2.3.14
在Slave-1上执行:
[root@node2 ~]# ssh-keygen -t dsa > /dev/null
[root@node2 ~]# ssh-copy-id -i .ssh/id_dsa.pub -p 22 10.2.3.11
[root@node2 ~]# ssh-copy-id -i .ssh/id_dsa.pub -p 22 10.2.3.13
[root@node2 ~]# ssh-copy-id -i .ssh/id_dsa.pub -p 22 10.2.3.14
在Slave-2上执行:
[root@node3 ~]# ssh-keygen -t dsa > /dev/null
[root@node3 ~]# ssh-copy-id -i .ssh/id_dsa.pub -p 22 10.2.3.11
[root@node3 ~]# ssh-copy-id -i .ssh/id_dsa.pub -p 22 10.2.3.12
[root@node3 ~]# ssh-copy-id -i .ssh/id_dsa.pub -p 22 10.2.3.14
在Slave-3上执行:
[root@node4 ~]# ssh-keygen -t dsa > /dev/null
[root@node4 ~]# ssh-copy-id -i .ssh/id_dsa.pub -p 22 10.2.3.11
[root@node4 ~]# ssh-copy-id -i .ssh/id_dsa.pub -p 22 10.2.3.12
[root@node4 ~]# ssh-copy-id -i .ssh/id_dsa.pub -p 22 10.2.3.13
2、安装依赖包
注意:除Haproxy节点以外所有节点都要安装
[root@node1 ~]# yum -y install epel*
[root@node1 ~]# yum makecache
[root@node1 ~]# yum install -y perl-CPAN perl-ExtUtils-CBuilder perl-ExtUtils-MakeMaker perl-DBD-MySQL perl-Config-Tiny perl-Log-Dispatch perl-Parallel-ForkManager perl-Config-IniFiles perl-Time-HiRes
3、部署 MHA-Node
注意:MHA-Node需要在所有MySQL节点上安装、也包括Manager节点
[root@manager ~]# tar xf mha-mysql-node-0.57.tar.gz -C /usr/src/
[root@manager ~]# cd /usr/src/mha4mysql-node-0.57/
[root@manager mha4mysql-node-0.57]# perl Makefile.PL
[root@manager mha4mysql-node-0.57]# make -j 8 && make install -j 8 && cd
4、部署 MHA-Manager
注意:MHA-Manager 只需在Manager节点安装即可
[root@manager ~]# tar xf mha-mysql-manager-0.57.tar.gz -C /usr/src/
[root@manager ~]# cd /usr/src/mha4mysql-manager-0.57/
[root@manager mha4mysql-manager-0.57]# perl Makefile.PL
[root@manager mha4mysql-manager-0.57]# make -j 8 && make install -j 8 && cd
5、创建对应的存储目录
[root@manager ~]# mkdir /etc/mha
[root@manager ~]# mkdir /etc/mha/logs
[root@manager ~]# mkdir /etc/mha/conf
[root@manager ~]# mkdir /etc/mha/script
[root@manager ~]# cp /usr/src/mha4mysql-manager-0.57/samples/conf/app1.cnf /etc/mha/conf/
[root@manager ~]# mv /etc/mha/conf/app1.cnf /etc/mha/conf/ms1.conf
6、添加虚拟地址
注意:只需在Master节点上添加即可、这个虚拟地址无需固定、因为在进行故障转移的时候这个地址需要移动
[root@node1 ~]# ifconfig ens33:1 10.2.3.30
[root@node1 ~]# ifconfig ens33:1
ens33:1: flags=4163<UP,BROADCAST,RUNNING,MULTICAST>  mtu 1500
        inet 10.2.3.30  netmask 255.0.0.0  broadcast 10.255.255.255
        ether 00:0c:29:44:ef:f3  txqueuelen 1000  (Ethernet)
7、编写故障转移脚本
注意1:在以下脚本中定义了虚拟IP、那么这个虚拟IP在Master节点上就要有
注意2:如果所有MySQL节点的SSH端口不同、那么就需要在底部的两段函数当中使用 -p 选项来指定摘除VIP主机的SSH端口与添加VIP主机的SSH端口
注意3:如果所有MySQL节点的SSH端口不同、那么就需要在故障转移脚本当中明确指定那台Slave为故障转移之后是新的Master、也就是指定添加VIP主机的SSH端口
[root@manager ~]# vim /etc/mha/script/ms1_ip_failover
#!/usr/bin/env perl

#ChangeTime:2020/1/15

use strict;
use warnings FATAL => 'all';

use Getopt::Long;

my (
        $command,
        $ssh_user,
        $orig_master_host,      $orig_master_ip,        $orig_master_port,
        $new_master_host,       $new_master_ip,         $new_master_port,
);

#===================================================================
my $vip = '10.2.3.30/24';
my $key = '1';
my $ssh_start_vip = "ifconfig ens33:$key $vip";
my $ssh_stop_vip = "ifconfig ens33:$key down";
#===================================================================

GetOptions(
        'command=s'          => \$command,
        'ssh_user=s'         => \$ssh_user,
        'orig_master_host=s' => \$orig_master_host,
        'orig_master_ip=s'   => \$orig_master_ip,
        'orig_master_port=i' => \$orig_master_port,
        'new_master_host=s'  => \$new_master_host,
        'new_master_ip=s'    => \$new_master_ip,
        'new_master_port=i'  => \$new_master_port,
);

exit &main();

sub main {

        print "\n\nIN Script Test====$ssh_stop_vip==$ssh_start_vip===\n\n";

        if ( $command eq "stop" || $command eq "stopssh" ) {

        my $exit_code = 1;
        eval {
            print "Disabling the VIP on old Master: $orig_master_host \n";
            &stop_vip();
            $exit_code = 0;
        };

        if ($@) {
            warn "Got Error: $@\n";
            exit $exit_code;
        }
        exit $exit_code;
    }
    elsif ( $command eq "start" ) {

        my $exit_code = 10;
        eval {
            print "Enabling The VIP - $vip on The New Master - $new_master_host \n";
            &start_vip();
            $exit_code = 0;
        };

        if ($@) {
            warn $@;
            exit $exit_code;
        }
        exit $exit_code;
    }
    elsif ( $command eq "status" ) {
        print "Checking The Status of The Script.. OK \n";
        exit 0;
    }
    else {
        exit 1;
    }
}

#====================================================================
#Remove VIP
sub stop_vip() {
    `ssh -p 22 $ssh_user\@$orig_master_host \" $ssh_stop_vip \"`;
}
#====================================================================
#Add VIP
sub start_vip() {
    `ssh -p 22 $ssh_user\@$new_master_host \" $ssh_start_vip \"`;
}
#====================================================================
注意:写完脚本之后别忘了给其赋予执行权限、命令为:chmod +x /etc/mha/script/ms1_ip_failover
8、定义MHA配置文件
注意1:在部署MHA的时候、一套主从复制组最好为1主3从、因为其中1台Master出现了异常、切换完成以后还有2两台节点可读
注意2:因为MySQL节点的SSH端口都不同、所以需要将其中的一台节点设置为 no_master = 1、即此节点永远不会成为主、这样定义是为了防止在切换的时候SSH连接不上或者转移错误、从而导致VIP不进行漂移
[root@manager ~]# vim /etc/mha/conf/ms1.conf
[server default]
remote_workdir = /opt
manager_workdir = /etc/mha/conf
manager_log = /etc/mha/logs/ms1.log
master_ip_failover_script = /etc/mha/script/ms1_ip_failover

user = mha
password = abc-123

repl_user = slave
repl_password = abc-123

ping_type = connect
ping_interval = 3

[server1]
ssh_user = root
ssh_port = 22
hostname = 10.2.3.11
port = 3635
master_binlog_dir = /usr/local/mysql/binlog

[server2]
ssh_user = root
ssh_port = 22
hostname = 10.2.3.12
port = 3635
candidate_master = 1
check_repl_delay = 0
master_binlog_dir = /usr/local/mysql/binlog

[server3]
ssh_user = root
ssh_port = 22
hostname = 10.2.3.13
port = 3635
master_binlog_dir = /usr/local/mysql/binlog

[server4]
ssh_user = root
ssh_port = 22
hostname = 10.2.3.14
port = 3635
no_master = 1
master_binlog_dir = /usr/local/mysql/binlog
9、检查免密登录
[root@manager ~]# masterha_check_ssh --conf=/etc/mha/conf/ms1.conf
Wed Jan 15 16:12:44 2020 - [warning] Global configuration file /etc/masterha_default.cnf not found. Skipping.
Wed Jan 15 16:12:44 2020 - [info] Reading application default configuration from /etc/mha/conf/ms1.conf..
Wed Jan 15 16:12:44 2020 - [info] Reading server configuration from /etc/mha/conf/ms1.conf..
Wed Jan 15 16:12:44 2020 - [info] Starting SSH connection tests..
Wed Jan 15 16:12:45 2020 - [debug]
Wed Jan 15 16:12:44 2020 - [debug]  Connecting via SSH from root@10.2.3.11(10.2.3.11:22) to root@10.2.3.12(10.2.3.12:22)..
Wed Jan 15 16:12:44 2020 - [debug]   ok.
Wed Jan 15 16:12:44 2020 - [debug]  Connecting via SSH from root@10.2.3.11(10.2.3.11:22) to root@10.2.3.13(10.2.3.13:22)..
Wed Jan 15 16:12:45 2020 - [debug]   ok.
Wed Jan 15 16:12:45 2020 - [debug]  Connecting via SSH from root@10.2.3.11(10.2.3.11:22) to root@10.2.3.14(10.2.3.14:22)..
Wed Jan 15 16:12:45 2020 - [debug]   ok.
Wed Jan 15 16:12:46 2020 - [debug]
Wed Jan 15 16:12:44 2020 - [debug]  Connecting via SSH from root@10.2.3.12(10.2.3.12:22) to root@10.2.3.11(10.2.3.11:22)..
Wed Jan 15 16:12:45 2020 - [debug]   ok.
Wed Jan 15 16:12:45 2020 - [debug]  Connecting via SSH from root@10.2.3.12(10.2.3.12:22) to root@10.2.3.13(10.2.3.13:22)..
Wed Jan 15 16:12:45 2020 - [debug]   ok.
Wed Jan 15 16:12:45 2020 - [debug]  Connecting via SSH from root@10.2.3.12(10.2.3.12:22) to root@10.2.3.14(10.2.3.14:22)..
Wed Jan 15 16:12:46 2020 - [debug]   ok.
Wed Jan 15 16:12:47 2020 - [debug]
Wed Jan 15 16:12:45 2020 - [debug]  Connecting via SSH from root@10.2.3.14(10.2.3.14:22) to root@10.2.3.11(10.2.3.11:22)..
Wed Jan 15 16:12:46 2020 - [debug]   ok.
Wed Jan 15 16:12:46 2020 - [debug]  Connecting via SSH from root@10.2.3.14(10.2.3.14:22) to root@10.2.3.12(10.2.3.12:22)..
Wed Jan 15 16:12:46 2020 - [debug]   ok.
Wed Jan 15 16:12:46 2020 - [debug]  Connecting via SSH from root@10.2.3.14(10.2.3.14:22) to root@10.2.3.13(10.2.3.13:22)..
Wed Jan 15 16:12:47 2020 - [debug]   ok.
Wed Jan 15 16:12:47 2020 - [debug]
Wed Jan 15 16:12:45 2020 - [debug]  Connecting via SSH from root@10.2.3.13(10.2.3.13:22) to root@10.2.3.11(10.2.3.11:22)..
Wed Jan 15 16:12:45 2020 - [debug]   ok.
Wed Jan 15 16:12:45 2020 - [debug]  Connecting via SSH from root@10.2.3.13(10.2.3.13:22) to root@10.2.3.12(10.2.3.12:22)..
Wed Jan 15 16:12:46 2020 - [debug]   ok.
Wed Jan 15 16:12:46 2020 - [debug]  Connecting via SSH from root@10.2.3.13(10.2.3.13:22) to root@10.2.3.14(10.2.3.14:22)..
Wed Jan 15 16:12:46 2020 - [debug]   ok.
Wed Jan 15 16:12:47 2020 - [info] All SSH connection tests passed successfully.
10、检查主从复制
[root@manager ~]# masterha_check_repl --conf=/etc/mha/conf/ms1.conf
Wed Jan 15 16:54:02 2020 - [warning] Global configuration file /etc/masterha_default.cnf not found. Skipping.
Wed Jan 15 16:54:02 2020 - [info] Reading application default configuration from /etc/mha/conf/ms1.conf..
Wed Jan 15 16:54:02 2020 - [info] Reading server configuration from /etc/mha/conf/ms1.conf..
Wed Jan 15 16:54:02 2020 - [info] MHA::MasterMonitor version 0.57.
Wed Jan 15 16:54:04 2020 - [info] GTID failover mode = 0
Wed Jan 15 16:54:04 2020 - [info] Dead Servers:
Wed Jan 15 16:54:04 2020 - [info] Alive Servers:
Wed Jan 15 16:54:04 2020 - [info]   10.2.3.11(10.2.3.11:3635)
Wed Jan 15 16:54:04 2020 - [info]   10.2.3.12(10.2.3.12:3635)
Wed Jan 15 16:54:04 2020 - [info]   10.2.3.13(10.2.3.13:3635)
Wed Jan 15 16:54:04 2020 - [info]   10.2.3.14(10.2.3.14:3635)
Wed Jan 15 16:54:04 2020 - [info] Alive Slaves:
Wed Jan 15 16:54:04 2020 - [info]   10.2.3.12(10.2.3.12:3635)  Version=5.7.27-log (oldest major version between slaves) log-bin:enabled
Wed Jan 15 16:54:04 2020 - [info]     Replicating from 10.2.3.11(10.2.3.11:3635)
Wed Jan 15 16:54:04 2020 - [info]     Primary candidate for the new Master (candidate_master is set)
Wed Jan 15 16:54:04 2020 - [info]   10.2.3.13(10.2.3.13:3635)  Version=5.7.27-log (oldest major version between slaves) log-bin:enabled
Wed Jan 15 16:54:04 2020 - [info]     Replicating from 10.2.3.11(10.2.3.11:3635)
Wed Jan 15 16:54:04 2020 - [info]   10.2.3.14(10.2.3.14:3635)  Version=5.7.27-log (oldest major version between slaves) log-bin:enabled
Wed Jan 15 16:54:04 2020 - [info]     Replicating from 10.2.3.11(10.2.3.11:3635)
Wed Jan 15 16:54:04 2020 - [info]     Not candidate for the new Master (no_master is set)
Wed Jan 15 16:54:04 2020 - [info] Current Alive Master: 10.2.3.11(10.2.3.11:3635)
Wed Jan 15 16:54:04 2020 - [info] Checking slave configurations..
Wed Jan 15 16:54:04 2020 - [info]  read_only=1 is not set on slave 10.2.3.12(10.2.3.12:3635).
Wed Jan 15 16:54:04 2020 - [info]  read_only=1 is not set on slave 10.2.3.13(10.2.3.13:3635).
Wed Jan 15 16:54:04 2020 - [info]  read_only=1 is not set on slave 10.2.3.14(10.2.3.14:3635).
Wed Jan 15 16:54:04 2020 - [info] Checking replication filtering settings..
Wed Jan 15 16:54:04 2020 - [info]  binlog_do_db= , binlog_ignore_db= mysql
Wed Jan 15 16:54:04 2020 - [info]  Replication filtering check ok.
Wed Jan 15 16:54:04 2020 - [info] GTID (with auto-pos) is not supported
Wed Jan 15 16:54:04 2020 - [info] Starting SSH connection tests..
Wed Jan 15 16:54:07 2020 - [info] All SSH connection tests passed successfully.
Wed Jan 15 16:54:07 2020 - [info] Checking MHA Node version..
Wed Jan 15 16:54:08 2020 - [info]  Version check ok.
Wed Jan 15 16:54:08 2020 - [info] Checking SSH publickey authentication settings on the current master..
Wed Jan 15 16:54:08 2020 - [info] HealthCheck: SSH to 10.2.3.11 is reachable.
Wed Jan 15 16:54:08 2020 - [info] Master MHA Node version is 0.57.
Wed Jan 15 16:54:08 2020 - [info] Checking recovery script configurations on 10.2.3.11(10.2.3.11:3635)..
Wed Jan 15 16:54:08 2020 - [info]   Executing command: save_binary_logs --command=test --start_pos=4 --binlog_dir=/usr/local/mysql/binlog --output_file=/opt/save_binary_logs_test --manager_version=0.57 --start_file=mysql-bin.000002
Wed Jan 15 16:54:08 2020 - [info]   Connecting to root@10.2.3.11(10.2.3.11:22)..
  Creating /opt if not exists..    ok.
  Checking output directory is accessible or not..
   ok.
  Binlog found at /usr/local/mysql/binlog, up to mysql-bin.000002
Wed Jan 15 16:54:09 2020 - [info] Binlog setting check done.
Wed Jan 15 16:54:09 2020 - [info] Checking SSH publickey authentication and checking recovery script configurations on all alive slave servers..
Wed Jan 15 16:54:09 2020 - [info]   Executing command : apply_diff_relay_logs --command=test --slave_user='mha' --slave_host=10.2.3.12 --slave_ip=10.2.3.12 --slave_port=3635 --workdir=/opt --target_version=5.7.27-log --manager_version=0.57 --relay_dir=/usr/local/mysql/relaylog --current_relay_log=mysql-relay.000001  --slave_pass=xxx
Wed Jan 15 16:54:09 2020 - [info]   Connecting to root@10.2.3.12(10.2.3.12:22)..
  Checking slave recovery environment settings..
    Relay log found at /usr/local/mysql/relaylog, up to mysql-relay.000004
    Temporary relay log file is /usr/local/mysql/relaylog/mysql-relay.000004
    Testing mysql connection and privileges..mysql: [Warning] Using a password on the command line interface can be insecure.
 done.
    Testing mysqlbinlog output.. done.
    Cleaning up test file(s).. done.
Wed Jan 15 16:54:09 2020 - [info]   Executing command : apply_diff_relay_logs --command=test --slave_user='mha' --slave_host=10.2.3.13 --slave_ip=10.2.3.13 --slave_port=3635 --workdir=/opt --target_version=5.7.27-log --manager_version=0.57 --relay_dir=/usr/local/mysql/relaylog --current_relay_log=mysql-relay.000001  --slave_pass=xxx
Wed Jan 15 16:54:09 2020 - [info]   Connecting to root@10.2.3.13(10.2.3.13:22)..
  Checking slave recovery environment settings..
    Relay log found at /usr/local/mysql/relaylog, up to mysql-relay.000004
    Temporary relay log file is /usr/local/mysql/relaylog/mysql-relay.000004
    Testing mysql connection and privileges..mysql: [Warning] Using a password on the command line interface can be insecure.
 done.
    Testing mysqlbinlog output.. done.
    Cleaning up test file(s).. done.
Wed Jan 15 16:54:10 2020 - [info]   Executing command : apply_diff_relay_logs --command=test --slave_user='mha' --slave_host=10.2.3.14 --slave_ip=10.2.3.14 --slave_port=3635 --workdir=/opt --target_version=5.7.27-log --manager_version=0.57 --relay_dir=/usr/local/mysql/relaylog --current_relay_log=mysql-relay.000003  --slave_pass=xxx
Wed Jan 15 16:54:10 2020 - [info]   Connecting to root@10.2.3.14(10.2.3.14:22)..
  Checking slave recovery environment settings..
    Relay log found at /usr/local/mysql/relaylog, up to mysql-relay.000006
    Temporary relay log file is /usr/local/mysql/relaylog/mysql-relay.000006
    Testing mysql connection and privileges.. done.
    Testing mysqlbinlog output..mysql: [Warning] Using a password on the command line interface can be insecure.
 done.
    Cleaning up test file(s).. done.
Wed Jan 15 16:54:10 2020 - [info] Slaves settings check done.
Wed Jan 15 16:54:10 2020 - [info]
10.2.3.11(10.2.3.11:3635) (current master)
 +--10.2.3.12(10.2.3.12:3635)
 +--10.2.3.13(10.2.3.13:3635)
 +--10.2.3.14(10.2.3.14:3635)

Wed Jan 15 16:54:10 2020 - [info] Checking replication health on 10.2.3.12..
Wed Jan 15 16:54:10 2020 - [info]  ok.
Wed Jan 15 16:54:10 2020 - [info] Checking replication health on 10.2.3.13..
Wed Jan 15 16:54:10 2020 - [info]  ok.
Wed Jan 15 16:54:10 2020 - [info] Checking replication health on 10.2.3.14..
Wed Jan 15 16:54:10 2020 - [info]  ok.
Wed Jan 15 16:54:10 2020 - [info] Checking master_ip_failover_script status:
Wed Jan 15 16:54:10 2020 - [info]   /etc/mha/script/ms1_ip_failover --command=status --ssh_user=root --orig_master_host=10.2.3.11 --orig_master_ip=10.2.3.11 --orig_master_port=3635

IN Script Test====ifconfig ens33:1 down==ifconfig ens33:1 10.2.3.30/24===

Checking The Status of The Script.. OK
Wed Jan 15 16:54:10 2020 - [info]  OK.
Wed Jan 15 16:54:10 2020 - [warning] shutdown_script is not defined.
Wed Jan 15 16:54:10 2020 - [info] Got exit code 0 (Not master dead).

MySQL Replication Health is OK.
11、开启Manager监控
[root@manager ~]# nohup masterha_manager --conf=/etc/mha/conf/ms1.conf --ignore_last_failover > /dev/null &
[1] 21271
[root@manager ~]# Wed Jan 15 16:55:22 2020 - [warning] Global configuration file /etc/masterha_default.cnf not found. Skipping.
Wed Jan 15 16:55:22 2020 - [info] Reading application default configuration from /etc/mha/conf/ms1.conf..
Wed Jan 15 16:55:22 2020 - [info] Reading server configuration from /etc/mha/conf/ms1.conf..

[root@manager ~]# netstat -anput | grep perl
tcp        0      0 10.2.3.16:17399         10.2.3.11:3635          ESTABLISHED 2269/perl

[root@manager ~]# tail -f /etc/mha/logs/ms1.log
IN Script Test====ifconfig ens33:1 down==ifconfig ens33:1 10.2.3.30/24===
Checking The Status of The Script.. OK
Wed Jan 15 16:55:30 2020 - [info]  OK.
Wed Jan 15 16:55:30 2020 - [warning] shutdown_script is not defined.
Wed Jan 15 16:55:30 2020 - [info] Set master ping interval 3 seconds.
Wed Jan 15 16:55:30 2020 - [info] Starting ping health check on 10.2.3.11(10.2.3.11:3635)..
Wed Jan 15 16:55:30 2020 - [info] Ping(CONNECT) succeeded, waiting until MySQL doesn't respond..
12、Master状态检查
[root@manager ~]# masterha_check_status --conf=/etc/mha/conf/ms1.conf
ms1 (pid:2198) is running(0:PING_OK), master:10.2.3.11
13、关闭Manager监控
[root@manager ~]# masterha_stop --conf=/etc/mha/conf/ms1.conf
Stopped ms1 successfully.
[1]+  退出 1                masterha_manager --conf=/etc/mha/conf/ms1.conf --ignore_last_failover > /dev/null
14、中继日志清理
注意:清理中继日志的命令为MHA-Node自带的 purge_relay_logs、这条命令只支持在127.0.0.1或者localhost上运行
如下所示:所有的MySQL节点都已经和Manager节点进行了免密、所以可以在Manager节点上使用SSH命令远程执行
[root@manager ~]# ssh -p 22 10.2.3.14 purge_relay_logs --user=purge --password=abc-123 --port=3635
2020-01-15 16:29:09: purge_relay_logs script started.
 Opening /usr/local/mysql/relaylog/mysql-relay.000001 ..
 Opening /usr/local/mysql/relaylog/mysql-relay.000002 ..
 Executing SET GLOBAL relay_log_purge=1; FLUSH LOGS; sleeping a few seconds so that SQL thread can delete older relay log files (if it keeps up); SET GLOBAL relay_log_purge=0; .. ok.
2020-01-15 16:29:12: All relay log purging operations succeeded.
没有清理之前、Slave上的中继日志如下所示:
[root@node4 ~]# ll /usr/local/mysql/relaylog/
总用量 12
-rw-r----- 1 mysql mysql  203 1月  15 14:35 mysql-relay.000001
-rw-r----- 1 mysql mysql 1183 1月  15 14:35 mysql-relay.000002
-rw-r----- 1 mysql mysql   90 1月  15 14:35 mysql-relay.index
清理完成之后、Slave上的中继日志如下所示:
[root@node4 ~]# ll /usr/local/mysql/relaylog/
总用量 12
-rw-r----- 1 mysql mysql 1232 1月  15 16:29 mysql-relay.000002
-rw-r----- 1 mysql mysql  273 1月  15 16:29 mysql-relay.000003
-rw-r----- 1 mysql mysql   90 1月  15 16:29 mysql-relay.index
在生产环境中可能会产生大量的中继日志、所以我们可以使用脚本并结合任务计划来定时清理中继日志、如下所示:每3小时清理一次中继日志
[root@manager ~]# vim /root/relaylog_clear.sh
#!/bin/bash

#定义远程节点的SSH端口与地址
MY_SSH="22"
MY_ADDR="10.2.3.14"

#定义远程节点的MySQL用户与密码等信息、底部为清除中继日志的命令
MY_USER="purge"
MY_PASS="abc-123"
MY_HOST="127.0.0.1"
MY_PORT="3635"
MHA_CMD="purge_relay_logs"

#执行清除命令
ssh -p $MY_SSH $MY_ADDR $MHA_CMD --user=$MY_USER --password=$MY_PASS --host=$MY_HOST --port=$MY_PORT >> /etc/mha/logs/relaylog_clear.log &
编写完脚本之后我们需要为其授予执行权限、并添加到任务计划当中定时运行
[root@manager ~]# chmod +x /root/relaylog_clear.sh
[root@manager ~]# crontab -e
* */3 * * * bash /root/relaylog_clear.sh
二、MySQL+MHA+Haproxy 测试
1)在Master上停掉MySQL服务
[root@node1 ~]# systemctl stop mysql
[root@node1 ~]# netstat -anput | grep mysql
[root@node1 ~]# ps -elf | grep -v grep | grep mysql
2)在Manager上查看日志(故障转移报告)
[root@manager ~]# tail -f /etc/mha/logs/ms1.log
----- Failover Report -----

ms1: MySQL Master failover 10.2.3.11(10.2.3.11:3635) to 10.2.3.12(10.2.3.12:3635) succeeded

Master 10.2.3.11(10.2.3.11:3635) is down!

Check MHA Manager logs at manager:/etc/mha/logs/ms1.log for details.

Started automated(non-interactive) failover.
Invalidated master IP address on 10.2.3.11(10.2.3.11:3635)
The latest slave 10.2.3.12(10.2.3.12:3635) has all relay logs for recovery.
Selected 10.2.3.12(10.2.3.12:3635) as a new master.
10.2.3.12(10.2.3.12:3635): OK: Applying all logs succeeded.
10.2.3.12(10.2.3.12:3635): OK: Activated master IP address.
10.2.3.13(10.2.3.13:3635): This host has the latest relay log events.
10.2.3.14(10.2.3.14:3635): This host has the latest relay log events.
Generating relay diff files from the latest slave succeeded.
10.2.3.14(10.2.3.14:3635): OK: Applying all logs succeeded. Slave started, replicating from 10.2.3.12(10.2.3.12:3635)
10.2.3.13(10.2.3.13:3635): OK: Applying all logs succeeded. Slave started, replicating from 10.2.3.12(10.2.3.12:3635)
10.2.3.12(10.2.3.12:3635): Resetting slave info succeeded.
Master failover to 10.2.3.12(10.2.3.12:3635) completed successfully.
这个时候Manager进程就会退出、并会在conf目录生成一个名为 ms1.failover.complete 的文件、如果下次还需开启Manager监控、则需要将其删除
[root@manager ~]# Wed Jan 15 16:57:28 2020 - [warning] Global configuration file /etc/masterha_default.cnf not found. Skipping.
Wed Jan 15 16:57:28 2020 - [info] Reading application default configuration from /etc/mha/conf/ms1.conf..
Wed Jan 15 16:57:28 2020 - [info] Reading server configuration from /etc/mha/conf/ms1.conf..
[1]+  完成                  masterha_manager --conf=/etc/mha/conf/ms1.conf --ignore_last_failover > /dev/null

[root@manager ~]# ls -lh /etc/mha/conf/
总用量 8.0K
-rw-r--r-- 1 root root 813 1月  15 16:53 ms1.conf
-rw-r--r-- 1 root root   0 1月  15 16:57 ms1.failover.complete
-rw-r--r-- 1 root root 177 1月  15 16:57 saved_master_binlog_from_10.2.3.11_3635_20200115165728.binlog
3)在node2(候选Master)上查看漂移过来的虚拟IP
[root@node2 ~]# ifconfig
ens33: flags=4163<UP,BROADCAST,RUNNING,MULTICAST>  mtu 1500
        inet 10.2.3.12  netmask 255.255.255.0  broadcast 10.2.3.255
        inet6 fe80::250:56ff:fe20:9efa  prefixlen 64  scopeid 0x20<link>
        ether 00:50:56:20:9e:fa  txqueuelen 1000  (Ethernet)
        RX packets 36630  bytes 34108215 (32.5 MiB)
        RX errors 0  dropped 0  overruns 0  frame 0
        TX packets 19913  bytes 2042497 (1.9 MiB)
        TX errors 0  dropped 0 overruns 0  carrier 0  collisions 0

ens33:1: flags=4163<UP,BROADCAST,RUNNING,MULTICAST>  mtu 1500
        inet 10.2.3.30  netmask 255.255.255.0  broadcast 10.2.3.255
        ether 00:50:56:20:9e:fa  txqueuelen 1000  (Ethernet)

lo: flags=73<UP,LOOPBACK,RUNNING>  mtu 65536
        inet 127.0.0.1  netmask 255.0.0.0
        inet6 ::1  prefixlen 128  scopeid 0x10<host>
        loop  txqueuelen 1000  (Local Loopback)
        RX packets 207  bytes 16541 (16.1 KiB)
        RX errors 0  dropped 0  overruns 0  frame 0
        TX packets 207  bytes 16541 (16.1 KiB)
        TX errors 0  dropped 0 overruns 0  carrier 0  collisions 0
4)在其它的Slave上查看复制状态、可以看见它已经将Master重新指向了node2(10.2.3.12)
[root@node3 ~]# mysql -uroot -pabc-123 2> /dev/null -e"show slave status\G" | head -13
*************************** 1. row ***************************
               Slave_IO_State: Waiting for master to send event
                  Master_Host: 10.2.3.12
                  Master_User: slave
                  Master_Port: 3635
                Connect_Retry: 60
              Master_Log_File: mysql-bin.000001
          Read_Master_Log_Pos: 2169
               Relay_Log_File: mysql-relay.000002
                Relay_Log_Pos: 320
        Relay_Master_Log_File: mysql-bin.000001
             Slave_IO_Running: Yes
            Slave_SQL_Running: Yes
5)查看保存的binlog文件
提示:刚刚我们在配置文件当中定义了 remote_workdir = /opt 、现在已经进行故障转移、这个时候我们就可以看到它保存的binlog了、如下所示
注意:这些保存的文件、是在每台MySQL节点上都有的、无论是Master还是Slave、如果日志文件很大、那将非常占用空间、所以进行故障转移之后一定要注意
[root@node2 ~]# ls -lh /opt/
总用量 8.0K
-rw-r--r-- 1 root root 1002 1月  15 16:57 relay_log_apply_for_10.2.3.12_3635_20200115165728_err.log
-rw-r--r-- 1 root root  177 1月  15 16:57 saved_master_binlog_from_10.2.3.11_3635_20200115165728.binlog
6)修复异常的Master、并作为Slave角色纳入集群
先重启MySQL
[root@node1 ~]# systemctl restart mysql
[root@node1 ~]# netstat -anput | grep mysql
tcp        0      0 0.0.0.0:3635            0.0.0.0:*               LISTEN      5516/mysqld
在node2上查看binlog状态
[root@node2 ~]# mysql -uroot -pabc-123 2> /dev/null -e"show master status;"
+------------------+----------+--------------+------------------+-------------------+
| File             | Position | Binlog_Do_DB | Binlog_Ignore_DB | Executed_Gtid_Set |
+------------------+----------+--------------+------------------+-------------------+
| mysql-bin.000001 |     2169 |              | mysql            |                   |
+------------------+----------+--------------+------------------+-------------------+
得知状态以后、即可指向新的Master
[root@node1 ~]# mysql -uroot -pabc-123 2> /dev/null -e"change master to master_host='10.2.3.12',master_port=3635,master_user='slave',master_password='abc-123',master_log_file='mysql-bin.000001',master_log_pos=2169;"
[root@node1 ~]# mysql -uroot -pabc-123 -P3635 2> /dev/null -e"start slave;"
[root@node1 ~]# mysql -uroot -pabc-123 -P3635 2> /dev/null -e"show slave status\G" | head -13
*************************** 1. row ***************************
               Slave_IO_State: Waiting for master to send event
                  Master_Host: 10.2.3.12
                  Master_User: slave
                  Master_Port: 3635
                Connect_Retry: 60
              Master_Log_File: mysql-bin.000001
          Read_Master_Log_Pos: 2169
               Relay_Log_File: node1-relay-bin.000002
                Relay_Log_Pos: 320
        Relay_Master_Log_File: mysql-bin.000001
             Slave_IO_Running: Yes
            Slave_SQL_Running: Yes
三、数据备份
1)全量备份
#!/bin/bash
#脚本声明:MySQL全量备份脚本,所使用的工具为mysqldump
#注意事项:备份的时候命名中有db的是备份库,有tb的是备份表
#更改地方:需要备份的库,备份文件存储目录,数据库连接信息,日志路径
#定义备份的库
MY_NAME="mds"
#定义时间格式
MY_TIME="$(date +%Y-%m-%d_%H-%M-%S)"
#定义备份文件存储目录
MY_BACK="/opt/fulldose"
######################
if [[ ! -d "${MY_BACK}" ]]
then
mkdir ${MY_BACK}
fi
#定义连接信息
MY_USER="mds"
MY_PASS="abc-123"
MY_HOST="10.2.3.14"
MY_PORT="3635"
#定义备份指令
mysqldump -u${MY_USER} -p${MY_PASS} -h${MY_HOST} -P${MY_PORT} 2> /dev/null -B ${MY_NAME} -F --master-data=2 --single-transaction > ${MY_BACK}/db_${MY_NAME}_${MY_TIME}.sql
2)增量备份
1、在需要备份的MySQL节点上开启binlog
log_bin = /usr/local/mysql/binlog/mysql-bin
log_bin_index = /usr/local/mysql/binlog/mysql-bin.index
2、在需要备份的MySQL节点上编辑rsync配置文件
[root@node4 ~]# vim /etc/rsyncd.conf
uid = root
gid = root
use chroot = yes
list = no
port = 873
address = 10.2.3.14
hosts allow = 10.2.3.0/24
max connections = 30
pid file = /var/run/rsyncd.pid
log file = /var/log/rsyncd.log
lock file = /var/run/rsyncd.lock

[ms1]
path = /usr/local/mysql/binlog/
read only = no
auth users = backup
secrets file = /etc/backup_user.db
dont compress = *.gz *.tgz *.zip *.z *.Z *.rpm *.deb *.bz2
3、在需要备份的MySQL节点上创建备份账号并定义权限
[root@node4 ~]# echo "backup:abc-123" > /etc/backup_user.db
[root@node4 ~]# chmod 600 /etc/backup_user.db
4、重启rsync服务
[root@node4 ~]# systemctl restart rsyncd
[root@node4 ~]# netstat -anput | grep rsync
tcp        0      0 10.2.3.14:873           0.0.0.0:*               LISTEN      9289/rsync
5、在备份服务器上定义免交互登录
[root@bak ~]# echo "abc-123" > /etc/server.pass
[root@bak ~]# chmod 600 /etc/server.pass
6、在备份服务器上免交互增量备份MySQL数据到/opt目录
[root@bak ~]# rsync -azt --password-file=/etc/server.pass backup@10.2.3.14::ms1 /opt
7、在备份服务器上使用任务计划定时备份MySQL数据到/opt目录
[root@bak ~]# crontab -e
30 03 * * * rsync -azt --password-file=/etc/server.pass backup@10.2.3.14::ms1 /opt
四、MHA问题记录
At least one of monitoring servers is not reachable from this script. This is likely a network
解决方法:删除/etc/masterha_default.cnf 这个默认的配置文件、或者刚开始就不要添加进去
Target master's advisory lock is already held by someone. Please check whether you monitor the same master from multiple monitoring processes.
解决方法:在/etc/mha/conf 目录下、删除 ms1.master_status.health 这个状态文件、然后再启动Manager即可
is dead, but must be alive! Check server settings.
解决方法:如果是一主两从、那么就代表还有一台节点没启动、因为MHA至少要三台节点
Can't exec "mysqlbinlog": 没有那个文件或目录 at /usr/local/share/perl5/MHA/BinlogManager.pm line 106.
解决方法:MHA有可能没有读取到变量、只需在各个MySQL节点上添加对应命令的软连接即可、因为在故障转移的时候需要调用这些命令
Bareword "FIXME_xxx" not allowed while "strict subs" in use at /usr/local/bin/master_ip_failover line 93.
解决方法:因为虚拟IP会牵扯到其它的软件或者临时地址、所以在没有配置虚拟IP前、需要大家先注释掉 master_ip_failover_script = /usr/local/bin/master_ip_failover 这个选项
五、测试总结
1、如果所有节点的SSH端口不同、那就需要在切换脚本的函数当中使用 -p 选项来指定远端节点的SSH端口

2、如果所有节点的SSH端口相同、则可以不用指定、只需在脚本当中定义在Master上添加的VIP地址即可

3、指定SSH端口的时候需要指定两个、第一个为摘除VIP主机的SSH端口、第二个为添加VIP主机的SSH端口

4、如果所有节点的SSH端口不同、那么进行一次故障转移之后、需要再次明确指定摘除VIP主机的SSH端口以及添加VIP主机的SSH端口

5、如果因为某种原因发生了故障转移、那就需要先在Haproxy的配置文件当中将某个Slave节点注释掉、因为其中一个可能会是新的Master

6、注释完成以后先不要着急重启、先试着修复异常的Master、并在MySQL的配置文件中添加相应的Slave参数

7、修复完成以后将其作为Slave角色并纳入集群、最后将它的IP地址添加到Haproxy的配置文件当中以参与读的负载均衡

8、以上配置都完成以后、即可重启Haproxy服务、最后在Manager节点上启动Manager监控新的Master即可

9、如果没有修复旧的Master、那么就需要在MHA的配置文件当中将旧Master的配置项注释、否则在启动Manager监控的时候会报错、如果修复了、则可忽略

10、如果所有节点的SSH端口不同、且不在故障转移脚本当中指定SSH的端口、那么Master出现异常以后、可以进行切换、但是VIP不会漂移、即新的Master不能添加VIP、旧的Master不能移除VIP
【只是为了打发时间】
【线上测试之后的应用】基于MySQL+MHA+Haproxy构建高可用负载均衡数据库集群(详解)的更多相关文章
- 基于MySQL+MHA+Haproxy部署高可用负载均衡集群
一.MHA 概述 MHA(Master High Availability)是可以在MySQL上使用的一套高可用方案.所编写的语言为Perl 从名字上我们可以看到.MHA的目的就是为了维护Master ...
- 基于HAProxy+Keepalived高可用负载均衡web服务的搭建
一 原理简介 1.HAProxyHAProxy提供高可用性.负载均衡以及基于TCP和HTTP应用的代理,支持虚拟主机,它是免费.快速并且可靠的一种解决方案.HAProxy特别适用于那些负载特大的web ...
- 利用LVS+Keepalived搭建Mysql双主复制高可用负载均衡环境
应用背景: MySQL复制(主主,主从...)能在保证数据的备份的同时也能够做读写分离分摊系统压力,但是发生单点故障时,需要手动 切换到另外一台主机.LVS和Keppalived可以设定一个VIP来实 ...
- 基于Haproxy+Keepalived构建高可用负载均衡集群
实验环境: 主机名 IP地址 VIP 192.168.200.254 Haproxy-1 192.168.200.101 Haproxy-2 192.168.200.102 Nginx1 192.16 ...
- Dubbo入门到精通学习笔记(二十):MyCat在MySQL主从复制的基础上实现读写分离、MyCat 集群部署(HAProxy + MyCat)、MyCat 高可用负载均衡集群Keepalived
文章目录 MyCat在MySQL主从复制的基础上实现读写分离 一.环境 二.依赖课程 三.MyCat 介绍 ( MyCat 官网:http://mycat.org.cn/ ) 四.MyCat 的安装 ...
- 搭建MySQL高可用负载均衡集群
1.简介 使用MySQL时随着时间的增长,用户量以及数据量的逐渐增加,访问量更是剧增,最终将会使MySQL达到某个瓶颈,那么MySQL的性能将会大大降低.这一结果也不利于软件的推广. 那么如何跨过这个 ...
- 搭建MySQL高可用负载均衡集群(转)
阅读目录 1.简介 2.基本环境 3.配置MySQL主主复制 4.中间件简述 4.1.Haproxy介绍 4.2.keepalived介绍 5.中间件的安装与配置(haproxy.keepalived ...
- [转]搭建MySQL高可用负载均衡集群
转自:http://www.cnblogs.com/phpstudy2015-6/p/6706465.html 阅读目录 1.简介 2.基本环境 3.配置MySQL主主复制 4.中间件简述 4.1.H ...
- Dubbo入门到精通学习笔记(十四):ActiveMQ集群的安装、配置、高可用测试,ActiveMQ高可用+负载均衡集群的安装、配置、高可用测试
文章目录 ActiveMQ 高可用集群安装.配置.高可用测试( ZooKeeper + LevelDB) ActiveMQ高可用+负载均衡集群的安装.配置.高可用测试 准备 正式开始 ActiveMQ ...
随机推荐
- PAT甲级——1036 Boys vs Girls
1036 Boys vs Girls This time you are asked to tell the difference between the lowest grade of all th ...
- ORs-1-introduction
introduction: 1.Olfactory receptors (ORs)很重要 2.已知的ORs的分子结构,但仍存在没清楚的地方: Though the relationship betwe ...
- 数据中台技术汇(二)| DataSimba系列之数据采集平台
继上期数据中台技术汇栏目发布DataSimba——企业级一站式大数据智能服务平台,本期介绍DataSimba的数据采集平台. DataSimba采集平台属于DataSimba的数据计算及服务平台的一部 ...
- CCD (电荷耦合元件)
CCD 是指电荷耦合器件,是一种用电荷量表示信号大小,用耦合方式传输信号的探测元件,具有自扫描.感受波谱范围宽.畸变小.体积小.重量轻.系统噪声低.功耗小.寿命长.可靠性高等一系列优点,并可做成集成度 ...
- Word Flow:创造吉尼斯世界纪录的触屏文本输入的全新体验——微软Windows Phone 8.1系统倾情巨献
Flow:创造吉尼斯世界纪录的触屏文本输入的全新体验--微软Windows Phone 8.1系统倾情巨献" title="Word Flow:创造吉尼斯世界纪录的触屏文本输入的全 ...
- 3dmax2017卸载/安装失败/如何彻底卸载清除干净3dmax2017注册表和文件的方法
3dmax2017提示安装未完成,某些产品无法安装该怎样解决呢?一些朋友在win7或者win10系统下安装3dmax2017失败提示3dmax2017安装未完成,某些产品无法安装,也有时候想重新安装3 ...
- JQ主页图片划动切换效果
.wrapper { width: 726px; float: left; } #jiao_dian { width: 980px; *height: 292px; margin-top: 10px; ...
- 分布式Web服务器架构(通俗易通)
最开始,由于某些想法,于是在互联网上搭建了一个网站,这个时候甚至有可能主机都是租借的,但由于这篇文章我们只关注架构的演变历程,因此就假设这个时候已经是托管了一台主机,并且有一定的带宽了,这个时候由于网 ...
- TOMCAT7不兼容spring boot 2.0
找不到这个类,找不到那个类... Spring Boot 2.0 (and Spring Framework 5 upon which it builds) requires a Servlet 3. ...
- mabatis中的元素属性
resultMap属性id 唯一标识type 返回类型extends 继承别的resultMap,可选关联其他标签id 设置主键使用,使用此标签配置映射关系(可能不止一个)result 一般属性的配置 ...