最近在做小程序的登录,需要同时获取用户手机号和头像昵称等信息,但是小程序又不支持单个接口同时获取两种数据,因此想到自定义一个弹窗,通过弹窗按钮触发获取手机号事件。记录一下。
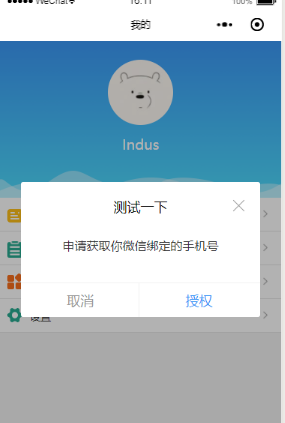
具体代码如下:
业务代码中:
在业务代码中引入dialog组件即可
<dialog visible="{{dialogVisible}}" showFooter="{{footerVisible}}" title="测试一下">
<view class='dialog-body' slot="dialog-body">
<view class='dialog-content'>申请获取你微信绑定的手机号</view>
<view class='dialog-footer' slot="dialog-footer">
<button class='cancel-btn' bindtap="close">取消</button>
<button open-type="getPhoneNumber" bindgetphonenumber="getPhoneNumber" class='confirm-btn'>授权</button>
</view>
</view>
</dialog>
dialog组件:
component下面新建dialog。注意是 component 不是 page ,因为要作为组件引入到页面中
dialog.wxml:
需要传入四个属性
visible:是否显示弹窗
title :标题
showClose:是否显示右上角关闭按钮
showFooter:是否显示底部按钮
<!--components/dialog/dialog.wxml-->
<view class='dialog-custom' wx:if="{{visible}}">
<view class='dialog-mask' bindtap="clickMask"></view>
<view class="dialog-main">
<view class="dialog-container">
<view class='dialog-container__title' wx:if="{{title.length>0}}">
<view class='title-label'>{{ title }}</view>
<view class='title-icon'>
<image wx:if="{{showClose}}" bindtap='close' src='/images/close-btn.png'></image>
</view>
</view>
<view class='dialog-container__body'>
<slot name="dialog-body"></slot>
</view>
<view class='dialog-container__footer' wx:if="{{showFooter}}">
<view class='dialog-container__footer__cancel' bindtap="close">取消</view>
<view class='dialog-container__footer__confirm' bindtap='confirm'>确定</view>
</view>
</view>
</view>
</view>
dialog.js
Component({
/**
* 组件的属性列表
*/
properties: {
visible: {
type: Boolean,
value: false
},
width: {
type: Number,
value: 85
},
position: {
type: String,
value: 'center'
},
title: {
type: String,
value: ''
},
showClose: {
type: Boolean,
value: true
},
showFooter: {
type: Boolean,
value: false
},
},
/**
* 组件的初始数据
*/
data: {
},
options:{
multipleSlots: true
},
/**
* 组件的方法列表
*/
methods: {
clickMask() {
this.setData({ visible: false });
},
close(){
this.setData({ visible: false });
},
cancel() {
this.setData({ visible: false });
this.triggerEvent('cancel');
},
confirm() {
this.setData({ visible: false });
this.triggerEvent('confirm');
}
}
})
dialog.json:声明是组件就行
{
"component": true,
"usingComponents": {}
}
dialog.wxss
css可以根据自己喜好的样式调整,注意mask遮罩层的z-index高一点,确保在最上层
/* components/dialog/dialog.wxss */
.dialog-custom {
width: 100vw;
height: 100%;
position: absolute;
left: 0;
top: 0;
z-index: 9999;
}
.dialog-mask {
position: fixed;
top: 0;
left: 0;
right: 0;
bottom: 0;
z-index: 10000;
width: 100vw;
height: 100%;
background: rgba(0, 0, 0, 0.3);
}
.dialog-main {
position: fixed;
z-index: 10001;
top: 50%;
left: 0;
right: 0;
width: 85vw;
height: auto;
margin: auto;
transform: translateY(-50%);
}
.dialog-container {
margin: 0 auto;
background: #fff;
z-index: 10001;
border-radius: 3px;
box-sizing: border-box;
padding: 40rpx;
}
.dialog-container__title {
width: 100%;
height: 50rpx;
line-height: 50rpx;
margin-bottom: 20rpx;
position: relative;
}
.dialog-container__title .title-label{
display: inline-block;
width: 100%;
height: 50rpx;
line-height: 50rpx;
font-size: 36rpx;
color: #000;
text-align: center;
}
.dialog-container__title .title-icon{
width: 34rpx;
height: 50rpx;
position: absolute;
top: 0;
right: 0;
}
.dialog-container__title .title-icon image{
width: 34rpx;
height: 34rpx;
}
.dialog-container__body {
padding-top: 10rpx;
font-size: 32rpx;
line-height: 50rpx;
}
.dialog-container__footer {
height: 76rpx;
line-height: 76rpx;
font-size: 32rpx;
text-align: center;
border-top: 1px solid #f1f1f1;
position: absolute;
bottom: 0;
left: 0;
right: 0;
}
.dialog-container__footer .dialog-container__footer__cancel {
width: 50%;
color: #999;
display: inline-block;
}
.dialog-container__footer .dialog-container__footer__cancel::after{
position: absolute;
right: 50%;
bottom: 0;
content: '';
width: 2rpx;
height: 76rpx;
background: #f1f1f1;
}
.dialog-container__footer .dialog-container__footer__confirm {
color: #3B98F7;
width: 50%;
display: inline-block;
text-align: center;
}
/* components/dialog/dialog.wxss */
.dialog-custom {
width: 100vw;
height: 100%;
position: absolute;
;
;
;
}
.dialog-mask {
position: fixed;
;
;
;
;
;
width: 100vw;
height: 100%;
, , , 0.3);
}
.dialog-main {
position: fixed;
;
top: 50%;
;
;
width: 85vw;
height: auto;
margin: auto;
transform: translateY(-50%);
}
.dialog-container {
auto;
background: #fff;
;
border-radius: 3px;
box-sizing: border-box;
rpx;
}
.dialog-container__title {
width: 100%;
rpx;
rpx;
rpx;
position: relative;
}
.dialog-container__title .title-label{
display: inline-block;
width: 100%;
rpx;
rpx;
rpx;
color: #000;
text-align: center;
}
.dialog-container__title .title-icon{
rpx;
rpx;
position: absolute;
;
;
}
.dialog-container__title .title-icon image{
rpx;
rpx;
}
.dialog-container__body {
rpx;
rpx;
rpx;
}
.dialog-container__footer {
rpx;
rpx;
rpx;
text-align: center;
border-top: 1px solid #f1f1f1;
position: absolute;
;
;
;
}
.dialog-container__footer .dialog-container__footer__cancel {
width: 50%;
color: #999;
display: inline-block;
}
.dialog-container__footer .dialog-container__footer__cancel::after{
position: absolute;
right: 50%;
;
content: '';
rpx;
rpx;
background: #f1f1f1;
}
.dialog-container__footer .dialog-container__footer__confirm {
color: #3B98F7;
width: 50%;
display: inline-block;
text-align: center;
}
- 微信小程序封装storage(含错误处理)
这次给你们安利的是微信小程序封装storage,先说下微信官方的 wx.getStorage({ key:"", success: function (res) { }, fail ...
- 微信小程序 修改(自定义) 单选/复选按钮样式 checkbox/radio样式自定义
参考文章: 微信小程序 修改(自定义) 单选/复选按钮样式 checkbox/radio样式自定义
- 微信小程序中自定义modal
微信小程序中自定义modal .wxml <modal hidden="{{hidden}}" title="这里是title" confirm-text ...
- 微信小程序之自定义toast弹窗
微信小程序里面的自带弹窗icon只有两种,success和loading.有时候用户输入错误的时候想加入一个提醒图标,也可以使用wx.showToast中的image来添加图片达到使用自定义图标的目的 ...
- 【微信小程序】自定义模态框实例
原文链接:https://mp.weixin.qq.com/s/23wPVFUGY-lsTiQBtUdhXA 1 概述 由于官方API提供的显示模态弹窗,只能简单地显示文字内容,不能对对话框内容进行自 ...
- 微信小程序之自定义select下拉选项框组件
知识点:组件,animation,获取当前点击元素的索引与内容 微信小程序中没有select下拉选项框,所以只有自定义.自定义的话,可以选择模板的方式,也可以选择组件的方式来创建. 这次我选择了组件, ...
- 微信小程序之自定义组件
在微信小程序项目中 肯定会存在很多功能和样式上相似的部分 面对这种情况 只是单单的ctrl+c ctrl+v 就显得很low了,而且也不便于后期维护那么这时候 使用微信小程序中的自定义组件功能就很合适 ...
- 微信小程序:自定义组件
为什么要学习自定义组件? 1.用上我自己的单词abc,我希望在页面中展示椭圆形的图片, 2.打开手机淘宝,假如现在要做一个企业级项目,里面有很多页面,首页存在导航模块,点击天猫,进入第二个页面,而第二 ...
- 微信小程序之自定义组件的应用
小程序支持自定义组件,下面是一个简单的购物车组件,实现的效果如图: 效果图 创建组件 在根目录创建components目录,然后创建计数组件 count 如图: 组件内容 <!--compone ...
随机推荐
- nodeJs基础方法
Node.js 是一个基于Chrome javascript 运行时建立的一个平台, 用来方便地搭建快速的 易于扩展的网络应用 Node.js 借助事件驱动, 非阻塞I/O 模型变得轻量和高效, 非常 ...
- php pdo操作数据库的方法
PDO 安装 你可以通过 PHP 的 phpinfo() 函数来查看是否安装了PDO扩展. 1.在 Unix /linux系统上安装 PDO 在Unix上或Linux上你需要添加以下扩展: exten ...
- 一次web请求发生的神奇故事
网络时代来临的时候,一个食指的点击就能解决很多问题! 那么当你的食指点击的时候,都发生了哪些神奇的事情呢?下面从几个角度为你做一个指引 1. 网络角度:一次网络请求是如何实现的 2. 浏览器角度:He ...
- Sql server定时执行某个sql 通过Windows 计划任务(非代理Job方式)
建立 bat文件.内容如下: osql -s "xxx.xxx.xx.x" -U sa -P sa -d DB -i TruncateSql.sql osql -S "l ...
- 深入浅出Cocoa 之动态创建类【转】
在前文<深入浅出Cocoa之类与对象>一文中,我已经详细介绍了ObjC中的 Class 与 Object 的概念,今天我们来如何在运行 时动态创建类.下面这个函数就是应用前面讲到的Clas ...
- Spring表达式语言:SpEl
概念: 是一个支持运行时查询和操作的对象图的强大的表达式语言. 语法类似于EL:SpEl使用#{ ...}作为定界符,所有在大括号中的 字符都将被认为是SpEl SpEl为bean的属性进行动态赋值提 ...
- 24种编程语言的Hello World程序
24种编程语言的Hello World程序 这篇文章主要介绍了 24 种编程语言的 Hello World 程序,包括熟知的 Java.C 语言.C++.C#.Ruby.Python.PHP 等编程语 ...
- pl/sql基础知识—函数快速入门
n 函数 函数用于返回特定的数据,当建立函数式,在函数头部必须包含return子句,而在函数体内必须包含return语句返回的数据,我们可以使用create function来建立函数,实际案例: ...
- PHPCMS快速建站系列之标签循环嵌套
标签循环嵌套方法,可以实现对PC标签循环调用,代码如下: 在此文件里/phpcms/lib/classes/template_cache.class.php 里的 template_parse 方法里 ...
- JavaScript--模拟百度搜索下拉li
上效果: 主要思路: 函数indexOf() .join().innerHTML的使用,还有 用完的数组要清空 <!DOCTYPE html> <html> <head ...
