
android -------- ConstraintLayout Guideline和Barrier(四)
前面的文章
此博文主要讲解:Guideline和Barrier
Guideline (了解,实际使用过程中我使用的不多)
当需要一个任意位置的锚点时,可以使用指示线(Guideline)来帮助定位,指示线实际上是 View 的子类,使用方式和普通的 View 相同,但指示线有着如下的特殊属性:
- 宽度和高度均为0
- 可见性为 View.GONE
案例:
<?xml version="1.0" encoding="utf-8"?>

<android.support.constraint.ConstraintLayout xmlns:android="http://schemas.android.com/apk/res/android"

    xmlns:app="http://schemas.android.com/apk/res-auto"

    android:layout_width="match_parent"

    android:layout_height="match_parent">

    <!--重要的是Guideline是不会显示到界面上的,默认是GONE的。-->

   <android.support.constraint.Guideline

        android:id="@+id/guidelineBegin"

        android:layout_width="wrap_content"

        android:layout_height="wrap_content"

        android:orientation="vertical"

        app:layout_constraintGuide_begin="100dp" />

    <Button

        android:id="@+id/button"

        android:layout_width="wrap_content"

        android:layout_height="wrap_content"

        android:layout_marginTop="16dp"

        android:text="Button"

        app:layout_constraintLeft_toLeftOf="@+id/guidelineBegin"

        app:layout_constraintTop_toTopOf="parent" />

    <android.support.constraint.Guideline

        android:id="@+id/guidelineEnd"

        android:layout_width="wrap_content"

        android:layout_height="wrap_content"

        android:orientation="vertical"

        app:layout_constraintGuide_end="100dp" />

    <Button

        android:id="@+id/buttonEnd"

        android:layout_width="wrap_content"

        android:layout_height="wrap_content"

        android:layout_marginTop="48dp"

        android:text="Button2"

        app:layout_constraintRight_toLeftOf="@+id/guidelineEnd"

        app:layout_constraintTop_toTopOf="parent" />

    <android.support.constraint.Guideline

        android:id="@+id/guidelinePercent"

        android:layout_width="wrap_content"

        android:layout_height="wrap_content"

        android:orientation="vertical"

        app:layout_constraintGuide_percent="0.8" />

    <Button

        android:id="@+id/buttonPercent"

        android:layout_width="wrap_content"

        android:layout_height="wrap_content"

        android:layout_marginTop="96dp"

        android:text="Button3"

        app:layout_constraintLeft_toLeftOf="@+id/guidelinePercent"

        app:layout_constraintTop_toTopOf="parent" />

    <!--当你要用一个控件占屏幕宽度的一半的时候,可以用layout_constraintGuide_percent -->

</android.support.constraint.ConstraintLayout>
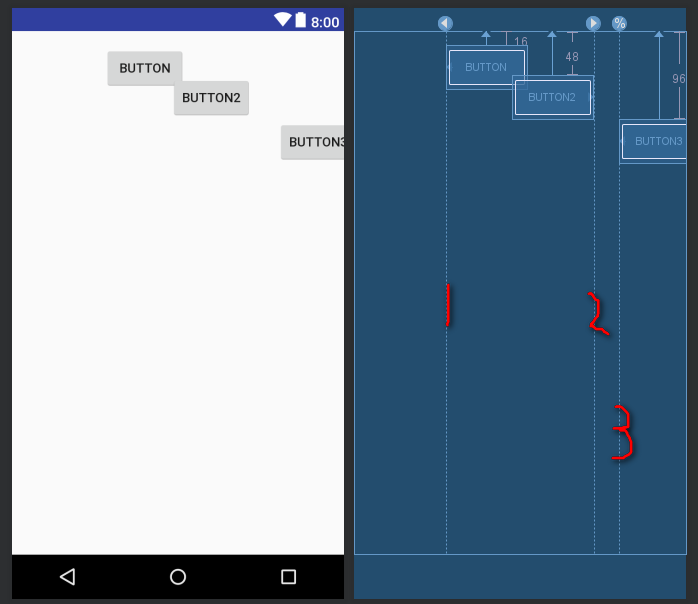
如图:(有三个指示线)
Barrier
直译为障碍、屏障。在约束布局中,可以使用属性constraint_referenced_ids属性来引用多个带约束的组件,
从而将它们看作一个整体,Barrier 的介入可以完成很多其他布局不能完成的功能;
它跟 Guideline 一样属于Virtual Helper objects,在运行时的界面上看不到,但是要比Guideline实用多了。
案例
<?xml version="1.0" encoding="utf-8"?>

<android.support.constraint.ConstraintLayout xmlns:android="http://schemas.android.com/apk/res/android"

    xmlns:app="http://schemas.android.com/apk/res-auto"

    xmlns:tools="http://schemas.android.com/tools"

    android:layout_width="match_parent"

    android:layout_height="match_parent">

    <!--Barrier-->

    <!-- 原始方案: 当改变textView1 的字段内容时,textView3随之改变,

                   当改变textView2 的字段内容时,则失效

        -->

    <TextView

        android:id="@+id/textView1"

        android:layout_width="wrap_content"

        android:layout_height="wrap_content"

        android:layout_marginStart="16dp"

        android:layout_marginTop="16dp"

        android:text="warehouse"

        app:layout_constraintStart_toStartOf="parent"

        app:layout_constraintTop_toTopOf="parent" />

    <TextView

        android:id="@+id/textView2"

        android:layout_width="wrap_content"

        android:layout_height="wrap_content"

        android:layout_marginStart="16dp"

        android:layout_marginTop="8dp"

        android:text="hospita"

        app:layout_constraintStart_toStartOf="parent"

        app:layout_constraintTop_toBottomOf="@+id/textView1" />

    <!--现在 Barrier 就已经定义好了,只剩下把textView3的约束从相对于 textView1 改为 相对于 Barrier 了:

        app:layout_constraintLeft_toRightOf="@+id/textView1"  ===> 不设置下面属性则会出现有的内容看不见  取消下面注释

        app:layout_constraintLeft_toRightOf="@+id/barrier1"/

        app:layout_constraintStart_toEndOf="@+id/barrier1"

    -->

    <android.support.constraint.Barrier

        android:id="@+id/barrier1"

        android:layout_width="wrap_content"

        android:layout_height="wrap_content"

        app:barrierDirection="end"

        app:constraint_referenced_ids="textView1,textView2"

       />

    <TextView

        android:id="@+id/textView3"

        android:layout_width="0dp"

        android:layout_height="wrap_content"

        android:layout_marginStart="8dp"

        android:layout_marginTop="16dp"

        android:layout_marginRight="10dp"

        android:text="为了看到整体的效果,可以切换语言,此时你会看到Barrier会自动位于较宽的那个textView后面,也就间接让 textView3 也位于了正确的位置:"

        app:layout_constraintLeft_toRightOf="@+id/barrier1"

        app:layout_constraintRight_toRightOf="parent"

        app:layout_constraintTop_toTopOf="parent" />

    <!--   <android.support.constraint.Barrier

        android:id="@+id/barrier7"

        android:layout_width="wrap_content"

        android:layout_height="wrap_content"

        app:barrierDirection="end"

        app:constraint_referenced_ids="textView2,textView1" />

    <TextView

        android:id="@+id/textView3"

        android:layout_width="0dp"

        android:layout_height="wrap_content"

        android:layout_marginStart="8dp"

        android:layout_marginTop="16dp"

        android:text="为了看到整体的效果,可以切换语言,此时你会看到 Barrier 会自动位于较宽的那个 textView 后面,也就间接让 textView3 也位于了正确的位置:"

        app:layout_constraintStart_toEndOf="@+id/barrier7"

        app:layout_constraintTop_toTopOf="parent" />-->

</android.support.constraint.ConstraintLayout>
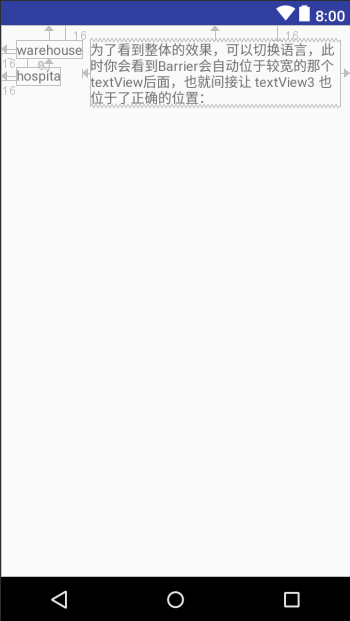
效果图:(你可以随便改变 textview1和textview2的长度,并不会影响textview3的显示)
很实用
参考地址:https://constraintlayout.com/basics/barriers.html
android -------- ConstraintLayout Guideline和Barrier(四)的更多相关文章
- android -------- ConstraintLayout Group和goneMargin(五)
前面的文章 ConstraintLayout 介绍 (一) ConstraintLayout约束属性 (二) ConstraintLayout 宽高比和偏移量比(三) ConstraintLayout ...
- Android ConstraintLayout详解(from jianshu)
Android ConstraintLayout详解 https://www.jianshu.com/p/a8b49ff64cd3 1. 概述 在本篇文章中,你会学习到有关Constraint ...
- Android系列之Fragment(四)----ListFragment的使用
[声明] 欢迎转载,但请保留文章原始出处→_→ 生命壹号:http://www.cnblogs.com/smyhvae/ 文章来源:http://www.cnblogs.com/smyhvae/p/ ...
- Android异步更新UI的四种方式
Android异步更新UI的四种方式 2015-09-06 09:23 segmentfault 字号:T | T 大家都知道由于性能要求,android要求只能在UI线程中更新UI,要想在其他线程中 ...
- 转--Android按钮单击事件的四种常用写法总结
这篇文章主要介绍了Android按钮单击事件的四种常用写法总结,比较了常见的四种写法的优劣,有不错的参考借鉴价值,需要的朋友可以参考下 很多学习Android程序设计的人都会发现每个人对代码的 ...
- Android开发_Android数据的四种存储方式
Android系统一共提供了四种数据存储方式.分别是:SharePreference.SQLite.Content Provider和File.由于Android系统中,数据基本都是私有的的,都是存放 ...
- Android 仿PhotoShop调色板应用(四) 不同区域颜色选择的颜色生成响应
版权声明:本文为博主原创文章,未经博主允许不得转载. Android 仿PhotoShop调色板应用(四) 不同区域颜色选择的颜色生成响应 上一篇讲过了主体界面的绘制,这里讲解调色板应用中的另外一 ...
- Android图表库MPAndroidChart(十四)——在ListView种使用相同的图表
Android图表库MPAndroidChart(十四)--在ListView种使用相同的图表 各位好久不见,最近挺忙的,所有博客更新的比较少,这里今天说个比较简单的图表,那就是在ListView中使 ...
- Android艺术开发探索第四章——View的工作原理(下)
Android艺术开发探索第四章--View的工作原理(下) 我们上篇BB了这么多,这篇就多多少少要来点实战了,上篇主席叫我多点自己的理解,那我就多点真诚,少点套路了,老司机,开车吧! 我们这一篇就扯 ...
随机推荐
- 如何开启Intel HAXM功能
1. 启用BIOS中的Intel(R) Virtualization Technology选项 2.设置成功后,在控制台中输入sc query intelhaxm.出现下图即为成功 3. 启动andr ...
- 《OFFER14》14_CuttingRope
// 面试题14:剪绳子 // 题目:给你一根长度为n绳子,请把绳子剪成m段(m.n都是整数,n>1并且m≥1). // 每段的绳子的长度记为k[0].k[1].…….k[m].k[0]*k ...
- 论文笔记:A Review on Deep Learning Techniques Applied to Semantic Segmentation
A Review on Deep Learning Techniques Applied to Semantic Segmentation 2018-02-22 10:38:12 1. Intr ...
- slot是标签的内容扩展,也就是说你用slot就可以在自定义组件时传递给组件内容,组件接收内容并输出
html 父页面<div id="app"> <register> <span slot="name">{{message. ...
- 【译】第18节---数据注解-ForeignKey
原文:http://www.entityframeworktutorial.net/code-first/foreignkey-dataannotations-attribute-in-code-fi ...
- 51nod 1020 逆序排列
http://www.51nod.com/onlineJudge/questionCode.html#!problemId=1020 题意: 思路: 一开始用了三重循环... 设f(n,k)表示n个数 ...
- 1.Jenkins 在windows下的安装与配置
1. 安装Jenkins 1.war包安装:启动Jenkins命令,打开cmd至Jenkins安装目录下,运行命令 java -jar jenkins.war 如果改变默认端口,则指定端口例如端口号1 ...
- 一些常见的第三方UI库
第三方UI库 1 bootstrap Bootstrap是Twitter推出的一个用于前端开发的开源工具包.它由Twitter的设计师Mark Otto和Jacob Thornton合作开发,是一个C ...
- win10,python3.6,django2.0.3,项目基本命令
1.django-admin startproject project_name(创建项目) 2.python manage.py startapp appname(创建应用) 3.python ma ...
- 设计模式(一)Chain Of Responsibility责任链模式
设计模式篇章,源于网课的学习,以及个人的整理 在我们接收用户提交的字符时,常常会使用到过滤,在学习责任链模式前,我们是这样做的 1.定义一个类 public class MsgProcesser { ...