jenkins部署web项目到tomcat(五)
(1)maven构建web项目
pom.xml
<project xmlns="http://maven.apache.org/POM/4.0.0" xmlns:xsi="http://www.w3.org/2001/XMLSchema-instance"

    xsi:schemaLocation="http://maven.apache.org/POM/4.0.0 http://maven.apache.org/maven-v4_0_0.xsd">

    <modelVersion>4.0.0</modelVersion>

    <groupId>cn.demo</groupId>

    <artifactId>jenkins_webdemo</artifactId>

    <packaging>war</packaging>

    <version>0.0.1-SNAPSHOT</version>

    <name>jenkins_webdemo Maven Webapp</name>

    <url>http://maven.apache.org</url>

    <build>

        <finalName>jenkins_webdemo</finalName>

        <plugins>

            <plugin>

                <inherited>true</inherited>

                <groupId>org.apache.maven.plugins</groupId>

                <artifactId>maven-compiler-plugin</artifactId>

                <version>3.5.1</version>

                <configuration>

                    <source>${compiler.source}</source>

                    <target>${compiler.target}</target>

                    <encoding>${project.build.sourceEncoding}</encoding>

                    <compilerArguments>

                        <extdirs>${project.basedir}/src/main/webapp/WEB-INF/lib</extdirs>

                    </compilerArguments>

                </configuration>

            </plugin>

            <!-- 源码打包

            <plugin>

                <inherited>true</inherited>

                <groupId>org.apache.maven.plugins</groupId>

                <artifactId>maven-source-plugin</artifactId>

                <version>3.0.1</version>

                <executions>

                    <execution>

                        <id>attach-sources</id>

                        <goals>

                            <goal>jar</goal>

                        </goals>

                    </execution>

                </executions>

            </plugin>

            -->

        </plugins>

    </build>

    <properties>

        <project.build.sourceEncoding>UTF-8</project.build.sourceEncoding>

        <compiler.source>1.7</compiler.source>

        <compiler.target>1.7</compiler.target>

        <!-- servlet/jsp/EL (2.4/2.0/?)(2.5/2.1/2.1),(3.0/2.2/2.2),(3.1/2.3/3.0) -->

        <servlet.version>3.1.0</servlet.version>

        <jsp.version>2.3.1</jsp.version>

        <jstl.version>1.2</jstl.version>

        <junit.version>4.12</junit.version>

    </properties>

    <dependencies>

        <dependency>

            <groupId>junit</groupId>

            <artifactId>junit</artifactId>

            <version>${junit.version}</version>

            <scope>test</scope>

        </dependency>

        <dependency>

            <groupId>javax.servlet</groupId>

            <artifactId>javax.servlet-api</artifactId>

            <version>${servlet.version}</version>

            <scope>provided</scope>

        </dependency>

        <dependency>

            <groupId>javax.servlet.jsp</groupId>

            <artifactId>javax.servlet.jsp-api</artifactId>

            <version>${jsp.version}</version>

            <scope>provided</scope>

        </dependency>

        <dependency>

            <groupId>javax.servlet</groupId>

            <artifactId>jstl</artifactId>

            <version>${jstl.version}</version>

        </dependency>

    </dependencies>

</project>
(2)在jenkins上的配新建项目
(3)jenkins上下载插件 Deploy to container Plugin (系统管理 --》 管理插件 --》 可选插件)
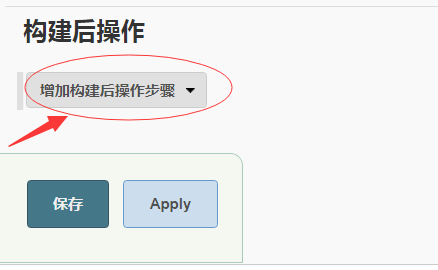
(4)开始配置项目,其他的都和以往的配置一样,在构建后操作中选择 增加构建后操作步骤中的 Deploy war/ear to a container
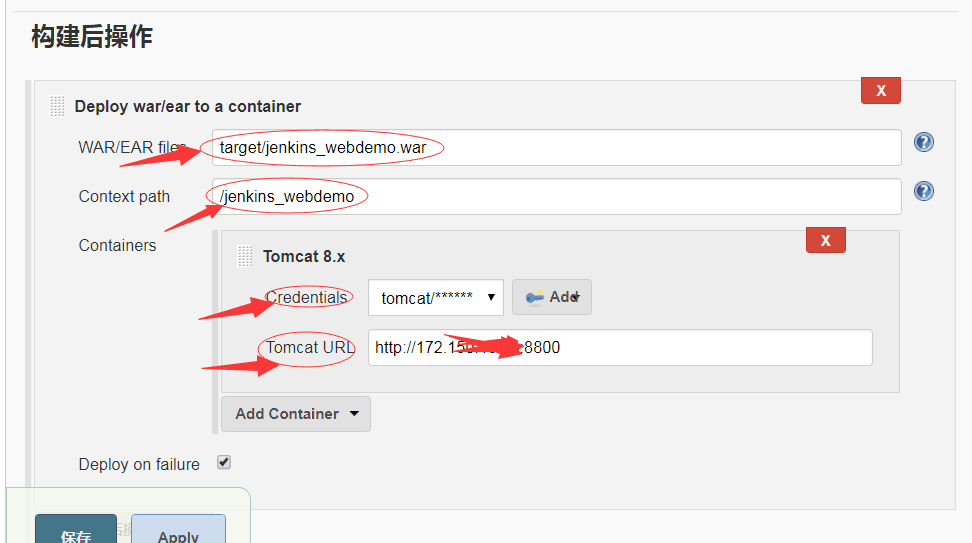
(5)开始配置tomcat
WAR/EAR files :是项目的war包位置,这里都是配置为 target/项目名.war
Context path:访问项目的路径
Credentails :这里是Tomcat用户,如果没有配置的要到tomcat 的conf/tomcat-users.xml 文件中配置
在conf目录下,tomcat-user.xml文件中增加以下配置:
<role rolename="admin"/>
<role rolename="manager"/>
<role rolename="manager-gui"/>
<role rolename="manager-script"/>
<user username="tomcat" password="tomcat" roles="admin,manager,manager-gui,manager-script"/>
然后再点击右侧的add 将用户添加进去 ,只需要添加 用户名 和 密码就可以了
Tomcat URL: 这里写访问Tomcat的路径 http://主机ip:端口号 例如:http://127.0.0.1:8080 Tomcat默认的端口号为8080,但是我的端口号和jenkins冲突了,所以改成了8800
到这里就可以发布了,构建成功后
使用 Tomcat URL + Context path 访问 就可以了
例如:http://172.123.23.12:8800/jenkins_webdemo
jenkins部署web项目到tomcat(五)的更多相关文章
- Jenkins部署web项目到Tomcat(热部署)
使用这个方式的话需要tomcat中有初始时Manage这个项目,本质上是通过http://ip:port/manager/html这个地址的上传接口进行上传,进行热部署(需要远程tomcat 必须开启 ...
- Jenkins部署web项目到Tomcat(shell脚本)
一.首先配置Publish Over SSH插件 配置地址:系统管理-->系统设置-->Publish over SSH(需要安装Publish over SSH插件) 二.jenkins ...
- Jenkins部署Web项目到远程tomcat(通过jenkins插件)
之前讲到的是如何构建一个项目,并且将代码进行编译.打包,那么打包完成最后的结果就需要发布到应用服务器,将项目部署成功.在之前的项目中我们采用的shell脚本来部署,下面讲解通过Jenkins部署web ...
- jenkins部署web项目到webogic
注: Docker容器里安装的jenkins,Docker容易里安装的weblogic 在jenkins里面直接将打包好的 war 包通过 Publish over SSH插件 放入 weblogic ...
- Maven实现项目构建直接部署Web项目到Tomcat
Maven实现项目构建直接部署Web项目到Tomcat配置如下: 1.Tomcat的用户及权限配置:在conf目录下,找到tomcat-users.xml,添加manager权限的用户. <ro ...
- jenkins部署web项目(不包含前后端分离)
本次部署的是非常非常传统的web项目, jsp页面那种, 一 首先给tomact设置管理员用户和管理员密码,这类的教程网上有很多,在<tomcat-users><tomcat-use ...
- eclipse+maven远程(自动)部署web项目到tomcat
[转自] http://blog.csdn.net/dhmpgt/article/details/11197995 eclipse集成maven后可以用maven命令把web项目自动部署到tomcat ...
- linux部署web项目到tomcat下(图文详解)
大家好,相信不少初学者不知道如何将windows eclipse下开发的web项目部署到linux系统的tomcat下,今天我将图文并茂教大家 首先呢,比如我新建一个web项目,打开eclipse编辑 ...
- MyEclipse部署web项目到Tomcat出现An internal error occurred during: "Launching on Tomcat 7.x"的问题
如果出现了上述的错误按照如下的3个步骤解决:1.首先关闭MyEclipse工作空间.2.然后删除工作空间下的文件."MyEclipse10\workspace.metadata.plugin ...
随机推荐
- win10如何一键开启关闭windows Defender(亲测有效)
win10如何一键开启关闭windows Defender(亲测有效) 一.总结 一句话总结:各种找资料如何开启关闭都没用,直接下载软件简单方便 软件 因为我关windows defender是用的一 ...
- (转)C#反射使用时注意BindingFlags的用法
c#反射查找方法时,默认只能查到public方法.如果想要查找private方法,需要设定BindingFlags. 即: BindingFlags.Public|BindingFlags.Insta ...
- compile FFMPEG under windows
这个文章应该算是中文版最好的了.但是还有一些需要修正. 特别是winsock2的处理 win10 msys2 vs2015 ffmpeg3.2.2 编译 这个英文版的才是最好的 Building ff ...
- Redisson实现分布式锁(二)
本次基于注解+AOP实现分布式锁(招式与前文基于注解切换多数据源相同),话不多说,直接上样例: 首先自定义注解:设计时需要考虑锁的一般属性:keys,最大等待时间,超时时间,时间单位. package ...
- nodejs安装、环境配置和测试
nodejs下载 https://nodejs.org/en/ nodejs安装 双击下载的nodejs,可自定义安装路径,安装模块部分直接next即可安装. 检查是否安装 win+R输入cmd,打开 ...
- apiCloud 版本号
应用版本号:this.appVersion = api.appVersion; 更新系版本的时候可用来比较
- 【洛谷p5015】标题统计
(写上瘾了再来一篇吧) 标题统计[传送门] 洛谷算法标签 字符串这种东西,我看到是崩溃的.因为我们只学到了二维数组[这个梗自行get],总之我们当时还没有学.然后显然就是各种翻书,各种百度.大致了解了 ...
- CentOS6.8逻辑卷管理实战
CentOS6.8逻辑卷管理实战 要求:利用现有的四块磁盘,创建一个有两个PV组成的大小为80G的名为testvg的VG:要求PE大小为16MB, 而后在卷组中创建大小为5G的逻辑卷testlv:挂载 ...
- 『TensorFlow × MXNet』SSD项目复现经验
『TensorFlow』SSD源码学习_其一:论文及开源项目文档介绍 『TensorFlow』SSD源码学习_其二:基于VGG的SSD网络前向架构 『TensorFlow』SSD源码学习_其三:锚框生 ...
- suse11安装mysql5.7
下载地址http://mirrors.sohu.com/mysql/MySQL-5.7/ 1. wget -c http://mirrors.sohu.com/mysql/MySQL-5.7/ ...