python 全栈开发,Day135(爬虫系列之第2章-BS和Xpath模块)
一、BeautifulSoup
1. 简介
简单来说,Beautiful Soup是python的一个库,最主要的功能是从网页抓取数据。官方解释如下:
'''

Beautiful Soup提供一些简单的、python式的函数用来处理导航、搜索、修改分析树等功能。

它是一个工具箱,通过解析文档为用户提供需要抓取的数据,因为简单,所以不需要多少代码就可以写出一个完整的应用程序。

'''
Beautiful Soup 是一个可以从HTML或XML文件中提取数据的Python库.它能够通过你喜欢的转换器实现惯用的文档导航,查找,修改文档的方式.Beautiful Soup会帮你节省数小时甚至数天的工作时间.你可能在寻找 Beautiful Soup3 的文档,Beautiful Soup 3 目前已经停止开发,官网推荐在现在的项目中使用Beautiful Soup 4。
安装
pip3 install bs4
解析器
pip3 install lxml
另一个可供选择的解析器是纯Python实现的 html5lib , html5lib的解析方式与浏览器相同,可以选择下列方法来安装html5lib:
pip install html5lib
解析器对比:
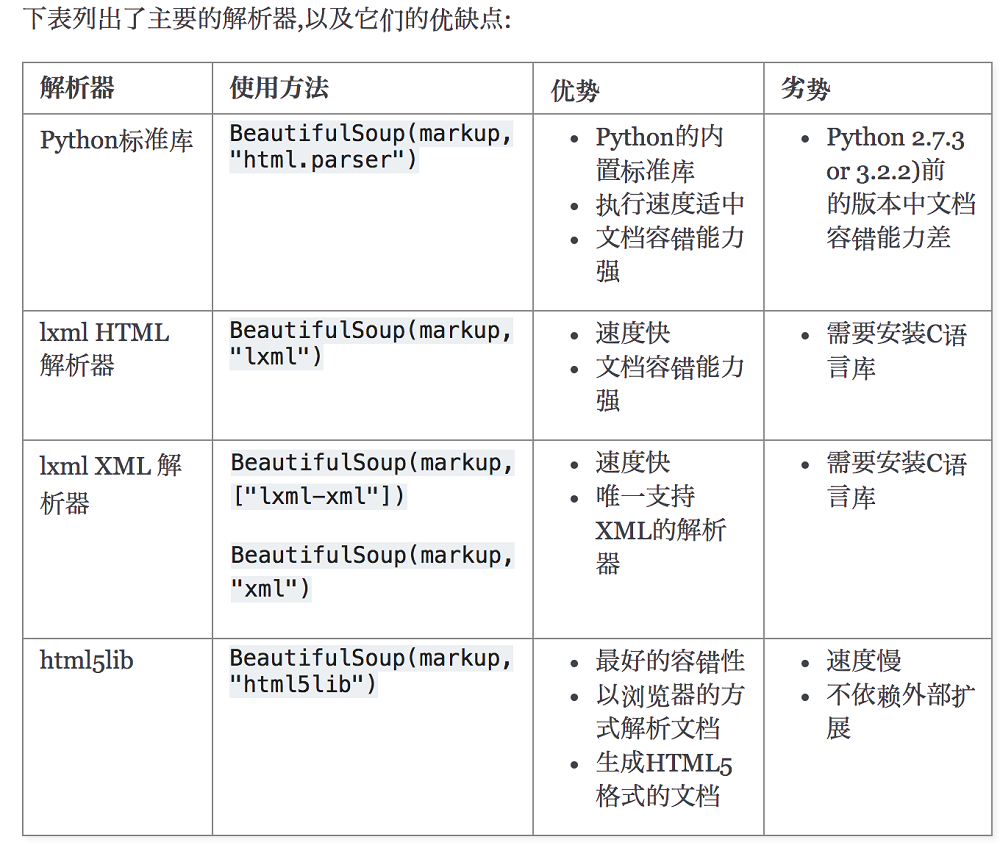
简单使用
下面的一段HTML代码将作为例子被多次用到.这是 爱丽丝梦游仙境的 的一段内容(以后内容中简称为 爱丽丝 的文档):
html_doc = """

<html><head><title>The Dormouse's story</title></head>

<body>

<p class="title"><b>The Dormouse's story</b></p>

<p class="story">Once upon a time there were three little sisters; and their names were

<a href="http://example.com/elsie" class="sister" id="link1">Elsie</a>,

<a href="http://example.com/lacie" class="sister" id="link2">Lacie</a> and

<a href="http://example.com/tillie" class="sister" id="link3">Tillie</a>;

and they lived at the bottom of a well.</p>

<p class="story">...</p>

"""
上面这段代码不是完整的html标签,为什么呢?它没有body和html的结束标签!
没关系,bs4有容错机制!
使用BeautifulSoup解析这段代码,能够得到一个 BeautifulSoup 的对象
from bs4 import BeautifulSoup

soup = BeautifulSoup(html_doc, 'html.parser')
从文档中找到所有<a>标签的链接:
for link in soup.find_all('a'):

    print(link.get('href'))
执行输出:
http://example.com/elsie

http://example.com/lacie

http://example.com/tillie
从文档中获取所有文字内容:
print(soup.get_text())
执行输出:
The Dormouse's story

The Dormouse's story

Once upon a time there were three little sisters; and their names were

Elsie,

Lacie and

Tillie;

and they lived at the bottom of a well.

...
2. 标签对象
通俗点讲就是 HTML 中的一个个标签,Tag 对象与XML或HTML原生文档中的tag相同:
from bs4 import BeautifulSoup

soup = BeautifulSoup('<b class="boldest">Extremely bold</b>','html.parser')

tag = soup.b

print(type(tag))
执行输出:<class 'bs4.element.Tag'>
Tag的名字
soup对象再以爱丽丝梦游仙境的html_doc为例,操作文档树最简单的方法就是告诉它你想获取的tag的name.如果想获取 <head> 标签,只要用 soup.head :
from bs4 import BeautifulSoup

soup = BeautifulSoup(html_doc, 'html.parser')

soup = soup.head  # 获取head标签

print(soup)

soup = soup.title  # 获取title标签

print(soup)
执行输出:
<head><title>The Dormouse's story</title></head>

<title>The Dormouse's story</title>
这是个获取tag的小窍门,可以在文档树的tag中多次调用这个方法.下面的代码可以获取<body>标签中的第一个<b>标签:
soup = soup.body.b  # <body>标签中的第一个<b>标签

print(soup)  # <b>The Dormouse's story</b>
通过点取属性的方式只能获得当前名字的第一个tag:
soup = soup.a  # 第一个a标签

print(soup)

# <a class="sister" href="http://example.com/elsie" id="link1">Elsie</a>
如果想要得到所有的<a>标签,或是通过名字得到比一个tag更多的内容的时候,就需要用到 Searching the tree 中描述的方法,比如: find_all()
soup = soup.find_all('a')  # 所有a标签

print(soup)
执行输出:
[<a class="sister" href="http://example.com/elsie" id="link1">Elsie</a>,

 <a class="sister" href="http://example.com/lacie" id="link2">Lacie</a>,

<a class="sister" href="http://example.com/tillie" id="link3">Tillie</a>]
结果是一个列表!
我们可以利用 soup加标签名轻松地获取这些标签的内容,注意,它查找的是在所有内容中的第一个符合要求的标签。
Tag的name和attributes属性
Tag有很多方法和属性,主要是 标签对象的名称,属性,文本。
现在介绍一下tag中最重要的属性: name和attributes
名称和属性
每个tag都有自己的名字,通过.name 来获取:
from bs4 import BeautifulSoup

soup = BeautifulSoup(html_doc, 'html.parser')

soup = soup.find_all('a')  # 所有a标签

for link in soup:

    print(link.name)  # 标签名

    print(link.get('id'))  # id属性

    print(link.get('class'))  # class属性

    print(link.get('href'))  # herf属性

    print(link.attrs)  # 标签所有属性

    # {'href': 'http://example.com/tillie', 'class': ['sister'], 'id': 'link3'}
tag的属性可以被添加,删除或修改. 再说一次, tag的属性操作方法与字典一样
修改
from bs4 import BeautifulSoup

soup = BeautifulSoup(html_doc, 'html.parser')

soup = soup.find_all('a')  # 所有a标签

soup[0]['class'] = 'verybold'  # 修改class属性

soup[0]['id'] = 1  # 修改id属性

print(soup[0])

# <a class="verybold" href="http://example.com/elsie" id="1">Elsie</a>
删除
soup = soup.find_all('a')  # 所有a标签

del soup[0]['class']

del soup[0]['id']

print(soup[0])

# <a href="http://example.com/elsie">Elsie</a>
文本获取
标签对象的文本获取
from bs4 import BeautifulSoup

soup = BeautifulSoup(html_doc, 'html.parser')

print(soup.p.string)  # p下的文本只有一个时,取到,否则为None

print(soup.p.strings)  # 拿到一个生成器对象, 取到p下所有的文本内容

print(soup.p.text)  #取到p下所有的文本内容

for line in soup.stripped_strings: #去掉空白

    print(line)
执行输出:
The Dormouse's story

<generator object _all_strings at 0x000001AA3941C5C8>

The Dormouse's story

The Dormouse's story

The Dormouse's story

Once upon a time there were three little sisters; and their names were

Elsie

,

Lacie

and

Tillie

;

and they lived at the bottom of a well.

...
如果tag包含了多个子节点,tag就无法确定 .string 方法应该调用哪个子节点的内容, .string 的输出结果是 None,如果只有一个子节点那么就输出该子节点的文本,比如下面的这种结构,soup.p.string 返回为None,但soup.p.strings就可以找到所有文本
from bs4 import BeautifulSoup

tmp_html= """<p id='list-1'>

    哈哈哈哈

    <a class='sss'>

        <span>

            <h1>aaaa</h1>

        </span>

    </a>

    <b>bbbbb</b>

</p>"""

soup = BeautifulSoup(tmp_html, 'html.parser')

print(soup.p.string)  # p下的文本只有一个时,取到,否则为None

print(soup.p.strings)  # 拿到一个生成器对象, 取到p下所有的文本内容

for i in soup.stripped_strings:

    print('-->',i)
执行输出:
None

<generator object _all_strings at 0x000002017427C570>

--> 哈哈哈哈

--> aaaa

--> bbbbb
因此,使用 string,标签下的文本只能有一个,否则返回None!
而使用text,返回所有文本!
这就是tag.text和tag.string的区别!
3.遍历文档树
关于DOM数,请参考链接:
https://www.cnblogs.com/majj/p/9102890.html
1、嵌套选择
from bs4 import BeautifulSoup

soup = BeautifulSoup(html_doc, 'html.parser')

print(soup.head.title.string)  # The Dormouse's story

print(soup.body.a.string)  # Elsie
2、子节点、子孙节点
from bs4 import BeautifulSoup

soup = BeautifulSoup(html_doc, 'html.parser')

print(soup.p.contents) #p下所有子节点

print(soup.p.children) #得到一个迭代器,包含p下所有子节点

for i,child in enumerate(soup.p.children):

    print(i,child)

print(soup.p.descendants) #获取子孙节点,p下所有的标签都会选择出来

for i,child in enumerate(soup.p.descendants):

    print(i,child)
3、父节点、祖先节点
print(soup.a.parent) #获取a标签的父节点

print(soup.a.parents) #找到a标签所有的祖先节点,父亲的父亲,父亲的父亲的父亲...
soup.a.parents 最终返回的节点是<html>...</html>。也就是说,它直接回到顶层了!
4、兄弟节点
print('=====>')

print(soup.a.next_sibling) #下一个兄弟

print(soup.a.previous_sibling) #上一个兄弟

print(list(soup.a.next_siblings)) #下面的兄弟们=>生成器对象

print(soup.a.previous_siblings) #上面的兄弟们=>生成器对象
4. 搜索文档树
BeautifulSoup定义了很多搜索方法,这里着重介绍2个: find() 和 find_all() .其它方法的参数和用法类似
1、五种过滤器
搜索文档树:BeautifulSoup定义了很多搜索方法,这里着重介绍2个: find() 和 find_all() .其它方法的参数和用法类似
html_doc = """

<html><head><title>The Dormouse's story</title></head>

<body>

<p id="my p" class="title"><b id="bbb" class="boldest">The Dormouse's story</b>

</p>

<p class="story">Once upon a time there were three little sisters; and their names were

<a href="http://example.com/elsie" class="sister" id="link1">Elsie</a>,

<a href="http://example.com/lacie" class="sister" id="link2">Lacie</a> and

<a href="http://example.com/tillie" class="sister" id="link3">Tillie</a>;

and they lived at the bottom of a well.</p>

<p class="story">...</p>

"""

from bs4 import BeautifulSoup

soup=BeautifulSoup(html_doc,'lxml')
五种过滤器: 字符串、正则表达式、列表、True、方法
1.1、字符串:即标签名
print(soup.find_all('b'))
执行输出:
[<b class="boldest" id="bbb">The Dormouse's story</b>]
1.2、正则表达式
import re

print(soup.find_all(re.compile('^b'))) #找出b开头的标签,结果有body和b标签
执行输出:
[<body>

<p class="title" id="my p"><b class="boldest" id="bbb">The Dormouse's story</b>

</p>

<p class="story">Once upon a time there were three little sisters; and their names were

<a class="sister" href="http://example.com/elsie" id="link1">Elsie</a>,

<a class="sister" href="http://example.com/lacie" id="link2">Lacie</a> and

<a class="sister" href="http://example.com/tillie" id="link3">Tillie</a>;

and they lived at the bottom of a well.</p>

<p class="story">...</p>

</body>, <b class="boldest" id="bbb">The Dormouse's story</b>]
1.3、列表
如果传入列表参数,Beautiful Soup会将与列表中任一元素匹配的内容返回.下面代码找到文档中所有<a>标签和<b>标签:
print(soup.find_all(['a','b']))
执行输出:
[<b class="boldest" id="bbb">The Dormouse's story</b>, <a class="sister" href="http://example.com/elsie" id="link1">Elsie</a>, <a class="sister" href="http://example.com/lacie" id="link2">Lacie</a>, <a class="sister" href="http://example.com/tillie" id="link3">Tillie</a>]
1.4、True
可以匹配任何值,下面代码查找到所有的tag,但是不会返回字符串节点
print(soup.find_all(True))

for tag in soup.find_all(True):

    print(tag.name)
这个不怎么用,可以忽略掉!
1.5、方法
如果没有合适过滤器,那么还可以定义一个方法,方法只接受一个元素参数 ,如果这个方法返回 True 表示当前元素匹配并且被找到,如果不是则反回 False
from bs4 import BeautifulSoup

soup=BeautifulSoup(html_doc,'lxml')

def has_class_but_no_id(tag):  # 有class但是没有id属性的标签

    return tag.has_attr('class') and not tag.has_attr('id')

print(soup.find_all(has_class_but_no_id))  # 将每一个标签传给这个方法过滤
执行输出:
[<p class="story">Once upon a time there were three little sisters; and their names were

<a class="sister" href="http://example.com/elsie" id="link1">Elsie</a>,

<a class="sister" href="http://example.com/lacie" id="link2">Lacie</a> and

<a class="sister" href="http://example.com/tillie" id="link3">Tillie</a>;

and they lived at the bottom of a well.</p>, <p class="story">...</p>]
最终输出的,都是有class属性,但是没有id属性的标签
2、find_all()
语法
find_all( name , attrs , recursive , text , **kwargs )
2.1、name
搜索name参数的值可以使任一类型的 过滤器 ,字符窜,正则表达式,列表,方法或是 True
from bs4 import BeautifulSoup

soup=BeautifulSoup(html_doc,'lxml')

import re

print(soup.find_all(name=re.compile('^t')))
执行输出:
[<title>The Dormouse's story</title>]
2.2、keyword
key=value的形式,value可以是过滤器:字符串 , 正则表达式 , 列表, True
print(soup.find_all(id=re.compile('my')))  # 查找id含有my属性的标签

# 查找herf含有lacle以及id带有数字的标签。

# 如果是class属性,需要使用class_,因为在python中,class是关键字!

print(soup.find_all(href=re.compile('lacie'),id=re.compile('\d')))

print(soup.find_all(id=True)) #查找有id属性的标签
执行输出:
[<p class="title" id="my p"><b class="boldest" id="bbb">The Dormouse's story</b>

</p>]

[<a class="sister" href="http://example.com/lacie" id="link2">Lacie</a>]

[<p class="title" id="my p"><b class="boldest" id="bbb">The Dormouse's story</b>

</p>, <b class="boldest" id="bbb">The Dormouse's story</b>, <a class="sister" href="http://example.com/elsie" id="link1">Elsie</a>, <a class="sister" href="http://example.com/lacie" id="link2">Lacie</a>, <a class="sister" href="http://example.com/tillie" id="link3">Tillie</a>]
有些tag属性在搜索不能使用,比如HTML5中的 data-* 属性:
data_soup = BeautifulSoup('<div data-foo="value">foo!</div>','lxml')

data_soup.find_all(data-foo="value") #报错:SyntaxError: keyword can't be an expression
但是可以通过 find_all() 方法的 attrs 参数定义一个字典参数来搜索包含特殊属性的tag:
from bs4 import BeautifulSoup

soup=BeautifulSoup(html_doc,'lxml')

data_soup = BeautifulSoup('<div data-foo="value">foo!</div>','lxml')

print(data_soup.find_all(attrs={"data-foo": "value"}))

# [<div data-foo="value">foo!</div>]
2.3、按照类名查找
注意关键字是class_,class_=value,value可以是五种选择器之一
from bs4 import BeautifulSoup

soup=BeautifulSoup(html_doc,'lxml')

import re

print(soup.find_all('a',class_='sister')) #查找类为sister的a标签

print(soup.find_all('a',class_='sister ssss')) #查找类为sister和sss的a标签,顺序错误也匹配不成功

print(soup.find_all(class_=re.compile('^sis'))) #查找类为sister的所有标签
执行输出:
[<a class="sister" href="http://example.com/elsie" id="link1">Elsie</a>, <a class="sister" href="http://example.com/lacie" id="link2">Lacie</a>, <a class="sister" href="http://example.com/tillie" id="link3">Tillie</a>]

[]

[<a class="sister" href="http://example.com/elsie" id="link1">Elsie</a>, <a class="sister" href="http://example.com/lacie" id="link2">Lacie</a>, <a class="sister" href="http://example.com/tillie" id="link3">Tillie</a>]
2.4、attrs
如果有多个属性,在attrs里面增加key-value即可
# 查询p标签,class属性为story

print(soup.find_all('p',attrs={'class':'story'}))
执行输出:
[<p class="story">Once upon a time there were three little sisters; and their names were

<a class="sister" href="http://example.com/elsie" id="link1">Elsie</a>,

<a class="sister" href="http://example.com/lacie" id="link2">Lacie</a> and

<a class="sister" href="http://example.com/tillie" id="link3">Tillie</a>;

and they lived at the bottom of a well.</p>, <p class="story">...</p>]
2.5、text
值可以是:字符,列表,True,正则
print(soup.find_all(text='Elsie'))

print(soup.find_all('a',text='Elsie'))
执行输出:
['Elsie']

[<a class="sister" href="http://example.com/elsie" id="link1">Elsie</a>]
2.6、limit参数
如果文档树很大那么搜索会很慢.如果我们不需要全部结果,可以使用 limit 参数限制返回结果的数量.效果与SQL中的limit关键字类似,当搜索到的结果数量达到 limit 的限制时,就停止搜索返回结果
print(soup.find_all('a',limit=2))
执行输出:
[<a class="sister" href="http://example.com/elsie" id="link1">Elsie</a>, <a class="sister" href="http://example.com/lacie" id="link2">Lacie</a>]
2.7、recursive
调用tag的 find_all() 方法时,Beautiful Soup会检索当前tag的所有子孙节点,如果只想搜索tag的直接子节点,可以使用参数 recursive=False
print(soup.html.find_all('a'))

print(soup.html.find_all('a',recursive=False))
执行输出:
[<a class="sister" href="http://example.com/elsie" id="link1">Elsie</a>, <a class="sister" href="http://example.com/lacie" id="link2">Lacie</a>, <a class="sister" href="http://example.com/tillie" id="link3">Tillie</a>]

[]
备注
像调用 find_all() 一样调用tag

find_all() 几乎是Beautiful Soup中最常用的搜索方法,所以我们定义了它的简写方法. BeautifulSoup 对象和 tag 对象可以被当作一个方法来使用,

这个方法的执行结果与调用这个对象的 find_all() 方法相同,下面两行代码是等价的:

soup.find_all("a")

soup("a")

这两行代码也是等价的:

soup.title.find_all(text=True)

soup.title(text=True)
3、find()
语法
find( name , attrs , recursive , text , **kwargs )
find_all() 方法将返回文档中符合条件的所有tag,尽管有时候我们只想得到一个结果.比如文档中只有一个<body>标签,那么使用 find_all() 方法来查找<body>标签就不太合适, 使用 find_all 方法并设置 limit=1 参数不如直接使用 find() 方法.下面两行代码是等价的:
from bs4 import BeautifulSoup

soup=BeautifulSoup(html_doc,'lxml')

print(soup.find_all('title', limit=1))

# soup.find_all('title', limit=1)

print(soup.find('title'))

# <title>The Dormouse's story</title>
唯一的区别是 find_all() 方法的返回结果是值包含一个元素的列表,而 find() 方法直接返回结果.
find_all() 方法没有找到目标是返回空列表, find() 方法找不到目标时,返回 None .
print(soup.find("nosuchtag"))

# None
soup.head.title 是 tag的名字 方法的简写.这个简写的原理就是多次调用当前tag的 find() 方法:
print(soup.head.title)

# <title>The Dormouse's story</title>

print(soup.find("head").find("title"))

# <title>The Dormouse's story</title>
4、其他方法
见官网: https://www.crummy.com/software/BeautifulSoup/bs4/doc/index.zh.html#find-parents-find-parent
5、css选择器
我们在写 CSS 时,标签名不加任何修饰,类名前加点,id名前加 #,在这里我们也可以利用类似的方法来筛选元素,用到的方法是 soup.select(),返回类型是 list
1. 通过标签名查找
from bs4 import BeautifulSoup

soup=BeautifulSoup(html_doc,'lxml')

print(soup.select("title"))  # [<title>The Dormouse's story</title>]

print(soup.select("b"))  # [<b class="boldest" id="bbb">The Dormouse's story</b>]
2. 通过类名查找
print(soup.select(".sister"))

'''

[<a class="sister" href="http://example.com/elsie" id="link1">Elsie</a>,

<a class="sister" href="http://example.com/lacie" id="link2">Lacie</a>,

<a class="sister" href="http://example.com/tillie" id="link3">Tillie</a>]

'''
3. 通过 id 名查找
print(soup.select("#link1"))

# [<a class="sister" href="http://example.com/elsie" id="link1">Elsie</a>]
4. 组合查找
组合查找即和写 class 文件时,标签名与类名、id名进行的组合原理是一样的,例如查找 p 标签中,id 等于 link1的内容,二者需要用空格分开
print(soup.select("p #link2"))

#[<a class="sister" href="http://example.com/lacie" id="link2">Lacie</a>]
直接子标签查找
print(soup.select("p > #link2"))

# [<a class="sister" href="http://example.com/lacie" id="link2">Lacie</a>]
5. 属性查找
查找时还可以加入属性元素,属性需要用中括号括起来,注意属性和标签属于同一节点,所以中间不能加空格,否则会无法匹配到。
print(soup.select("a[href='http://example.com/tillie']"))

#[<a class="sister" href="http://example.com/tillie" id="link3">Tillie</a>]
select 方法返回的结果都是列表形式,可以遍历形式输出,然后用 get_text() 方法来获取它的内容:
for title in soup.select('a'):

    print (title.get_text())

'''

Elsie

Lacie

Tillie

'''
5. 修改文档树
二、Xpath模块
xpath简介
XPath在Python的爬虫学习中,起着举足轻重的地位,对比正则表达式 re两者可以完成同样的工作,实现的功能也差不多,但XPath明显比re具有优势,在网页分析上使re退居二线。
XPath介绍
是什么? 全称为XML Path Language 一种小型的查询语言
说道XPath是门语言,不得不说它所具备的优点:
- 可在XML中查找信息
- 支持HTML的查找
- 通过元素和属性进行导航
python开发使用XPath条件: 由于XPath属于lxml库模块,所以首先要安装库lxml。
XPath的简单调用方法:
from lxml import etree

selector=etree.HTML(源码) #将源码转化为能被XPath匹配的格式

selector.xpath(表达式) #返回为一列表
Xpath语法
查询
html_doc = """

<!DOCTYPE html>

<html lang="en">

<head>

    <meta charset="UTF-8">

    <title>Title</title>

</head>

<body>

<div class="d1">

    <div class="d2">

            <p class="story">

                <a href="http://example.com/elsie" class="sister" id="link1">Elsie</a>,

                <a href="http://example.com/lacie" class="sister" id="link2">Lacie</a> and

                <a href="http://example.com/tillie" id="link3">Tillie</a>

            </p>

    </div>

    <div>

        <p id="p1">ALex is dsb</p>

        <p id="p2">Egon too</p>

    </div>

</div>

<div class="d3">

    <a href="http://www.baidu.com">baidu</a>

    <p>百度</p>

</div>

</body>

</html>

"""

from lxml import etree

selector=etree.HTML(html_doc) # 将源码转化为能被XPath匹配的格式
1. 选取节点
语法:
nodename     选取nodename节点的所有子节点         xpath(‘//div’)         选取了所有div节点

/            从根节点选取                        xpath(‘/div’)          从根节点上选取div节点

//           选取所有的当前节点,不考虑他们的位置    xpath(‘//div’)         选取所有的div节点

.            选取当前节点                        xpath(‘./div’)         选取当前节点下的div节点

..           选取当前节点的父节点                 xpath(‘..’)            回到上一个节点

@            选取属性                           xpath(’//@calss’)     选取所有的class属性
示例代码:
ret=selector.xpath("//div")

ret=selector.xpath("/div")

ret=selector.xpath("./div")

ret=selector.xpath("//p[@id='p1']")

ret=selector.xpath("//div[@class='d1']/div/p[@class='story']")
2. 谓语
语法:
表达式                                         结果

xpath(‘/body/div[1]’)                     选取body下的第一个div节点

xpath(‘/body/div[last()]’)                选取body下最后一个div节点

xpath(‘/body/div[last()-1]’)              选取body下倒数第二个div节点

xpath(‘/body/div[positon()<3]’)           选取body下前两个div节点

xpath(‘/body/div[@class]’)                选取body下带有class属性的div节点

xpath(‘/body/div[@class=”main”]’)         选取body下class属性为main的div节点

xpath(‘/body/div[price>35.00]’)           选取body下price元素值大于35的div节点
示例代码:
from lxml import etree

selector=etree.HTML(html_doc) # 将源码转化为能被XPath匹配的格式

ret=selector.xpath("//p[@class='story']//a[2]")  # [<Element a at 0x20d9a188c88>]

ret=selector.xpath("//p[@class='story']//a[last()]")  # [<Element a at 0x27a64818d88>]
返回结果是一个Element对象
3. 通配符
Xpath通过通配符来选取未知的XML元素
表达式                 结果

xpath(’/div/*’)     选取div下的所有子节点

xpath(‘/div[@*]’)    选取所有带属性的div节点
示例代码:
ret=selector.xpath("//p[@class='story']/*")

# [<Element a at 0x22c8461bcc8>, <Element a at 0x22c8461bc88>, <Element a at 0x22c8461bd88>]

ret=selector.xpath("//p[@class='story']/a[@class]")  # [<Element a at 0x1ebe370bc88>, <Element a at 0x1ebe370bd88>]
4. 取多个路径
使用“|”运算符可以选取多个路径
表达式                         结果

xpath(‘//div|//table’)    选取所有的div和table节点
示例代码:
ret=selector.xpath("//p[@class='story']/a[@class]|//div[@class='d3']")

print(ret)

# [<Element a at 0x1d509bd9cc8>, <Element a at 0x1d509bd9c88>, <Element div at 0x1d509bd9d88>]
5. Xpath轴
轴可以定义相对于当前节点的节点集
轴名称                      表达式                                  描述

ancestor                xpath(‘./ancestor::*’)              选取当前节点的所有先辈节点(父、祖父)

ancestor-or-self        xpath(‘./ancestor-or-self::*’)      选取当前节点的所有先辈节点以及节点本身

attribute               xpath(‘./attribute::*’)             选取当前节点的所有属性

child                   xpath(‘./child::*’)                 返回当前节点的所有子节点

descendant              xpath(‘./descendant::*’)            返回当前节点的所有后代节点(子节点、孙节点)

following               xpath(‘./following::*’)             选取文档中当前节点结束标签后的所有节点

following-sibing        xpath(‘./following-sibing::*’)      选取当前节点之后的兄弟节点

parent                  xpath(‘./parent::*’)                选取当前节点的父节点

preceding               xpath(‘./preceding::*’)             选取文档中当前节点开始标签前的所有节点

preceding-sibling       xpath(‘./preceding-sibling::*’)     选取当前节点之前的兄弟节点

self                    xpath(‘./self::*’)                  选取当前节点
6. 功能函数
使用功能函数能够更好的进行模糊搜索
函数                  用法                                                               解释

starts-with         xpath(‘//div[starts-with(@id,”ma”)]‘)                        选取id值以ma开头的div节点

contains            xpath(‘//div[contains(@id,”ma”)]‘)                           选取id值包含ma的div节点

and                 xpath(‘//div[contains(@id,”ma”) and contains(@id,”in”)]‘)    选取id值包含ma和in的div节点

text()              xpath(‘//div[contains(text(),”ma”)]‘)                        选取节点文本包含ma的div节点
举例1:
# 选取p标签class属性为story,在它下面的a标签id属性为link1的文本信息

ret=selector.xpath("//p[@class='story']/a[@id='link1']/text()")

print(ret)  # ['Elsie']
举例2:
# 选取p标签class属性为story,在它下面的a标签id属性以link开头的文本信息

ret=selector.xpath("//p[@class='story']/a[starts-with(@id,'link')]/text()")

print(ret)  # ['Elsie', 'Lacie', 'Tillie']
举例3:
# 选取p标签class属性为story,在它下面的a标签id属性包含k的文本信息

ret=selector.xpath("//p[@class='story']/a[contains(@id,'k')]/text()")

print(ret)  # ['Elsie', 'Lacie', 'Tillie']
举例4:
# 选取p标签class属性为story,在它下面的a标签class属性包含is的文本信息

ret=selector.xpath("//p[@class='story']/a[contains(@class,'is')]/text()")

print(ret)  # ['Elsie', 'Lacie']
举例5:
# 选取p标签class属性为story,在它下面的a标签文本信息包含ie的文本信息

ret=selector.xpath("//p[@class='story']/a[contains(text(),'ie')]/text()")

print(ret)  # ['Elsie', 'Lacie', 'Tillie']
Element对象
from lxml.etree import _Element

for obj in ret:

    print(obj)

    print(type(obj))  # from lxml.etree import _Element

'''

Element对象

class xml.etree.ElementTree.Element(tag, attrib={}, **extra)

  tag:string,元素代表的数据种类。

  text:string,元素的内容。

  tail:string,元素的尾形。

  attrib:dictionary,元素的属性字典。


  #针对属性的操作

  clear():清空元素的后代、属性、text和tail也设置为None。

  get(key, default=None):获取key对应的属性值,如该属性不存在则返回default值。

  items():根据属性字典返回一个列表,列表元素为(key, value)。

  keys():返回包含所有元素属性键的列表。

  set(key, value):设置新的属性键与值。

  #针对后代的操作

  append(subelement):添加直系子元素。

  extend(subelements):增加一串元素对象作为子元素。#python2.7新特性

  find(match):寻找第一个匹配子元素,匹配对象可以为tag或path。

  findall(match):寻找所有匹配子元素,匹配对象可以为tag或path。

  findtext(match):寻找第一个匹配子元素,返回其text值。匹配对象可以为tag或path。

  insert(index, element):在指定位置插入子元素。

  iter(tag=None):生成遍历当前元素所有后代或者给定tag的后代的迭代器。#python2.7新特性

  iterfind(match):根据tag或path查找所有的后代。

  itertext():遍历所有后代并返回text值。

  remove(subelement):删除子元素。

'''
本文参考链接:
https://www.cnblogs.com/yuanchenqi/articles/9487175.html
应用案例:安居客
打开安居客二手房链接:
https://beijing.anjuke.com/sale/?from=navigation
需要爬取 标题

务必使用谷歌浏览器打开,右键检查。找到对应的标签,右键copy-->copy Xpath
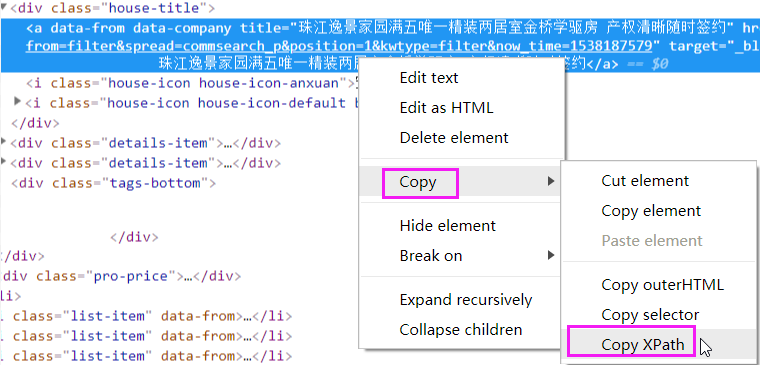
那么就能得到
//*[@id="leftContent"]/ul/li[1]/div/div[1]/a
接下来写代码:
import requests

from lxml import etree

# 访问二手房网页

res= requests.get("https://beijing.anjuke.com/sale/?from=navigation")

selector=etree.HTML(res.content) # 将html源码转化为能被XPath匹配的格式

# 匹配第一个条信息的标题

ret=selector.xpath('//*[@id="houselist-mod-new"]/li[1]/div[2]/div[1]/a/text()')

print(ret)
执行输出:
['\n 凤凰城二期,高层两居室,看房有钥匙随时,临国际村,金星园澜石']
怎么样,是不是很方便。注意:它能帮你快速生成 XPath表达式。它并不是万能的,在某些动态加载的网页中,可能不适用!
上面的结果只有一条,如果有多条呢?需要自己修改规则了!
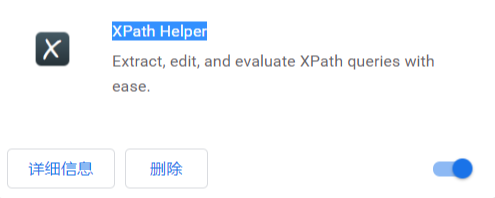
XPath Helper
XPath Helper可以支持在网页点击元素生成xpath,整个抓取使用了xpath、正则表达式、消息中间件、多线程调度框架的chrome插件。
这里我已经安装好了
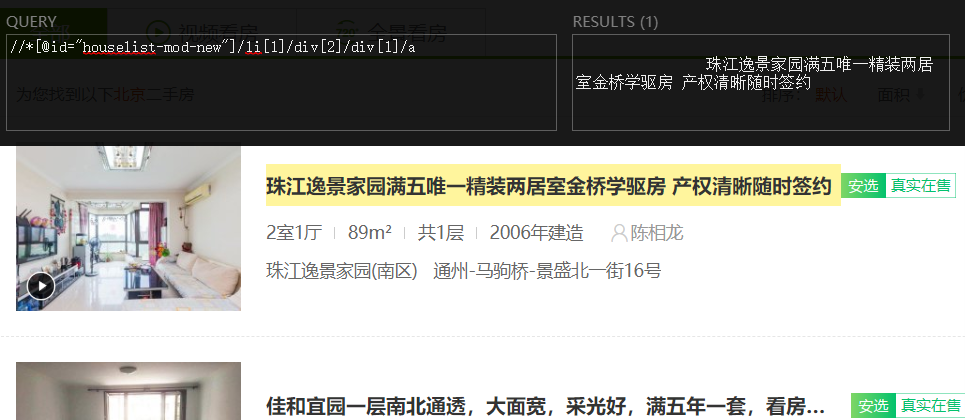
安装完成之后,在页面右上角,有一个图标

点击一下,它会弹出一个黑框。将刚才的XPath规则复制到左边,右边会立即显示结果
如果被选中,页面会有黄色标记!
作业:
爬取链家二手房信息,爬取3页即可!
注意:使用XPath完成!
分解步骤
打开链接二手房链接:
https://bj.lianjia.com/ershoufang/
获取标题
获取第一条信息的标题
选择所有信息中的标题部分

使用python代码实现
import requests
from lxml import etree # 访问二手房网页
res= requests.get("https://bj.lianjia.com/ershoufang/") selector=etree.HTML(res.content) # 将html源码转化为能被XPath匹配的格式 # 匹配所有的标题
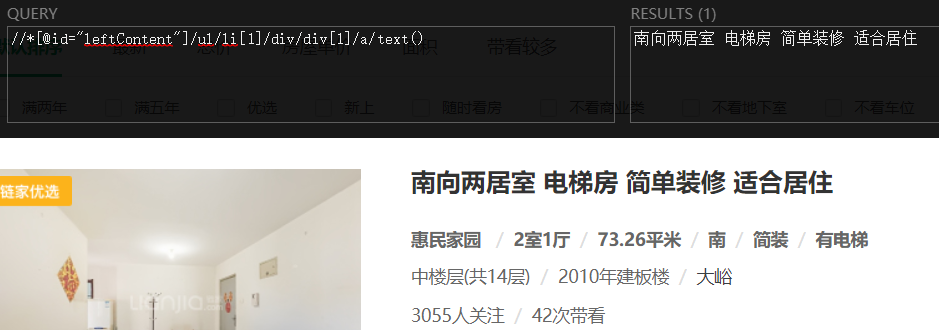
ret=selector.xpath('//*[@id="leftContent"]/ul/li[*]//div/div/a/text()')
print(ret)
执行输出:
['南向两居室 电梯房 简单装修 适合居住', '惠民家园 ', ...]
那么所有的标题,就获取完成了!
python 全栈开发,Day135(爬虫系列之第2章-BS和Xpath模块)的更多相关文章
- python全栈开发,Day43(引子,协程介绍,Greenlet模块,Gevent模块,Gevent之同步与异步)
昨日内容回顾 I/O模型,面试会问道 I/O操作,不占用CPU,它内部有一个专门的处理I/O模块 print和写log属于I/O操作,它不占用CPU 线程 GIL保证一个进程中的多个线程在同一时刻只有 ...
- python全栈开发目录
python全栈开发目录 Linux系列 python基础 前端~HTML~CSS~JavaScript~JQuery~Vue web框架们~Django~Flask~Tornado 数据库们~MyS ...
- python全栈开发中级班全程笔记(第二模块、第三章)(员工信息增删改查作业讲解)
python全栈开发中级班全程笔记 第三章:员工信息增删改查作业代码 作业要求: 员工增删改查表用代码实现一个简单的员工信息增删改查表需求: 1.支持模糊查询,(1.find name ,age fo ...
- Python全栈开发【面向对象进阶】
Python全栈开发[面向对象进阶] 本节内容: isinstance(obj,cls)和issubclass(sub,super) 反射 __setattr__,__delattr__,__geta ...
- python 全栈开发之路 day1
python 全栈开发之路 day1 本节内容 计算机发展介绍 计算机硬件组成 计算机基本原理 计算机 计算机(computer)俗称电脑,是一种用于高速计算的电子计算机器,可以进行数值计算,又可 ...
- 老男孩最新Python全栈开发视频教程(92天全)重点内容梳理笔记 看完就是全栈开发工程师
为什么要写这个系列博客呢? 说来讽刺,91年生人的我,同龄人大多有一份事业,或者有一个家庭了.而我,念了次985大学,年少轻狂,在大学期间迷信创业,觉得大学里的许多课程如同吃翔一样学了几乎一辈子都用不 ...
- 学习笔记之Python全栈开发/人工智能公开课_腾讯课堂
Python全栈开发/人工智能公开课_腾讯课堂 https://ke.qq.com/course/190378 https://github.com/haoran119/ke.qq.com.pytho ...
- python全栈开发之正则表达式和python的re模块
正则表达式和python的re模块 python全栈开发,正则表达式,re模块 一 正则表达式 正则表达式(Regular Expression)是一种文本模式,包括普通字符(例如,a 到 z 之间的 ...
- Python 全栈开发【第0篇】:目录
Python 全栈开发[第0篇]:目录 第一阶段:Python 开发入门 Python 全栈开发[第一篇]:计算机原理&Linux系统入门 Python 全栈开发[第二篇]:Python基 ...
随机推荐
- Linux重启服务器步骤
- vue项目首次加载过慢
vue项目优化 浅谈 Vue 项目优化 关于vue在app首次加载缓慢的解决办法 nginx开启缓存 在http部分加入 #要想开启nginx的缓存功能,需要添加此处的两行内容! #设置Web缓存区名 ...
- Error: failed to execute 'C:\Keil\ARM\ARMCC'的解决办法
在KEIL新建工程时,容易出现该问题,我查了一些资料,最终找到该问题解决方法: 第一步:在keil里的菜单栏依次选择Project->Manage->Components,Environm ...
- js 报delete object in strict mode
JAVA->Compiler->Building->No strictly compatible JRE for execution environment available Ig ...
- Nginx 内核优化
内核参数的优化示例: /etc/sysctl.conf net.ipv4.tcp_max_tw_buckets = // timewait的数量,默认是180000. net.ipv4.ip_loca ...
- Netty入门(4) - 附带的ChannelHandler和Codec
使用SSL/TLS创建安全的Netty程序 Java提供了抽象的SslContext和SslEngine,实际上SslContext可以用来获取SslEngine来进行加密和解密.Netty拓展了Ja ...
- 让 IE9 以下的浏览器支持 Media Queries
1. 如何让 IE9 以下的浏览器支持 css3 的media query 需要用到的 min-width/max-width 属性 css3 的媒体查询 IE 浏览器的支持程度是从 IE9开始支持, ...
- magelinux(0111)
Web Service 应用层:http, https 实现某类具体应用: 传输层协议:TCP, UDP, SCTP IANA: 0-1023:众所周知,永久地分配给固定的应用使用,特权端口: 102 ...
- linux 命令格式
1.命令 选项 参数 选项——短选项: - 多个选项可以合在一起书写 ——长选项:-- 选项是一个word 参数:命令的作用对象 ls -la /etc /opt 2.su swit ...
- Linux分区设置
基本3个就可以了 序号 路径 大小 格式 ① /boot 200MB ext4 ② 物理内存*1-1.5 swap ③ / 剩余存储空间 ext4