
Axis2之Spring装配
主要介绍 axis2 接口在 spring 项目中的整合配置。
使用jar包:axis2-1.6.2、spring2.5.6
目录结构:
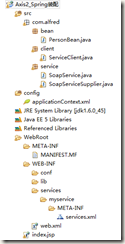
关键代码:

package com.alfred.bean;

public class PersonBean {

	private String username;

	public PersonBean() {

	}

	public PersonBean(String username) {

		this.username = username;

	}

	public String getUsername() {

		return username;

	}

	public void setUsername(String username) {

		this.username = username;

	}

	public String say(String str) {

		return username + " say:" + str;

	}

}
PersonBean.java
package com.alfred.service;

import org.apache.axis2.AxisFault;

import com.alfred.bean.PersonBean;

public class SoapService {

	private PersonBean personBean;

	public String sayHello(String username) throws AxisFault {

		personBean.setUsername(username);

		return personBean.say("hello");

	}

	public String saySorry() {

		return personBean.say("sorry");

	}

	public PersonBean getPersonBean() {

		return personBean;

	}

	public void setPersonBean(PersonBean personBean) {

		this.personBean = personBean;

	}

}
SoapService.java
package com.alfred.service;

import org.apache.axis2.AxisFault;

import org.apache.axis2.ServiceObjectSupplier;

import org.apache.axis2.description.AxisService;

import org.apache.axis2.description.Parameter;

import org.apache.axis2.i18n.Messages;

import org.springframework.beans.BeansException;

import org.springframework.context.ApplicationContext;

import org.springframework.context.ApplicationContextAware;

/**

 * 可能出现Axis2 spring bean not found 或者 Spring applicationContext not found。

 *

 * 解决办法:构建自己的ServiceObjectSupplier,实现接口ServiceObjectSupplier,同时也实现Spring的ApplicationContextAware接口

 *

 * @author alfred

 *

 */

public class SoapServiceSupplier implements ServiceObjectSupplier,

		ApplicationContextAware {

	private static ApplicationContext ctx;

	public Object getServiceObject(AxisService axisService) throws AxisFault {

		System.out.println("in getServiceObject");

		Parameter springBeanName = axisService.getParameter("SpringBeanName");

		String beanName = ((String) springBeanName.getValue()).trim();

		if (beanName != null) {

			if (ctx == null)

				throw new AxisFault("applicationContext is NULL! ");

			if (ctx.getBean(beanName) == null)

				throw new AxisFault("Axis2 Can't find Spring Bean: " + beanName);

			return ctx.getBean(beanName);

		} else {

			throw new AxisFault(Messages.getMessage("paramIsNotSpecified",

					"SERVICE_SPRING_BEANNAME"));

		}

	}

	public void setApplicationContext(ApplicationContext ctx)

			throws BeansException {

		this.ctx = ctx;

	}

}
SoapServiceSupplier.java
package com.alfred.client;

import javax.xml.namespace.QName;

import org.apache.axis2.AxisFault;

import org.apache.axis2.addressing.EndpointReference;

import org.apache.axis2.client.Options;

import org.apache.axis2.rpc.client.RPCServiceClient;

public class ServiceClient {

	public static void main(String args[]) throws AxisFault {

		sendAxis2();

	}

	/**

	 * 发送axis2的接口信息

	 * @throws AxisFault

	 */

	private static void sendAxis2() throws AxisFault {

		// 使用RPC方式调用WebService

		RPCServiceClient serviceClient = new RPCServiceClient();

		Options options = serviceClient.getOptions();

		// 指定调用WebService的URL

		EndpointReference targetEPR = new EndpointReference(

				"http://127.0.0.1:8080/aws/services/mySoapService");

		options.setTo(targetEPR);

		// 指定sayHello方法的参数值,如果有多个,继续往后面增加即可

		Object[] opAddEntryArgs = new Object[] { "alfred" };

		// 指定sayHello方法返回值的数据类型的Class对象

		Class[] classes = new Class[] { String.class };

		// 在创建QName对象时,QName类的构造方法的第一个参数表示WSDL,文件的命名空间名,也就是<wsdl:definitions>元素的targetNamespace属性值

		// 第二个参数是要调用的方法名

		QName opAddEntry = new QName("http://service.alfred.com", "saySorry");

		// 返回参数类型,这个和axis1有点区别

		// invokeBlocking方法有三个参数:

		// 第一个参数的类型是QName对象,表示要调用的方法名;

		// 第二个参数表示要调用的WebService方法的参数值,参数类型为Object[];

		// 第三个参数表示WebService方法的返回值类型的Class对象,参数类型为Class[];

		// 当方法没有参数时,invokeBlocking方法的第二个参数值不能是null,而要使用new Object[]{}

		// 如果被调用的WebService方法没有返回值,应使用RPCServiceClient类的invokeRobust方法,

		// 该方法只有两个参数,它们的含义与invokeBlocking方法的前两个参数的含义相同

		Object ret = serviceClient.invokeBlocking(opAddEntry, opAddEntryArgs,

				classes)[0];

		System.out.println(ret);

	}

}
ServiceClient.java
<?xml version="1.0" encoding="UTF-8"?>

<beans xmlns="http://www.springframework.org/schema/beans"

       xmlns:xsi="http://www.w3.org/2001/XMLSchema-instance"

       xmlns:context="http://www.springframework.org/schema/context"

       xmlns:tx="http://www.springframework.org/schema/tx"

       xmlns:aop="http://www.springframework.org/schema/aop"

       xsi:schemaLocation="http://www.springframework.org/schema/beans

		 http://www.springframework.org/schema/beans/spring-beans-2.5.xsd

		 http://www.springframework.org/schema/context

		 http://www.springframework.org/schema/context/spring-context-2.5.xsd

		 http://www.springframework.org/schema/tx

		 http://www.springframework.org/schema/tx/spring-tx-2.5.xsd

		 http://www.springframework.org/schema/aop

		 http://www.springframework.org/schema/aop/spring-aop-2.5.xsd">

	<bean id="applicationContext"

        class="org.apache.axis2.extensions.spring.receivers.ApplicationContextHolder" />

    <bean class="com.alfred.service.SoapServiceSupplier"></bean>

	<bean id="soapService" class="com.alfred.service.SoapService">

    	<property name="personBean" ref="personBean" />

    </bean>

    <bean id="personBean" class="com.alfred.bean.PersonBean">

    	<!-- 设置username的初始值 -->

    	<property name="username">

    		<value>john</value>

    	</property>

    </bean>

</beans>
applicationContext.xml
<?xml version="1.0" encoding="UTF-8"?>

<serviceGroup>

	<!-- 可以指定发布多个service -->

	<service name="mySoapService">

	    <description>axis2与spring集成案例</description>

	    <!-- 通过ServiceObjectSupplier参数指定SpringServletContextObjectSupplier类来获得Spring的ApplicationContext对象 -->

	    <parameter name="ServiceObjectSupplier">

	    	org.apache.axis2.extensions.spring.receivers.SpringAppContextAwareObjectSupplier

			<!-- com.alfred.service.SoapServiceSupplier -->

	    </parameter>

	    <!--

	       SpringBeanName固定的不能改

	       soapService是spring中注册的实现类得id

	     -->

	    <parameter name="SpringBeanName">soapService</parameter>

	    <!-- 服务级消息接收器 -->

	    <messageReceivers>

	        <messageReceiver mep="http://www.w3.org/2004/08/wsdl/in-out"

	            class="org.apache.axis2.rpc.receivers.RPCMessageReceiver" />

	        <messageReceiver mep="http://www.w3.org/2004/08/wsdl/in-only"

	            class="org.apache.axis2.rpc.receivers.RPCInOnlyMessageReceiver" />

	    </messageReceivers>

	</service>

</serviceGroup>
services.xml
<?xml version="1.0" encoding="UTF-8"?>

<web-app version="2.5" xmlns="http://java.sun.com/xml/ns/javaee"

	xmlns:xsi="http://www.w3.org/2001/XMLSchema-instance"

	xsi:schemaLocation="http://java.sun.com/xml/ns/javaee

	http://java.sun.com/xml/ns/javaee/web-app_2_5.xsd">

	<listener>

    	<listener-class>org.springframework.web.context.ContextLoaderListener

     	</listener-class>

    </listener>

	<context-param>

		<description>配置spring读取的xml文件,param-name是spring规定,spring自动加载以下内容</description>

		<param-name>contextConfigLocation</param-name>

		<param-value>

			classpath*:applicationContext*.xml

		</param-value>

	</context-param>

	<!--Axis2 config start-->

	<display-name>Apache-Axis2</display-name>

    <servlet>

        <servlet-name>AxisServlet</servlet-name>

        <servlet-class>org.apache.axis2.transport.http.AxisServlet</servlet-class>

        <!--<init-param>-->

        <!--<param-name>axis2.xml.path</param-name>-->

        <!--<param-value>/WEB-INF/conf/axis2.xml</param-value>-->

        <!--<param-name>axis2.xml.url</param-name>-->

        <!--<param-value>http://localhost/myrepo/axis2.xml</param-value>-->

        <!--<param-name>axis2.repository.path</param-name>-->

        <!--<param-value>/WEB-INF</param-value>-->

        <!--<param-name>axis2.repository.url</param-name>-->

        <!--<param-value>http://localhost/myrepo</param-value>-->

        <!--</init-param>-->

        <load-on-startup>1</load-on-startup>

    </servlet>

    <servlet>

        <servlet-name>AxisAdminServlet</servlet-name>

        <servlet-class>

            org.apache.axis2.webapp.AxisAdminServlet</servlet-class>

    </servlet>

    <servlet-mapping>

        <servlet-name>AxisServlet</servlet-name>

        <url-pattern>/servlet/AxisServlet</url-pattern>

    </servlet-mapping>

    <servlet-mapping>

        <servlet-name>AxisServlet</servlet-name>

        <url-pattern>/services/*</url-pattern>

    </servlet-mapping>

    <servlet-mapping>

        <servlet-name>AxisServlet</servlet-name>

        <url-pattern>*.jws</url-pattern>

    </servlet-mapping>

	<!--Axis2  end-->

	<welcome-file-list>

		<welcome-file>index.jsp</welcome-file>

	</welcome-file-list>

</web-app>
web.xml
spring 与 axis2 集成的关键就是 services.xml 文件中由原先的接口类地址指定改为注入 spring 的接口类对象。
Axis2之Spring装配的更多相关文章
- spring装配---处理自动装配的歧义性
一.歧义性 当我们使用spring的注解进行自动装配bean时,如果不仅有一个bean能够匹配结果的话,会抛出NoUniqueBeanDefinitionException: 例如本例中 当sprin ...
- Spring 装配Bean
Spring 装配Bean 装配解释: 创建应用对象之间协作关系的的行为通常称为装配(wiring),这也是依赖注入的本质 依赖注入是Spring的基础要素 一 : 使用spring装配Bean基础介 ...
- Spring装配bean
Spring配置的可选方案 Spring提供了如下三种装配机制: (1)在XML中显式配置 (2)在Java中显式配置 (3)隐式的bean发现机制和自动装配 Spring有多种方式可以装配bean, ...
- Spring装配Bean之XML装配bean
在Spring刚出现的时候,XML是描述配置的主要方式,在Spring的名义下,我们创建了无数行XML代码.在一定程度上,Spring成为了XML的同义词. 现在随着强大的自动化配置和Java代码的配 ...
- JAVA入门[13]-Spring装配Bean
一.概要 Sping装配bean主要有三种装配机制: 在XML中进行显式配置. 在Java中进行显式配置. 隐式的bean发现机制和自动装配. 原则: 建议尽可能地使用自动配置的机制,显式配置越少越好 ...
- AXIS2整合spring需要的jar,以及大部分缺少jar所报的异常
axis2 webservice 服务端jar包: -->axis2-kernel-1.6.1.jar -->axis2-spri ...
- spring/java ---->记录和整理用过的注解以及spring装配bean方式
spring注解 @Scope:该注解全限定名称是:org.springframework.context.annotation.Scope.@Scope指定Spring容器如何创建Bean的实例,S ...
- spring装配注解(IOC容器加载控制)ComponentScan及ComponentScans使用
ComponentScan,只写入value,可扫描路径下装配的@Contrller.@Service.@Repository @ComponentScan(value = "com.tes ...
- Spring装配Bean的过程补充
对上一篇的<Spring装配Bean的过程>的过程说一下,不然真产生了误区. 误区在哪里呢?那就是spring bean的作用域问题. 说哈常用的两种作用域:默认是scope = sing ...
随机推荐
- 去除字符串中的html代码
public static String Html2Text(String inputString) { String htmlStr = inputString; // 含html标签的字符串 St ...
- python 版Faster Rcnn
直接按照官网https://github.com/rbgirshick/py-faster-rcnn上的教程对faster Rcnn进行编译的时候,会发有一些层由于cudnn版本的更新,会报错如下: ...
- 运行Maven工程中修改tomcat端口
Maven 运行:clean tomcat7:run 若需要修改端口,则用clean -Dmaven.tomcat.port=8082 tomcat7:run
- 500 G JAVA视频网盘分享(JEECG开源社区)
500 G JAVA视频网盘分享(JEECG开源社区) [涵盖从java入门到深入架构,Linux.云计算.分布式.大数据Hadoop.ios.Android.互联网技术应有尽有] [转载:h ...
- MySQL 5.6 Index Condition Pushdown
ICP(index condition pushdown)是mysql利用索引(二级索引)元组和筛字段在索引中的where条件从表中提取数据记录的一种优化操作.ICP的思想是:存储引擎在访问索引的时候 ...
- 20170728 Celery项目 后台处理SQL SERVER的一个异常
-- 1. 感觉是访问DB 失败了,失败原因不明确 -- 2. 考虑解决问题的解决办法,后台记录异常,并重新发送任务. 具体如何来实现
- RN-android 打包后,部分图片不显示
安卓打包后以及真机调试的时候部分图片不显示,原因是 安卓的包文件并不会每次都把图片资源重新打包.也就是说,你第一次打完包之后,再更新图片与代码,代码是会生效,但是图片文件是拿不到的,解决办法是 ../ ...
- iframe子父窗口相互操作方法或元素
一.jquery 父.子页面之间页面元素的获取,方法的调用: 1. 父页面获取子页面元素: 格式:$("#iframe的ID").contents().find("#if ...
- [django]前后端分离之JWT用户认证
在前后端分离开发时为什么需要用户认证呢?原因是由于HTTP协定是不储存状态的(stateless),这意味着当我们透过帐号密码验证一个使用者时,当下一个request请求时它就把刚刚的资料忘了.于是我 ...
- cloud-api-service和cloud-iopm-web提交merge方法
cloud-api-service应该push to '自己的分支',然后去gitserver请求合并 cloud-iopm-web(master分支)应该push to Upstream,然后去gi ...