
LostRoutes项目日志——在main.js中添加多分辨率适配
初始的Cocos2d-JS项目中的main.js代码的内容为:
/**

 * A brief explanation for "project.json":

 * Here is the content of project.json file, this is the global configuration for your game, you can modify it to customize some behavior.

 * The detail of each field is under it.

 {

    "project_type": "javascript",

    // "project_type" indicate the program language of your project, you can ignore this field

    "debugMode"     : 1,

    // "debugMode" possible values :

    //      0 - No message will be printed.

    //      1 - cc.error, cc.assert, cc.warn, cc.log will print in console.

    //      2 - cc.error, cc.assert, cc.warn will print in console.

    //      3 - cc.error, cc.assert will print in console.

    //      4 - cc.error, cc.assert, cc.warn, cc.log will print on canvas, available only on web.

    //      5 - cc.error, cc.assert, cc.warn will print on canvas, available only on web.

    //      6 - cc.error, cc.assert will print on canvas, available only on web.

    "showFPS"       : true,

    // Left bottom corner fps information will show when "showFPS" equals true, otherwise it will be hide.

    "frameRate"     : 60,

    // "frameRate" set the wanted frame rate for your game, but the real fps depends on your game implementation and the running environment.

    "noCache"       : false,

    // "noCache" set whether your resources will be loaded with a timestamp suffix in the url.

    // In this way, your resources will be force updated even if the browser holds a cache of it.

    // It's very useful for mobile browser debuging.

    "id"            : "gameCanvas",

    // "gameCanvas" sets the id of your canvas element on the web page, it's useful only on web.

    "renderMode"    : 0,

    // "renderMode" sets the renderer type, only useful on web :

    //      0 - Automatically chosen by engine

    //      1 - Forced to use canvas renderer

    //      2 - Forced to use WebGL renderer, but this will be ignored on mobile browsers

    "engineDir"     : "frameworks/cocos2d-html5/",

    // In debug mode, if you use the whole engine to develop your game, you should specify its relative path with "engineDir",

    // but if you are using a single engine file, you can ignore it.

    "modules"       : ["cocos2d"],

    // "modules" defines which modules you will need in your game, it's useful only on web,

    // using this can greatly reduce your game's resource size, and the cocos console tool can package your game with only the modules you set.

    // For details about modules definitions, you can refer to "../../frameworks/cocos2d-html5/modulesConfig.json".

    "jsList"        : [

    ]

    // "jsList" sets the list of js files in your game.

 }

 *

 */

cc.game.onStart = function(){

    if(!cc.sys.isNative && document.getElementById("cocosLoading")) //If referenced loading.js, please remove it

        document.body.removeChild(document.getElementById("cocosLoading"));

    // Pass true to enable retina display, on Android disabled by default to improve performance

    cc.view.enableRetina(cc.sys.os === cc.sys.OS_IOS ? true : false);

    // Adjust viewport meta

    cc.view.adjustViewPort(true);

    // Uncomment the following line to set a fixed orientation for your game

    // cc.view.setOrientation(cc.ORIENTATION_PORTRAIT);

    // Setup the resolution policy and design resolution size

    cc.view.setDesignResolutionSize(960, 640, cc.ResolutionPolicy.SHOW_ALL);

    // The game will be resized when browser size change

    cc.view.resizeWithBrowserSize(true);

    //load resources

    cc.LoaderScene.preload(g_resources, function () {

        cc.director.runScene(new HelloWorldScene());

    }, this);

};

cc.game.run();
main.js(origional)
删除一些注释,main.js看的清晰一些:
cc.game.onStart = function(){

    if(!cc.sys.isNative && document.getElementById("cocosLoading")) //If referenced loading.js, please remove it

        document.body.removeChild(document.getElementById("cocosLoading"));

        cc.view.enableRetina(cc.sys.os === cc.sys.OS_IOS ? true : false);

    cc.view.adjustViewPort(true);

    cc.view.setDesignResolutionSize(960, 640, cc.ResolutionPolicy.SHOW_ALL);

    cc.view.resizeWithBrowserSize(true);

    cc.LoaderScene.preload(g_resources, function () {

        cc.director.runScene(new HelloWorldScene());

    }, this);

};

cc.game.run();
不过这里还要做一些修改,然后修改后的代码如下:
cc.game.onStart = function () {

    cc.view.setDesignResolutionSize(640, 960, cc.ResolutionPolicy.SHOW_ALL);

    cc.view.resizeWithBrowserSize(true);

    cc._loaderImage = res.loading_jpg;

    //load resources

    cc.LoaderScene.preload(g_resources, function () {

        cc.director.runScene(new HomeScene());

    }, this);

};

cc.game.run();
这里还有一些东西没有修改,比如初始的Scene不是HelloworldScene而是HomeScene(虽然这个HomeScene现在还没有,但是马上就会有的)
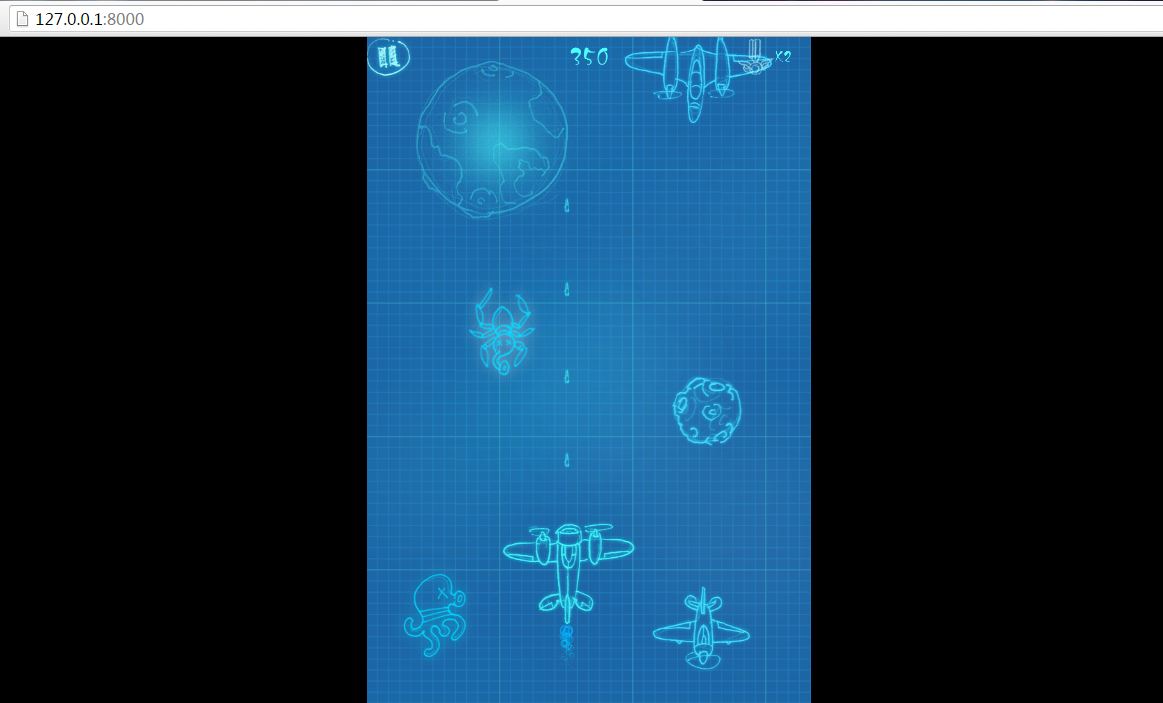
这里还有一个问题是资源文件是640x960的,所以在web项目和android项目中运行的项目实际上看起来是如下图所示的,因为一般屏幕的宽度比高度要大所以这里会看到左右两边的黑色区域,但是因为这样的话能看到整个游戏场景,我个人感觉测试起来还是挺清晰的,所以还是选择SHOW_ALL。
LostRoutes项目日志——在main.js中添加多分辨率适配的更多相关文章
- 在vue项目中的main.js中直接使用element-ui中的Message 消息提示、MessageBox 弹框、Notification 通知
需求来源:向后台请求数据时后台挂掉了,后台响应就出现错误,不做处理界面就卡住了,这时需要在main.js中使用axios的响应拦截器在出现相应错误是给出提示.项目使用element-ui,就调用里面的 ...
- main.js中封装全局登录函数
1. 在 main.js 中封装全局登录函数 通过 vue 对象的原型扩展,可以扩展一个函数,这样这个函数就可以在每一个界面通过类似指向对象的方式,去访问这个函数. 如下是 main.js 扩展的函数 ...
- main.js中import引入css与引入js的区别
表现:引入css样式文件能够作用到全局,而引入js文件就只能在main.js中产生作用 在 main.js 中引入的 css 都是全局生效的.引入的 js 文件只在 main.js 中生效,是因为 m ...
- 一道面试题关于js中添加动态属性
js中数据类型包含基本数据类型和引用类型,基本类型包括:string.null.undefined.number.boolean.引用类型即是对象比如:array .function以及自定义对象等 ...
- LostRoutes项目日志——玩家飞机精灵Fighter解析
Fighter类的定义在Fighter.js中,Fighter类继承与PhysicsSprite. 原版的Fighter.js: var Fighter = cc.PhysicsSprite.exte ...
- LostRoutes项目日志——敌人精灵Enemy解析
Enemy类在Enemy.js中,类Enemy类继承自PhysicsSprite,以便于可以使用物理引擎中的一些特性. 原版的Enemy.js: var Enemy = cc.PhysicsSprit ...
- 如何在其他js 引入main.js 中 vue 的实例?
1.原因解析 经测试发现,代码先执行了 index.js >> main.js >> Home.vue scr/api/index.js src/main.js src/co ...
- bootstrap table 生成的表格里动态添加HTML元素按钮,JS中添加点击事件,点击没反应---解决办法
bootstraptable中onExpandRow属性---js 方法添加的 html代码,然后给这代码里面的 元素 添加 事件,却获取不该元素.(称之为未来元素),由于是未来的 所以现在没有这个 ...
- 项目开发---使用node.js中sass语法
前言:本文中所有sass文件都指后缀名为scss的文件.在此也建议使用后缀名为scss的文件,以避免sass后缀名的严格格式要求报错. 一.sass插件的安装: gulp-sass-china // ...
随机推荐
- JDBC(1)—Connection
一.简介: 1.JDBC(Java Database Connectivity)是一个独立于特定数据库管理系统.通用的SQL数据库存取和操作的 *公共接口(一组API) *定义了用来访问数据库的标准j ...
- arcgis pro行列转换
行转列 列转行
- centos7下安装gcc7
之前写过在linux下升级gcc 4.8至gcc 4.9的过程,现在gcc最新的版本是8,有些软件必须是gcc 7或者以上的版本才可以编译,比如clickhouse,gcc 7的安装过程和之前基本上一 ...
- 解决PuppetDB Failed to submit 'replace facts'问题
在升级了CentOS6.5后,系统一直运行正常,今天在尝试自动部署了一台新的Bootnode后,发现在运行puppet agent时,发生报错: Error: Could not retrieve c ...
- Apache log4net™ 手册——介绍【翻译】
原文地址 本文内容 配置 配置属性 应用程序 appSettings 配置文件 配置语法 追加器(Appenders) 筛选器(Filters) 布局(Layouts) 根记录器(Root Logge ...
- RHEL磁盘修复
0. 1.基础工具:e2label /device/xxx [new label name] 显示/设定设备的label名称 2.e2fsck 修复工具,用-b 指定备用的superblock位置 ...
- 【SqlServer】解析SqlServer中的事务
目录结构: contents structure [+] 事务是什么 控制事务 数据并发访问产生的影响 事务的隔离级别 锁 NOLOCK.HOLDLOCK.UPDLOCK 死锁分析 在这篇Blog中, ...
- eclipse开发android入门学习
1.device窗体 查看android执行情况的窗体和DDMS内容一致 2.android.bat 在adb路径下执行adb操作,实现android系统 ...
- [CTCI] 最小调整有序
最小调整有序 题目描述 有一个整数数组,请编写一个函数,找出索引m和n,只要将m和n之间的元素排好序,整个数组就是有序的.注意:n-m应该越小越好,也就是说,找出符合条件的最短序列. 给定一个int数 ...
- 腾讯云SpringBoot部署 + HTTPS配置
springboot可以打包为jar和war,jar不多说了,最近的一个工程需要打包为war发布,大致说一下吧: 先看一下项目的大致结构: 第一步,需要排除springboot自带的tomcat插件 ...