02-springboot配置
目录
6,@PropertySource、@ImportResource和@Bean注解
1,前言
主要讲的有yaml语法,配置文件,配置文件加载顺序,配置文件配置原理。
2,YAML介绍
A:什么是YAML
YAML(/ˈjæməl/,尾音类似camel骆驼)是一个可读性高,用来表达数据序列化的格式。内容是一个键值对,所以它是与数据为中心,更加适合作为配置文件。文件后缀是以yml结尾,用于springboot的配置文件中,默认的配置文件名为:application.yml。
B:YAML语法
a:基本语法
K:(空格)V:表示一个键值对,在冒号后面必须有一个空格,空格表示的是层级关系,如果多行的时候是对齐的,表示是同级关系:
server:

 port: 8080
注意:属性和值之间是区分大小写的;双引号不会转义字符(name: "zhangsan \n lisi":输出;zhangsan 换行 lisi );
单引号会转义字符(name: ‘zhangsan \n lisi’:输出;zhangsan \n lisi );字符串可以不需要引号。
b:值的写法
字面值:
:字面直接来写;
对象。Map:
k: v:在下一行来写对象的属性和值的关系;注意缩进 ,对象还是k: v的方式;
friends:

  lastName: zhangsan

  age: 20
行内写法:
friends: {lastName: zhangsan,age: 18}集合:
pets:

  ‐ cat

  ‐ dog

  ‐ pig
行内写法:
pets: [cat,dog,pig] 3,获取yml配置文件内容
A:编写两个实体类Person,Student,用于存放属性。
Person类:
@Component

@ConfigurationProperties(prefix="Person")

public class Person {

     private int age;

     private String name;

     private Map<String,String> map;

     private List<String> list;

     private Student student;

	public int getAge() {

		return age;

	}

	public void setAge(int age) {

		this.age = age;

	}

	public String getName() {

		return name;

	}

	public void setName(String name) {

		this.name = name;

	}

	public Map<String, String> getMap() {

		return map;

	}

	public void setMap(Map<String, String> map) {

		this.map = map;

	}

	public List<String> getList() {

		return list;

	}

	public void setList(List<String> list) {

		this.list = list;

	}

	public Student getStudent() {

		return student;

	}

	public void setStudent(Student student) {

		this.student = student;

	}

	@Override

	public String toString() {

		return "Person [age="+ age + ", name=" + name + ", map=" + map + ", list=" + list + ", student=" + student

				+ "]";

	}

}
Student类:
public class Student {

	private int age;

    private String name;

	public int getAge() {

		return age;

	}

	public void setAge(int age) {

		this.age = age;

	}

	public String getName() {

		return name;

	}

	public void setName(String name) {

		this.name = name;

	}

	@Override

	public String toString() {

		return "Student [age=" + age + ", name=" + name + "]";

	}

}
编写yml配置文件:
server:

	port: 8080

Person:

	age: 18

	name: xiaozhi

	map:

		k1: we

		k2: wo

	list:

		-haha

		-hoho

	student:

		age: 20

		name:xiaofang
这是需要将我们通知springboot该类类中的所有属性和配置文件中相关的配置进行绑定,使用的注解为:@ConfigurationProperties:该注解有个属性prefix ,值为类,配置文件中哪个类下面的所有属性进行映射。
同时还需要将给类加入到springboot组件,需要的注解为:@Component
还需要在pom文件添加一个坐标,该坐标表示的是扫描配置文件,文件校验,可以不给出,如果不给,编写yml配置文件不给出提示和校验。
<dependency>

      <groupId>org.springframework.boot</groupId>

      <artifactId>spring‐boot‐configuration‐processor</artifactId>

      <optional>true</optional>

</dependency
B:在主程序运行结果(可使用单元测试)
控制类:
@Controller

public class AppController {

	@Resource

	private Person person;

	@ResponseBody

	@RequestMapping("/show")

   public String show(){

		System.out.print(person);

	   return "你好!世界";

   }

}
测试结果为:

可以看到Person类的属性以及被注入了。
4,springboot的配置文件
A:springboot给出两种配置文件
•application.properties
•application.yml
配置文件默认为固定文件名,springboot可以将自动将文件扫描到容器中。之前一起讲了yml配置文件的编写方法和加载方式。项目将会说properties 文件的编写和加载方式;
B:编写properties 文件
Person.age=18

Person.name=xiaozhi

Person.map.k1=we

Person.map.k2=wuw

Person.list=we.weo.werf

Person.student.age=20

Person.student.name=xiaofang
只要编写程这样就可以了,加载方式和yml的一样,结果如下图所示:

5,springboot使用@Value实现映射
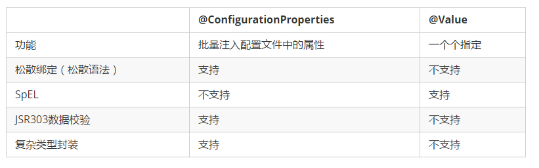
之前使用@ConfigurationProperties(prefix="Person")这个注解实现配置文件到类属性的映射,@ConfigurationProperties注解表示的是将该类的全部属性实现映射,只要配置文件有对应的属性,就将配置文件的内容注入到类中。而@Value是单个注入,分别对类的属性进行注入。
A:使用@Value实现注入
只需要通过修改Person类就可以了,如下段代码:
@Component

//@ConfigurationProperties(prefix="Person")

public class Person {

	@Value("${Person.age}")

     private int age;

     private String name;

     private Map<String,String> map;

     private List<String> list;

     private Student student;

	public int getAge() {

		return age;

	}

	public void setAge(int age) {

		this.age = age;

	}

	public String getName() {

		return name;

	}

	public void setName(String name) {

		this.name = name;

	}

	public Map<String, String> getMap() {

		return map;

	}

	public void setMap(Map<String, String> map) {

		this.map = map;

	}

	public List<String> getList() {

		return list;

	}

	public void setList(List<String> list) {

		this.list = list;

	}

	public Student getStudent() {

		return student;

	}

	public void setStudent(Student student) {

		this.student = student;

	}

	@Override

	public String toString() {

		return "Person [age="+ age + ", name=" + name + ", map=" + map + ", list=" + list + ", student=" + student

				+ "]";

	}

}
测试结果:

可以发现,只是在age属性上加上@Value时,注入值只是注入这个属性的值。
B:@Value和@ConfigurationProperties的比较
6,@PropertySource、@ImportResource和@Bean注解
A:PropertySource:读取指定的文件(只适用于Properties文件)
属性:value:String[]
写一个a.Properties文件
Person.age=20

Person.name=xiao

Person.map.k1=hahah

Person.map.k2=xixi

Person.list=we,weo,werfwowowoowowo

Person.student.age=210

Person.student.name=xiaofan
在Person类上添加注解
@PropertySource(value={"classpath:a.properties"})

@Component

@ConfigurationProperties(prefix="Person")

public class Person {

     private int age;

     private String name;

     private Map<String,String> map;

     private List<String> list;

     private Student student;

	public int getAge() {

		return age;

	}

	public void setAge(int age) {

		this.age = age;

	}

	public String getName() {

		return name;

	}

	public void setName(String name) {

		this.name = name;

	}

	public Map<String, String> getMap() {

		return map;

	}

	public void setMap(Map<String, String> map) {

		this.map = map;

	}

	public List<String> getList() {

		return list;

	}

	public void setList(List<String> list) {

		this.list = list;

	}

	public Student getStudent() {

		return student;

	}

	public void setStudent(Student student) {

		this.student = student;

	}

	@Override

	public String toString() {

		return "Person [age="+ age + ", name=" + name + ", map=" + map + ", list=" + list + ", student=" + student

				+ "]";

	}

}
运行结果:

值得注意的是使用此注解扫描时,如果配置文件目录有一个application.properties文件,而且该文件中存在该类的配置,它会优先使用默认配置文件而不去加载自定义配置文件。
B:@ImportResource注解:用于加载spring配置文件
在学习spring的时候,spring的配置文件主要配置的是bean对象,springboot页提供了一个扫描器用于加载spring的配置文件。该注解就是扫描spring配置文件所使用的。
编写一个spring的配置文件
<?xml version="1.0" encoding="UTF‐8"?> <beans

xmlns="http://www.springframework.org/schema/beans"

xmlns:xsi="http://www.w3.org/2001/XMLSchema‐instance"

xsi:schemaLocation="http://www.springframework.org/schema/beans

http://www.springframework.org/schema/beans/spring‐beans.xsd">

<bean id="helloService" class="com.atguigu.springboot.service.HelloService"></bean>

</beans>
在主程序类中加入注解:
@ImportResource(locations = {"classpath:beans.xml"})就可以将该bean对象注入到sprig容器中。
C:@Bean标签
spring不建议我们使用@ImportResource注解,主要是会导致开发的周期过长,编写spring配置文件过于麻烦。为了解决这个问题,springboot提供@Bean注解,将类注入到spring容器中。使用该注解需要指定需要配置的类,@Configuration注解就可以指定配置类。
@Configuration//指明当前类是一个配置类;就是来替代之前的Spring配置文件

public class Person {

     private int age;

     private String name;

     private Map<String,String> map;

     private List<String> list;

     private Student student;

     @Bean//在配置文件中用<bean><bean/>标签添加组件

     public void show(){}
7,Springboot的占位符
springboot在配置文件中可以定义占位符,通过占位符设置默认值,获取该配置文件其他值,拼接一些随机数等。
A:随机数
${random.value}、${random.int}、${random.long}

${random.int(10)}、${random.int[1024,65536]}
springboot自己定义了一些获取随机数或者uuid的方法,如下所示:
Person.age=$(random.int)

Person.name=xiao$(random.uuid)

Person.map.k1=hahah

Person.map.k2=xixi

Person.list=we,weo,werfwowowoowowo

Person.student.age=210

Person.student.name=xiaofan
B:获取配置文件其他值:
Person.age=20

Person.name=xiao

Person.map.k1=hahah

Person.map.k2=xixi

Person.list=we,weo,werfwowowoowowo

Person.student.age=210${Person.age}

Person.student.name=xiaofan
表示获取到Person.age的值拼接到Person.student.age的值的后面,如果配置文件中没有属性和值,而配置类中有该属性,通过配置配置文件中的属性,将获取不到该值:
#Person.age=20

Person.name=xiao

Person.map.k1=hahah

Person.map.k2=xixi

Person.list=we,weo,werfwowowoowowo

Person.student.age=210${Person.age}

Person.student.name=xiaofan
如上面代码所示,将Person.age注释掉,将会导致出错。
C:设置默认值
Person.age=20

Person.name=xiao

Person.map.k1=hahah

Person.map.k2=xixi

Person.list=we,weo,werfwowowoowowo

Person.student.age=210${Person.hahah}

Person.student.name=xiaofan
这种上面代码的情况是如果配置文件中的占位符在配置类没有属性,没有给出默认值,表示的是字符拼接。
Person.age=20

Person.name=xiao

Person.map.k1=hahah

Person.map.k2=xixi

Person.list=we,weo,werfwowowoowowo

Person.student.age=210${Person.hahah:html}

Person.student.name=xiaofan
这种情况是给该属性赋值一个默认值,获取的时候是直接获取html这个值而不是直接拼接。
8,profile
springboot为我们提供了在不同环境使用不同配置文件的方式,例如配置端口号,在生产环境下使用8080端口,在测试环境下使用8081端口,开发环境使用8082端口,通过使用profile,可以让我们快速更换端口号
A:多个Profifile文件
文件命名格式:
application-dev.properties

application-dev.yml
B:properties配置文件使用profile功能
编写多个properties文件
server.port=8080application-dev.properties
server.port=8081激活profile:在默认配置文件application.properties中配置:
spring.profiles.active=dev表示的是使用dev环境,也就是端口号为8081的配置。
C:yml配置文件使用profile
这种方式比较简单,只需要编写在一个yml文件就可以了,这种方式在yml被叫做多文档块,通过"---"将一个yml文件分为多个文档块(三个横线),在最上面通过最上面的文档块进行激活:
spring:

  profiles:

    active: prod
全部的配置文件如下所示:
server:

 port: 8081

spring:

  profiles:

    active: prod #激活prod环境

‐‐‐

server:

  port: 8083

spring:

  profiles: dev

‐‐‐

server:

  port: 8084

spring:

profiles: prod #指定属于哪个环境
9,配置文件存放目录优先级(从高到低)
项目/config
项目目录项
classpath:config
classpath目录
10,总结
没有总结的总结
02-springboot配置的更多相关文章
- springboot配置server相关配置&整合模板引擎Freemarker、thymeleaf&thymeleaf基本用法&thymeleaf 获取项目路径 contextPath 与取session中信息
1.Springboot配置server相关配置(包括默认tomcat的相关配置) 下面的配置也都是模板,需要的时候在application.properties配置即可 ############## ...
- SpringBoot配置属性之Server
SpringBoot配置属性系列 SpringBoot配置属性之MVC SpringBoot配置属性之Server SpringBoot配置属性之DataSource SpringBoot配置属性之N ...
- SpringBoot基础系列-SpringBoot配置
原创作品,可以转载,但是请标注出处地址:https://www.cnblogs.com/V1haoge/p/9990680.html SpringBoot基础系列-SpringBoot配置 概述 属性 ...
- springboot上传文件 & 不配置虚拟路径访问服务器图片 & springboot配置日期的格式化方式 & Springboot配置日期转换器
1. Springboot上传文件 springboot的文件上传不用配置拦截器,其上传方法与SpringMVC一样 @RequestMapping("/uploadPicture&q ...
- springboot配置Druid数据源
springboot配置druid数据源 Author:SimpleWu springboot整合篇 前言 对于数据访问层,无论是Sql还是NoSql,SpringBoot默认采用整合SpringDa ...
- springboot配置详解
springboot配置详解 Author:SimpleWu properteis文件属性参考大全 springboot默认加载配置 SpringBoot使用两种全局的配置文件,全局配置文件可以对一些 ...
- SpringBoot 配置 Servlet、Filter、Listener
SpringBoot 配置 Servlet.Filter.Listener 在SpringBoot应用中,嵌入式的 Servlet 3.0+ 容器不会直接使用 ServletContainerInit ...
- SpringBoot 配置静态资源映射
SpringBoot 配置静态资源映射 (嵌入式servlet容器)先决知识 request.getSession().getServletContext().getRealPath("/& ...
- springboot配置cxf
1.引入两个需要的jar <dependency> <groupId>org.apache.cxf</groupId> <artifactId>cxf- ...
- SpringBoot配置(2) slf4j&logback
SpringBoot配置(2) slf4j&logback 一.SpringBoot的日志使用 全局常规设置(格式.路径.级别) SpringBoot能自动适配所有的日志,而且底层使用slf4 ...
随机推荐
- 微信小程序报错“Component “页面路径“ does not have a method “ 方法名“ to handle event tap的
我遇到这个问题的原因是,data属性把methods包括在里面了,把methods当成了一个字段,所以就相当于没写methods属性,里面的方法就识别不了了.解决办法就是把data的后括号打在meth ...
- java stream 简单函数
写在前面 本文为笔者学习的一些心得,如有问题,评论请轻喷 本文分为以下部分: 中间操作 终止操作 归纳 中间操作 对 list 进行操作,返回一个新的 list 主要函数 作用 filter 过滤操作 ...
- Android 13 - Media框架(21)- ACodec(三)
关注公众号免费阅读全文,进入音视频开发技术分享群! 这一节我们一起来了解 ACodec 是如何通过 configureCodec 方法配置 OMX 组件的,因为 configureCodec 代码比较 ...
- 为WPF框架Prism注册Nlog日志服务
这篇文章介绍了为WPF框架Prism注册Nlog日志服务的方法,对大家的学习或者工作具有一定的参考学习价值,需要的朋友们下面随着小编来一起学习学习吧 无论是Nlog还是Serilog, 它们都提供 ...
- NOIP模拟91(多校24)
T1 破门而入 解题思路 签到题(然而我数组开小直接变成暴力分...) 发现其实就是第一类斯特林数,然后 \(n^2\) 推就好了. 感觉可以用 NTT 优化成 \(nlogn\) ,但是好像并没有什 ...
- yum install 出错
``` yum -y install ansible ``` 出错 一直在刷屏,刚开始以为在安装但是最后没有安装成功 百度发现是这是redhat7和8的yum源混用 1.先确认本机器系统信息 cat ...
- 解决 Https 站点请求 Http 接口服务后报 the content must be served over HTTPS 错误的问题
问题分析 之前将自己所有的 Http 站点全部更新为 Https 站点,但是在请求后台接口服务的时候还是 Http 请求,导致部署之后,直接在控制台报 This request has been bl ...
- Redux之combineReducers方法
Redux 提供了一个combineReducers方法,用于 Reducer 的拆分.你只要定义各个子 Reducer 函数,然后用这个方法,将它们合成一个大的 Reducer. import { ...
- LeetCode 297. Serialize and Deserialize Binary Tree 二叉树的序列化与反序列化(C++/Java)
题目: Serialization is the process of converting a data structure or object into a sequence of bits so ...
- Flink状态(一)
key状态和算子状态 key状态 key状态总是与key有关,只能被用于keyedStream类型的函数与算子.你可以认为key状态是一种被分区的算子状态,每一个key有一个状态分区.每一个key状态 ...