qemu的使用
一、QEMU的运行模式
直接摘抄自己《揭秘家用路由器0day漏洞挖掘技术》,网上查了一下也没有找到令人满意的QEMU的使用说明,就采用这本书上的介绍。如果后期能够找到比较满意的QEMU的使用方法的说明,再添加上来。
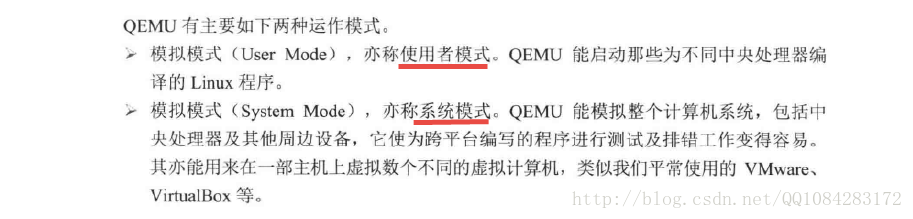
QEMU模拟器主要有两种比较常见的运作模式:User Mode(使用者模式)、System Mode(系统模式)。User Mode模式下,用户只需要将各种不同平台的处理编译得到的Linux程序放在QEMU虚拟中运行即可,其他的事情全部由QEMU虚拟机来完成,不需要用户自定义内核和虚拟磁盘等文件;System Mode模式下,最明显的特点是用户可以为QEMU虚拟机指定运行的内核或者虚拟硬盘等文件,简单来说系统模式下QEMU虚拟机是可根据用户的要求配置的。
二、QEMU在使用者模式下执行程序
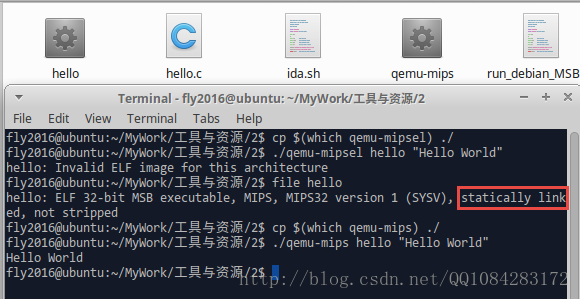
当程序是静态编译(gcc编译的时候,加了静态编译选项 "-static" )完成,运行时 不需要依赖动态链接库 ,在使用QEMU运行编译好的Linux程序使用下面的命令就好:
# 查看可执行程序hello的文件类型MIPS32

$ file hello

hello: ELF 32-bit MSB executable, MIPS, MIPS32 version 1 (SYSV), statically linked, not stripped

$ cp $(which qemu-mips) ./

# 使用qemu-mips加载hello程序

$ ./qemu-mips hello "Hello World"

Hello World
执行结果截图:
当程序是动态编译(gcc编译的时候,没有静态编译选项 "-static" )完成,程序运行时 需要依赖动态链接库 ,在使用QEMU运行编译好的Linux程序使用下面的命令就好:
# 查看即将执行的文件的类型
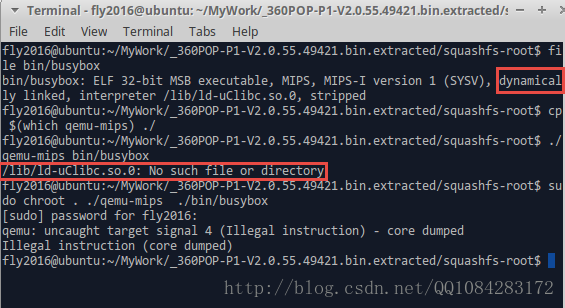
$ file bin/busybox
# 拷贝qemu-mips到当前目录
$ cp $(which qemu-mips) ./
# 直接运行报错
$ ./qemu-mips bin/busybox
# 更改QEMU-MIPS执行的根目录到当前目录
$ sudo chroot . ./qemu-mips ./bin/busybox
执行的结果截图:
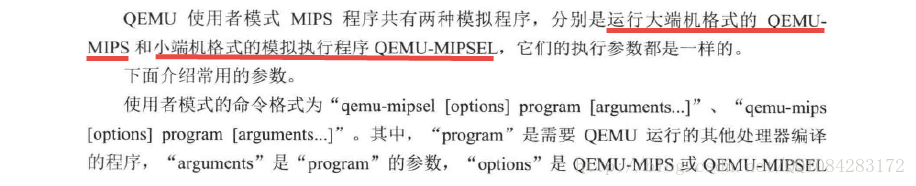
QEMU使用者模式下使用的命令行帮助,以 qemu-mipsel 为例:
fly2016@ubuntu:~$ qemu-mipsel --help
usage: qemu-mipsel [options] program [arguments...]
Linux CPU emulator (compiled for mipsel emulation)
Options and associated environment variables:
Argument Env-variable Description
-h print this help
-help
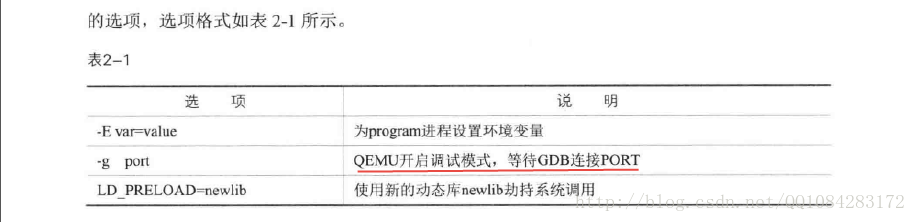
-g port QEMU_GDB wait gdb connection to 'port'
-L path QEMU_LD_PREFIX set the elf interpreter prefix to 'path'
-s size QEMU_STACK_SIZE set the stack size to 'size' bytes
-cpu model QEMU_CPU select CPU (-cpu help for list)
-E var=value QEMU_SET_ENV sets targets environment variable (see below)
-U var QEMU_UNSET_ENV unsets targets environment variable (see below)
-0 argv0 QEMU_ARGV0 forces target process argv[0] to be 'argv0'
-r uname QEMU_UNAME set qemu uname release string to 'uname'
-B address QEMU_GUEST_BASE set guest_base address to 'address'
-R size QEMU_RESERVED_VA reserve 'size' bytes for guest virtual address space
-d item[,...] QEMU_LOG enable logging of specified items (use '-d help' for a list of items)
-D logfile QEMU_LOG_FILENAME write logs to 'logfile' (default stderr)
-p pagesize QEMU_PAGESIZE set the host page size to 'pagesize'
-singlestep QEMU_SINGLESTEP run in singlestep mode
-strace QEMU_STRACE log system calls
-seed QEMU_RAND_SEED Seed for pseudo-random number generator
-trace QEMU_TRACE [[enable=]<pattern>][,events=<file>][,file=<file>]
-version QEMU_VERSION display version information and exit
Defaults:
QEMU_LD_PREFIX = /usr/gnemul/qemu-mipsel
QEMU_STACK_SIZE = 8388608 byte
You can use -E and -U options or the QEMU_SET_ENV and
QEMU_UNSET_ENV environment variables to set and unset
environment variables for the target process.
It is possible to provide several variables by separating them
by commas in getsubopt(3) style. Additionally it is possible to
provide the -E and -U options multiple times.
The following lines are equivalent:
-E var1=val2 -E var2=val2 -U LD_PRELOAD -U LD_DEBUG
-E var1=val2,var2=val2 -U LD_PRELOAD,LD_DEBUG
QEMU_SET_ENV=var1=val2,var2=val2 QEMU_UNSET_ENV=LD_PRELOAD,LD_DEBUG
Note that if you provide several changes to a single variable
the last change will stay in effect.
三、QEMU的系统模式使用
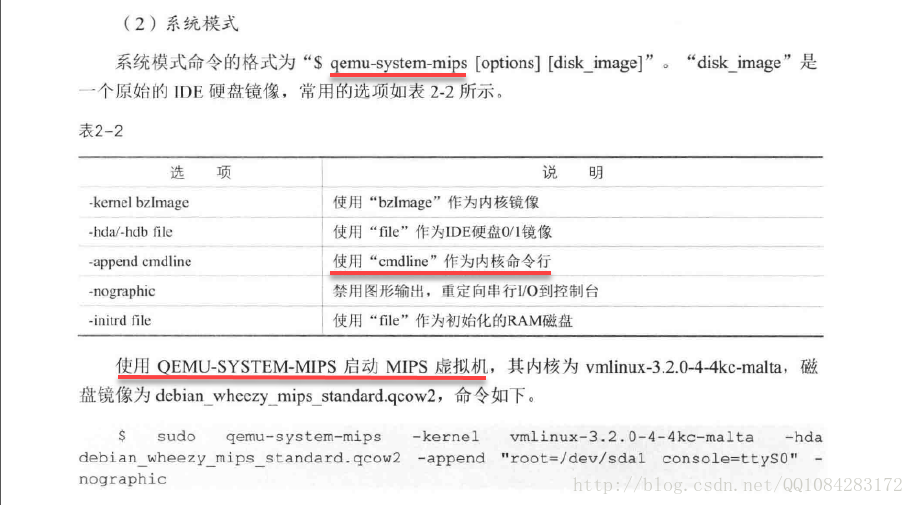
QEMU运行在系统模式下,需要为QEMU指定 内核镜像、IDE硬盘0/1镜像、内核命令行 等参数,QEMU虚拟机才能正常运行。Debian官网提供了QEMU虚拟机各种平台架构的内核镜像、硬盘文件镜像文件的下载,下载地址为:https://people.debian.org/~aurel32/qemu/,其中mips为大端机的,mipsel为小端机的。

这里以下载 mips大端机 的虚拟机镜像文件为例,具体的下载网址为:
https://people.debian.org/~aurel32/qemu/mips/
,点击进去以后会发现mips虚拟机镜像文件的下载说明。我们根据mips虚拟机镜像文件的使用命令参数进行选择性的下载。
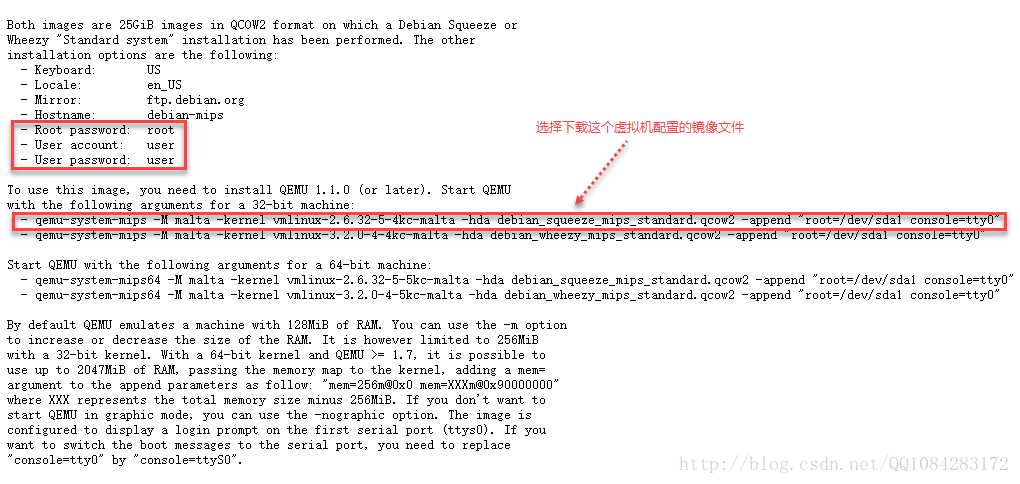
Debian Squeeze and Wheezy mips images for QEMU

==============================================

This directory contains Debian Squeeze and Wheezy mips images for QEMU and

the corresponding kernels and initrds:

  1d58f831f5e5064753c0c138d8d74057  debian_squeeze_mips_standard.qcow2

  cb56139b63b88fdb38776051d28bb750  vmlinux-2.6.32-5-4kc-malta

  7165e80b0e5c5c3e40f2ca46401373ce  vmlinux-2.6.32-5-5kc-malta

  bf699f435160b0bd9ac62905fa64701e  debian_wheezy_mips_standard.qcow2

  1fecbe19ff49a6fd715901483b23647c  vmlinux-3.2.0-4-4kc-malta

  19e6e853d4a7a7b9ed5e787b7f875835  vmlinux-3.2.0-4-5kc-malta

Both images are 25GiB images in QCOW2 format on which a Debian Squeeze or

Wheezy "Standard system" installation has been performed. The other

installation options are the following:

  - Keyboard:       US

  - Locale:         en_US

  - Mirror:         ftp.debian.org

  - Hostname:       debian-mips

  - Root password:  root

  - User account:   user

  - User password:  user

To use this image, you need to install QEMU 1.1.0 (or later). Start QEMU

with the following arguments for a 32-bit machine:

  - qemu-system-mips -M malta -kernel vmlinux-2.6.32-5-4kc-malta -hda debian_squeeze_mips_standard.qcow2 -append "root=/dev/sda1 console=tty0"

  - qemu-system-mips -M malta -kernel vmlinux-3.2.0-4-4kc-malta -hda debian_wheezy_mips_standard.qcow2 -append "root=/dev/sda1 console=tty0"

Start QEMU with the following arguments for a 64-bit machine:

  - qemu-system-mips64 -M malta -kernel vmlinux-2.6.32-5-5kc-malta -hda debian_squeeze_mips_standard.qcow2 -append "root=/dev/sda1 console=tty0"

  - qemu-system-mips64 -M malta -kernel vmlinux-3.2.0-4-5kc-malta -hda debian_wheezy_mips_standard.qcow2 -append "root=/dev/sda1 console=tty0"

By default QEMU emulates a machine with 128MiB of RAM. You can use the -m option

to increase or decrease the size of the RAM. It is however limited to 256MiB

with a 32-bit kernel. With a 64-bit kernel and QEMU >= 1.7, it is possible to

use up to 2047MiB of RAM, passing the memory map to the kernel, adding a mem=

argument to the append parameters as follow: "mem=256m@0x0 mem=XXXm@0x90000000"

where XXX represents the total memory size minus 256MiB. If you don't want to

start QEMU in graphic mode, you can use the -nographic option. The image is

configured to display a login prompt on the first serial port (ttys0). If you

want to switch the boot messages to the serial port, you need to replace

"console=tty0" by "console=ttyS0".
这里下载内核文件 vmlinux-2.6.32-5-4kc-malta,磁盘镜像 debian_squeeze_mips_standard.qcow2 作为mips虚拟机的配置文件。
ubuntu下可以使用下面的命令进行mips和mipsel虚拟机镜像配置文件的下载:
# +++++++++++++++++++++++++++++++++++++++++++++++++++++++++++++++++++++++++++++++++++++++++++++++++++++++++++++++++++++++++++

# Start QEMU with the following arguments for a 32-bit machine:

$ qemu-system-mips -M malta -kernel vmlinux-2.6.32-5-4kc-malta -hda debian_squeeze_mips_standard.qcow2 -append "root=/dev/sda1 console=tty0"

$ qemu-system-mips -M malta -kernel vmlinux-3.2.0-4-4kc-malta -hda debian_wheezy_mips_standard.qcow2 -append "root=/dev/sda1 console=tty0"

# for MIPS 32bit ###############:

# 内核版本为2.6.x

$ wget https://people.debian.org/~aurel32/qemu/mips/vmlinux-2.6.32-5-4kc-malta

$ wget https://people.debian.org/~aurel32/qemu/mips/debian_squeeze_mips_standard.qcow2

# 内核版本为3.2.x

$ wget https://people.debian.org/~aurel32/qemu/mips/vmlinux-3.2.0-4-4kc-malta

$ wget https://people.debian.org/~aurel32/qemu/mips/debian_wheezy_mips_standard.qcow2

# +++++++++++++++++++++++++++++++++++++++++++++++++++++++++++++++++++++++++++++++++++++++++++++++++++++++++++++++++++++++++++

# Start QEMU with the following arguments for a 64-bit machine:

$ qemu-system-mips64 -M malta -kernel vmlinux-2.6.32-5-5kc-malta -hda debian_squeeze_mips_standard.qcow2 -append "root=/dev/sda1 console=tty0"

$ qemu-system-mips64 -M malta -kernel vmlinux-3.2.0-4-5kc-malta -hda debian_wheezy_mips_standard.qcow2 -append "root=/dev/sda1 console=tty0"

# for MIPS 64bit ###############:

# 内核版本为2.6.x

$ wget https://people.debian.org/~aurel32/qemu/mips/vmlinux-2.6.32-5-5kc-malta

$ wget https://people.debian.org/~aurel32/qemu/mips/debian_squeeze_mips_standard.qcow2

# 内核版本为3.2.x

$ wget https://people.debian.org/~aurel32/qemu/mips/vmlinux-3.2.0-4-5kc-malta

$ wget https://people.debian.org/~aurel32/qemu/mips/debian_wheezy_mips_standard.qcow2

# +++++++++++++++++++++++++++++++++++++++++++++++++++++++++++++++++++++++++++++++++++++++++++++++++++++++++++++++++++++++++++

# Start QEMU with the following arguments for a 32-bit machine:

$ qemu-system-mipsel -M malta -kernel vmlinux-2.6.32-5-4kc-malta -hda debian_squeeze_mipsel_standard.qcow2 -append "root=/dev/sda1 console=tty0"

$ qemu-system-mipsel -M malta -kernel vmlinux-3.2.0-4-4kc-malta -hda debian_wheezy_mipsel_standard.qcow2 -append "root=/dev/sda1 console=tty0"

# for MIPSEL 32bit ###############:

# 内核版本为2.6.x

$ wget https://people.debian.org/~aurel32/qemu/mipsel/vmlinux-2.6.32-5-4kc-malta

$ wget https://people.debian.org/~aurel32/qemu/mipsel/debian_squeeze_mipsel_standard.qcow2

# 内核版本为3.2.x

$ wget https://people.debian.org/~aurel32/qemu/mipsel/vmlinux-3.2.0-4-4kc-malta

$ wget https://people.debian.org/~aurel32/qemu/mipsel/debian_wheezy_mipsel_standard.qcow2

# +++++++++++++++++++++++++++++++++++++++++++++++++++++++++++++++++++++++++++++++++++++++++++++++++++++++++++++++++++++++++++

# Start QEMU with the following arguments for a 64-bit machine:

$ qemu-system-mips64el -M malta -kernel vmlinux-2.6.32-5-5kc-malta -hda debian_squeeze_mipsel_standard.qcow2 -append "root=/dev/sda1 console=tty0"

$ qemu-system-mips64el -M malta -kernel vmlinux-3.2.0-4-5kc-malta -hda debian_wheezy_mipsel_standard.qcow2 -append "root=/dev/sda1 console=tty0"

# for MIPSEL 64bit ###############:

# 内核版本为2.6.x

$ wget https://people.debian.org/~aurel32/qemu/mipsel/vmlinux-2.6.32-5-5kc-malta

$ wget https://people.debian.org/~aurel32/qemu/mipsel/debian_squeeze_mipsel_standard.qcow2

# 内核版本为3.2.x

$ wget https://people.debian.org/~aurel32/qemu/mipsel/vmlinux-3.2.0-4-5kc-malta

$ wget https://people.debian.org/~aurel32/qemu/mipsel/debian_wheezy_mipsel_standard.qcow2
使用 qemu-system-mips 启动内核2.6.x版本MIPS 32bit的QEMU虚拟机镜像,QEMU启动失败,结果如下图:
$ sudo qemu-system-mips -M malta -kernel vmlinux-2.6.32-5-4kc-malta -hda debian_squeeze_mips_standard.qcow2 -append "root=/dev/sda1 console=tty0" -nographic
以控制台的形式启动QEMU虚拟机成功,结果如图:

QEMU系统者模式下使用的命令行帮助,以 qemu-system-mips 为例,功能挺强大的:
fly2016@ubuntu:~$ qemu-system-mips -h

QEMU emulator version 2.8.92 (v2.9.0-rc2-42-g6499fd1-dirty)

Copyright (c) 2003-2017 Fabrice Bellard and the QEMU Project developers

usage: qemu-system-mips [options] [disk_image]

'disk_image' is a raw hard disk image for IDE hard disk 0

Standard options:

-h or -help     display this help and exit

-version        display version information and exit

-machine [type=]name[,prop[=value][,...]]

                selects emulated machine ('-machine help' for list)

                property accel=accel1[:accel2[:...]] selects accelerator

                supported accelerators are kvm, xen, tcg (default: tcg)

                kernel_irqchip=on|off|split controls accelerated irqchip support (default=off)

                vmport=on|off|auto controls emulation of vmport (default: auto)

                kvm_shadow_mem=size of KVM shadow MMU in bytes

                dump-guest-core=on|off include guest memory in a core dump (default=on)

                mem-merge=on|off controls memory merge support (default: on)

                igd-passthru=on|off controls IGD GFX passthrough support (default=off)

                aes-key-wrap=on|off controls support for AES key wrapping (default=on)

                dea-key-wrap=on|off controls support for DEA key wrapping (default=on)

                suppress-vmdesc=on|off disables self-describing migration (default=off)

                nvdimm=on|off controls NVDIMM support (default=off)

                enforce-config-section=on|off enforce configuration section migration (default=off)

-cpu cpu        select CPU ('-cpu help' for list)

-accel [accel=]accelerator[,thread=single|multi]

               select accelerator ('-accel help for list')

               thread=single|multi (enable multi-threaded TCG)-smp [cpus=]n[,maxcpus=cpus][,cores=cores][,threads=threads][,sockets=sockets]

                set the number of CPUs to 'n' [default=1]

                maxcpus= maximum number of total cpus, including

                offline CPUs for hotplug, etc

                cores= number of CPU cores on one socket

                threads= number of threads on one CPU core

                sockets= number of discrete sockets in the system

-numa node[,mem=size][,cpus=firstcpu[-lastcpu]][,nodeid=node]

-numa node[,memdev=id][,cpus=firstcpu[-lastcpu]][,nodeid=node]

-add-fd fd=fd,set=set[,opaque=opaque]

                Add 'fd' to fd 'set'

-set group.id.arg=value

                set <arg> parameter for item <id> of type <group>

                i.e. -set drive.$id.file=/path/to/image

-global driver.property=value

-global driver=driver,property=property,value=value

                set a global default for a driver property

-boot [order=drives][,once=drives][,menu=on|off]

      [,splash=sp_name][,splash-time=sp_time][,reboot-timeout=rb_time][,strict=on|off]

                'drives': floppy (a), hard disk (c), CD-ROM (d), network (n)

                'sp_name': the file's name that would be passed to bios as logo picture, if menu=on

                'sp_time': the period that splash picture last if menu=on, unit is ms

                'rb_timeout': the timeout before guest reboot when boot failed, unit is ms

-m [size=]megs[,slots=n,maxmem=size]

                configure guest RAM

                size: initial amount of guest memory

                slots: number of hotplug slots (default: none)

                maxmem: maximum amount of guest memory (default: none)

NOTE: Some architectures might enforce a specific granularity

-mem-path FILE  provide backing storage for guest RAM

-mem-prealloc   preallocate guest memory (use with -mem-path)

-k language     use keyboard layout (for example 'fr' for French)

-audio-help     print list of audio drivers and their options

-soundhw c1,... enable audio support

                and only specified sound cards (comma separated list)

                use '-soundhw help' to get the list of supported cards

                use '-soundhw all' to enable all of them

-balloon none   disable balloon device

-balloon virtio[,addr=str]

                enable virtio balloon device (default)

-device driver[,prop[=value][,...]]

                add device (based on driver)

                prop=value,... sets driver properties

                use '-device help' to print all possible drivers

                use '-device driver,help' to print all possible properties

-name string1[,process=string2][,debug-threads=on|off]

                set the name of the guest

                string1 sets the window title and string2 the process name (on Linux)

                When debug-threads is enabled, individual threads are given a separate name (on Linux)

                NOTE: The thread names are for debugging and not a stable API.

-uuid %08x-%04x-%04x-%04x-%012x

                specify machine UUID

:

Block device options:

-fda/-fdb file  use 'file' as floppy disk 0/1 image

-hda/-hdb file  use 'file' as IDE hard disk 0/1 image

-hdc/-hdd file  use 'file' as IDE hard disk 2/3 image

-cdrom file     use 'file' as IDE cdrom image (cdrom is ide1 master)

-blockdev [driver=]driver[,node-name=N][,discard=ignore|unmap]

          [,cache.direct=on|off][,cache.no-flush=on|off]

          [,read-only=on|off][,detect-zeroes=on|off|unmap]

          [,driver specific parameters...]

                configure a block backend

-drive [file=file][,if=type][,bus=n][,unit=m][,media=d][,index=i]

       [,cyls=c,heads=h,secs=s[,trans=t]][,snapshot=on|off]

       [,cache=writethrough|writeback|none|directsync|unsafe][,format=f]

       [,serial=s][,addr=A][,rerror=ignore|stop|report]

       [,werror=ignore|stop|report|enospc][,id=name][,aio=threads|native]

       [,readonly=on|off][,copy-on-read=on|off]

       [,discard=ignore|unmap][,detect-zeroes=on|off|unmap]

       [[,bps=b]|[[,bps_rd=r][,bps_wr=w]]]

       [[,iops=i]|[[,iops_rd=r][,iops_wr=w]]]

       [[,bps_max=bm]|[[,bps_rd_max=rm][,bps_wr_max=wm]]]

       [[,iops_max=im]|[[,iops_rd_max=irm][,iops_wr_max=iwm]]]

       [[,iops_size=is]]

       [[,group=g]]

                use 'file' as a drive image

-mtdblock file  use 'file' as on-board Flash memory image

-sd file        use 'file' as SecureDigital card image

-pflash file    use 'file' as a parallel flash image

-snapshot       write to temporary files instead of disk image files

-hdachs c,h,s[,t]

                force hard disk 0 physical geometry and the optional BIOS

                translation (t=none or lba) (usually QEMU can guess them)

-fsdev fsdriver,id=id[,path=path,][security_model={mapped-xattr|mapped-file|passthrough|none}]

 [,writeout=immediate][,readonly][,socket=socket|sock_fd=sock_fd]

 [[,throttling.bps-total=b]|[[,throttling.bps-read=r][,throttling.bps-write=w]]]

 [[,throttling.iops-total=i]|[[,throttling.iops-read=r][,throttling.iops-write=w]]]

 [[,throttling.bps-total-max=bm]|[[,throttling.bps-read-max=rm][,throttling.bps-write-max=wm]]]

 [[,throttling.iops-total-max=im]|[[,throttling.iops-read-max=irm][,throttling.iops-write-max=iwm]]]

 [[,throttling.iops-size=is]]

-virtfs local,path=path,mount_tag=tag,security_model=[mapped-xattr|mapped-file|passthrough|none]

        [,writeout=immediate][,readonly][,socket=socket|sock_fd=sock_fd]

-virtfs_synth Create synthetic file system image

:

USB options:

-usb            enable the USB driver (will be the default soon)

-usbdevice name add the host or guest USB device 'name'

:

Display options:

-display sdl[,frame=on|off][,alt_grab=on|off][,ctrl_grab=on|off]

            [,window_close=on|off][,gl=on|off]

-display gtk[,grab_on_hover=on|off][,gl=on|off]|

-display vnc=<display>[,<optargs>]

-display curses

-display none                select display type

The default display is equivalent to

    "-vnc localhost:0,to=99,id=default"

-nographic      disable graphical output and redirect serial I/Os to console

-curses         shorthand for -display curses

-no-frame       open SDL window without a frame and window decorations

-alt-grab       use Ctrl-Alt-Shift to grab mouse (instead of Ctrl-Alt)

-ctrl-grab      use Right-Ctrl to grab mouse (instead of Ctrl-Alt)

-no-quit        disable SDL window close capability

-sdl            shorthand for -display sdl

-spice [port=port][,tls-port=secured-port][,x509-dir=<dir>]

       [,x509-key-file=<file>][,x509-key-password=<file>]

       [,x509-cert-file=<file>][,x509-cacert-file=<file>]

       [,x509-dh-key-file=<file>][,addr=addr][,ipv4|ipv6|unix]

       [,tls-ciphers=<list>]

       [,tls-channel=[main|display|cursor|inputs|record|playback]]

       [,plaintext-channel=[main|display|cursor|inputs|record|playback]]

       [,sasl][,password=<secret>][,disable-ticketing]

       [,image-compression=[auto_glz|auto_lz|quic|glz|lz|off]]

       [,jpeg-wan-compression=[auto|never|always]]

       [,zlib-glz-wan-compression=[auto|never|always]]

       [,streaming-video=[off|all|filter]][,disable-copy-paste]

       [,disable-agent-file-xfer][,agent-mouse=[on|off]]

       [,playback-compression=[on|off]][,seamless-migration=[on|off]]

       [,gl=[on|off]][,rendernode=<file>]

   enable spice

   at least one of {port, tls-port} is mandatory

-portrait       rotate graphical output 90 deg left (only PXA LCD)

-rotate <deg>   rotate graphical output some deg left (only PXA LCD)

-vga [std|cirrus|vmware|qxl|xenfb|tcx|cg3|virtio|none]

                select video card type

-full-screen    start in full screen

-vnc <display>  shorthand for -display vnc=<display>

:

Network options:

-netdev user,id=str[,ipv4[=on|off]][,net=addr[/mask]][,host=addr]

         [,ipv6[=on|off]][,ipv6-net=addr[/int]][,ipv6-host=addr]

         [,restrict=on|off][,hostname=host][,dhcpstart=addr]

         [,dns=addr][,ipv6-dns=addr][,dnssearch=domain][,tftp=dir]

         [,bootfile=f][,hostfwd=rule][,guestfwd=rule][,smb=dir[,smbserver=addr]]

                configure a user mode network backend with ID 'str',

                its DHCP server and optional services

-netdev tap,id=str[,fd=h][,fds=x:y:...:z][,ifname=name][,script=file][,downscript=dfile]

         [,br=bridge][,helper=helper][,sndbuf=nbytes][,vnet_hdr=on|off][,vhost=on|off]

         [,vhostfd=h][,vhostfds=x:y:...:z][,vhostforce=on|off][,queues=n]

         [,poll-us=n]

                configure a host TAP network backend with ID 'str'

                connected to a bridge (default=br0)

                use network scripts 'file' (default=/etc/qemu-ifup)

                to configure it and 'dfile' (default=/etc/qemu-ifdown)

                to deconfigure it

                use '[down]script=no' to disable script execution

                use network helper 'helper' (default=/usr/local/libexec/qemu-bridge-helper) to

                configure it

                use 'fd=h' to connect to an already opened TAP interface

                use 'fds=x:y:...:z' to connect to already opened multiqueue capable TAP interfaces

                use 'sndbuf=nbytes' to limit the size of the send buffer (the

                default is disabled 'sndbuf=0' to enable flow control set 'sndbuf=1048576')

                use vnet_hdr=off to avoid enabling the IFF_VNET_HDR tap flag

                use vnet_hdr=on to make the lack of IFF_VNET_HDR support an error condition

                use vhost=on to enable experimental in kernel accelerator

                    (only has effect for virtio guests which use MSIX)

                use vhostforce=on to force vhost on for non-MSIX virtio guests

                use 'vhostfd=h' to connect to an already opened vhost net device

                use 'vhostfds=x:y:...:z to connect to multiple already opened vhost net devices

                use 'queues=n' to specify the number of queues to be created for multiqueue TAP

                use 'poll-us=n' to speciy the maximum number of microseconds that could be

                spent on busy polling for vhost net

-netdev bridge,id=str[,br=bridge][,helper=helper]

                configure a host TAP network backend with ID 'str' that is

                connected to a bridge (default=br0)

                using the program 'helper (default=/usr/local/libexec/qemu-bridge-helper)

-netdev l2tpv3,id=str,src=srcaddr,dst=dstaddr[,srcport=srcport][,dstport=dstport]

         [,rxsession=rxsession],txsession=txsession[,ipv6=on/off][,udp=on/off]

         [,cookie64=on/off][,counter][,pincounter][,txcookie=txcookie]

         [,rxcookie=rxcookie][,offset=offset]

                configure a network backend with ID 'str' connected to

                an Ethernet over L2TPv3 pseudowire.

                Linux kernel 3.3+ as well as most routers can talk

                L2TPv3. This transport allows connecting a VM to a VM,

                VM to a router and even VM to Host. It is a nearly-universal

                standard (RFC3391). Note - this implementation uses static

                pre-configured tunnels (same as the Linux kernel).

                use 'src=' to specify source address

                use 'dst=' to specify destination address

                use 'udp=on' to specify udp encapsulation

                use 'srcport=' to specify source udp port

                use 'dstport=' to specify destination udp port

                use 'ipv6=on' to force v6

                L2TPv3 uses cookies to prevent misconfiguration as

                well as a weak security measure

                use 'rxcookie=0x012345678' to specify a rxcookie

                use 'txcookie=0x012345678' to specify a txcookie
qemu的使用的更多相关文章
- [原] KVM 虚拟化原理探究(2)— QEMU启动过程
KVM 虚拟化原理探究- QEMU启动过程 标签(空格分隔): KVM [TOC] 虚拟机启动过程 第一步,获取到kvm句柄 kvmfd = open("/dev/kvm", O_ ...
- 虚拟机体验之 QEMU 篇
引言 说起虚拟机,大家都不陌生.需要使用虚拟机的场景也非常的多,比如有志于写操作系统的同志,往往需要一个虚拟机来运行和调试他写的系统:再比如喜欢研究网络体系结构的朋友,需要在自己的电脑上虚拟出 N 个 ...
- kvm/qemu/libvirt学习笔记 (1) qemu/kvm/libvirt介绍及虚拟化环境的安装
kvm简介 kvm最初由Quramnet公司开发,2008年被RedHat公司收购.kvm全称基于内核的虚拟机(Kernel-based Virtual Machine),它是Linux的一个内核模块 ...
- QEMU VCPU热插特性
最近学习QEMU中VCPU热插特性,需要了解QEMU中VCPU热插的整个流程,VCPU热插是QEMU主板的一个feature. 1:这里先分析一下QEMU的主板模拟,主板在QEMU的设备模型中对应的是 ...
- QEMU 中的QOM分析
QOM (QEMU Object Model) 类对象的意义: 1:每个类型在系统中都只有且只有一个类对象 2:当系统中的某个类型的实例对象都被销毁了,那么系统就会销毁该类对象了 3:类对象的作用:负 ...
- qemu 源码调试
1:下载最新的QEMU源码 git clone https://github.com/qemu/qemu.git 2:对qemu进行编译 ./configure --prefix=/usr --lib ...
- 编译可在Android上运行的qemu user mode
前言 本文在Ubuntu 64位系统上对qemu项目进行交叉编译,并且只编译与qemu user mode有关的代码. 下文中的”NDK”若无特殊说明均指”Android NDK”. 下文中”$NDK ...
- 利用QMP和QEMU虚拟机交互的几种方式
QMP是一种基于JSON格式的传输协议,我们能利用它与一个QEMU虚拟机实例进行交互,例如查询,更改虚拟机的状态,获取设备信息等等.下面是几种创建QMP的方法以及对其它的一些基本命令的使用: 1.基于 ...
- [dpdk] 熟悉SDK与初步使用 (一)(qemu搭建实验环境)
搭建实验环境: troubleshoot 第一步加载驱动 第二步切换驱动 使用了所有qemu支持的卡 [tong@T7:~/VM/dpdk] % cat start.sh sudo qemu-syst ...
- 理解 QEMU/KVM 和 Ceph(3):存储卷挂接和设备名称
本系列文章会总结 QEMU/KVM 和 Ceph 之间的整合: (1)QEMU-KVM 和 Ceph RBD 的 缓存机制总结 (2)QEMU 的 RBD 块驱动(block driver) (3)存 ...
随机推荐
- Intent 显示与隐式了解认识
显示Intent 用于精确匹配,指定跳转目标 1.在intent构造函数中调用 Intent intent = new Intent(this,XX.class); 2.调用意图对象的setClass ...
- springMvc使用自定义View生成Excel表格
1:通过自定义的View视图可以让请求直接到一个Excel表去. 2:自定义的视图必须继承 AbstractXlsView /AbstractXlsxView / AbstractXlsxStrea ...
- 自动化测试框架开发python selenium excel POM
自动化测试框架开发python selenium excel POM 本文主要是采用python selenium excel POM 做UI自动化测试 测试框架选用的是unittest 测试框架用的 ...
- app接口测试
app接口测试 一,app请求服务器端接口和web页面请求服务器端接口有什么区别? 1,大多数项目如果有app的话,而且web端和app端的页面显示结构已经功能都相似,调用的后台接口也是一样的. 2, ...
- Android studio报错:Failed to allocate a 3213123 byte allocation with 31231 free bytes and 189MB ontil 0OM
这个问题是运行内存超了 在AndroidManifest中加入 android:hardwareAccelerated="false"android:largeHeap= &quo ...
- 【Maven】下载安装(Linux)
Maven官网下载地址: http://maven.apache.org/download.cgi 点选这个压缩包 wget或者上传都行 解压 tar -zxvf apache-maven-3.6.3 ...
- 【Docker】05 容器操作
[查看容器 Check Container] 查看所有容器: docker ps 查看所有正在运行的,或者运行过的容器: docker ps -a 查看单个指定的容器完整信息: docker insp ...
- Java 文件 I/O流详解
文件 文件操作是Java开发中一个重要的组成部分,它允许开发者对文件进行读取,写入,创建,删除和修改等操作,文件操作的主要通过java.io包中的类来实现的,其中的File类更是文件操作的核心类 Fi ...
- 从.net开发做到云原生运维(六)——分布式应用运行时Dapr
1. 前言 上一篇文章我们讲了K8s的一些概念,K8s真的是带来了很多新玩法,就像我们今天这篇文章的主角Dapr一样,Dapr也能在K8s里以云原生的方式运行.当然它也可以和容器一起运行,或者是CLI ...
- Ubuntu系统anaconda报错version `GLIBCXX_3.4.30' not found
参考文章: https://blog.csdn.net/zhu_charles/article/details/75914060 =================================== ...