记录--你知道Vue中的Scoped css原理么?
这里给大家分享我在网上总结出来的一些知识,希望对大家有所帮助

追忆Scoped
偶然想起了一次面试,二面整体都聊完了,该做的算法题都做出来了,该背的八股文也背的差不多了,面试官频频点头,似乎对我的基础和项目经验都很是满意。嗯,我内心os本次面试应该十拿九稳了。
突然,面试官说:「我的主技术栈是React,Vue写的很少,对Vue中style样式中的scoped有点兴趣,你知道vue中为什么有这个么?」
我不假思索:「哦, 这个主要是为了做样式隔离,避免组件间和父子组件间的样式覆盖问题。有点类似React中使用的StyleModule,也是可以避免不同组件间样式覆盖问题。」
回答完之后我又开始暗自得意,回答的多么巧妙,既回答了问题,又表明自己对React也是有一点了解的。
可能面试官看出了我的得意之色,点点头之后又问出了一个问题:「知道是怎么实现的么?」
我先茫然的盯着面试官的脸看了两秒钟,然后在我已有的知识库中搜索,搜索一遍又一遍,发现这可能是我的一个盲区,我确实不太清楚实现原理啊!!
面试官可能看出了我对于此的知识匮乏,很和善的说「我就是感兴趣,随便问问」。
啊,事已至此,我只能对面试官露出一个尴尬却不失礼貌的微笑说「这块我确实没有仔细思考过,我下来会详细研究一下这款,具体是如何现在scoped的。」
「好,那本次面试就到这里吧,回去等通知吧!」面试官和蔼的说。
虽然最后面试顺利通过,但是这个问题我觉得还是有必要记录下:”Vue中Style中的Scoped属性是如何实现样式隔离的?“
初见Scoped
我们初次见到scoped应该是在Vue Loader中的Scoped Css文档中。
子组件的根元素
使用 scoped 后,父组件的样式将不会渗透到子组件中。
深度作用选择器
如果你希望 scoped 样式中的一个选择器能够作用得“更深”,例如影响子组件,你可以使用 >>> 操作符:
<style scoped>

.a >>> .b { /* ... */ }

</style>
上述代码会编译成:
.a[data-v-f3f3eg9] .b { /* ... */ }
注意:像Sass之类的预处理器无法正确解析>>>。这种情况下可以使用/deep/或::v-deep操作符取而代之,两者都是>>>的别名,同样可以正常工作。
实战Scoped
style标签无scoped标识
<style lang="less" >

.demo {

  a {

    color: red;

  }

}

</style>
编译之后
.demo a {

  color: red;

}
style表现中有scoped标识
<style lang="less" scoped>

.demo {

  a {

    color: red;

  }

}

</style>
编译之后
.demo a[data-v-219e4e87] {

  color: red;

}
父子组件中同时修改a标签样式
// 子组件

<style scoped>

a {

  color: green;

}

</style>

// 父组件

<style lang="less" scoped>

.demo {

  a {

    color: red;

  }

}

</style>
编译完之后,父组件样式对子组件样式没有影响
/* 子组件 a 标签样式 */

a[data-v-458323f2] {

  color: green;

}

/* 父组件 a 标签样式 */

.demo a[data-v-219e4e87] {

  color: red;

}
如果想父组件对子组件的样式产生影响,就需要使用更深级的选择器 >>> 或 /deep/或 ::v-deep使父组件的样式对子组件产生影响。
<style lang="less" scoped>

.demo {

  /deep/ a {

    color: red;

  }

}

</style>
编译完之后
a[data-v-458323f2] {

  color: green;

}

.demo[data-v-ca3944e4] a {

  color: red;

}
我们可以看到 编译后的 /deep/ a被替换成了 a标签,实现了父组件对子组件样式的修改。
解密Scoped实现
回顾初见Scoped,我们是在vue-loader的说明文档中了解到的scoped的用法,所以我们从vue-loader包入手,发现compiler.ts中:
try {

  // Vue 3.2.13+ ships the SFC compiler directly under the `vue` package

  // making it no longer necessary to have @vue/compiler-sfc separately installed.

  compiler = require('vue/compiler-sfc')

} catch (e) {

  try {

    compiler = require('@vue/compiler-sfc')

  } catch (e) {

  }

}
可以看到compiler的引用在@vue/compiler-sfc包中,@vue/compiler-sfc包的compileStyle.ts文件中有一个doCompileStyle()函数,然后我们大致看下这个函数的作用:
export function doCompileStyle(

  options: SFCAsyncStyleCompileOptions

): SFCStyleCompileResults {

// 只保留了部分主要流程代码

  const plugins = (postcssPlugins || []).slice()

  plugins.unshift(cssVarsPlugin({ id: id.replace(/^data-v-/, ''), isProd }))

  if (trim) {

    plugins.push(trimPlugin())

  }

  if (scoped) {

    //   引入了scoped插件

    plugins.push(scopedPlugin(id))

  }

  try {

    //   调用postcss

    result = postcss(plugins).process(source, postCSSOptions)

  } catch (e) {

  }

}
doCompileStyle()主要做了一件事,就是按需引入postcss需要的插件,其中就有scoped的插件。这个scoped插件应该就是Scoped Css的核心了。
我们看下scopedPlugin插件都做了什么
const scopedPlugin = () => {

 return {

    postcssPlugin: 'vue-sfc-scoped',

    Rule(rule) {

      processRule(id, rule)

    }

}

function processRule(id: string, rule: Rule) {

/* import selectorParser from 'postcss-selector-parser'

* 通过 postcss-selector-parser 获取css AST

*/

  rule.selector = selectorParser(selectorRoot => {

    selectorRoot.each(selector => {

      rewriteSelector(id, selector, selectorRoot)

    })

  }).processSync(rule.selector)

}

function rewriteSelector(

  id: string,

  selector: selectorParser.Selector,

  selectorRoot: selectorParser.Root

) {

  let node: selectorParser.Node | null = null

  let shouldInject = true

  // find the last child node to insert attribute selector

  selector.each(n => {

    // DEPRECATED ">>>" and "/deep/" combinator

    if (

      n.type === 'combinator' &&

      (n.value === '>>>' || n.value === '/deep/')

    ) {

      n.value = ' '

      n.spaces.before = n.spaces.after = ''

      // warn(

      //   `the >>> and /deep/ combinators have been deprecated. ` +

      //     `Use :deep() instead.`

      // )

    //   可以结束本次循环

      return false

    }

    if (n.type === 'pseudo') {

      const { value } = n

      // deep: inject [id] attribute at the node before the ::v-deep

      // combinator.

      if (value === ':deep' || value === '::v-deep') {

        if (n.nodes.length) {

          // .foo ::v-deep(.bar) -> .foo[xxxxxxx] .bar

          // replace the current node with ::v-deep's inner selector

          let last: selectorParser.Selector['nodes'][0] = n

          n.nodes[0].each(ss => {

            selector.insertAfter(last, ss)

            last = ss

          })

          // insert a space combinator before if it doesn't already have one

          const prev = selector.at(selector.index(n) - 1)

          if (!prev || !isSpaceCombinator(prev)) {

            selector.insertAfter(

              n,

              selectorParser.combinator({

                value: ' '

              })

            )

          }

          selector.removeChild(n)

        } else {

          // DEPRECATED usage in v3

          // .foo ::v-deep .bar -> .foo[xxxxxxx] .bar

          // warn(

          //   `::v-deep usage as a combinator has ` +

          //     `been deprecated. Use :deep(<inner-selector>) instead.`

          // )

          const prev = selector.at(selector.index(n) - 1)

          if (prev && isSpaceCombinator(prev)) {

            selector.removeChild(prev)

          }

          selector.removeChild(n)

        }

        return false

      }

    }

    if (n.type !== 'pseudo' && n.type !== 'combinator') {

      node = n

    }

  })

  if (node) {

    ;(node as selectorParser.Node).spaces.after = ''

  } else {

    // For deep selectors & standalone pseudo selectors,

    // the attribute selectors are prepended rather than appended.

    // So all leading spaces must be eliminated to avoid problems.

    selector.first.spaces.before = ''

  }

  if (shouldInject) {

    //  给seletor的node节点添加属性 id

    selector.insertAfter(

      // If node is null it means we need to inject [id] at the start

      // insertAfter can handle `null` here

      node as any,

      selectorParser.attribute({

        attribute: id,

        value: id,

        raws: {},

        quoteMark: `"`

      })

    )

  }

}
上述是保留了主要流程的插件代码,至此,我们可以得出scoped的实现方案就是通过postcss插件这种形式实现。
大家如果没有理解上述插件的原理,下面我提供个简单的插件代码,方便大家在node平台上运行理解。
简易流程:
const postcss = require('postcss');

// 解析Css AST

const selectorParser = require('postcss-selector-parser');

postcss([

{

    postcssPlugin: 'post-test-plugin',

    Rule(rule) {

        console.log(rule.selector, 'rule.selector');

        rule.selector = selectorParser(selectorRoot => {

            selectorRoot.each(selector => {

                let node = null;

                selector.each(n => {

                    if(n.type === 'combinator'  && n.value === '/deep/') {

                        n.value = ' ';

                        return false;

                    }

                    if(n.type !=='pseudo' && n.type !=='combinator') {

                        node= n;

                    }

                })

                selector.insertAfter(

                    node,

                    selectorParser.attribute({

                        attribute: '123456',

                    })

                )

            })

        }).processSync(rule.selector)

        console.log(rule.selector, 'after ruleSelector');

    }

}

]).process(`/deep/ a { color: red }; b:hover{ color: blue }`).then(res =>{

    console.log(res.css); // [123456]  a { color: red }; b[123456]:hover{ color: blue }

});
关于Debug的一个小技巧
上述解密部分有的朋友可能会疑惑,怎么就能刚好定位到这些文件呢?这里给大家分享一个debug的小技巧,主要适用于vscode编辑器。以本次scoped分析为例:
通过源码我们大概分析出可能是compiler-sfc包中的插件进行的scoped操作,那么我们直接在猜测位置打下断点如图所示:

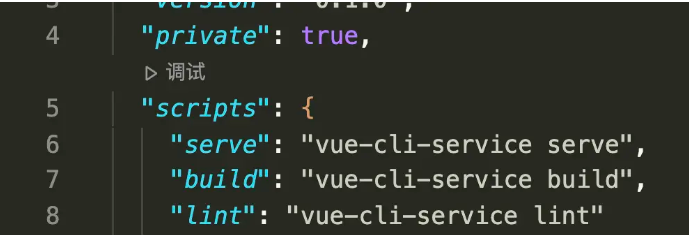
然后打开package.json文件,在scripts命令行上有调试按钮,点击调试选择build命令:
然后自动开始执行npm run build,定位到我们刚才打的断点那里:
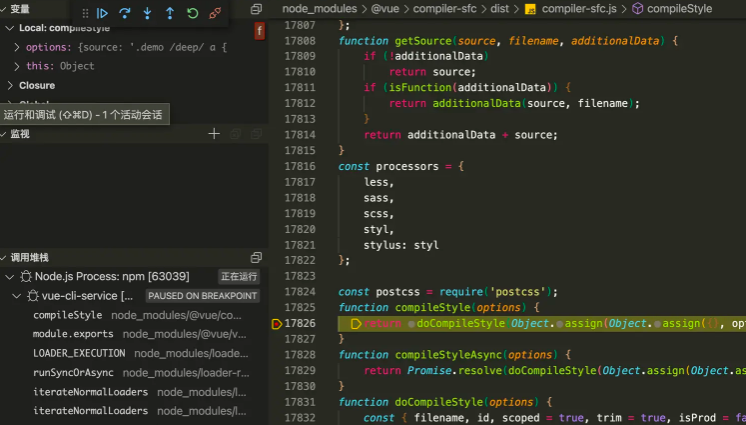
左侧有调用堆栈和当前变量以及调试按钮,然后就可以一步步进行调试啦。
至此,Vue的Scoped Css对你来说应该不再陌生了吧,如果还是有疑惑,可以按照上述步骤自行调试解惑哦~
本文转载于:
https://juejin.cn/post/7254083731488849957
如果对您有所帮助,欢迎您点个关注,我会定时更新技术文档,大家一起讨论学习,一起进步。

记录--你知道Vue中的Scoped css原理么?的更多相关文章
- Vue中的scoped及穿透方法
何为scoped? 在vue文件中的style标签上,有一个特殊的属性:scoped.当一个style标签拥有scoped属性时,它的CSS样式就只能作用于当前的组件,也就是说,该样式只能适用于当前组 ...
- Vue中的scoped和scoped穿透
1.什么是scoped 在Vue文件中的style标签上有一个特殊的属性,scoped.当一个style标签拥有scoped属性时候,它的css样式只能用于当前的Vue组件,可以使组件的样式不相互污染 ...
- Vue中的scoped及穿透方法(修改第三方组件局部的样式)
何为scoped? 在vue文件中的style标签上,有一个特殊的属性:scoped.当一个style标签拥有scoped属性时,它的CSS样式就只能作用于当前的组件,也就是说,该样式只能适用于当前组 ...
- vue中的css作用域、vue中的scoped坑点
一.css作用域 之前一直很困扰css的作用域问题,即使是模块化编程下,在对应的模块的js中import css进来,这个css仍然是全局的.导致在css中需要加上对应模块的html的id/class ...
- vue中的scoped分析以及在element-UI和vux中的应用
vue使用了单文件组件方式来解耦视图即.vue后缀文件名 单文件组件组成部分: <template> </template> <script> </scrip ...
- vue中使用animate.css
一:使用animate.css的使用 1.安装npm install animate.css --save 2.在main.js中引入import animate from 'animate.css' ...
- VUE中 style scoped 修改原有样式
作用域CSS 当<style>标记具有该scoped属性时,其CSS将仅应用于当前组件的元素.这类似于Shadow DOM中的样式封装.它有一些警告,但不需要任何polyfill.通过使用 ...
- vue中使用animate.css动画库
1.安装: npm install animate.css --save 2.引入及使用: //main.js中 import animated from 'animate.css' Vue.use( ...
- 在vue中使用animate.css
animate.css是一款前端动画库,相似的有velocity-animate 用法: 首先 npm install animate.css --save 然后在vue文件的script中引入: i ...
- vue中html、css、js 分离
在正常的创建和引用vue文件都是html.css.js三者在一起的,这样写起来虽然方便了,但是页面比较大或者代码比较多的情况下,即使使用组件有时代码也比较多,简单来说查找不变不利于编程,大的来说影像优 ...
随机推荐
- NC16696 [NOIP2001]统计单词个数
题目链接 题目 题目描述 给出一个长度不超过200的由小写英文字母组成的字母串(约定;该字串以每行20个字母的方式输入,且保证每行一定为20个).要求将此字母串分成k份( 1 < k ≤ 40 ...
- CentOS 7 SSH连接超时自动断开解决方案
用SSH登录到Linux的时候,由于默认的连接超时时间很短,经常断开! 1.修改文件 # vi /etc/ssh/sshd_config # vi /etc/ssh/sshd_config 找到 #C ...
- win32 - WM_DROPFILES的用法
WM_DROPFILES: 当用户将文件拖放到已注册为丢弃文件的接收者的应用程序窗口中时发送该消息 我们可以利用这个消息获取文件名称,并将它们保存到容器里. LRESULT CALLBACK Stat ...
- win32 - Redirect Input and Output
如果要将exe的输出重定向到cmd,则可以使用匿名管道将子进程的标准输入和输出句柄重定向.请注意,命名管道也可以用于重定向进程I / O //CMD.exe #include <windows. ...
- win32 - 使用CreateRemoteThread调用dll上的函数(建立管道)
Dll: // dllmain.cpp : Defines the entry point for the DLL application. #include "pch.h" #i ...
- React native随笔——解决navigation导航栏 android和ios样式不统一
navigation导航栏存在android和ios样式不统一的问题.Android手机上标题不居中,导航栏与状态栏重合. 解决方法为在navigationOptions中进行如下配置. 一.Andr ...
- 6大数据类型之间的转换及数据在内存中的缓存机制----day03
1.自动类型转换 当2个不同类型的数据进行运算的时候,默认向更高精度转换 数据类型精度从低到高:bool < int < float <complex 1,1强制类型转换 # Nu ...
- 第一篇博客——MarkDown语法
Markdown学习 标题 三级标提 四级标题 字体 Hello World ! 两个星号加粗 Hello World ! 一个星号斜体 Hello World ! Hello World ! 两个波 ...
- kafka节点故障恢复原理
Kafka的LEO和HW LEO LEO是Topic每一个副本的最后的偏移量offset+1 HW(高水位线) High WaterMark是所有副本中,最小的LEO Follower副本所在节点宕机 ...
- 一文带你了解 「图数据库」Nebula 的存储设计和思考
本文首发于 Nebula Graph Community 公众号 在上次的 nebula-storage on nLive 直播中,来自 Nebula 存储团队的负责人王玉珏(四王)同大家分享了 ne ...