SpringBoot启动流程分析原理(一)
我们都知道
SpringBoot自问世以来,一直有一个响亮的口号"约定优于配置",其实一种按约定编程的软件设计范式,目的在于减少软件开发人员在工作中的各种繁琐的配置,我们都知道传统的SSM框架的组合,会伴随着大量的繁琐的配置;稍有不慎,就可能各种bug,被人发现还以为我们技术很菜。而SpringBoot的出现不仅大大提高的开发人员的效率,还能避免由于"手抖"带来的配置错误。
很多程序员都感慨SpringBoot的到来大大解放了生产力,但是也有聪明的程序猿会多思考一下下,SpringBoot是怎么做到的约定的配置?它配置在了哪里?又是怎么启动的作用等等一系列的问号在跟女朋友花前月下的时候,依然会时不时冒出来。这严重影响了程序猿们的"幸"福生活,为了能广大"程序猿"同胞过上幸福美满的生活,今天咱么就来一起跟随源码探究下SpringBoot到底是如何做到"约定优于配置"的。
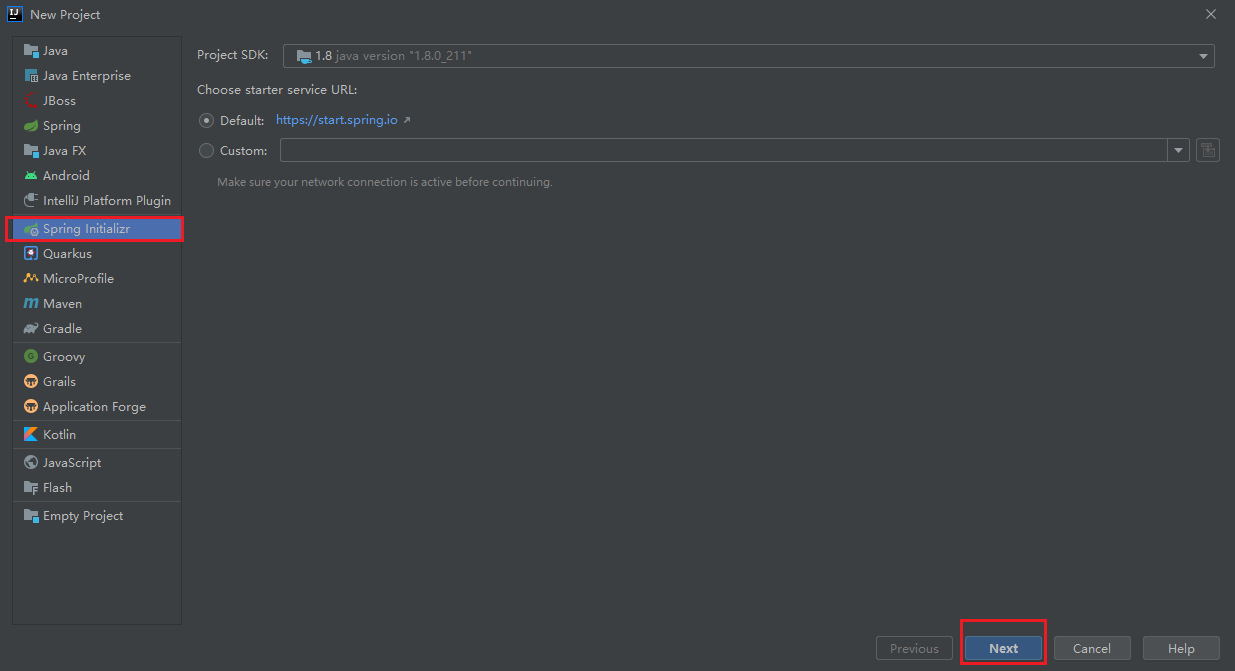
首先,我们先介绍下我们的演示的项目环境,我们先试用 Spring Initializr来创建一个SpirngBoot 工程。我们使用的版本是SpringBoot 2.4.3.RELEASE
接下来就只在 pom.xmL文件中添加一个web工程的依赖,是为了观察后面容器类型的源码。
        <dependency>

            <groupId>org.springframework.boot</groupId>

            <artifactId>spring-boot-starter-web</artifactId>

        </dependency>
这样我们的环境就准备好了。
我们跟着 SpringBoot的源码来探究它的启动流程,首先,先找到这个应用程序的入口主方法,在上面打一个断点:
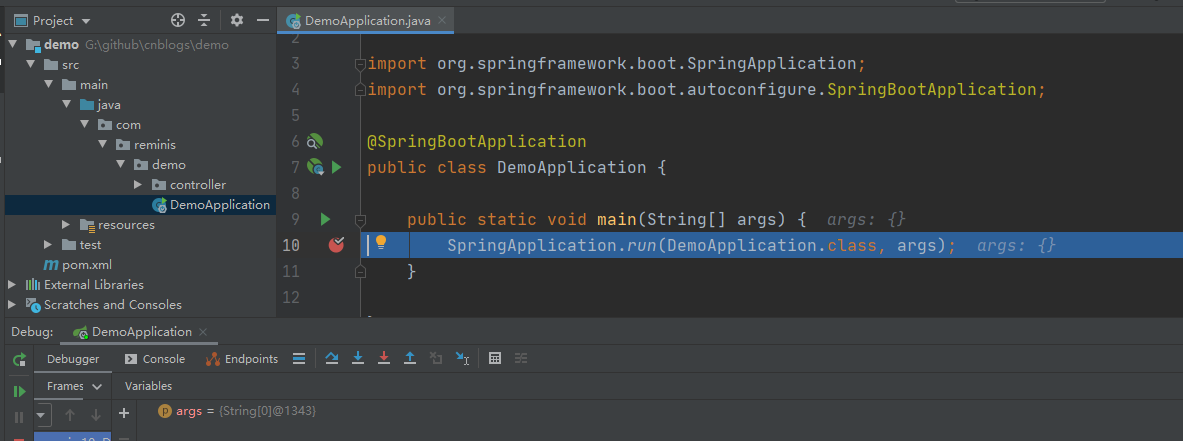
启动之后,F7进入到 run()方法,我的电脑是点击F7(Step into)
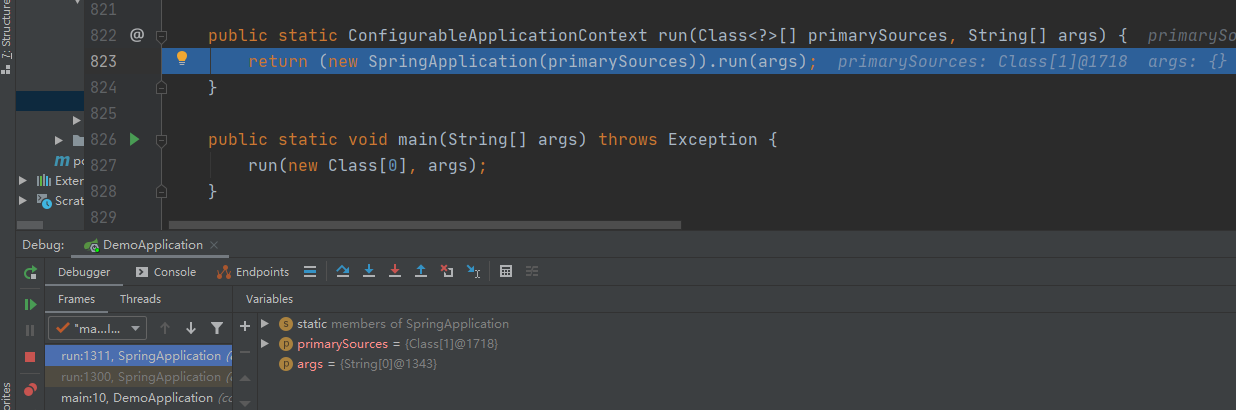
到这里会执行 new SpringApplication(primarySources)创建spring应用对象,继续F7往下跟会执行 SpringApplication构造器
//SpringApplication构造器
public SpringApplication(ResourceLoader resourceLoader, Class<?>... primarySources) {
// 此处省略源码...
// 资源加载器
this.resourceLoader = resourceLoader;
Assert.notNull(primarySources, "PrimarySources must not be null");
this.primarySources = new LinkedHashSet(Arrays.asList(primarySources));
// 1.可能的web应用程序类型的类型。
this.webApplicationType = WebApplicationType.deduceFromClasspath();
this.bootstrappers = new ArrayList(this.getSpringFactoriesInstances(Bootstrapper.class));
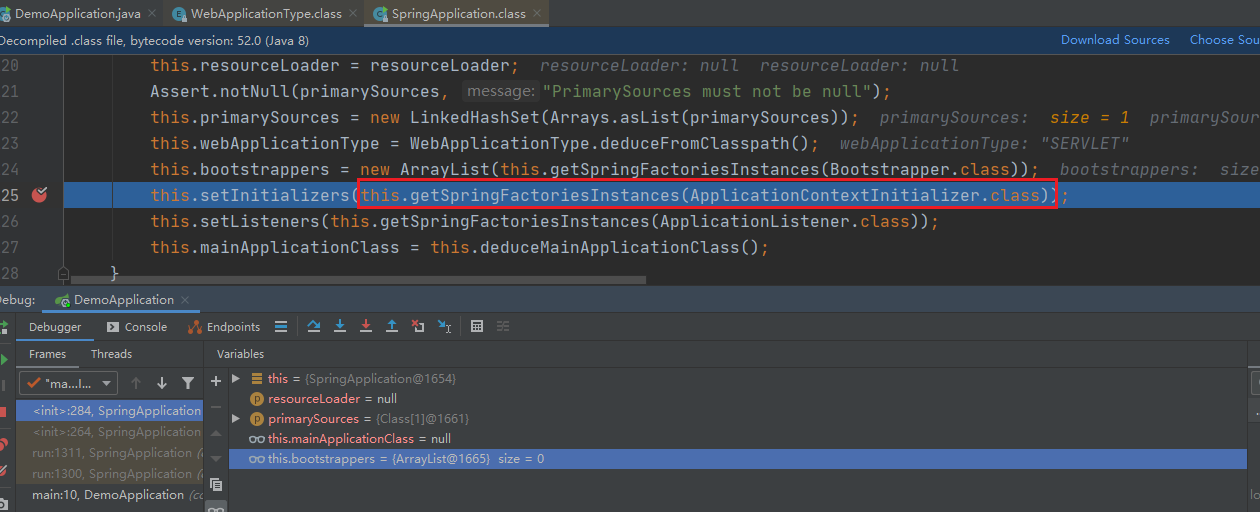
// 2.设置初始化应用context
this.setInitializers(this.getSpringFactoriesInstances(ApplicationContextInitializer.class));
// 3.设置初始化监听
this.setListeners(this.getSpringFactoriesInstances(ApplicationListener.class));
// 4.推演主程序类
this.mainApplicationClass = this.deduceMainApplicationClass();
}
很多不为人知的事情都是发生在这个对象初始化的时候,这里我们都来一一解密
    static WebApplicationType deduceFromClasspath() {

        if (ClassUtils.isPresent("org.springframework.web.reactive.DispatcherHandler", (ClassLoader)null) && !ClassUtils.isPresent("org.springframework.web.servlet.DispatcherServlet", (ClassLoader)null) && !ClassUtils.isPresent("org.glassfish.jersey.servlet.ServletContainer", (ClassLoader)null)) {

            return REACTIVE;

        } else {

            String[] var0 = SERVLET_INDICATOR_CLASSES;

            int var1 = var0.length;

            for(int var2 = 0; var2 < var1; ++var2) {

                String className = var0[var2];

                if (!ClassUtils.isPresent(className, (ClassLoader)null)) {

                    return NONE;

                }

            }

            // 这里是我们测试web容器

            return SERVLET;

        }

    }
1. 推断web 应用类型
这段代码是来推断我们的应用是哪种web应用程序
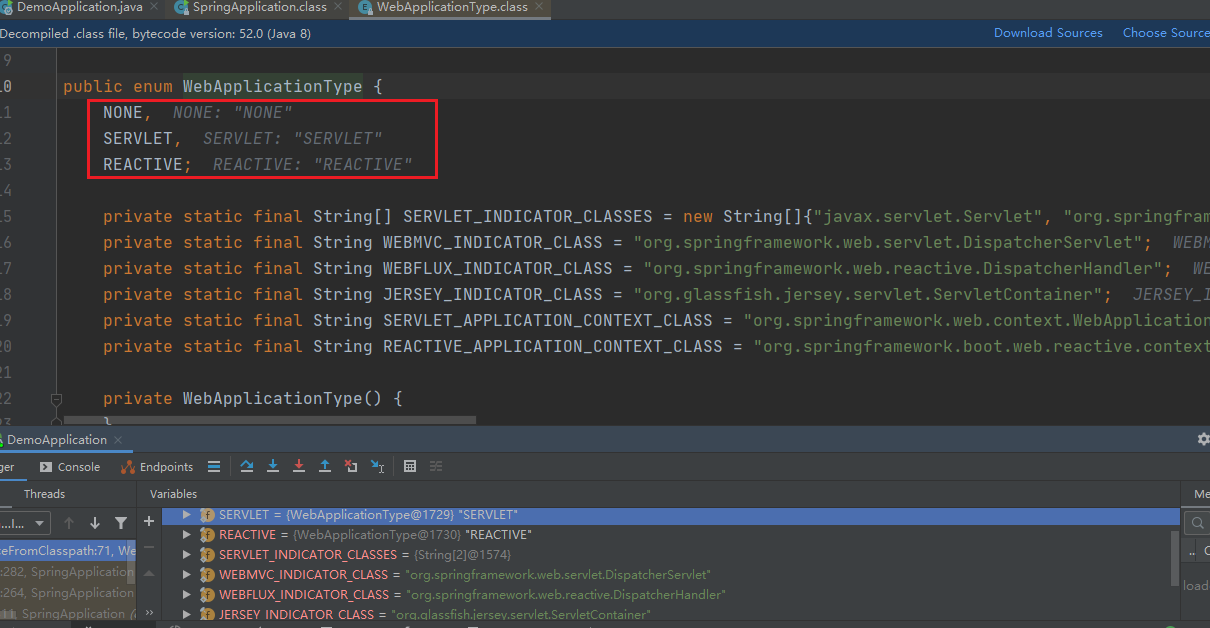
public enum WebApplicationType{

    NONE,// 不是web应用

    SERVLET,// servlet容器

    REACTIVE; // 反应型web应用(webflux)

}
当然一开始我们加入了web的依赖,所以我们是 servlet 容器。
2. 初始化应用上下文
在设置初始化应用context的时候,是先执行了
getSpringFactoriesInstances(ApplicationContextInitializer.class)方法,参数是ApplicationContextInitializer.class字节码对象。
    private <T> Collection<T> getSpringFactoriesInstances(Class<T> type, Class<?>[] parameterTypes, Object... args) {

        ClassLoader classLoader = this.getClassLoader();

        // Use names and ensure unique to protect against dupLicates

        Set<String> names = new LinkedHashSet(

                 // 加载ApplicationContextInitializer.class类型的类

                 // 这里传入就是参数 ApplicationContextInitializer.class

                SpringFactoriesLoader.loadFactoryNames(type, classLoader));

        // 实例化加载到的类

        List<T> instances = this.createSpringFactoriesInstances(type, parameterTypes, classLoader, args, names);

        AnnotationAwareOrderComparator.sort(instances);

        // 返回

        return instances;

    }
我们先来看看他是如何加载到这些类
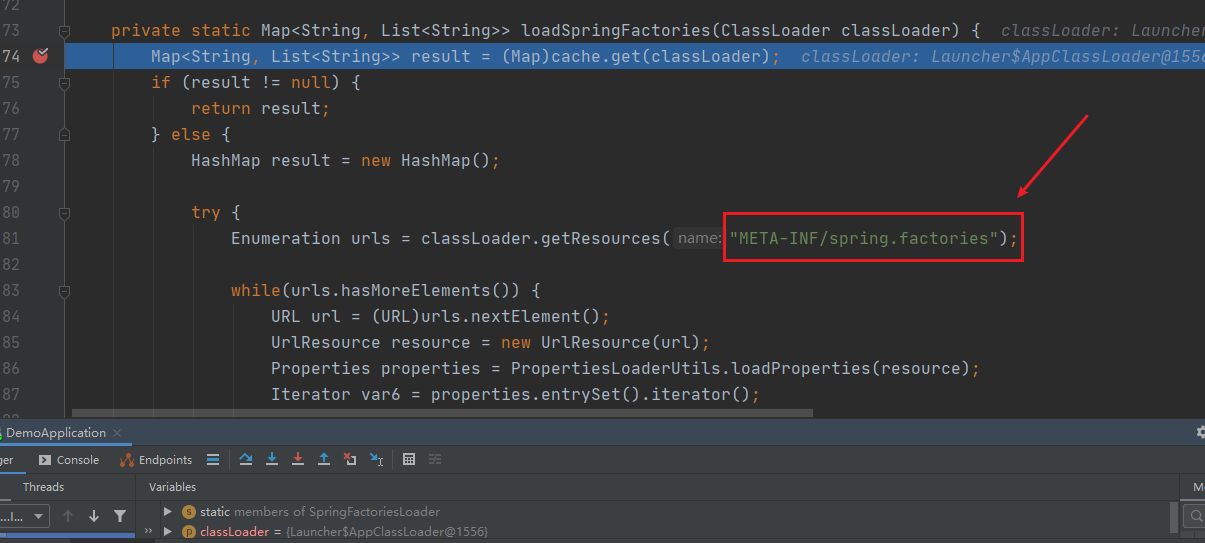
    private static Map<String, List<String>> loadSpringFactories(ClassLoader classLoader) {

        // 从缓存中拿

        Map<String, List<String>> result = (Map)cache.get(classLoader);

        if (result != null) {

            return result;

        } else {

            HashMap result = new HashMap();

            try {

                // 从资源路径下加载

                Enumeration urls = classLoader.getResources("META-INF/spring.factories");

                while(urls.hasMoreElements()) {

                    URL url = (URL)urls.nextElement();

                    UrlResource resource = new UrlResource(url);

                    Properties properties = PropertiesLoaderUtils.loadProperties(resource);

                    Iterator var6 = properties.entrySet().iterator();

                    while(var6.hasNext()) {

                        Entry<?, ?> entry = (Entry)var6.next();

                        String factoryTypeName = ((String)entry.getKey()).trim();

                        String[] factoryImplementationNames = StringUtils.commaDelimitedListToStringArray((String)entry.getValue());

                        String[] var10 = factoryImplementationNames;

                        int var11 = factoryImplementationNames.length;

                        for(int var12 = 0; var12 < var11; ++var12) {

                            String factoryImplementationName = var10[var12];

                            ((List)result.computeIfAbsent(factoryTypeName, (key) -> {

                                return new ArrayList();

                            })).add(factoryImplementationName.trim());

                        }

                    }

                }

                result.replaceAll((factoryType, implementations) -> {

                    return (List)implementations.stream().distinct().collect(Collectors.collectingAndThen(Collectors.toList(), Collections::unmodifiableList));

                });

                cache.put(classLoader, result);

                // 返回所有的加载的类

                return result;

            } catch (IOException var14) {

                throw new IllegalArgumentException("Unable to load factories from location [META-INF/spring.factories]", var14);

            }

        }

    }
这里有两个加载配置类的地方其实都指向了META-INF/spring.factories,通过断点我们可以看到应用程序是加载了以下几个jar下的 spring.factories 文件。
双击Shifi搜索spring.factories可以看到它存在于以下工程中
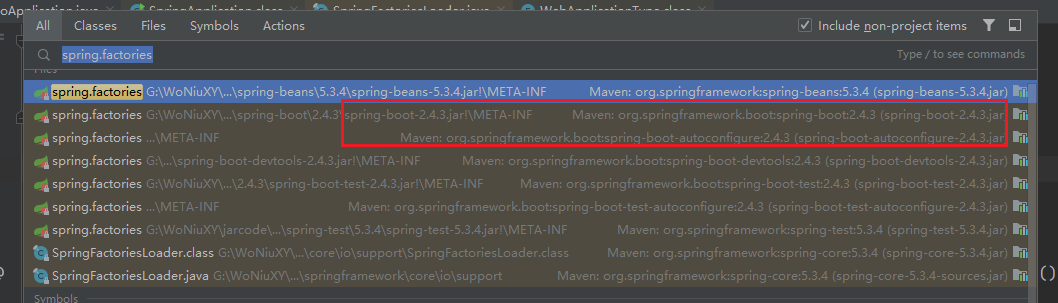
spring-boot-2.4.3.RELEASE.jar 下的 spring.factories (截图未完整截取)

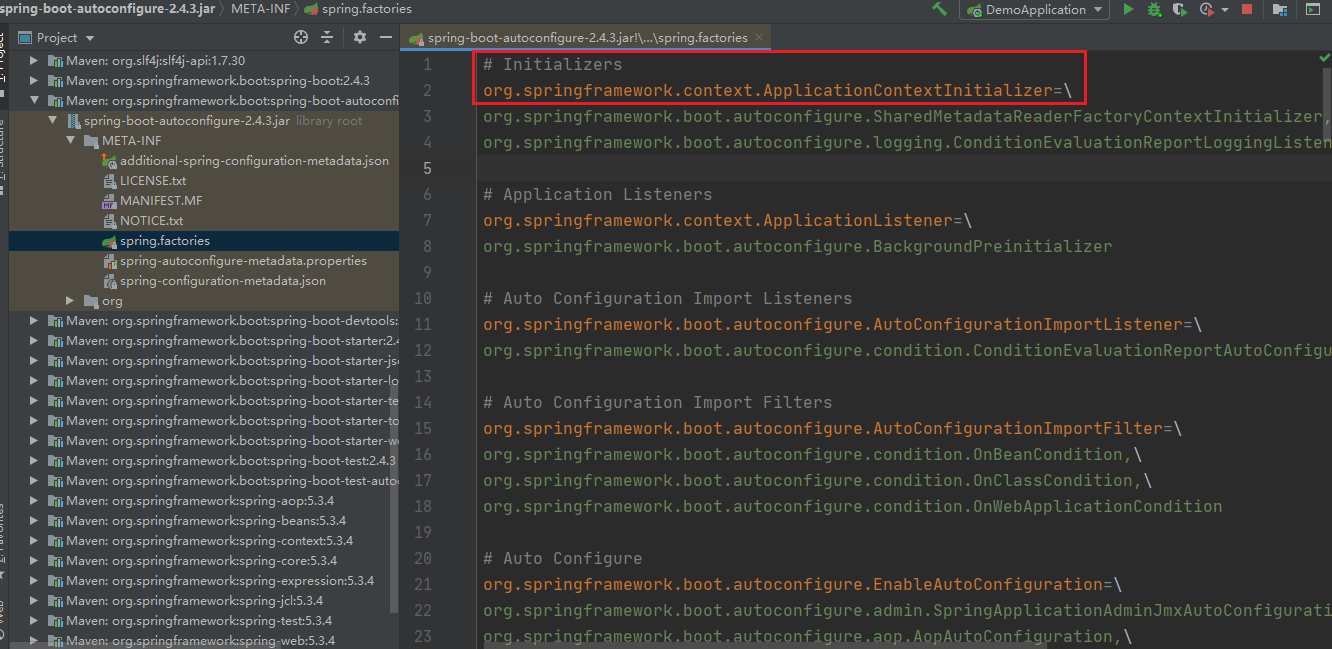
spring-boot-autoconfigure-2.4.3.RELEASE.jar 下的 spring.factories
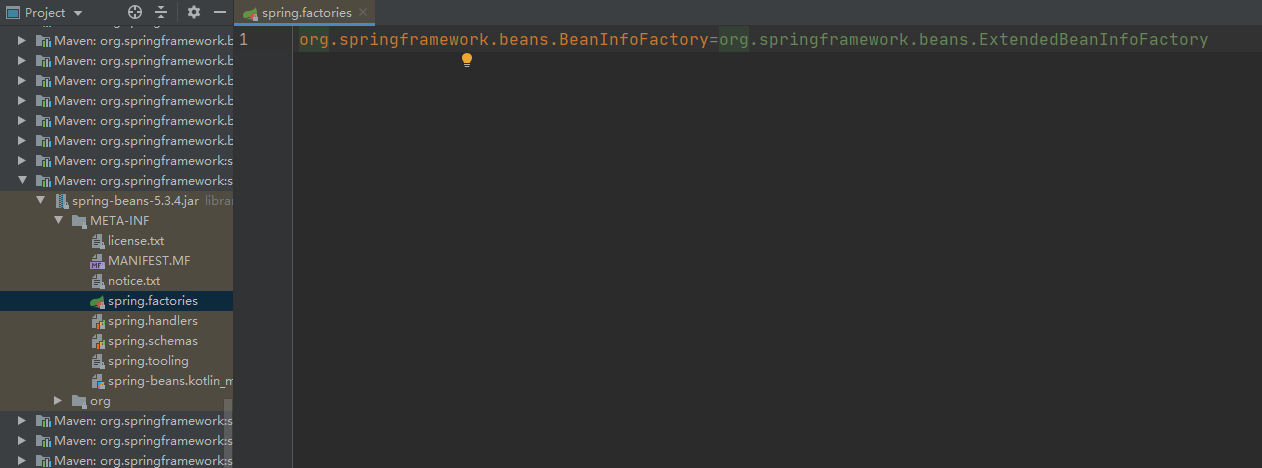
spring-beans-2.4.3.RELEASE.jar 下的 spring.factories
从Map中根据 org.springframework.context.ApplicationContextInitializer 的类型拿到需要的类初始化类,断点进入 getOrDefault(factoryClassName,Collections.emptyList());方法
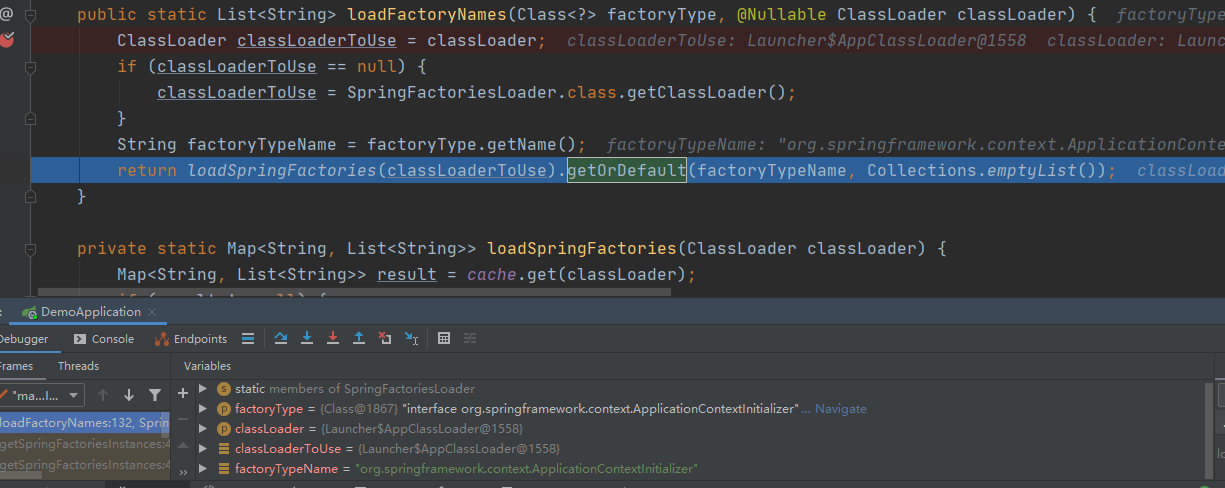
之后就是把加载到的需要初始化的类进行实例化添加到一个集合中等待备用

3. 初始化监听器类
最关键的的还是这句
当我们跟进去之后,会发现在初始化监听类的时候和上面初始化应用上下文是一样的代码。唯一不同的是 getSpringFactoriesInstances(ApplicationListener.class))传进去的是·ApplicationListener.class 所以这里就不再赘述。
4. 推演主程序类
也就是这个最关键的代码了
this.mainApplicationClass = this.deduceMainApplicationClass();
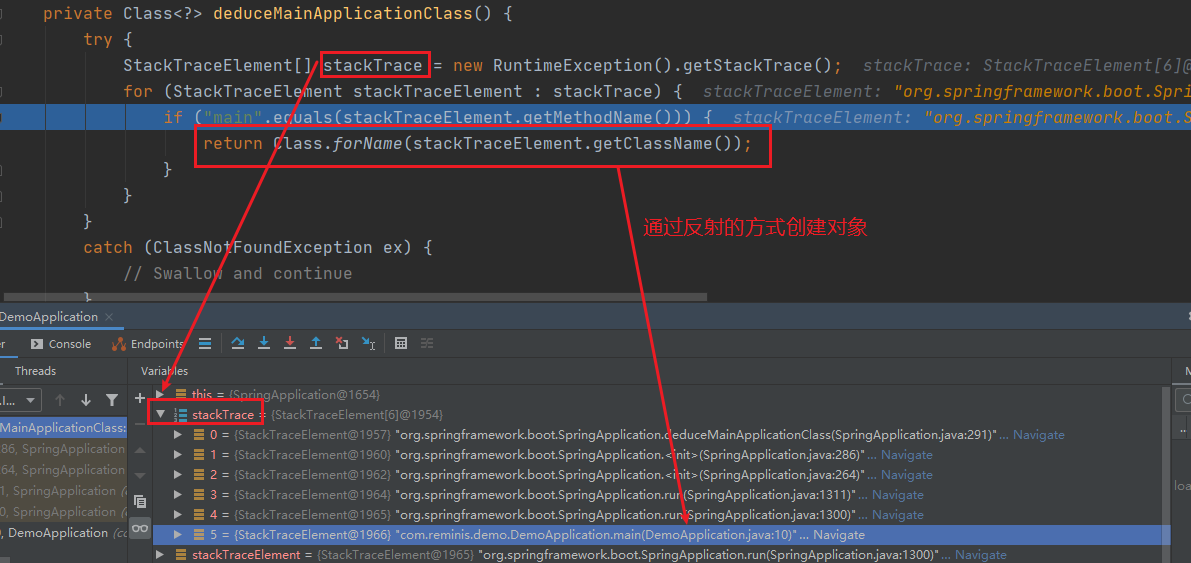
到这里就完成了SpringBoot启动过程中初始化SpringApplication 的过程。
这篇文章主要是给大家说了下SpringBoot 启动过程中初始化SpringApplication的流程,大致可以分为四个步骤∶
- 推演web应用的类型(如果没有加web依赖类型NONE)
- 初始化 ApplicationContextInitializer
- 初始化 ApplicationListener
- 推演出主程序类
通过这样四个步骤就完成了第一步 SpringApplication 的初始化过程。
SpringBoot启动流程分析原理(一)的更多相关文章
- SpringBoot启动流程分析(五):SpringBoot自动装配原理实现
SpringBoot系列文章简介 SpringBoot源码阅读辅助篇: Spring IoC容器与应用上下文的设计与实现 SpringBoot启动流程源码分析: SpringBoot启动流程分析(一) ...
- SpringBoot启动流程分析(六):IoC容器依赖注入
SpringBoot系列文章简介 SpringBoot源码阅读辅助篇: Spring IoC容器与应用上下文的设计与实现 SpringBoot启动流程源码分析: SpringBoot启动流程分析(一) ...
- SpringBoot启动流程分析(一):SpringApplication类初始化过程
SpringBoot系列文章简介 SpringBoot源码阅读辅助篇: Spring IoC容器与应用上下文的设计与实现 SpringBoot启动流程源码分析: SpringBoot启动流程分析(一) ...
- SpringBoot启动流程分析(二):SpringApplication的run方法
SpringBoot系列文章简介 SpringBoot源码阅读辅助篇: Spring IoC容器与应用上下文的设计与实现 SpringBoot启动流程源码分析: SpringBoot启动流程分析(一) ...
- SpringBoot启动流程分析(三):SpringApplication的run方法之prepareContext()方法
SpringBoot系列文章简介 SpringBoot源码阅读辅助篇: Spring IoC容器与应用上下文的设计与实现 SpringBoot启动流程源码分析: SpringBoot启动流程分析(一) ...
- SpringBoot启动流程分析(四):IoC容器的初始化过程
SpringBoot系列文章简介 SpringBoot源码阅读辅助篇: Spring IoC容器与应用上下文的设计与实现 SpringBoot启动流程源码分析: SpringBoot启动流程分析(一) ...
- SpringBoot启动流程及其原理
Spring Boot.Spring MVC 和 Spring 有什么区别? 分别描述各自的特征: Spring 框架就像一个家族,有众多衍生产品例如 boot.security.jpa等等:但他们的 ...
- SpringBoot启动流程分析
前景提示 @ComponentScan 的处理都放在org.springframework.context.annotation.ConfigurationClassParser#doProcess ...
- SpringBoot启动流程解析
写在前面: 由于该系统是底层系统,以微服务形式对外暴露dubbo服务,所以本流程中SpringBoot不基于jetty或者tomcat等容器启动方式发布服务,而是以执行程序方式启动来发布(参考下图ke ...
随机推荐
- C#线程Thread类
在System.Threading 命名空间下,包含了用于创建和控制线程的Thread 类.对线程的常用操作有:启动线程.终止线程.合并线程和让线程休眠等. 1 启动线程 在使用线程前,首先要创建一个 ...
- Redis 多实例 & 主从复制
Redis 多实例 多实例目录 [root@db01 ~]# mkdir /service/redis/{6380,6381} 多实例配置文件 # 第一台多实例配置 [root@db01 ~]# vi ...
- Prometheus监控k8s企业级应用
Prometheus架构图 常见的镜像 pod 备注 kube-state-metric 用来收集K8S基本状态信息的监控代理 node-exporter 专门用来收集K8S运算节点基础信息,需要部署 ...
- eclipse中使用debug,显示参数配置
打开Window---->Preferences------>java------>Editor-------->Hovers 效果:
- 3.keepalived+脚本实现nginx高可用
标题 : 3.keepalived+脚本实现nginx高可用 目录 : Nginx 序号 : 3 else exit 0 fi else exit 0 fi - 需要保证脚本有执行权限,可以使用chm ...
- next v5升级到next v7需要注意的地方
title: next v5升级到next v7需要注意的地方 date: 2020-03-04 categories: web tags: [hexo,next] 大部分的设置都是一样的,但有一些细 ...
- CVE-2019-13272:Linux本地内核提权漏洞复现
0x00 简介 2019年07月20日,Linux正式修复了一个本地内核提权漏洞.通过此漏洞,攻击者可将普通权限用户提升为Root权限. 0x01 漏洞概述 当调用PTRACE_TRACEME时,pt ...
- 翻译:《实用的Python编程》01_05_Lists
目录 | 上一节 (1.4 字符串) | 下一节 (1.6 文件) 1.5 列表 本节介绍 Python 原始数据类型列表(list). 列表是一种有序的集合. 创建列表 使用方括号 [] 来定义列表 ...
- pub package all in one
pub package all in one best practice The pubspec file https://dart.dev/tools/pub/pubspec demo name: ...
- ES2021 & Pipeline operator (|>) / 管道运算符 |>
ES2021 & Pipeline operator (|>) / 管道运算符 |> demo "use strict"; /** * * @author xg ...