graph attention network(ICLR2018)官方代码详解(tensorflow)-稀疏矩阵版
论文地址:https://arxiv.org/abs/1710.10903
代码地址: https://github.com/Diego999/pyGAT
之前非稀疏矩阵版的解读:https://www.cnblogs.com/xiximayou/p/13622283.html
我们知道图的邻接矩阵可能是稀疏的,将整个图加载到内存中是十分耗费资源的,因此对邻接矩阵进行存储和计算是很有必要的。
我们已经讲解了图注意力网络的非稀疏矩阵版本,再来弄清其稀疏矩阵版本就轻松了,接下来我们将来看不同之处。
主运行代码在:execute_cora_sparse.py中
同样的,先加载数据:
adj, features, y_train, y_val, y_test, train_mask, val_mask, test_mask = process.load_data(dataset)
其中adj是coo_matrix类型,features是lil_matrix类型。
对于features,我们最终还是:
def preprocess_features(features):

    """Row-normalize feature matrix and convert to tuple representation"""

    rowsum = np.array(features.sum(1))

    r_inv = np.power(rowsum, -1).flatten()

    r_inv[np.isinf(r_inv)] = 0.

    r_mat_inv = sp.diags(r_inv)

    features = r_mat_inv.dot(features)

    return features.todense(), sparse_to_tuple(features)
将其:
features, spars = process.preprocess_features(features)
转换为原始矩阵。
对于biases:
if sparse:

    biases = process.preprocess_adj_bias(adj)

else:

    adj = adj.todense()

    adj = adj[np.newaxis]

    biases = process.adj_to_bias(adj, [nb_nodes], nhood=1)
如果是稀疏格式的,就调用biases = process.preprocess_adj_bias(adj):
def preprocess_adj_bias(adj):

    num_nodes = adj.shape[0] #

    adj = adj + sp.eye(num_nodes)  # self-loop 给对角上+1

    adj[adj > 0.0] = 1.0 #大于0的值置为1

    if not sp.isspmatrix_coo(adj):

        adj = adj.tocoo()

    adj = adj.astype(np.float32) #类型转换

    indices = np.vstack((adj.col, adj.row)).transpose()  # This is where I made a mistake, I used (adj.row, adj.col) instead

    # return tf.SparseTensor(indices=indices, values=adj.data, dense_shape=adj.shape)

    return indices, adj.data, adj.shape
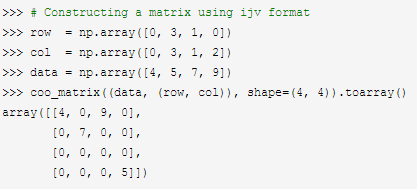
这里看两个例子:


我们可以通过indices,data,shape来构造一个coo_matrix。
在定义计算图中的占位符时:
       if sparse:

            #bias_idx = tf.placeholder(tf.int64)

            #bias_val = tf.placeholder(tf.float32)

            #bias_shape = tf.placeholder(tf.int64)

            bias_in = tf.sparse_placeholder(dtype=tf.float32)

        else:

            bias_in = tf.placeholder(dtype=tf.float32, shape=(batch_size, nb_nodes, nb_nodes))
使用bias_in = tf.sparse_placeholder(dtype=tf.float32)。
再接着就是模型中了,在utils文件夹下的layers.py中:
# Experimental sparse attention head (for running on datasets such as Pubmed)

# N.B. Because of limitations of current TF implementation, will work _only_ if batch_size = 1!

def sp_attn_head(seq, out_sz, adj_mat, activation, nb_nodes, in_drop=0.0, coef_drop=0.0, residual=False):

    with tf.name_scope('sp_attn'):

        if in_drop != 0.0:

            seq = tf.nn.dropout(seq, 1.0 - in_drop)

        seq_fts = tf.layers.conv1d(seq, out_sz, 1, use_bias=False)

        # simplest self-attention possible

        f_1 = tf.layers.conv1d(seq_fts, 1, 1)

        f_2 = tf.layers.conv1d(seq_fts, 1, 1)

        f_1 = tf.reshape(f_1, (nb_nodes, 1))

        f_2 = tf.reshape(f_2, (nb_nodes, 1))

        f_1 = adj_mat*f_1

        f_2 = adj_mat * tf.transpose(f_2, [1,0])

        logits = tf.sparse_add(f_1, f_2)

        lrelu = tf.SparseTensor(indices=logits.indices,

                values=tf.nn.leaky_relu(logits.values),

                dense_shape=logits.dense_shape)

        coefs = tf.sparse_softmax(lrelu)

        if coef_drop != 0.0:

            coefs = tf.SparseTensor(indices=coefs.indices,

                    values=tf.nn.dropout(coefs.values, 1.0 - coef_drop),

                    dense_shape=coefs.dense_shape)

        if in_drop != 0.0:

            seq_fts = tf.nn.dropout(seq_fts, 1.0 - in_drop)

        # As tf.sparse_tensor_dense_matmul expects its arguments to have rank-2,

        # here we make an assumption that our input is of batch size 1, and reshape appropriately.

        # The method will fail in all other cases!

        coefs = tf.sparse_reshape(coefs, [nb_nodes, nb_nodes])

        seq_fts = tf.squeeze(seq_fts)

        vals = tf.sparse_tensor_dense_matmul(coefs, seq_fts)

        vals = tf.expand_dims(vals, axis=0)

        vals.set_shape([1, nb_nodes, out_sz])

        ret = tf.contrib.layers.bias_add(vals)

        # residual connection

        if residual:

            if seq.shape[-1] != ret.shape[-1]:

                ret = ret + conv1d(seq, ret.shape[-1], 1) # activation

            else:

                ret = ret + seq

        return activation(ret)  # activation
相应的位置都要使用稀疏的方式。
graph attention network(ICLR2018)官方代码详解(tensorflow)-稀疏矩阵版的更多相关文章
- graph attention network(ICLR2018)官方代码详解(te4nsorflow)
论文地址:https://arxiv.org/abs/1710.10903 代码地址: https://github.com/Diego999/pyGAT 我并没有完整看过这篇论文,但是在大致了解其原 ...
- 代码详解:TensorFlow Core带你探索深度神经网络“黑匣子”
来源商业新知网,原标题:代码详解:TensorFlow Core带你探索深度神经网络“黑匣子” 想学TensorFlow?先从低阶API开始吧~某种程度而言,它能够帮助我们更好地理解Tensorflo ...
- DeepLearning tutorial(3)MLP多层感知机原理简介+代码详解
本文介绍多层感知机算法,特别是详细解读其代码实现,基于python theano,代码来自:Multilayer Perceptron,如果你想详细了解多层感知机算法,可以参考:UFLDL教程,或者参 ...
- ARM Cortex-M底层技术(2)—启动代码详解
杂谈 工作了一天,脑袋比较乱.一直想把底层的知识写成一个系列,希望可以坚持下去.为什么要写底层的东西呢?首先,工作用到了这部分内容,最近和内部Flash打交道比较多,自然而然会接触到一些底层的东西:第 ...
- 论文解读(FedGAT)《Federated Graph Attention Network for Rumor Detection》
论文信息 论文标题:Federated Graph Attention Network for Rumor Detection论文作者:Huidong Wang, Chuanzheng Bai, Ji ...
- BM算法 Boyer-Moore高质量实现代码详解与算法详解
Boyer-Moore高质量实现代码详解与算法详解 鉴于我见到对算法本身分析非常透彻的文章以及实现的非常精巧的文章,所以就转载了,本文的贡献在于将两者结合起来,方便大家了解代码实现! 算法详解转自:h ...
- ASP.NET MVC 5 学习教程:生成的代码详解
原文 ASP.NET MVC 5 学习教程:生成的代码详解 起飞网 ASP.NET MVC 5 学习教程目录: 添加控制器 添加视图 修改视图和布局页 控制器传递数据给视图 添加模型 创建连接字符串 ...
- Github-karpathy/char-rnn代码详解
Github-karpathy/char-rnn代码详解 zoerywzhou@gmail.com http://www.cnblogs.com/swje/ 作者:Zhouwan 2016-1-10 ...
- 十图详解tensorflow数据读取机制(附代码)转知乎
十图详解tensorflow数据读取机制(附代码) - 何之源的文章 - 知乎 https://zhuanlan.zhihu.com/p/27238630
随机推荐
- C#LeetCode刷题之#326-3的幂(Power of Three)
问题 该文章的最新版本已迁移至个人博客[比特飞],单击链接 https://www.byteflying.com/archives/3867 访问. 给定一个整数,写一个函数来判断它是否是 3 的幂次 ...
- 从零开始,Windows操作系统下的超详细的阿里云发布项目过程
==================== 步骤0: 购买阿里云服务器 ==================== 0.1 从来没有搞过外网部署的我,当然是先买服务器了,感谢很多小伙伴的帮忙 0.2 登录 ...
- STM32 重启之后程序丢失
1 BOOT1 BOOT0都已经接10K接地,晶振波形正常 2 在主程序最开始运行的地方加入5秒的延时,程序不会丢失.原因可能为单片机其它外设没有准备好 int main(void) { delay_ ...
- 使用动态链接为什么还需要静态库lib文件
在Windows上使用动态链接时,不光需要头文件 .dll文件 还需要一个.lib 文件. 不是动态链接吗?为什么还需要静态库.lib文件? 实际上,这个.lib文件并不是静态库,而是 导入库 文件, ...
- unity探索者之socket传输protobuf字节流(二)
版权声明:本文为原创文章,转载请声明http://www.cnblogs.com/unityExplorer/p/6977935.html 上一篇主要说的是protobuf字节流的序列化和解析,将pr ...
- Nordic 52840-Timer定时器学习问题(一)
今天在ble_app_blinky例程中移植定时器驱动,在编译过程中报出了两个错误,在此记录一下. 1. 在nRF_Dreivers中添加nrfx_timer.c文件 选中“nRF_Dreivers ...
- Ubuntu图形桌面切换到命令行界面
Ubuntu提供两种进入方式,一个是我们平常最熟悉的图形界面形式,还有一种是纯命令行方式. 1.按 Ctrl + Alt + (F1~F6中的任意一个)即可进入纯命令行模式. 进入后,需要输入用户名, ...
- circos pipeline
# /usr/bin/env python# coding=utf-8#################################### Author : yunkeli# Version : ...
- archlinux安装kde
联网 dhcpcd & 配置国内源 打开文件 nano /etc/pacman.conf 在文件最后加上这段 [arhclinuxcn] Server = https://mirrors.tu ...
- Java多线程_阻塞队列
1.什么是阻塞队列 我们知道,PriorityQueue.LinkedList这些都是非阻塞队列.在我们使用非阻塞队列的时候有一个很大问题,它不会对当前线程产生阻塞,那么在面对类似消费者- ...
