springboot 开发入门,及问题汇总
1 . springboot简单介绍(http://projects.spring.io/spring-boot/)
现在的web项目几乎都会用到spring框架,而要使用spring难免需要配置大量的xml配置文件,而springboot的出现解 决了这一问题,一个项目甚至不用部署到服务器上直接开跑,真像springboot所说:“just run”。
springboot的很多默认编码方式都是utf-8,真是福利啊。
org.spring 2013年新开发的框架springboot , 它让一个单独项目的创建变得更加的简单,让所有依赖spring的程序可以做到“just run”。springboot提供大量第三方libraries让我们可以非常轻松的开始创建一个spring工程,甚至不需要再去配置一些繁琐的xml配置文件
框架特点:
1:创建独立的spring应用。
2:嵌入Tomcat, Jetty Undertow 而且不需要部署他们。
3:提供的“starters”poms来简化Maven配置
4:尽可能自动配置spring应用。
5:提供生产指标,健壮检查和外部化配置
6:绝对没有代码生成和XML配置要求
2 . 简单实例演示
本文全程使用Springboot当前版本1.2.2(当前,推荐)

一个简单的helloworld 直接开始run main方法就可以了 控制台我也不知道都干了什么,好像是开始部署了,
但是没有关联到我的tomcat。

浏览器就能直接访问了。

3 . 步骤详解
*注意事项:
1.开发第一个springboot程序最好使用maven来搭建,文档全程也是maven构建。
2.springboot因为是一个最新开发的框架,所以只支持java6以上,java7最好,官方推荐java8。
3.需要maven3.2以上版本支持。
4.支持以下servlet容器 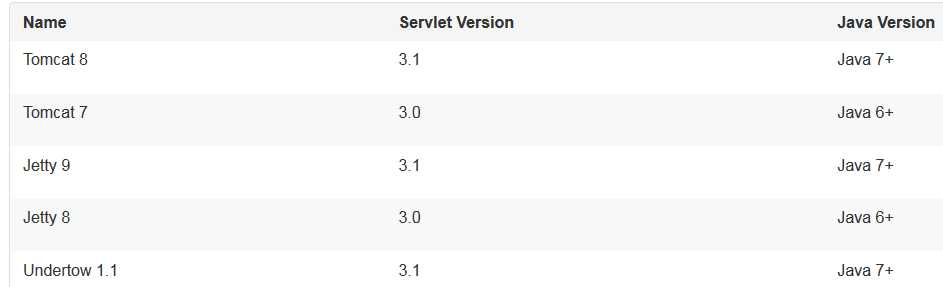
也可以将springboot程序部署到所有支持servlet3.0以上的容器
#开发第一个springboot应用 HelloWorld
我这里用的MyEclipse10 java 6 maven 3.2.3 tomcat 7.0.55
新建web project 并添加maven支持。

next之后后面要选择javaee 6.0的library 记住不要选上,因为里面的slf4j会跟springboot自带的产生冲突。
#配置pom.xml
配置pom的时候碰到了很多问题。这里提醒大家一下:
|
1
2
3
4
5
6
7
8
9
10
11
12
13
14
15
16
17
18
19
20
21
22
23
24
25
26
27
28
29
30
31
32
33
34
35
36
37
38
39
40
41
|
<project xmlns="http://maven.apache.org/POM/4.0.0" xmlns:xsi="http://www.w3.org/2001/XMLSchema-instance" xsi:schemaLocation="http://maven.apache.org/POM/4.0.0 http://maven.apache.org/xsd/maven-4.0.0.xsd"> <modelVersion>4.0.0</modelVersion> <groupId>springboot</groupId> <artifactId>springboot</artifactId> <version>0.0.1-SNAPSHOT</version> <packaging>war</packaging> <name>springboot</name> <description /> <properties> <project.build.sourceEncoding>UTF-8</project.build.sourceEncoding> <!-- 这里一定要配置上java的版本,如果是1.7版本的可不用配置 --> <java.version>1.6</java.version> <!-- 配置你的tomcat版本 --> <tomcat.version>7.0.55</tomcat.version> </properties> <build> <plugins> <!--如果是通过parent方式继承spring-boot-starter-parent则不用此插件 <plugin> <groupId>org.springframework.boot</groupId> <artifactId>spring-boot-maven-plugin</artifactId> </plugin> --> </plugins> </build> <!-- 父依赖 --> <parent> <groupId>org.springframework.boot</groupId> <artifactId>spring-boot-starter-parent</artifactId> <version>1.2.2.RELEASE</version> </parent> <dependencies> <dependency> <!-- 导入jar包 --> <groupId>org.springframework.boot</groupId> <artifactId>spring-boot-starter-web</artifactId> </dependency> </dependencies></project> |
1. springboot 的logback-classes-1.1.2.jar的包下有一个org.slf4j.impl包 这是springboot真正需要的包而MyEclipse自带的javaEE6.0library里也有一个slf4j包但它不是springboot所需要的,会一直报
NoSuchMethod异常getSingleton()。搞了半天才找到,所以一开始暂时不添加javaEE6.0Library。
2.这里教大家一个快速找到class文件真正所处包的方法。
当无法确定某个类属于哪个包是 可以通过Test.class.getProtectionDomain();来查看
例如:发生noSuchMethod异常时,但是确实有该方法,一般就是重复加载了jar包。
3.官方文档的例子都是用java7运行的。不配置<java.version>1.6</java.version>的话可能 会报版本异常的错误。具体是啥忘了 类似mirro.minor什么51.0的 50表示jdk1.6 51是jdk1.7
4.如果也不配置tomcat版本的话springboot默认会使用8.x版本的tomcat。所以要加一个
<tomcat.version>7.0.55</tomcat.version>来指定你所使用的tomcat版本(视你CATALINA_HOME配 置的所定)。
#编写java代码
|
1
2
3
4
5
6
7
8
9
10
11
12
13
14
15
16
17
18
19
20
21
|
package com.i.springboot.controller;import org.springframework.boot.SpringApplication;import org.springframework.boot.autoconfigure.EnableAutoConfiguration;import org.springframework.web.bind.annotation.RequestMapping;import org.springframework.web.bind.annotation.RestController;@RestController@EnableAutoConfigurationpublic class FirstController { @RequestMapping(value="/")//是springmvc中的注解 String home(){ return "helloworld"; } public static void main(String[] args) throws Exception { SpringApplication.run(FirstController.class, args); } } |
@EnableAutoConfiguration注解用来自动配置,我们pom中配置了 spring-boot-starter-web所以spring会来创建一
个web应用来配置程序
完成后运行main程序无报错则运行成功。在浏览器输入相应的路径即可获得@RequestMapping返回的数据。
4 . 一个标准的springboot程序结构应该是什么样?
1. spring通常建议我们将main方法所在的类放到一个root包下,@EnableAutoConfiguration(开启自动配置)注解通常都放到main所在类的上面,下面是一个典型的结构布局,供参考
com

 +- example

     +- myproject

         +- Application.java//main方法所在类在最底层

         |

         +- bean            //bean类

         |   +- Customer.java

         |   +- CustomerRepository.java

         |

         +- service         //service层

         |   +- CustomerService.java

         |

         +- web             //controller层

             +- CustomerController.java
从整体看去跟我们平时的布局差不多,就是将main方法放到了最底层。
这样@EnableAutoConfiguration可以从逐层的往下搜索各个加注解的类,例如,你正在编写一个JPA程序(如果你的pom里进行了配置的话),spring会自动去搜索加了@Entity注解的类,并进行调用。
通常我们只需要一个@EnableAutoConfiguration类
2. spring通常建议我们在进行配置的时候尽量使用@注解的方式,尽管现在网上有各种各样成熟的xml配置方式,如果你实在不想用注解(我目前还不会怎么用注解配置。。。)可以通过@ImportResource方式导入xml文件。
下面是一个加载xml文件配置的例子(官方实例)。
|
1
2
3
4
5
6
7
8
9
10
11
12
13
14
15
16
17
18
19
20
21
22
23
24
25
26
27
28
|
import org.springframework.beans.factory.annotation.Autowired;import org.springframework.boot.CommandLineRunner;import org.springframework.boot.SpringApplication;import sample.xml.service.HelloWorldService;public class SampleSpringXmlApplication implements CommandLineRunner { @Autowired private HelloWorldService helloWorldService; @Override public void run(String... args) { System.out.println(this.helloWorldService.getHelloMessage()); } public static void main(String[] args) throws Exception { //run的时候加载xml的配置 SpringApplication.run("classpath:/META-INF/application-context.xml", args); }}<!-- xml中与我们平时见到的一样。 --><?xml version="1.0" encoding="UTF-8"?><beans xmlns="http://www.springframework.org/schema/beans" xmlns:xsi="http://www.w3.org/2001/XMLSchema-instance" xmlns:context="http://www.springframework.org/schema/context" xsi:schemaLocation="http://www.springframework.org/schema/beans http://www.springframework.org/schema/beans/spring-beans.xsd http://www.springframework.org/schema/context http://www.springframework.org/schema/context/spring-context.xsd"> <context:annotation-config/> <context:property-placeholder/> <bean id="helloService" class="sample.xml.service.HelloWorldService"/> <bean id="application" class="sample.xml.SampleSpringXmlApplication"/></beans> |
3. 自动配置对程序没有影响,我们随时可以修改自己的配置来替代自动配置。例如,如果我们添加自己的数据源,那么spring默认的将不再使用。如果你一定要消除某些特定配置可以这样来,如下所示:
import org.springframework.boot.autoconfigure.*;

import org.springframework.boot.autoconfigure.jdbc.*;

import org.springframework.context.annotation.*;

@Configuration

@EnableAutoConfiguration(exclude={DataSourceAutoConfiguration.class})

public class MyConfiguration {

}
4. 使用@SpringbootApplication注解 可以解决根类或者配置类(我自己的说法,就是main所在类)头上注解过多的问题,一个@SpringbootApplication相当于@Configuration,@EnableAutoConfiguration和 @ComponentScan 并具有他们的默认属性值。
package com.example.myproject;

import org.springframework.boot.SpringApplication;

import org.springframework.boot.autoconfigure.SpringBootApplication;

@SpringBootApplication //等同于 @Configuration @EnableAutoConfiguration @ComponentScanpublic

class Application {

    public static void main(String[] args) {

        SpringApplication.run(Application.class, args);

    }

}
5. springboot功能全解.
1.SpringApplication 程序入口
SpringApplication.run(MySpringConfiguration.class,
args);
2.自定义打印项(就是控制台输出内容)
在classpath下加入banner.txt 来定义程序启动时要输出的内容,例如我这样

banner的变量:
|
Variable |
Description |
|
${application.version} |
MANIFEST.MF中的版本号例如1.0 |
|
${application.formatted-version} |
格式化后的版本号,就是加了个V,例如V1.0… |
|
${spring-boot.version} |
springboot版本号,例如1.2.2.RELEASE. |
|
${spring-boot.formatted-version} |
格式化后的Springboot版本号,例如V1.2.2.RELEASE……… |
3. 自定义SpringApplication
可以自定义一些应用的配置,如下关闭banner输出:
public static void main(String[] args) {

    SpringApplication app = new SpringApplication(MySpringConfiguration.class);

    app.setShowBanner(false);

    app.run(args);

}
SpringApplication的一些方法:

SpringApplication的构造器参数往往是一个类.class,而这个类一定是加有@Configuration注解的,另外还可以换成xml的配置路径哦,前面有写出来过,SpringApplication.run("classpath:/META-INF/application-context.xml",args);
4. 流畅的创建API
通过SpringApplicationBuilder构建

    new SpringApplicationBuilder()

    .showBanner(false)

    .sources(Parent.class)

    .child(Application.class)

    .run(args);
5. 程序的事件和监听
除了通常的Spring框架的事件,如ContextRefreshedEvent
SpringApplication发送一些额外的应用程序事件。触发一些事件实际上是ApplicationContext之前创建。
除了一些常见的spring时间,像ContextRefreshedEvent
SpringApplication会产生一些额外的事件,某些事件甚至会再ApplicationContext创建之间触发。你可以通过很多方式创建监听器,一般最常用的就是如下:
|
1
2
3
4
5
6
7
8
9
10
11
12
13
14
15
16
|
public static void main(String[] args) throws Exception { SpringApplication app = new SpringApplication(FirstController.class); app.addListeners(new TestListener()); app.run(args);}付一个自定义的listener。import org.springframework.boot.context.event.ApplicationStartedEvent;import org.springframework.context.ApplicationListener;public class TestListener implements ApplicationListener<ApplicationStartedEvent>{ @Override public void onApplicationEvent(ApplicationStartedEvent event) { /*do something*/ }} |
程序事件运行顺序:
An ApplicationStartedEvent is sent at the start of a run, but before any processing except the registration of listeners and initializers.
An ApplicationEnvironmentPreparedEvent is sent when the Environment to be used in the context is known, but before the context is created.
An ApplicationPreparedEvent is sent just before the refresh is started, but after bean definitions have been loaded.
An ApplicationFailedEvent is sent if there is an exception on startup.
springboot 开发入门,及问题汇总的更多相关文章
- SpringBoot开发快速入门
SpringBoot开发快速入门 目录 一.Spring Boot 入门 1.Spring Boot 简介 2.微服务 3.环境准备 1.maven设置: 2.IDEA设置 4.Spring Boot ...
- SpringBoot开发二十-Redis入门以及Spring整合Redis
安装 Redis,熟悉 Redis 的命令以及整合Redis,在Spring 中使用Redis. 代码实现 Redis 内置了 16 个库,索引是 0-15 ,默认选择第 0 个 Redis 的常用命 ...
- 深入浅出!springboot从入门到精通,实战开发全套教程!
前言 之前一直有粉丝想让我出一套springboot实战开发的教程,我这边总结了很久资料和经验,在最近总算把这套教程的大纲和内容初步总结完毕了,这份教程从springboot的入门到精通全部涵盖在内, ...
- Java开发学习(三十五)----SpringBoot快速入门及起步依赖解析
一.SpringBoot简介 SpringBoot 是由 Pivotal 团队提供的全新框架,其设计目的是用来简化 Spring 应用的初始搭建以及开发过程. 使用了 Spring 框架后已经简化了我 ...
- 移动H5开发入门知识,CSS的单位汇总与用法
说到css的单位,大家应该首先想到的是px,也就是像素,我们在网页布局中一般都是用px,但是近年来自适应网页布局越来越多,em和百分比也经常用到了.然后随着手机的流行,web app和hybrid a ...
- H5移动端开发入门知识以及CSS的单位汇总与用法
说到css的单位,大家应该首先想到的是px,也就是像素,我们在网页布局中一般都是用px,但是近年来自适应网页布局越来越多,em和百分比也经常用到了.然后随着手机的流行,web app和hybrid a ...
- BITED-Windows8应用开发学习札记之一:Win8应用开发入门
基于WinRT的Metro应用是我对Windows8的第一印象,简洁方块配以简单色调真的有沁人心脾的美感. 非常幸运,BITED在这个暑假的这个小学期里有幸学习到一门课程:软件工程基础实践,老师邀请了 ...
- SpringData 基于SpringBoot快速入门
SpringData 基于SpringBoot快速入门 本章通过学习SpringData 和SpringBoot 相关知识将面向服务架构(SOA)的单点登录系统(SSO)需要的代码实现.这样可以从实战 ...
- [转载]HTML5开发入门经典教程和案例合集(含视频教程)
http://www.iteye.com/topic/1132555 HTML5作为下一代网页语言,对Web开发者而言,是一门必修课.本文档收集了多个HTML5经典技术文档(HTML5入门资料.经典) ...
随机推荐
- 微信红包API接口(PHP)
根据微信高级红包接口,开发PHP版本的API接口,现在进行主要代码分析. 红包接口调用请求代码,所有请求参数为必填参数与文档对应: class Wxapi { private $app_id = 'w ...
- 《算法导论》读书笔记之图论算法—Dijkstra 算法求最短路径
自从打ACM以来也算是用Dijkstra算法来求最短路径了好久,现在就写一篇博客来介绍一下这个算法吧 :) Dijkstra(迪杰斯特拉)算法是典型的最短路径路由算法,用于计算一个节点到其他所有节点的 ...
- 观django-messages包笔记
django_messages是一个提供注册用户之间互相发送消息的django app.最近在研究其实现机制,安装测试非常容易,导入包,配好url以及syncdb生成数据库即可使用. 一.收获一: 我 ...
- HTML 5 Web Storage 使用
在html中,可以使用 Web Storage API 来保存数据在浏览器客户端,这样可以避免重复从服务器加载数据. 有两种API, sessionStorage 和 localStorage ,它们 ...
- docker学习笔记11:Dockerfile 指令 CMD介绍
我们知道,通过docker run 创建并启动一个容器时,命令的最后可以指定容器启动后在容器内立即要执行的指令,如: docker run -i -t ubunu /bin/bash //表示容器 ...
- 非确定有限状态自动机的构建(二)——将CharVal转换为NFA
保留版权,转载注明出处:潘军彪的个人博客(http://blog.csdn.net/panjunbiao/article/details/9378933) 将上下文无关文法读入内存之后,可以将它转换成 ...
- Android:创建可穿戴应用 - 安装和依赖管理
安装可穿戴应用 在开发时,你能够像一般移动应用一样直接把应用安装到可穿戴设备中. 使用adb install或者 Android Studio上的Play button. 当你准备好要公布时,你须要把 ...
- Objective-C KVC 自己主动转换类型研究
## Objective-C KVC 自己主动转换类型研究 apple非常厚道,kvc的时候帮我们做了一些类型转换,规律贴出来,给大伙參考參考 @interface Entity : NSObject ...
- MVC整个样例的源代码
以下就是整MVC样例的源代码: #windows应用程序 #开发者:蔡军生(QQ:9073204) 深圳 2014-9-24 #使用类来描写叙述 from ctypes import * from c ...
- java socket线程通信
关于socket线程通信的一些知识整理 一般我们需要要让两台机子进行通信,需要创建一个Server 类,一个Client类,还需要创建一个线程类 server public class Server ...