
4.1/4.2 多线程进阶篇<上>(Pthread & NSThread)
本文并非最终版本,如有更新或更正会第一时间置顶,联系方式详见文末
本文源码 Demo 详见 Github
https://github.com/shorfng/iOS-4.0-multithreading.git
因为Pthread很少用到,所以对于Pthread的知识没有抠那么细致,所以将Pthread和 NSThread放在了一起。
4.1 Pthread
4.1-1.0 创建线程 - pthread_create
 /*

 <#pthread_t *restrict#>  线程的id,指向线程标识符的指针,C 语言中类型的结尾通常 _t/Ref,而且不需要使用 *

 <#const pthread_attr_t *restrict#> 用来设置线程的属性 (一般为 NULL)

 <#void *(*)(void *)#>  新建立的线程执行代码的函数,线程开启后需要调用的函数或方法 (指向函数的指针)

 <#void *restrict#>     运行函数的参数,线程的限制 (一般为 NULL)

 */

 返回值:

  - 若线程创建成功,则返回0

  - 若线程创建失败,则返回出错编号

 pthread_create(

           <#pthread_t *restrict#>,   // pthread_t :线程标识符.

           <#const pthread_attr_t *restrict#>,

           <#void *(*)(void *)#>,

           <#void *restrict#>

 );
4.1-1.1 __bridge 桥接
|
1、在c语言和OC之间,对数据类型进行转成换
2、通过桥接告诉c语言的函数,name就由C语言去管了
|
|
桥接的目的 :
就是为了告诉编译器如何管理内存,为OC添加自动内存管理操作
|
number = 1: 表示 主线程
number != 1: 表示 子线程
C语言中 void * == OC中的id
C语言的数据类型,一般以 Ref / _t
|
|
 首先导入头文件

 #import <pthread.h>

 代码创建:

 // 创建线程,并且在线程中执行 demo 函数

 - (void)pthreadDemo {

   pthread_t threadId = NULL;

   NSString *str = @"Hello Pthread";

   int result = pthread_create(&threadId, NULL, demo, (__bridge void *)(str));

   if (result == ) {

     NSLog(@"创建线程 OK");

   } else {

     NSLog(@"创建线程失败 %d", result);

   }

 }

 // 后台线程调用函数

 void *demo(void *params) {

   NSString *str = (__bridge NSString *)(params);

   NSLog(@"%@ - %@", [NSThread currentThread], str);

   return NULL;

 }
4.2 NSThread
4.2-1.0 创建线程
|
 创建方式1 : 通过NSThread的对象方法 (先创建初始化线程alloc/init , 再 start 开启线程)   ——调试方便

 NSThread *thread = [[NSThread alloc]initWithTarget:<#(nonnull id)#>

                                           selector:<#(nonnull SEL)#>

                                             object:<#(nullable id)#> ];
 #import "ViewController.h"

 @interface ViewController ()

 @end

 @implementation ViewController

 - (void)viewDidLoad {

   [super viewDidLoad];

   // Do any additional setup after loading the view, typically from a nib.

 }

 - (void)touchesBegan:(NSSet *)touches withEvent:(UIEvent *)event {

   [self threadDemo1];

 }

 #pragma mark - 对象方法alloc/init

 /*

  - 在 OC 中,任何一个方法的代码都是从上向下顺序执行的

  - 同一个方法内的代码,都是在相同线程执行的(block除外)

  */

 - (void)threadDemo1 {

   NSLog(@"before %@", [NSThread currentThread]);

   // 线程一启动,就会在线程thread中执行self的run方法

   NSThread *thread = [[NSThread alloc] initWithTarget:self

                                              selector:@selector(longOperation:)

                                                object:@"THREAD"];

   //开启线程,通过start方法,就会将我们创建出来的当前线程加入到`可调度线程池`,供CPU调度

   //[thread start];执行后,会在另外一个线程执行 longOperation: 方法

   [thread start];

   NSLog(@"after %@", [NSThread currentThread]);

 }

 - (void)longOperation:(id)obj {

   NSLog(@"%@ - %@", [NSThread currentThread], obj);

 }

 - (void)didReceiveMemoryWarning {

   [super didReceiveMemoryWarning];

   // Dispose of any resources that can be recreated.

 }

 @end
打印结果:

2016-03-17 18:19:41.878 创建线程1 - 对象方法[2543:387435] before <NSThread: 0x7ffd28c00ca0>{number = 1, name = main}

2016-03-17 18:19:41.880 创建线程1 - 对象方法[2543:387711] <NSThread: 0x7ffd28d77be0>{number = 2, name = (null)} - THREAD

2016-03-17 18:19:41.880 创建线程1 - 对象方法[2543:387435] after <NSThread: 0x7ffd28c00ca0>{number = 1, name = main}
4.2-1.1.1 Target
 NSThread *thread = [[NSThread alloc] initWithTarget:self.person

                                            selector:@selector(longOperation:)

                                              object:@"THREAD"];

 [thread start];
- 通过指定不同的 target 会在后台线程执行该对象的 @selector 方法
- 不要看见 target 就写 self
 创建方式2 : 通过NSThread的类方法 (创建线程后直接自动启动线程)

 [NSThread detachNewThreadSelector:<#(nonnull SEL)#>

                          toTarget:<#(nonnull id)#>

                        withObject:<#(nullable id)#> ];
 #import "ViewController.h"

 @interface ViewController ()

 @end

 @implementation ViewController

 - (void)viewDidLoad {

   [super viewDidLoad];

   // Do any additional setup after loading the view, typically from a nib.

 }

 - (void)touchesBegan:(NSSet *)touches withEvent:(UIEvent *)event {

   [self threadDemo2];

 }

 #pragma mark - 类方法

 - (void)threadDemo2 {

   NSLog(@"before %@", [NSThread currentThread]);

   // detachNewThreadSelector 类方法不需要启动,会自动创建线程并执行@selector方法

   // 它会自动给我们做两件事 :  1.创建线程对象  2.添加到`可调度线程池`

   // 通过NSThread的类和NSObject的分类方法直接加入到可调度线程池里面去,等待CPU调度

   [NSThread detachNewThreadSelector:@selector(longOperation:)

                            toTarget:self

                          withObject:@"DETACH"];

   NSLog(@"after %@", [NSThread currentThread]);

 }

 - (void)longOperation:(id)obj {

   NSLog(@"%@ - %@", [NSThread currentThread], obj);

 }

 - (void)didReceiveMemoryWarning {

   [super didReceiveMemoryWarning];

   // Dispose of any resources that can be recreated.

 }

 @end
打印结果:

2016-03-17 18:36:05.339 创建线程2 - 类方法[2647:404930] before <NSThread: 0x7fddf8f01eb0>{number = 1, name = main}

2016-03-17 18:36:05.340 创建线程2 - 类方法[2647:404930] after <NSThread: 0x7fddf8f01eb0>{number = 1, name = main}

2016-03-17 18:36:05.340 创建 线程2 - 类方法[2647:405061] <NSThread: 0x7fddf8e0e7a0>{number = 2, name = (null)} - DETACH
4.2-1.3 创建线程3 - 分类方法(NSObject)
 创建方式3 : 通过NSObject的分类方法  (隐式创建并直接自动启动线程)   ——推荐,开发常用

 // 此方法在后台线程中执行 (即是 : 在子线程中执行)

 [self performSelectorInBackground:<#(nonnull SEL) #>

                        withObject:<#(nullable id) #> per];
 #import "ViewController.h"

 @interface ViewController ()

 @end

 @implementation ViewController

 - (void)viewDidLoad {

   [super viewDidLoad];

   // Do any additional setup after loading the view, typically from a nib.

 }

 - (void)touchesBegan:(NSSet *)touches withEvent:(UIEvent *)event {

   [self threadDemo3];

 }

 #pragma mark - 分类方法

 - (void)threadDemo3 {

   NSLog(@"before %@", [NSThread currentThread]);

   // performSelectorInBackground 是NSObject的分类方法,会自动在后台线程执行@selector方法

   // 没有 thread 字眼,隐式创建并启动线程

   // 所有 NSObject 都可以使用此方法,在其他线程执行方法

   // 通过NSThread的类和NSObject的分类方法直接加入到可调度线程池里面去,等待CPU调度

   // PerformSelectorInBackground 可以让方便地在后台线程执行任意NSObject对象的方法

   [self performSelectorInBackground:@selector(longOperation:)

                          withObject:@"PERFORM"];

   NSLog(@"after %@", [NSThread currentThread]);

 }

 - (void)longOperation:(id)obj {

   NSLog(@"%@ - %@", [NSThread currentThread], obj);

 }

 - (void)didReceiveMemoryWarning {

   [super didReceiveMemoryWarning];

   // Dispose of any resources that can be recreated.

 }

 @end
打印结果:

2016-03-17 18:41:58.696 创建线程3 - 分类方法[2711:412522] before <NSThread: 0x7ff078c02320>{number = 1, name = main}

2016-03-17 18:41:58.696 创建线程3 - 分类方法[2711:412522] after <NSThread: 0x7ff078c02320>{number = 1, name = main}

2016-03-17 18:41:58.697 创建线程3 - 分类方法[2711:412751] <NSThread: 0x7ff078c0e390>{number = 2, name = (null)} - PERFORM
| 方式2和方式3的优缺点 : |
|
优点:简单快捷
缺点:无法对线程进行更详细的设置
|
4.2-2.0 线程属性
 主线程相关方法 :

 + (NSThread *)mainThread; // 获得主线程

 - (BOOL)isMainThread; // 是否为主线程

 + (BOOL)isMainThread; // 是否为主线程

 NSThread *main = [NSThread mainThread];   // + (NSThread *)mainThread;  获得主线程

 [NSThread  isMainThread]; //  + (BOOL)isMainThread;    类方法判断,该方法是否为主线程

 [main isMainThread];      //  - (BOOL)isMainThread;   对象方法判断,该对象是否为主线程
 其他用法:

 () currentThread - 获得当前线程 :

 举例 :

 NSThread *current = [NSThread currentThread]; //获得当前线程

 () threadPriority - 线程的调度优先级 :

 优先级,是一个浮点数,取值范围从 ~1.0 默认优先级是0. 值越大,优先级越高

 优先级高只是保证 CPU 调度的可能性会高

 建议:在开发的时候,不要修改优先级

 多线程的目的:是将耗时的操作放在后台,不阻塞主线程和用户的交互!

 多线程开发的原则:简单

 //返回当前方法所在线程的优先级

 + (double)threadPriority;

 举例:[NSThread threadPriority];

 //设置线程的优先级

 + (BOOL)setThreadPriority:(double)p;

 举例:self.thread1.threadPriority = 1.0;

 - (double)threadPriority;//返回当前方法所在线程的优先级

 - (BOOL)setThreadPriority:(double)p;//设置线程的优先级

 () name - 线程的名字 : 在大的商业项目中,通常需要在程序崩溃时,获取程序准确执行所在的线程

 - (void)setName:(NSString *)n;   //set 方法

 - (NSString *)name;              //get 方法

 举例:

 thread.name = @"线程A";

 () stackSize - 栈区大小

 - 默认情况下,无论是主线程还是子线程,栈区大小都是 512K

 - 栈区大小虽然可以设置,但是我们一般都使用系统默认的大小就行了

 举例:

 [NSThread currentThread].stackSize =  * ;
代码示例:
 // 线程属性

 - (void)threadProperty {

   NSThread *t1 = [[NSThread alloc] initWithTarget:self

                                          selector:@selector(demo)

                                            object:nil];

   // 1. 线程名称

   t1.name = @"Thread AAA";

   // 2. 优先级

   t1.threadPriority = ;

   [t1 start];

   NSThread *t2 = [[NSThread alloc] initWithTarget:self

                                          selector:@selector(demo)

                                            object:nil];

   // 1. 线程名称

   t2.name = @"Thread BBB";

   // 2. 优先级

   t2.threadPriority = ;

   [t2 start];

 }

 - (void)demo {

   for (int i = ; i < ; ++i) {

     // 堆栈大小

     NSLog(@"%@ 堆栈大小:%tuK", [NSThread currentThread],[NSThread currentThread].stackSize / );

   }

    // 模拟崩溃

    // 判断是否是主线程

       if (![NSThread currentThread].isMainThread) {

           NSMutableArray *a = [NSMutableArray array];

           [a addObject:nil];

       }

 }
4.2-3.0 线程状态/线程生命周期
|
|
线程开启 : 线程进入可调度线程池
|
|
|
 方法执行过程,符合某一条件时,可以利用 sleep 方法让线程进入 阻塞 状态

 sleepForTimeInterval:    //休眠指定时长    (从现在起睡多少秒)

 sleepUntilDate:          //休眠到指定日期 (从现在起睡到指定的日期)

 @synchronized(self) { }   //互斥锁

 ()阻塞2秒

 [NSThread sleepForTimeInterval:]; // 阻塞状态

 ()以当前时间为基准阻塞4秒

 NSDate *date = [NSDate dateWithTimeIntervalSinceNow:4.0]; //从现在开始多少秒

 [NSThread sleepUntilDate:date];  //睡眠多少秒
|
(1) 正常死亡
(2) 非正常死亡
注意:在终止线程之前,应该注意释放之前分配的对象!
|
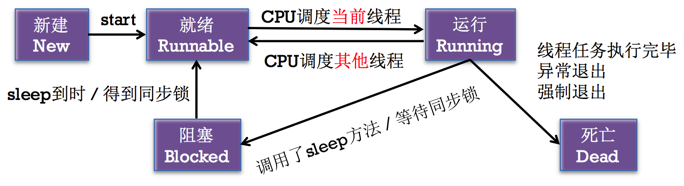
 #import "ViewController.h"

 @interface ViewController ()

 @end

 @implementation ViewController

 - (void)viewDidLoad {

   [super viewDidLoad];

   // Do any additional setup after loading the view, typically from a nib.

 }

 - (void)touchesBegan:(NSSet *)touches withEvent:(UIEvent *)event {

   // 1.在主线程中创建一个子线程(实例化线程对象) ---> 新建状态

   NSThread *Th =

       [[NSThread alloc] initWithTarget:self selector:@selector(run) object:nil];

   // 2.将 Th 线程加入到可调度线程池,等待CPU调度--->就绪状态

   [Th start];

   // 3.让主线程阻塞,让当前线程(主线程)休眠

   [NSThread sleepForTimeInterval:1.0];

   // 4.在主线程给 Th 线程打死亡标签

   [Th cancel]; //只是打了个标签,并没有执行,需要在子线程中

 }

 // Th 线程---> 运行状态

 - (void)run {

   NSThread *huThread = [NSThread currentThread];

   CGMutablePathRef path = CGPathCreateMutable();

   for (int i = ; i < ; i++) {

     if ([huThread isCancelled]) {

       NSLog(@"good bye1");

       return; // --->非正常死亡(被逼着死亡)

     }

     if (i == ) {

       [NSThread sleepForTimeInterval:3.0]; //--->huThread阻塞状态3秒

       // [NSThread sleepUntilDate:[NSDate distantFuture]]; // 睡到遥远的未来

       // [NSThread sleepUntilDate:[NSDate dateWithTimeIntervalSinceNow:2]]; //线程睡到从现在开始后的2秒为止

     }

     if ([huThread isCancelled]) {

       NSLog(@"good bye2");

       return;

     }

     if (i == ) {

       //清空资源

       CGPathRelease(path);

       //在调用下面方法之前,必须清空资源  非正常死亡--自杀(退出线程)

       [NSThread exit];

     }

     if ([huThread isCancelled]) {

       NSLog(@"good bye3");

       return;

     }

     NSLog(@"%d", i);

   }

 } //--->huThread死亡状态  (正常死亡状态)

 - (void)didReceiveMemoryWarning {

   [super didReceiveMemoryWarning];

   // Dispose of any resources that can be recreated.

 }

 @end
4.2-4.1 多线程安全隐患 - 资源共享/抢夺
|
(1) 起因 :
资源共享概念 : 1块资源可能会被多个线程共享,也就是多个线程可能会访问同一块资源
主要是因为多条线程,对`同一资源同时操作`,导致的问题
|
| (2) 举例 : 比如多个线程访问同一个对象、同一个变量、同一个文件 |
| (3) 结果 : 当多个线程访问同一块资源时,很容易引发数据错乱和数据安全问题 (资源强夺) |
| (4) 解决方案 : 互斥锁 / 同步锁 |
|
多线程开发的复杂度相对较高,在开发时可以按照以下套路编写代码:
|
 #import "ViewController.h"

 @interface ViewController ()

 @property(nonatomic, strong) NSThread *thread01; // 售票员01

 @property(nonatomic, strong) NSThread *thread02; // 售票员02

 @property(nonatomic, strong) NSThread *thread03; // 售票员03

 @property(nonatomic, assign) NSInteger ticketCount; //票的总数

 @end

 @implementation ViewController

 - (void)viewDidLoad {

   [super viewDidLoad];

   // Do any additional setup after loading the view, typically from a nib.

   self.ticketCount = ;

   //创建线程

   self.thread01 = [[NSThread alloc] initWithTarget:self

                                           selector:@selector(saleTicket)

                                             object:nil];

   self.thread01.name = @"售票员01";

   self.thread02 = [[NSThread alloc] initWithTarget:self

                                           selector:@selector(saleTicket)

                                             object:nil];

   self.thread02.name = @"售票员02";

   self.thread03 = [[NSThread alloc] initWithTarget:self

                                           selector:@selector(saleTicket)

                                             object:nil];

   self.thread03.name = @"售票员03";

 }

 // 开启线程

 - (void)touchesBegan:(NSSet *)touches withEvent:(UIEvent *)event {

   [self.thread01 start];

   [self.thread02 start];

   [self.thread03 start];

 }

 // 卖票

 - (void)saleTicket {

   while () {

     @synchronized(self) { //互斥锁(控制器做锁对象)

       // 先取出总数

       NSInteger count = self.ticketCount;

       // 判断还有没有余票

       if (count > ) {

         self.ticketCount = count - ;

         NSLog(@"%@卖了一张票,还剩下%zd张", [NSThread currentThread].name,

               self.ticketCount);

       } else {

         NSLog(@"票已经卖完了");

         break;

       }

     }

   }

 }

 - (void)didReceiveMemoryWarning {

   [super didReceiveMemoryWarning];

   // Dispose of any resources that can be recreated.

 }

 @end
打印结果:

2016-03-17 19:37:27.429 线程安全[3386:472835] 售票员02卖了一张票,还剩下9张

2016-03-17 19:37:27.430 线程安全[3386:472836] 售票员03卖了一张票,还剩下8张

2016-03-17 19:37:27.430 线程安全[3386:472834] 售票员01卖了一张票,还剩下7张

2016-03-17 19:37:27.430 线程安全[3386:472835] 售票员02卖了一张票,还剩下6张

2016-03-17 19:37:27.430 线程安全[3386:472836] 售票员03卖了一张票,还剩下5张

2016-03-17 19:37:27.430 线程安全[3386:472834] 售票员01卖了一张票,还剩下4张

2016-03-17 19:37:27.431 线程安全[3386:472835] 售票员02卖了一张票,还剩下3张

2016-03-17 19:37:27.431 线程安全[3386:472836] 售票员03卖了一张票,还剩下2张

2016-03-17 19:37:27.431 线程安全[3386:472834] 售票员01卖了一张票,还剩下1张

2016-03-17 19:37:27.431 线程安全[3386:472835] 售票员02卖了一张票,还剩下0张

2016-03-17 19:37:27.432 线程安全[3386:472836] 票已经卖完了

2016-03-17 19:37:27.434 线程安全[3386:472834] 票已经卖完了

2016-03-17 19:37:27.434 线程安全[3386:472835] 票已经卖完了
4.2-4.2 安全隐患解决 – 互斥锁 / 同步锁
| 概念:多条线程按顺序地执行任务 |
| 引申 : 互斥锁,就是使用了线程同步技术 |
 //锁对象为能够加锁的任意 NSObject 对象

 //锁对象一定要保证所有的线程都能够访问

 //如果代码中只有一个地方需要加锁,大多都使用self,这样可以避免单独再创建一个锁对象

 @synchronized(锁对象) {

     //需要锁定的代码

 }
|
注意:
|
| 多条线程抢夺同一块资源 |
| 优点:能有效防止因多线程抢夺资源造成的数据安全问题 , 能保证数据的准确性 |
| 缺点:需要消耗大量的CPU资源 , 可能会导致执行速度变慢 |
| (默认) atomic | 原子属性 | 为setter方法加锁 | 线程安全,需要消耗大量的资源 |
| (推荐) nonatomic | 非原子属性 | 不会为setter方法加锁 | 非线程安全,适合内存小的移动设备 |
 @property (assign, atomic) int age;

 - (void)setAge:(int)age

 {

     @synchronized(self) {

         _age = age;

     }

 }
iOS开发的建议:
|
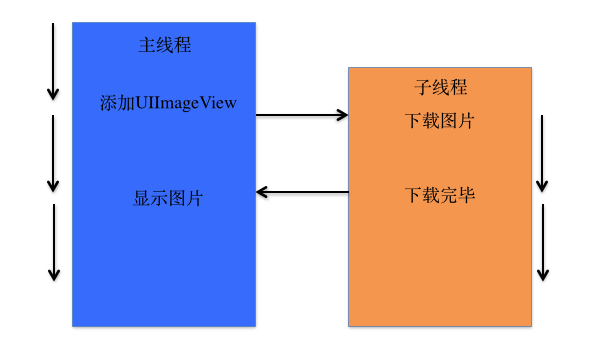
| 概念 : 在1个进程中,线程往往不是孤立存在的,多个线程之间需要经常进行通信 |
|
线程间通信的体现 :
|
 //在主线程执行操作 (从子线程回到主线程)(推荐)

 - (void)performSelectorOnMainThread:(SEL)aSelector

                          withObject:(id)arg

                       waitUntilDone:(BOOL)wait;

 - (void)performSelector:(SEL)aSelector

                onThread:(NSThread *)thr

              withObject:(id)arg

           waitUntilDone:(BOOL)wait;
另外一种线程之间的通信方式:NSPort(端口)
|
包括的子类:
(1)NSMessagePort;
(2)NSMachPort;
|
4.2-5.1 图片下载示例
 #import "ViewController.h"

 @interface ViewController ()

 @property(weak, nonatomic) IBOutlet UIImageView *imageView;

 @end

 @implementation ViewController

 - (void)viewDidLoad {

   [super viewDidLoad];

   // Do any additional setup after loading the view, typically from a nib.

 }

 - (void)touchesBegan:(NSSet *)touches withEvent:(UIEvent *)event {

   // 开启子线程(在子线程中调用download方法下载图片)

   [self performSelectorInBackground:@selector(download) withObject:nil];

 }

 #pragma mark - 图片下载

 - (void)download {

   // 1.图片的网络路径

   NSURL *url =

       [NSURL URLWithString:@"http://www.5068.com/u/faceimg/20140804114111.jpg"];

   // 2.下载图片并把图片转换为二进制的数据(耗时操作)

   NSData *data = [NSData dataWithContentsOfURL:url];

   // 3.生成图片(把数据转换成图片)

   UIImage *image = [UIImage imageWithData:data];

   // 4.回到主线程中设置图片

   // 方法1:

   [self.imageView

       performSelector:@selector(setImage:)

              onThread:[NSThread mainThread]

            withObject:image

         waitUntilDone:NO]; //是否等到@selector的方法完成后再往下执行,NO表示否

   //方法2:

   [self.imageView performSelectorOnMainThread:@selector(setImage:)

                                    withObject:image

                                 waitUntilDone:NO];

   // 方法3:代码一

   [self performSelectorOnMainThread:@selector(showImage:)

                          withObject:image

                       waitUntilDone:NO];

 }

 // 方法3:代码二

 - (void)showImage:(UIImage *)image {

   self.imageView.image = image; //设置显示图片

 }

 #pragma mark - 测试图片下载时间 方法1:NSDate

 - (void)download1 {

   // 1.图片的网络路径

   NSURL *url =

       [NSURL URLWithString:@"http://www.5068.com/u/faceimg/20140804114111.jpg"];

   NSDate *begin = [NSDate date]; //开始时间

   // 2.根据图片的网络路径去下载图片数据

   NSData *data = [NSData dataWithContentsOfURL:url];

   NSDate *end = [NSDate date]; //结束时间

   NSLog(@"%f", [end timeIntervalSinceDate:begin]); // 时间间隔 = 开始-结束

   // 3.显示图片

   self.imageView.image = [UIImage imageWithData:data];

 }

 #pragma mark - 测试图片下载时间 方法2:CFTimeInterval

 - (void)download2 {

   // 1.图片的网络路径

   NSURL *url =

       [NSURL URLWithString:@"http://www.5068.com/u/faceimg/20140804114111.jpg"];

   CFTimeInterval begin = CFAbsoluteTimeGetCurrent(); // 开始时间

   // 2.根据图片的网络路径去下载图片数据

   NSData *data = [NSData dataWithContentsOfURL:url];

   CFTimeInterval end = CFAbsoluteTimeGetCurrent(); //结束时间

   NSLog(@"%f", end - begin); // 时间间隔 = 开始-结束

   // 3.显示图片

   self.imageView.image = [UIImage imageWithData:data];

 }

 - (void)didReceiveMemoryWarning {

   [super didReceiveMemoryWarning];

   // Dispose of any resources that can be recreated.

 }

 @end
4.1/4.2 多线程进阶篇<上>(Pthread & NSThread)的更多相关文章
- 4.4 多线程进阶篇<下>(NSOperation)
本文并非最终版本,如有更新或更正会第一时间置顶,联系方式详见文末 如果觉得本文内容过长,请前往本人"简书" 本文源码 Demo 详见 Github https://github.c ...
- 4.3 多线程进阶篇<中>(GCD)
更正:队列名称的作用的图中,箭头标注的有些问题,已修正 本文并非最终版本,如有更新或更正会第一时间置顶,联系方式详见文末 如果觉得本文内容过长,请前往本人 “简书” 本文源码 Demo 详见 Gith ...
- JVM性能调优与实战进阶篇-上
ZGC 诞生原因 Java生态非常强大,但还不够,有些场景仍处于劣势,而ZGC的出现可以让Java语言抢占其他语言的某些特定领域市场.比如 谷歌主导的Android手机系统显示卡顿. 证券交易市场,实 ...
- java 网络编程(五)----TCP进阶篇上传文本文件
设计需求:从客户端上传txt文件到服务器,服务端收到文件后,发送消息给客户端接收完成. 1. 服务器端: public class UpLoadFileServer { public static v ...
- form表单那点事儿(下) 进阶篇
form表单那点事儿(下) 进阶篇 上一篇主要温习了一下form表单的属性和表单元素,这一片主要讲解用JavaScript如何操作form. 目录: 表单操作 取值 赋值 重置 校验 提交 技巧 不提 ...
- Java进阶篇(六)——Swing程序设计(上)
Swing是GUI(图形用户界面)开发工具包,内容有很多,这里会分块编写,但在进阶篇中只编写Swing中的基本要素,包括容器.组件和布局等,更深入的内容会在高级篇中出现.想深入学习的朋友们可查阅有关资 ...
- Visual Studio调试之断点进阶篇
Visual Studio调试之断点进阶篇 在上一篇文章Visual Studio调试之断点基础篇里面介绍了什么是断点,INT 是Intel系列CPU的一个指令,可以让程序产生一个中断或者异常.程序中 ...
- .NET进阶篇-丑话先说,Flag先立--致青春
作为开发者,工作了半年,也总觉得技术栈和刚毕业区别不大,用的技术还都是N年前的,每每看到新东西,也只心里哇塞惊叹一下,然后就回归于忙碌.怪自己的技术池太浅,热门的令人称奇的技术也都是在其他巨人的肩膀上 ...
- .NET进阶篇-丑话先说,Flag先立
作为开发者,工作了几年,也总觉得技术栈和刚毕业区别不大,用的技术还都是N年前的,每每看到新东西,也只心里哇塞惊叹一下,然后就回归于忙碌.怪自己的技术池太浅,热门的令人称奇的技术也都是在其他巨人的肩膀上 ...
随机推荐
- .NET深入实战系列--EF到底怎么写过滤条件
本文唯一访问地址:http://www.cnblogs.com/yubaolee/p/DynamicLinq.html 对于系统开发来说,按不同字段进行过滤查询是一种常见的需求.在EF中通常的做法是: ...
- 从scheduler is shutted down看程序员的英文水平
我有个windows服务程序,今天重点在测试系统逻辑.部署后,在看系统日志时,不经意看到一行:scheduler is shutted down. 2016-12-29 09:40:24.175 {& ...
- Android开发学习之路-LeakCanary使用
LeakCanary是一个内存泄漏检测库,它可以在我们的应用发生内存泄漏的时候发出提醒,提醒包括通知和Log.GitHub 这个库使用起来比较简单: ①添加依赖: dependencies { deb ...
- jQuery系列:DOM操作
1. 访问元素 在访问页面时,需要与页面中的元素进行交互式的操作.在操作中,元素的访问主要包括对元素属性.内容.值.CSS的操作. 1.1 元素属性操作 1.1.1 设置或返回被选元素的属性值 语法格 ...
- 【Python五篇慢慢弹(5)】类的继承案例解析,python相关知识延伸
类的继承案例解析,python相关知识延伸 作者:白宁超 2016年10月10日22:36:57 摘要:继<快速上手学python>一文之后,笔者又将python官方文档认真学习下.官方给 ...
- DotNet程序配置文件
在实际的项目开发中,对于项目的相关信息的配置较多,在.NET项目中,我们较多的将程序的相关配置直接存储的.config文件中,例如web.config和app.config. .NET中配置文件分为两 ...
- 新年抢红包效果(New Year Red Packet)
新年抢红包效果(New Year Red Packet) 晓娜的文章(微信公众号:migufe) 2016即将过去,我们将迎来新的一年2017,这里小编提前祝大家新年快乐!万事如意!那我们新年最开心的 ...
- [收藏]IntelliJ Idea快捷键
Alt+回车 导入包,自动修正 Ctrl+N 查找类 Ctrl+Shift+N 查找文件 Ctrl+Alt+L 格式化代码 Ctrl+Alt+O 优化导入的类和包 Alt+Insert 生成代码(如g ...
- [Quartz笔记]玩转定时调度
简介 Quartz是什么? Quartz是一个特性丰富的.开源的作业调度框架.它可以集成到任何Java应用. 使用它,你可以非常轻松的实现定时任务的调度执行. Quartz的应用场景 场景1:提醒和告 ...
- TeamCity : .NET Core 插件
笔者在<TeamCity : 配置 Build 过程>一文中提到 "TeamCity 内置支持几乎所有的 build 类型".在当今这个软件语言和各种框架飞速发展的时代 ...