kubernetes快速应用入门
kubectl 就是 api server的客户端工具
创建一个nginx的pod
[root@master ~]# kubectl run nginx-deploy --image=nginx:1.14-alpine --port=80 --replicas=1
kubectl run --generator=deployment/apps.v1 is DEPRECATED and will be removed in a future version. Use kubectl run --generator=run-pod/v1 or kubectl create instead.
deployment.apps/nginx-deploy created
查看pod状态
[root@master ~]# kubectl get deployment
NAME READY UP-TO-DATE AVAILABLE AGE
nginx-deploy 1/1 1 1 54s
[root@master ~]# kubectl get pods
NAME READY STATUS RESTARTS AGE
nginx-deploy-55d8d67cf-xdxcj 1/1 Running 0 85s
[root@master ~]# kubectl get pods -o wide
NAME READY STATUS RESTARTS AGE IP NODE NOMINATED NODE READINESS GATES
nginx-deploy-55d8d67cf-xdxcj 1/1 Running 0 2m4s 10.244.1.2 node1 <none> <none>
[root@node1 ~]# ifconfig
cni0: flags=4163<UP,BROADCAST,RUNNING,MULTICAST> mtu 1450
inet 10.244.1.1 netmask 255.255.255.0 broadcast 0.0.0.0
inet6 fe80::ac25:6fff:fe19:4a09 prefixlen 64 scopeid 0x20<link>
ether ae:25:6f:19:4a:09 txqueuelen 1000 (Ethernet)
RX packets 1 bytes 28 (28.0 B)
RX errors 0 dropped 0 overruns 0 frame 0
TX packets 8 bytes 656 (656.0 B)
TX errors 0 dropped 0 overruns 0 carrier 0 collisions 0
10.244.1.1这个网段是24位掩码,因此10.244.1都是网络地址,它是整个大网10.244.0.0/16位掩码的一个子网。这个子网专供node1上的pod使用。
node2上面的都是10.244.2.1开始。和node1不冲突。
[root@node2 ~]# curl 10.244.1.2
<!DOCTYPE html>
<html>
<head>
<title>Welcome to nginx!</title>
<style>
body {
width: 35em;
margin: 0 auto;
font-family: Tahoma, Verdana, Arial, sans-serif;
}
</style>
</head>
<body>
<h1>Welcome to nginx!</h1>
<p>If you see this page, the nginx web server is successfully installed and
working. Further configuration is required.</p>
<p>For online documentation and support please refer to
<a href="http://nginx.org/">nginx.org</a>.<br/>
Commercial support is available at
<a href="http://nginx.com/">nginx.com</a>.</p>
<p><em>Thank you for using nginx.</em></p>
</body>
</html>
这时说明nginx的pod已经运行起来了。
这时的nginx只能被集群内部访问,还没法对外,所以需要创建service层来代理。
[root@master ~]# kubectl expose deployment nginx-deploy --name=nginx --port=80 --target-port=80 --protocol=TCP
service/nginx exposed
把deployment控制器相关的pod资源都创建为一个服务nginx-deploy,而服务名字叫nignx ,服务的端口号为80,pod的端口号,TCP服务。默认用的是Cluster-IP
[root@master ~]# kubectl get svc (svc是services的简写)
NAME TYPE CLUSTER-IP EXTERNAL-IP PORT(S) AGE
kubernetes ClusterIP 10.96.0.1 <none> 443/TCP 3d
nginx ClusterIP 10.96.69.143 <none> 80/TCP 3m24s
nginx的CLUSTER-IP是动态生成的,10.96.69.143是10.96.0.0/12位掩码中的地址。暴露的地址是80端口。
[root@master ~]# curl 10.96.69.143
<!DOCTYPE html>
<html>
<head>
<title>Welcome to nginx!</title>
<style>
body {
width: 35em;
margin: 0 auto;
font-family: Tahoma, Verdana, Arial, sans-serif;
}
</style>
</head>
<body>
<h1>Welcome to nginx!</h1>
<p>If you see this page, the nginx web server is successfully installed and
working. Further configuration is required.</p>
<p>For online documentation and support please refer to
<a href="http://nginx.org/">nginx.org</a>.<br/>
Commercial support is available at
<a href="http://nginx.com/">nginx.com</a>.</p>
<p><em>Thank you for using nginx.</em></p>
</body>
</html>
这时候,访问service的地址就可以访问nginx了,依然在外部是访问不到的,因为创建service的时候用的是默认的CLUSTER-IP模式,是被集群内部pod客户端访问的。基于service自己的名称所访问的。
[root@master ~]# curl nginx
curl: (6) Could not resolve host: nginx; 未知的名称或服务
这时还是必须指定IP地址才能访问,因为还没有用DNS解析IP地址呢。所以需要去解析IP地址,这样以后直接访问ningx服务名就行了不用理IP地址。
查看DNS的地址:
[root@master ~]# kubectl get pods -n kube-system -o wide
NAME READY STATUS RESTARTS AGE IP NODE NOMINATED NODE READINESS GATES
coredns-fb8b8dccf-8lczd 1/1 Running 1 3d 10.244.0.5 master <none> <none>
coredns-fb8b8dccf-rljmp 1/1 Running 1 3d 10.244.0.4 master <none> <none>
etcd-master 1/1 Running 3 3d 192.168.163.100 master <none> <none>
kube-apiserver-master 1/1 Running 4 3d 192.168.163.100 master <none> <none>
kube-controller-manager-master 1/1 Running 9 3d 192.168.163.100 master <none> <none>
kube-flannel-ds-amd64-26kk7 1/1 Running 1 26h 192.168.163.102 node2 <none> <none>
kube-flannel-ds-amd64-428x9 1/1 Running 1 26h 192.168.163.101 node1 <none> <none>
kube-flannel-ds-amd64-mj4s6 1/1 Running 1 28h 192.168.163.100 master <none> <none>
kube-proxy-5s2gz 1/1 Running 1 26h 192.168.163.101 node1 <none> <none>
kube-proxy-lwntd 1/1 Running 3 3d 192.168.163.100 master <none> <none>
kube-proxy-tjcpd 1/1 Running 1 26h 192.168.163.102 node2 <none> <none>
kube-scheduler-master 1/1 Running 8 3d 192.168.163.100 master <none> <none>
[root@master ~]# kubectl get svc -n kube-system
NAME TYPE CLUSTER-IP EXTERNAL-IP PORT(S) AGE
kube-dns ClusterIP 10.96.0.10 <none> 53/UDP,53/TCP,9153/TCP 3d
安装解析命令:
[root@master ~]# yum -y install bind-utils
创建一个临时的客户端进去设置DNS
[root@master ~]# kubectl run client1 --image=busybox --replicas=1 -it --restart=Never
If you don't see a command prompt, try pressing enter.
/ # cat /etc/resolv.conf
nameserver 10.96.0.10
search default.svc.cluster.local svc.cluster.local cluster.local
options ndots:5
default.svc.cluster.local 是一个特殊域名, 表示是你的kubenetes集群的本地pod资源特定后缀,而default表示这个pod所属的名称空间的名字,如果不给完整的名称,搜索的时候就搜索的域就不一样。
[root@master ~]# dig -t A nginx.default.svc.cluster.local @10.96.0.10
; <<>> DiG 9.9.4-RedHat-9.9.4-73.el7_6 <<>> -t A nginx.default.svc.cluster.local @10.96.0.10
;; global options: +cmd
;; Got answer:
;; ->>HEADER<<- opcode: QUERY, status: NOERROR, id: 18720
;; flags: qr aa rd; QUERY: 1, ANSWER: 1, AUTHORITY: 0, ADDITIONAL: 1
;; WARNING: recursion requested but not available
;; OPT PSEUDOSECTION:
; EDNS: version: 0, flags:; udp: 4096
;; QUESTION SECTION:
;nginx.default.svc.cluster.local. IN A
;; ANSWER SECTION:
nginx.default.svc.cluster.local. 5 IN A 10.96.69.143
;; Query time: 3 msec
;; SERVER: 10.96.0.10#53(10.96.0.10)
;; WHEN: 四 5月 16 10:05:59 CST 2019
;; MSG SIZE rcvd: 107
[root@master ~]# kubectl run client1 --image=busybox --replicas=1 -it --restart=Never
If you don't see a command prompt, try pressing enter.
/ # cat /etc/resolv.conf
nameserver 10.96.0.10
search default.svc.cluster.local svc.cluster.local cluster.local
options ndots:5
/ # nslookup nginx
Server: 10.96.0.10
Address: 10.96.0.10:53
Name: nginx.default.svc.cluster.local
Address: 10.96.69.143
*** Can't find nginx.svc.cluster.local: No answer
*** Can't find nginx.cluster.local: No answer
*** Can't find nginx.default.svc.cluster.local: No answer
*** Can't find nginx.svc.cluster.local: No answer
*** Can't find nginx.cluster.local: No answer
/ # wget nginx
Connecting to nginx (10.96.69.143:80)
index.html 100% |**********************************| 612 0:00:00 ETA
/ # wget -O - -q http://nginx:80/
<!DOCTYPE html>
<html>
<head>
<title>Welcome to nginx!</title>
<style>
body {
width: 35em;
margin: 0 auto;
font-family: Tahoma, Verdana, Arial, sans-serif;
}
</style>
</head>
<body>
<h1>Welcome to nginx!</h1>
<p>If you see this page, the nginx web server is successfully installed and
working. Further configuration is required.</p>
<p>For online documentation and support please refer to
<a href="http://nginx.org/">nginx.org</a>.<br/>
Commercial support is available at
<a href="http://nginx.com/">nginx.com</a>.</p>
<p><em>Thank you for using nginx.</em></p>
</body>
</html>
这时已经解析成功,可以通过服务名ningx访问了。
为了测试是否成功,先删除pod试试看,看看在起来的pod是否能通过服务名访问。
[root@master ~]# kubectl get pods
NAME READY STATUS RESTARTS AGE
client1 1/1 Running 0 18m
nginx-deploy-55d8d67cf-xdxcj 1/1 Running 0 57m
[root@master ~]# kubectl delete pods nginx-deploy-55d8d67cf-xdxcj
pod "nginx-deploy-55d8d67cf-xdxcj" deleted
[root@master ~]# kubectl get pods
NAME READY STATUS RESTARTS AGE
client1 1/1 Running 0 19m
nginx-deploy-55d8d67cf-9rm67 0/1 ContainerCreating 0 22s
这时新的pod已经创建成功了。通过临时客户端在去访问服务名看看是否能联通。
/ # wget -O - -q http://nginx:80/
<!DOCTYPE html>
<html>
<head>
<title>Welcome to nginx!</title>
<style>
body {
width: 35em;
margin: 0 auto;
font-family: Tahoma, Verdana, Arial, sans-serif;
}
</style>
</head>
<body>
<h1>Welcome to nginx!</h1>
<p>If you see this page, the nginx web server is successfully installed and
working. Further configuration is required.</p>
<p>For online documentation and support please refer to
<a href="http://nginx.org/">nginx.org</a>.<br/>
Commercial support is available at
<a href="http://nginx.com/">nginx.com</a>.</p>
<p><em>Thank you for using nginx.</em></p>
</body>
</html>
发现还是可以发现。没有问题。
[root@master ~]# kubectl get svc
NAME TYPE CLUSTER-IP EXTERNAL-IP PORT(S) AGE
kubernetes ClusterIP 10.96.0.1 <none> 443/TCP 3d
nginx ClusterIP 10.96.69.143 <none> 80/TCP 43m
[root@master ~]# kubectl describe svc nginx
Name: nginx
Namespace: default
Labels: run=nginx-deploy
Annotations: <none>
Selector: run=nginx-deploy
Type: ClusterIP
IP: 10.96.69.143
Port: <unset> 80/TCP
TargetPort: 80/TCP
Endpoints: 10.244.2.3:80
Session Affinity: None
Events: <none>
[root@master ~]# kubectl get pods --show-labels
NAME READY STATUS RESTARTS AGE LABELS
client1 1/1 Running 0 27m run=client1
nginx-deploy-55d8d67cf-9rm67 1/1 Running 0 8m18s pod-template-hash=55d8d67cf,run=nginx-deploy
可以得出结论是根据标签选中的,而不是根据IP地址选中的。
删除服务以后,在从新起个服务,发现客户端还是能直接发现nginx服务的。
[root@master ~]# kubectl get svc
NAME TYPE CLUSTER-IP EXTERNAL-IP PORT(S) AGE
kubernetes ClusterIP 10.96.0.1 <none> 443/TCP 3d1h
nginx ClusterIP 10.96.69.143 <none> 80/TCP 58m
[root@master ~]# kubectl delete svc nginx
service "nginx" deleted
[root@master ~]# kubectl get svc
NAME TYPE CLUSTER-IP EXTERNAL-IP PORT(S) AGE
kubernetes ClusterIP 10.96.0.1 <none> 443/TCP 3d1h
[root@master ~]# kubectl expose deployment nginx-deploy --name=nginx
service/nginx exposed
[root@master ~]# kubectl get svc
NAME TYPE CLUSTER-IP EXTERNAL-IP PORT(S) AGE
kubernetes ClusterIP 10.96.0.1 <none> 443/TCP 3d1h
nginx ClusterIP 10.104.156.118 <none> 80/TCP 7s
/ # wget -O - -q http://nginx:80/
<!DOCTYPE html>
<html>
<head>
<title>Welcome to nginx!</title>
<style>
body {
width: 35em;
margin: 0 auto;
font-family: Tahoma, Verdana, Arial, sans-serif;
}
</style>
</head>
<body>
<h1>Welcome to nginx!</h1>
<p>If you see this page, the nginx web server is successfully installed and
working. Further configuration is required.</p>
<p>For online documentation and support please refer to
<a href="http://nginx.org/">nginx.org</a>.<br/>
Commercial support is available at
<a href="http://nginx.com/">nginx.com</a>.</p>
<p><em>Thank you for using nginx.</em></p>
</body>
</html>
只要服务在,就可以正确的反应到DNS上的。
查看控制器的详细信息:
[root@master ~]# kubectl describe deployment nginx-deploy
Name: nginx-deploy
Namespace: default
CreationTimestamp: Thu, 16 May 2019 08:41:11 +0800
Labels: run=nginx-deploy
Annotations: deployment.kubernetes.io/revision: 1
Selector: run=nginx-deploy
Replicas: 1 desired | 1 updated | 1 total | 1 available | 0 unavailable
StrategyType: RollingUpdate
MinReadySeconds: 0
RollingUpdateStrategy: 25% max unavailable, 25% max surge
Pod Template:
Labels: run=nginx-deploy
Containers:
nginx-deploy:
Image: nginx:1.14-alpine
Port: 80/TCP
Host Port: 0/TCP
Environment: <none>
Mounts: <none>
Volumes: <none>
Conditions:
Type Status Reason
---- ------ ------
Progressing True NewReplicaSetAvailable
Available True MinimumReplicasAvailable
OldReplicaSets: <none>
NewReplicaSet: nginx-deploy-55d8d67cf (1/1 replicas created)
Events: <none
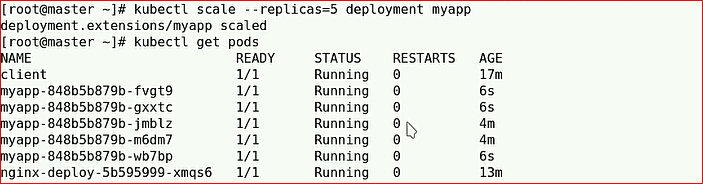
-w 表示监控进度

pod也是可以动态扩展的。当然也可以动态缩减,直接修改要改成的几,例如像缩减成3个。就把下面图片的改成 --replicas=3 就可以了
动态升级:
[root@master ~]# kubectl set image -h
Usage:
kubectl set image (-f FILENAME | TYPE NAME) CONTAINER_NAME_1=CONTAINER_IMAGE_1
... CONTAINER_NAME_N=CONTAINER_IMAGE_N [options]
TYPE NAME 表示哪个pod
CONTAINER_NAME_1=CONTAINER_IMAGE_1 表示哪个容器替换成哪个镜像

比如像替换myapp-848b5b879b-gxxtc容器
通过kubectl describe pods 可以查看容器的各种信息,包括容器名字等等。
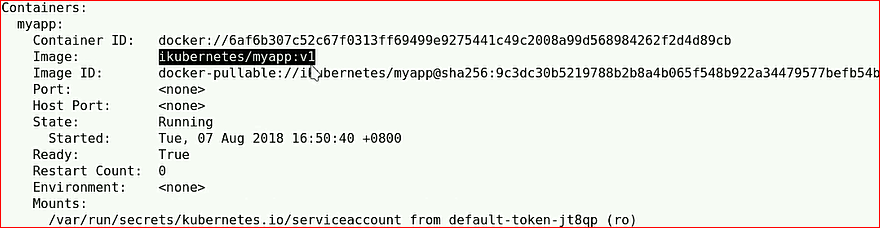

把v1版本升级成v2版本。第一个myapp是控制器的名字,第二个myapp是容器名
kubectl rollout status deployment myapp 可以查看更新的过程。
使用上面的命令在查看就可以看到是v2版本了。
也可以进行回滚操作:
kubectl rollout undo deployment myapp 回滚的时候可以指定回滚到哪个版本。不指定就默认回滚到上个版本。
如果想集群外部访问nginx的话,只需要修改service类型为NodeProt即可。
[root@master ~]# kubectl edit svc nginx
metadata:
creationTimestamp: "2019-05-16T02:02:30Z"
labels:
run: nginx-deploy
name: nginx
namespace: default
resourceVersion: "51839"
selfLink: /api/v1/namespaces/default/services/nginx
uid: a94b9787-777e-11e9-833b-000c29ac207f
spec:
clusterIP: 10.104.156.118
externalTrafficPolicy: Cluster
ports:
- nodePort: 31998
port: 80
protocol: TCP
targetPort: 80
selector:
run: nginx-deploy
sessionAffinity: None
type: NodePort //这里修改成NodePort就可以外部访问了
status:
loadBalancer: {}
[root@master ~]# kubectl get svc
NAME TYPE CLUSTER-IP EXTERNAL-IP PORT(S) AGE
kubernetes ClusterIP 10.96.0.1 <none> 443/TCP 3d2h
nginx NodePort 10.104.156.118 <none> 80:31998/TCP 67m
可以看到了多了一个端口。这个端口就是外部访问的端口

可以看到通过浏览器访问node2节点的IP地址和31998端口号就可以外部进行访问nginx了。
kubernetes快速应用入门的更多相关文章
- Kubernetes快速入门
二.Kubernetes快速入门 (1)Kubernetes集群的部署方法及部署要点 (2)部署Kubernetes分布式集群 (3)kubectl使用基础 1.简介 kubectl就是API ser ...
- codevs3500 快速幂入门题解
codevs3500 快速幂入门题解 //我也是抄的题解 题目描述 Description 输入3个数a,b,c,求a^b mod c=? 输入描述 Input Description 三个数a,b, ...
- smarty半小时快速上手入门教程
http://www.jb51.net/article/56754.htm http://www.yiibai.com/smarty/smarty_functions.html http://www. ...
- EFCodeFirst快速搭建入门
EFCodeFirst快速搭建入门 1.新建Model类库项目. 添加EntityFramework.dll的引用. 编写实体类Course,Student. namespace EFCodeFirs ...
- (三)Kubernetes 快速入门
Kubernetes的核心对象 API Server提供了RESTful风格的编程接口,其管理的资源是Kubernetes API中的端点,用于存储某种API对象的集合,例如,内置Pod资源是包含了所 ...
- 第二章 Kubernetes快速入门
一.四组基本概念 Pod/Pod控制器: Name/Namespace: Label/Label选择器: Service/Ingress. 二.Pod/Pod控制器 2.1 Pod Pod是K8S里能 ...
- 【译】Hello Kubernetes快速交互实验手册
原文:https://kubernetes.io/docs/tutorials 翻译:Edison Zhou 一.基本介绍 此交互实验可以让你不用搭建K8S环境就可以轻松地尝试管理一个简单的容器化应用 ...
- Kubernetes服务发现入门:如何高效管理服务?
愈发复杂的应用程序正在依靠微服务来保持可扩展性和提升效率.Kubernetes为微服务提供了完美的环境,并能够让其与Kubernetes的工具组件和功能兼容.当应用程序的每个部分放置在一个容器中,整个 ...
- Python快速编程入门,打牢基础必须知道的11个知识点 !
Python被誉为全世界高效的编程语言,同时也被称作是“胶水语言”,那它为何能如此受欢迎,下面我们就来说说Python入门学习的必备11个知识点,也就是它为何能够如此受欢迎的原因. Python 简介 ...
随机推荐
- java数据结构3--List
List 1.1 list接口的简介 1.2 list实现子类 ArrayList:线程不安全,查询速度快,底层用的是数组,增删慢LinkedList:线程不安全,链表结构,增删速度快,查询慢Vect ...
- python list颠倒写法
a=[1,2,3,4] a[::-1] ...... [4,3,2,1]
- asp.net mvc 异步控制器
参考:https://blog.csdn.net/niewq/article/details/20490707 https://www.cnblogs.com/visonme/p/5537190.ht ...
- vs2017 制作winfrom 安装包!
https://www.cnblogs.com/GuZhenYin/p/8176981.html 转载 前言 项目中有用到winfrom做配套的打印程序,直接给客户一个debug文件夹,当然不是很好. ...
- Cassandra 安装部署
Linux 系统安装Cassandra 一.Cassandra需要安装jdk支持,首先安装jdk 自行百度查找安装 二.下载Cassandra 官网地址: https://cassandra.apac ...
- input框与img在同一行对齐
将input和img放同一行,img标签总是比input高出一个头,难看.后来在网站搜到最多的就是给img添加一个align="absmiddle"属性,这个方法似乎的确可行,但是 ...
- nginx typecho config
## # You should look at the following URL's in order to grasp a solid understanding # of Nginx confi ...
- vue之Object.defineProperty()
了解Object.defineProerty()方法 关于Object.defineProperty()方法的解释,理解Object.defineProperty的作用 这篇文章做了很详细的概述 关于 ...
- json根据一个值返回对象,filter方法使用
d = { "student":[ { "count":1000, "stuList":[ ...
- yanse
0E71F9 左上面蓝色 0EA8FF 左下面蓝色 498B54 右边绿色