https://www.jb51.net/article/133868.htm
这次给大家带来Angular2 父子组件通信方式,使用Angular2 父子组件通信方式的注意事项有哪些,下面就是实战案例,一起来看一下。
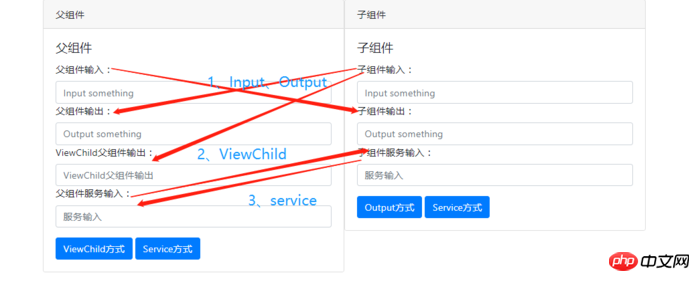
Angular2官方文档对组件交互这块有详细的介绍-->文档--组件之间的交互。按文档介绍,组件间交互的方式一共有4种,包括:
通过输入型绑定把数据从父组件传到子组件(@Input decoration);子组件暴露一个EventEmitter属性(@Output decoration),当事件发生时,利用该属性emits向父组件发射事件。
父组件与子组件通过本地变量互动。(# var)
父组件调用@ViewChild。
父组件和子组件通过服务来通讯。
我在这里只总结、详细介绍3种我在项目中使用过的方法,看完本文大概能做到如下的效果:
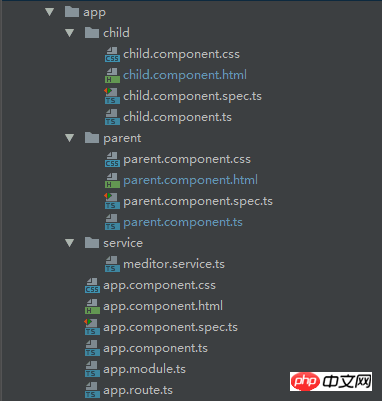
创建项目,项目结构如下:
通过@Input、@Output装饰器进行父、子组件间的通信
@Input:该属性绑定用于父组件向子组件传递数据。子组件可以通过以下两种方法截取属性的变更:
使用一个输入属性的setter,以拦截父组件中值得变化。
通过ngOnchanges()来截听输入属性值的变化。
@Output:该数据绑定用于子组件向父组件传递数据和事件。
|
1
2
3
4
5
6
7
8
9
10
11
12
13
14
15
16
17
18
19
20
21
22
23
24
25
26
27
28
29
30
31
|
<!--parent.component.html-->
<p style="width: 1000px;margin: auto">
<p class="card" style="width: 500px;float: left">
<p class="card-header">
父组件
</p>
<p class="card-body">
<h5 class="card-title">父组件</h5>
<p class="form-group">
<label for="input">父组件输入:</label>
<input type="text"
class="form-control"
id="input"
placeholder="Input something"
[(ngModel)]="parentPrint"
>
<label for="output">父组件输出:</label>
<input type="text"
class="form-control"
id="output"
placeholder="Output something"
[(ngModel)]="contentFromChild"
>
</p>
</p>
</p>
<app-child
[fromParent]="parentPrint"
(fromChild)="fromChild($event)"
></app-child>
</p>
|
|
1
2
3
4
5
6
7
8
9
10
11
12
13
14
15
16
17
18
19
20
21
22
23
24
25
26
|
<!--child.component.html-->
<p class="card" style="width: 500px;">
<p class="card-header">
子组件
</p>
<p class="card-body">
<h5 class="card-title">子组件</h5>
<p class="form-group">
<label for="input">子组件输入:</label>
<input type="text"
class="form-control"
id="input"
placeholder="Input something"
[(ngModel)]="contentFromChild"
>
<label for="output">子组件输出:</label>
<input type="text"
class="form-control"
id="output"
placeholder="Output something"
[(ngModel)]="fromParent"
>
</p>
<button class="btn btn-primary" (click)="clickChild()">Output方式</button>
</p>
</p>
|
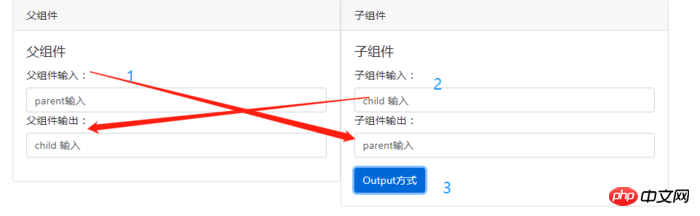
效果如下:(1、父组件输入,子组件可同步输出;2、子组件输入需要(3、)点击按钮触发发射事件,将数据传送给父组件。)
@Input:父组件输入的同时,子组件能同步获取数据进行显示。核心代码如下:
|
1
2
3
4
5
6
7
8
|
//父组件
parentPrint: any; //ts中,声明一个变量
[(ngModel)]="parentPrint" //html中,绑定变量,获取用户输入
//html中,将数据传给子组件
<app-child [fromParent]="parentPrint"></app-child>
//子组件
@Input() fromParent; //ts中,用于直接接收从父组件获取的数据
[(ngModel)]="fromParent" //html中,用于显示数据
|
通过setter截听输入属性值的变化,在子组件中声明一个私有变量来获取父组件传递过来的数据,从而屏蔽上层获取下层信息。(简单一点就是不让父组件知道子组件用什么东西去接收传过来的数据)通过这种方法也可以获得同样的效果。
|
1
2
3
4
5
6
7
8
9
|
//子组件
private _fromParent: any; //私有变量,通过setter获取父组件的数据
@Input() //通过setter获取父组件的数据
set fromParent(fromParent: any) {
this._fromParent = fromParent;
}
get fromParent(): any {
return this._fromParent;
}
|
@Output:父组件接收子组件的数据时,子组件暴露一个EventEmitter属性,当事件发生时,子组件利用该属性emits(向上弹射)事件。父组件绑定到这个事件属性,并在事件发生时作出回应。核心代码如下:
|
1
2
3
4
5
6
7
8
|
//子组件
@Output() fromChild = new EventEmitter<any>(); //暴露一个输出属性
<button class="btn btn-primary" (click)="clickChild()">Output方式</button>
//触发发射函数,将数据发送给父组件
clickChild() {
console.log('click child' , this.contentFromChild);
this.fromChild.emit(this.contentFromChild);
}
|
|
1
2
3
4
5
6
7
8
9
10
11
12
|
//父组件
[(ngModel)]="contentFromChild" //绑定输出子组件的数据
//使用子组件,绑定事件属性
<app-child
[fromParent]="parentPrint"
(fromChild)="fromChild($event)"
></app-child>
//事件处理函数
fromChild(event) {
console.log(event);
this.contentFromChild = event;
}
|
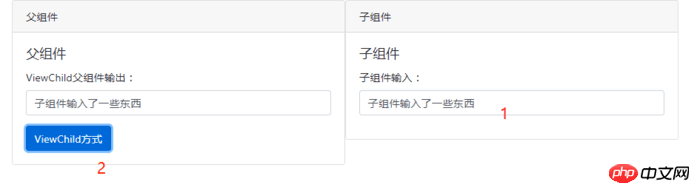
父组件通过调用@ViewChild()来获取子组件的数据
如果父组件的类需要读取子组件的属性和值或调用子组件的方法时,就可以把子组件作为ViewChild,注入到父组件里面。ViewChild顾名思义就是可以看见子组件里面的属性和方法。
|
1
2
3
4
5
6
7
8
9
10
11
12
13
14
15
16
17
18
19
20
21
22
|
<!--parent.component.html-->
<p style="width: 1000px;margin: auto">
<p class="card" style="width: 500px;float: left">
<p class="card-header">
父组件
</p>
<p class="card-body">
<h5 class="card-title">父组件</h5>
<p class="form-group">
<label for="viewoutput">ViewChild父组件输出:</label>
<input type="text"
class="form-control"
id="viewoutput"
placeholder="ViewChild父组件输出"
[(ngModel)]="viewOutput"
>
</p>
<button class="btn btn-primary" (click)="clickView()">ViewChild方式</button>
</p>
</p>
<app-child></app-child>
</p>
|
|
1
2
3
4
5
6
7
8
9
10
11
12
13
14
15
16
17
18
|
<!--child.component.html-->
<p class="card" style="width: 500px;">
<p class="card-header">
子组件
</p>
<p class="card-body">
<h5 class="card-title">子组件</h5>
<p class="form-group">
<label for="input">子组件输入:</label>
<input type="text"
class="form-control"
id="input"
placeholder="Input something"
[(ngModel)]="contentFromChild"
>
</p>
</p>
</p>
|
效果如下:
父组件核心代码:
|
1
2
3
4
5
6
7
8
|
//ts
@ViewChild(ChildComponent) // 使用viewChild导入引用
private childComponent: ChildComponent; // 将子组件注入到私有属性
//获取子组件数据并显示
clickView() {
//直接获取子组件的属性
this.viewOutput = this.childComponent.contentFromChild;
}
|
|
1
2
3
|
//html
[(ngModel)]="viewOutput"
<button class="btn btn-primary" (click)="clickView()">ViewChild方式</button>
|
父组件和子组件通过服务来通讯
父组件和它的子组件共享同一个服务,利用该服务在家庭内部实现双向通讯。
|
1
2
3
4
5
6
7
8
9
10
11
12
13
14
15
16
17
18
19
20
21
22
|
<!--parent.component.html-->
<p style="width: 1000px;margin: auto">
<p class="card" style="width: 500px;float: left">
<p class="card-header">
父组件
</p>
<p class="card-body">
<h5 class="card-title">父组件</h5>
<p class="form-group">
<label for="serviceoutput">父组件服务输入:</label>
<input type="text"
class="form-control"
id="serviceoutput"
placeholder="服务输入"
[(ngModel)]="serviceInput"
>
</p>
<button class="btn btn-primary" (click)="clickService()">Service方式</button>
</p>
</p>
<app-child></app-child>
</p>
|
|
1
2
3
4
5
6
7
8
9
10
11
12
13
14
15
16
17
18
19
|
<!--child.component.html-->
<p class="card" style="width: 500px;">
<p class="card-header">
子组件
</p>
<p class="card-body">
<h5 class="card-title">子组件</h5>
<p class="form-group">
<label for="serviceoutput">子组件服务输入:</label>
<input type="text"
class="form-control"
id="serviceoutput"
placeholder="服务输入"
[(ngModel)]="serviceInput"
>
</p>
<button class="btn btn-primary" (click)="clickService()">Service方式</button>
</p>
</p>
|
|
1
2
3
4
5
6
7
8
9
10
11
12
13
14
15
16
17
18
19
20
21
22
23
|
//服务
//meditor.service.ts
import {Injectable} from '@angular/core';
import {Subject} from 'rxjs/Subject';
import {Observable} from 'rxjs/Observable';
@Injectable()
export class MeditorService {
private subject = new Subject<MeditorMsg>();
constructor() {}
// 获取订阅者
public getObservable(): Observable<MeditorMsg> {
return this.subject.asObservable();
}
// 推送信息
public push(msg: MeditorMsg) {
this.subject.next(msg);
}
}
// 中间者信息
export interface MeditorMsg {
id: string;
body: any;
}
|
效果如下:
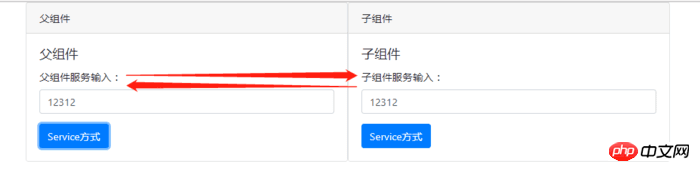
父子组件的核心代码类似,在构造函数中将该服务实例注入到自身,父子组件都有一个唯一的id。无论是父组件还是子组件调用push()方法推送数据,双方都能接收到数据,这时候就要根据id来判断是要父组件使用数据还是子组件使用数据。核心代码如下:
|
1
2
3
4
5
6
7
8
9
10
11
12
13
14
15
16
17
18
19
20
21
22
23
24
25
26
27
28
29
30
31
32
33
34
35
|
subscription: Subscription = null; //初始化一个订阅对象
//子组件构造函数,用于监听数据推送
constructor(
private meditor: MeditorService
) {
this.subscription = meditor.getObservable().subscribe(
msg => {
console.log(msg);
if (msg.id === 'parent') { //id为parent,获取父组件数据
this.serviceInput = msg.body;
}
}
);
}
// 子组件将数据推送到中间着,给订阅者
clickService() {
this.meditor.push({id: 'parent', body: this.serviceInput});
}
//父组件构造函数,用于监听数据推送
constructor(
private meditor: MeditorService
) {
this.subscription = meditor.getObservable().subscribe(
msg => {
console.log(msg);
if (msg.id === 'child') { //id为child,获取子组件数据
this.serviceInput = msg.body;
}
}
);
}
// 父组件将数据推送到中间着,给订阅者
clickService() {
this.meditor.push({id: 'parent', body: this.serviceInput});
}
|
我上面写的还不是很完善,就是在生命周期结束前,也就是在onDestroy周期中,要取消订阅。
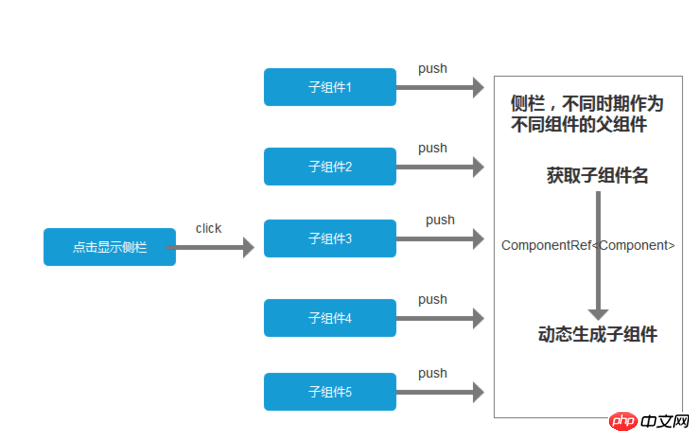
以上,就是最近在使用的组件交互的总结。个人觉得通过服务来交互的可扩展性更强。例如,我们项目中用到了一个动态显示的侧栏,不同时期点击显示侧栏要显示不同的东西。这个时候把侧栏作为父组件,子组件作为消息的一部分传递给父组件,父组件根据子组件名动态生成模板,显示在侧栏上面。说了这么多废话大概就是下图的意思:
最后附上demo源码:父子组件交互demo
以上就是本文的全部内容,希望对大家的学习有所帮助,也希望大家多多支持脚本之家。
- 三大前端框架(react、vue、angular2+)父子组件通信总结
公司业务需要,react.vue.angular都有接触[\无奈脸].虽然说可以拓展知识广度,但是在深度上很让人头疼.最近没事的时候回忆各框架父子组件通信,发现很模糊,于是乎稍微做了一下功课,记录于此 ...
- Vue(基础四)_总结五种父子组件之间的通信方式
一.前言 这篇文章主要总结了几种通信方式: 1.方式一:使用props: [ ]和$emit() (适用于单层通信) 2.方式二:$attrs和$listeners(适用于多层) 3.方式三:中央处 ...
- Angular2 之父子组件交互方式
父子组件交互方式,这里介绍主要的三种方式 1.事件传值 下面以列表页和分页组件举例. list.component.html <pagination *ngIf="pageParams ...
- vue之父子组件之间的通信方式
(一)props与$emit <!-这部分是一个关于父子组件之间参数传递的例子--> <!--父组件传递参数到子组件是props,子组件传递参数到父组件是用事件触发$emit--&g ...
- Vue2.x中的父子组件相互通信
业务场景:(这里指的是直接父子级关系的通信) 美女(子组件)将消息发送给大群(父组件) 大群(父组件)收到美女发送的消息后再回个信息给美女(子组件) 父组件 template <template ...
- 整理4种Vue组件通信方式
整理4种Vue组件通信方式 重点是梳理了前两个,父子组件通信和eventBus通信,我觉得Vue文档里的说明还是有一些简易,我自己第一遍是没看明白. 父子组件的通信 非父子组件的eventBus通信 ...
- 【转】vue父子组件之间的通信
vue父子组件之间的通信 在vue组件通信中其中最常见通信方式就是父子组件之中的通性,而父子组件的设定方式在不同情况下又各有不同.最常见的就是父组件为控制组件子组件为视图组件.父组件传递数据给子组件使 ...
- 【Vue课堂】Vue.js 父子组件之间通信的十种方式
这篇文章介绍了Vue.js 父子组件之间通信的十种方式,不管是初学者还是已经在用 Vue 的开发者都会有所收获.无可否认,现在无论大厂还是小厂都已经用上了 Vue.js 框架,简单易上手不说,教程详尽 ...
- vuejs组件交互 - 01 - 父子组件之间的数据交互
父子组件之间的数据交互遵循: props down - 子组件通过props接受父组件的数据 events up - 父组件监听子组件$emit的事件来操作数据 示例 子组件的点击事件函数中$emit ...
随机推荐
- danbooru 图片下载工具。
danbooru 是什么,查搜索引擎去吧. 试了四个站点 yande.re,konachan.com,danbooru.donmai.us,gelbooru.com ,其他就不知道了. 有的站点对搜索 ...
- Android测试之查看package和activity名称的方法
方法一:使用aapt //aapt是sdk自带的一个工具,在sdk\builds-tools\目录下 1.命令行中切换到aapt.exe目录执行:aapt dump badging + 路径 ...
- WEB框架初识
HTTP介绍 Hyper Text Transfer Protocol,超文本传输书协议,是万维网数据通信的基础,规定了请求和响应标准. HTTP工作原理 HTTP 请求以及响应的步骤 客户端连接到W ...
- 【MM系列】SAP技巧之更改布局
公众号:SAP Technical 本文作者:matinal 原文出处:http://www.cnblogs.com/SAPmatinal/ 原文链接:[MM系列]SAP技巧之更改布局 前言部分 ...
- 关于Thread ThreadPool Parallel 的一些小测试demo
using System; using System.Diagnostics; using System.Runtime.InteropServices; using System.Threading ...
- Ubuntu - Ubuntu应用记录(2)
1.安装Ubuntu16.04的一种分区分案(240G固态硬盘小例) 1.创建boot分区(引导分区)-> 512M ->逻辑分区->空间起始位置->Ext4日志文件系统-&g ...
- 阿里云对象存储OSS
阿里云的产品种类繁多,今天让我们一起来了解下对象存储(Object Storage Service,简称OSS)吧! 什么是对象存储呢? 简单来说,对象存储OSS是阿里云提供的海量.安全和高可靠的云存 ...
- Spring实现构造注入
Spring通过setter访问器实现对属性的赋值,这种做法称为设值注入:Spring还提供了通过构造方法赋值的能力,称为构造注入.使用设值注入时,Spring通过JavaBean的无参构造方法实例化 ...
- 【Usaco2014Open银组】双导航(gpsdual)
题目 [题目描述] FJ 最近网购了一台小车.但是由于他的草率,在选择加装物品时偶然地点击了两次"Submit" ,结果最后他的小车装了两台GPS 导航系统!更糟的是,这两个系统对 ...
- webAapi
学习目标: 掌握API和Web API的概念 掌握常见浏览器提供的API的调用方式 能通过Web API开发常见的页面交互功能 能够利用搜索引擎解决问题 typora-copy-images-to: ...