
总结关于Mac上使用MySQL一些常见的问题
Num 1. MySQL5.7导出数据时提示--secure-file-priv解决办法:
问题分析
在官方的文档中,对secure_file_priv进行了说明,它用于限制数据的导出。
- secure_file_priv 为 NULL 时,表示限制mysqld不允许导入或导出。
- secure_file_priv 为 /tmp 时,表示限制mysqld只能在/tmp目录中执行导入导出,其他目录不能执行。
- secure_file_priv 没有值时,表示不限制mysqld在任意目录的导入导出。
在Mysql中输入命令show variables like '%secure_file_priv%';可以看到默认secure_file_priv = NULL。
  mysql> show global variables like '%secure_file_priv%';

  +------------------+-------+

  | Variable_name    | Value |

  +------------------+-------+

  | secure_file_priv | NULL  |

  +------------------+-------+
解决办法
1. 检查support-files文件夹(路径 /usr/local/mysql/support-files 这是Mac中的隐藏文件夹,在Finder下shift+command+g然后输入路径),是否有my.cnf配置文件,在Mac中好像是默认不存在该文件(具体不清楚),需要我们自己手动配置Mysql。
2. (关闭Mysql)需要在 /etc下配置my.cnf,首先 cd /etc,然后手动配置,vim my.cnf,输入以下配置信息。
  # Example MySQL config file for medium systems.

  #

  # This is for a system with little memory (32M - 64M) where MySQL plays

  # an important part, or systems up to 128M where MySQL is used together with

  # other programs (such as a web server)

  #

  # MySQL programs look for option files in a set of

  # locations which depend on the deployment platform.

  # You can copy this option file to one of those

  # locations. For information about these locations, see:

  # http://dev.mysql.com/doc/mysql/en/option-files.html

  #

  # In this file, you can use all long options that a program supports.

  # If you want to know which options a program supports, run the program

  # with the "--help" option.

  # The following options will be passed to all MySQL clients

  [client]

  default-character-set=utf8

  #password   = your_password

  port        = 3306

  socket      = /tmp/mysql.sock

  # Here follows entries for some specific programs

  # The MySQL server

[mysqld]

  character-set-server=utf8

  init_connect='SET NAMES utf8

  port        = 3306

  socket      = /tmp/mysql.sock

  skip-external-locking

  key_buffer_size = 16M

  max_allowed_packet = 1M

  table_open_cache = 64

  sort_buffer_size = 512K

  net_buffer_length = 8K

  read_buffer_size = 256K

  read_rnd_buffer_size = 512K

  myisam_sort_buffer_size = 8M

  character-set-server=utf8

  init_connect='SET NAMES utf8'

  secure_file_priv=

# Don't listen on a TCP/IP port at all. This can be a security enhancement,

# if all processes that need to connect to mysqld run on the same host.

# All interaction with mysqld must be made via Unix sockets or named pipes.

# Note that using this option without enabling named pipes on Windows

# (via the "enable-named-pipe" option) will render mysqld useless!

#

#skip-networking

  # Replication Master Server (default)

  # binary logging is required for replication

  log-bin=mysql-bin

    # binary logging format - mixed recommended

    binlog_format=mixed

      # required unique id between 1 and 2^32 - 1

      # defaults to 1 if master-host is not set

      # but will not function as a master if omitted

      server-id   = 1

    # Replication Slave (comment out master section to use this)

    #

    # To configure this host as a replication slave, you can choose between

    # two methods :

    #

    # 1) Use the CHANGE MASTER TO command (fully described in our manual) -

    #    the syntax is:

    #

    #    CHANGE MASTER TO MASTER_HOST=<host>, MASTER_PORT=<port>,

    #    MASTER_USER=<user>, MASTER_PASSWORD=<password> ;

    #

    #    where you replace <host>, <user>, <password> by quoted strings and

    #    <port> by the master's port number (3306 by default).

    #

    #    Example:

    #

    #    CHANGE MASTER TO MASTER_HOST='125.564.12.1', MASTER_PORT=3306,

    #    MASTER_USER='joe', MASTER_PASSWORD='secret';

    #

    # OR

    #

    # 2) Set the variables below. However, in case you choose this method, then

    #    start replication for the first time (even unsuccessfully, for example

    #    if you mistyped the password in master-password and the slave fails to

    #    connect), the slave will create a master.info file, and any later

    #    change in this file to the variables' values below will be ignored and

    #    overridden by the content of the master.info file, unless you shutdown

    #    the slave server, delete master.info and restart the slaver server.

    #    For that reason, you may want to leave the lines below untouched

    #    (commented) and instead use CHANGE MASTER TO (see above)

    #

    # required unique id between 2 and 2^32 - 1

    # (and different from the master)

    # defaults to 2 if master-host is set

    # but will not function as a slave if omitted

    #server-id       = 2

    #

    # The replication master for this slave - required

    #master-host     =   <hostname>

    #

    # The username the slave will use for authentication when connecting

    # to the master - required

    #master-user     =   <username>

    #

    # The password the slave will authenticate with when connecting to

    # the master - required

    #master-password =   <password>

    #

    # The port the master is listening on.

    # optional - defaults to 3306

    #master-port     =  <port>

    #

    # binary logging - not required for slaves, but recommended

    #log-bin=mysql-bin

      # Uncomment the following if you are using InnoDB tables

      #innodb_data_home_dir = /usr/local/mysql/data

      #innodb_data_file_path = ibdata1:10M:autoextend

      #innodb_log_group_home_dir = /usr/local/mysql/data

      # You can set .._buffer_pool_size up to 50 - 80 %

      # of RAM but beware of setting memory usage too high

      #innodb_buffer_pool_size = 16M

      #innodb_additional_mem_pool_size = 2M

      # Set .._log_file_size to 25 % of buffer pool size

      #innodb_log_file_size = 5M

      #innodb_log_buffer_size = 8M

      #innodb_flush_log_at_trx_commit = 1

      #innodb_lock_wait_timeout = 50

        [mysqldump]

        quick

        max_allowed_packet = 16M

          [mysql]

          no-auto-rehash

          # Remove the next comment character if you are not familiar with SQL

          #safe-updates

          default-character-set=utf8

        [myisamchk]

        key_buffer_size = 20M

        sort_buffer_size = 20M

        read_buffer = 2M

        write_buffer = 2M

          [mysqlhotcopy]

          interactive-timeout
3. sudo chmod 644 my.cnf,将该配置文件的读写执行权限改为644。(推荐每次修改该配置文件后都重新设置644权限)
4. 打开Mysql,输入 show variables like '%secure_file_priv%';可以看到secure_file_priv = 空。
  mysql> show variables like '%secure_file_priv%';

  +------------------+-------+

  | Variable_name    | Value |

  +------------------+-------+

  | secure_file_priv |       |

  +------------------+-------+

  1 row in set (0.00 sec)
Num2. MySQL导入数据显示“Error code:13. Can't get stat of ‘ ’(Permission denied)”解决办法:
解决办法:
在解决"secure-file-priv"问题后,导入数据时再次碰见错误。在google后找到解决办法。
将load data infile 改为 load data local infile。错误即可解决(具体原因不清楚)
Num3. MySQL导出数据显示“Can't create/write to file ‘Users/***’(Errcode:13)”解决办法:
问题分析:
这应该是关于MySQL临时文件目录的问题,为解决这个问题做了很多尝试,在my.cnf配置临时文件目录,并给予该文件777权限等等都没有解决问题。
解决办法:
最后同样在google上找到解决办法。如下图
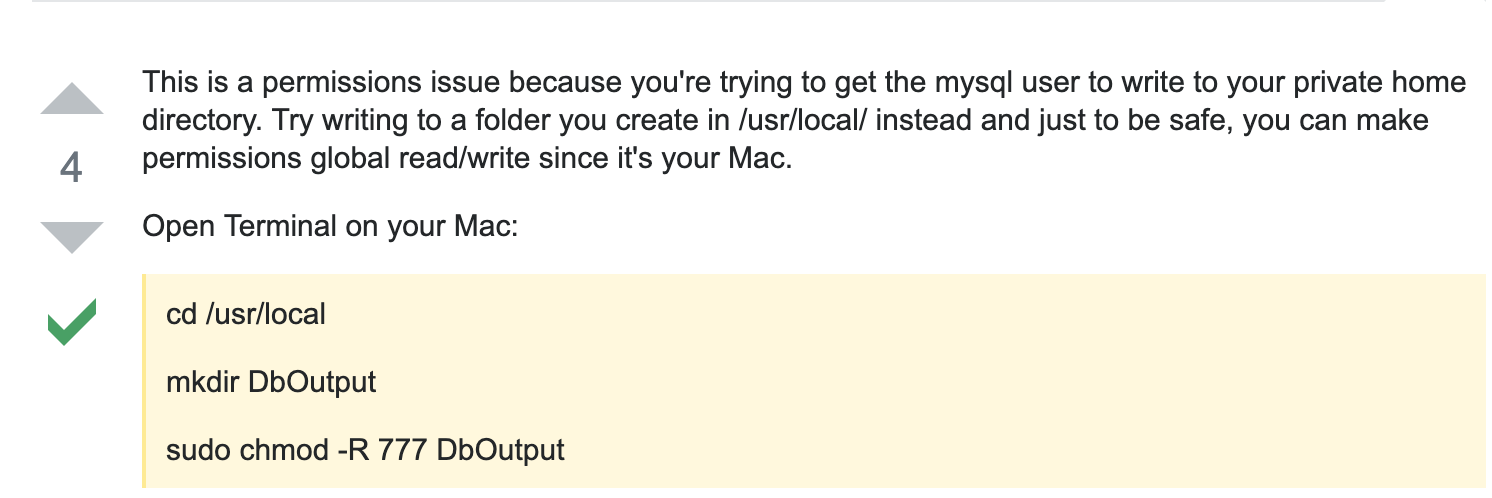
这是由于权限问题,因为试图让mysql用户将数据写入私人主目录。我们可以在usr/local下创建一个文件夹,用来保存从mysql中导出的数据。
2019-06-30 18:03:14
Num4. 关于MySQL5.7下初始密码
问题分析:
安装Mysql5.7完成后,Mysql会随机给定一个初始密码。
Num5. MySQL启动出现“MySQL server PID file could not be found!
Starting MySQL...The server quit without updating PID file (/usr/local/mysql/data/rekfan.pid).”解决办法
问题分析:
比较详细的分析见https://blog.csdn.net/zalion/article/details/9274263
解决办法:
就我自己的尝试而言,以下三种情况可能性较大
1.可能是/usr/local/mysql/data/rekfan.pid文件没有写的权限
解决方法 :给予权限,执行 “chown -R mysql:mysql /var/data” “chmod -R 755 /usr/local/mysql/data” 然后重新启动mysqld
2. 可能进程里已经存在mysql进程
解决方法:用命令“ps -ef|grep mysqld”查看是否有mysqld进程,如果有使用“kill -9 进程号”杀死,貌似在最后还会剩下一个进程,mysqld。
3. mysql在启动时没有指定配置文件时会使用/etc/my.cnf配置文件,请打开这个文件查看在[mysqld]节下有没有指定数据目录(datadir)
解决方法:请在[mysqld]下设置这一行:datadir = /usr/local/mysql/data。希望用Mac的同学,安装好Mac之后就配置好my.cnf(新建位于/etc/下)
2019-07-08 18:33:25 更新
总结关于Mac上使用MySQL一些常见的问题的更多相关文章
- 将sqlserver导出的csv数据导入到ubuntu和mac上的mysql
最近在捣鼓一些数据相关的东西.将sql server里的数据导入到ubuntu和mac上的mysql,方法有很多.不过我选择了最简单的一种:将sql server的数据导成csv,然后将csv导入到m ...
- Mac上重置mysql 5.7密码
Mac上重置mysql 5.7密码 >我的mac系统是osx 10.12 装完mysql5.7之前根本登录不上,网上说用DMG方式装完后,后弹出一个框,上面会有临时密码,但是我安装的时候却手一抖 ...
- mac上搭建mysql环境配置和Navicat连接mysql
mac上搭建mysql环境配置 1.下载mysql for mac: https://downloads.mysql.com/archives/community/ 注意:mysql版本要和你的MAC ...
- 在Mac上安装mysql并配置环境(详细篇)
在Mac上安装mysql并配置环境(详细篇) 1.下载mysql mysql官网 这一步根据自己电脑架构选择,分为arm和x86 下载完成之后打开就可以 接下来运行安装就可以,一直下一步,设置完密码就 ...
- mac上安装MySQL
mysql 官网下载http://dev.mysql.com/downloads/mysql/ 注意安装mysql-5.5.17-osx10.6-x86_64.dmg这样安装方便设置系统安全权限后 点 ...
- os即时通讯客户端开发之-mac上安装MySQL
一.安装 到MySQL官网上http://dev.mysql.com/downloads/mysql/,下载mysql可安装dmg版本 比如:Mac OS X ver. 10.7 (x86, 64-b ...
- 在Mac上安装mysql
进入这个网站: https://dev.mysql.com/downloads/mysql/ 然后点击安装就行了. 注意在这里启动mysql 然后mac上所有的mysql命令都得用绝对路径才能生效
- mac上的mysql管理工具sequel pro
https://blog.csdn.net/wan_zaiyunduan/article/details/54909389 以前用过Plsql.Navicat.Workbench,现在换到mac上,用 ...
- MAC上安装mysql及workbench
下载mysql for mac https://dev.mysql.com/downloads/installer/ 官网下载很慢---百度云:链接: https://pan.baidu.com ...
随机推荐
- 在k3d上快速安装Istio,助你在本地灵活使用K8S!
作者丨Mitsuyuki Shiiba 原文链接: https://dev.to/bufferings/tried-k8s-istio-in-my-local-machine-with-k3d-52g ...
- .NET 5 Preview 1的深度解读和跟进
这几天微软.NET 团队发布了.NET 5 Preview-1, 如约而至.很兴奋,因为.NET Core和.NET Framework终于实现了大一统,同时也很期待,期待.NET 5能给我们带来哪些 ...
- Java 14 发布了,再也不怕 NullPointerException 了!
2020年3月17日发布,Java正式发布了JDK 14 ,目前已经可以开放下载.在JDK 14中,共有16个新特性,本文主要来介绍其中的一个特性:JEP 358: Helpful NullPoint ...
- 几十万学费总结出来的Ddos攻击防护经验!
本人从事网络安全行业十余年年.有十年被骗经验.被骗了很多回(都说能防300G,500G,买完就防不住了),本文当然重点给大家说明,ddos攻击是什么,中小企业如何防护,用到成本等. 言归正传 首先我们 ...
- 全国职业技能大赛信息安全管理与评估-一些细节tips
Base64加解密: ubuntu@VM-0-5-ubuntu:~$ echo iloveyou | base64aWxvdmV5b3UKubuntu@VM-0-5-ubuntu:~$ echo aW ...
- 洛谷 P1047 校门外的树 题解
Case 1. 本题其实不难,直接模拟就可以了.时间复杂度: \(O(L \times M)\) Case 2. 考虑一个简单的增强:把原来的: \[L \leq 10^4,M \leq 10^2 \ ...
- 题解 P2642 【双子序列最大和】
前言 其实这道题的关键就是在于预处理,其方法类似于 合唱队形 正文 求最大子段和 要想求出双子序列最大和,首先我们要会求出最大子段和 最大子段和的求值方法很简单 定义 \(f_i\) 为以第 \(i\ ...
- 动态规划-Last Stone Weight II
2020-01-11 17:47:59 问题描述: 问题求解: 本题和另一题target sum非常类似.target sum的要求是在一个数组中随机添加正负号,使得最终得到的结果是target,这个 ...
- ASP.NET Core AutoWrapper 自定义响应输出
前言 AutoWrapper是一个简单可自定义全局异常处理程序和ASP.NET Core API响应的包装.他使用ASP.NET Core middleware拦截传入的HTTP请求,并将最后的结果使 ...
- python快速入门基础知识
1.变量赋值与语句 #python 不需要手动指定变量类型.不需要分号 #To assign the value 365 to the variable days,we enter the varia ...