
mysql+MHA高可用 (一主双从)
1、准备三台服务器
10.0.0.12
10.0.0.13
10.0.0.14
2、在三台服务器上执行操作
时间同步
[root@ c7m01 ~]# echo "*/5* * * * /usr/sbin/ntpdate ntp1.aliyun.com >/dev/null 2>&1" >>/var/spool/cron/root
修改主机名(主)
[root@ c7m01 ~]# vim /etc/hostname

c7m01
修改主机名(从)
[root@ c702 ~]# vim /etc/hostname

c702
修改主机名(从)
[root@ c703 ~]# vim /etc/hostname

c703
修改完主机名重启机子就可以
3、三台服务器配置hosts解析(这里的主机名要和自己的一样,以便于区分)
[root@ c7m01 ~]# vim /etc/hostsEOF

c7m01 10.0.0.12

c702  10.0.0.13

c703  10.0.0.14
4、关闭防火墙和selinux (三台服务器执行同样的操作)
systemctl stop firewalld
systemctl disable firewalld
setenforce 0
[root@ c7m01 ~]# sed -i ' /^SELINUX/s#enforcing#disabled#g' /etc/selinux/config
5、配置免密登录(三台服务器执行同样的操作)
[root@ c7m01 ~]# vim ssh.sh

#!/bin/bash

yum -y install sshpass &> /dev/null

read -p "请输入服务器密码:" passwd

UserName=root

IP="10.0.0."

#创建密钥

ssh-keygen -t dsa -f ~/.ssh/id_dsa -P "" &>/dev/null

#分发公钥

for i in   14   #这里的要改成自己机子的ip

  do

    sshpass -p "$passwd" ssh-copy-id -i ~/.ssh/id_dsa.pub -p  -o StrictHostKeyChecking=no $UserName@$IP$i &>/dev/null

done
6、执行脚本配置,并连接其中一台服务器
[root@ c7m01 ~]# sh ssh.sh

请输入服务器密码:

[root@ c7m01 ~]#

[root@ c7m01 ~]# ssh root@10.0.0.13

Last login: Fri Feb  ::  from 10.0.0.1

[root@ c702 ~]# exit

logout

Connection to 10.0.0.13 closed.
7、mysql安装yum repo(三台服务器执行同样的操作)
[root@ c7m01 ~]# wget http://repo.mysql.com/mysql-community-release-el7-5.noarch.rpm

[root@ c7m01 ~]# rpm -ivh mysql-community-release-el7-.noarch.rpm

[root@ c7m01 ~]# yum -y install mysql-server
8、启动MySQL,三台服务器执行同样的操作
[root@ c7m01 ~]# systemctl restart mysql
9、修改MySQL密码,三台服务器执行同样的操作
mysql> update mysql.user set password=password('') where user='root' and host='localhost';

Query OK,  row affected (0.00 sec)

Rows matched:   Changed:   Warnings:

mysql> flush privileges;

Query OK,  rows affected (0.00 sec)

mysql>
主服务器上操作
10、在c7m01服务器上更改mysql配置文件
vim /etc/my.cnf

[mysqld]

server-id=

log-bin=mysql-bin

#禁止mysql自动删除relaylog工能

relay_log_purge =

#mysql5.6已上的特性,开启gtid,必须主从全开

gtid_mode = on

enforce_gtid_consistency =

log_slave_updates = 1

更改完成后重启mysql
systemctl restart mysql
11、创建同步用户
[root@ c7m01 ~]# mysql -uroot -p123456

Warning: Using a password on the command line interface can be insecure.

Welcome to the MySQL monitor.  Commands end with ; or \g.

Your MySQL connection id is

Server version: 5.6.-log MySQL Community Server (GPL)

Copyright (c) , , Oracle and/or its affiliates. All rights reserved.

Oracle is a registered trademark of Oracle Corporation and/or its

affiliates. Other names may be trademarks of their respective

owners.

Type 'help;' or '\h' for help. Type '\c' to clear the current input statement.

mysql> grant replication slave on *.* to 'rep'@'10.0.0.%' identified by '';

Query OK,  rows affected (0.01 sec)

mysql> flush privileges;

Query OK,  rows affected (0.00 sec)
12、查看MySQL主库的master状态
mysql> show master status\G

*************************** . row ***************************

             File: mysql-bin.

         Position:

     Binlog_Do_DB:

 Binlog_Ignore_DB:

Executed_Gtid_Set: f45fe1ec-53a4-11ea-899f-000c29d39f7e:-

 row in set (0.00 sec)

mysql> show master status;

+------------------+----------+--------------+------------------+------------------------------------------+

| File             | Position | Binlog_Do_DB | Binlog_Ignore_DB | Executed_Gtid_Set                        |

+------------------+----------+--------------+------------------+------------------------------------------+

| mysql-bin. |       |              |                  | f45fe1ec-53a4-11ea-899f-000c29d39f7e:- |

+------------------+----------+--------------+------------------+------------------------------------------+

 row in set (0.00 sec)
13、查看GTID状态
mysql> show global variables like '%gtid%';

+---------------------------------+------------------------------------------+

| Variable_name                   | Value                                    |

+---------------------------------+------------------------------------------+

| binlog_gtid_simple_recovery     | OFF                                      |

| enforce_gtid_consistency        | ON                                       |  #执行GTID模块

| gtid_executed                   | f45fe1ec-53a4-11ea-899f-000c29d39f7e:- |

| gtid_mode                       | ON                                       |  #开启GTID模块

| gtid_owned                      |                                          |

| gtid_purged                     |                                          |

| simplified_binlog_gtid_recovery | OFF                                      |

+---------------------------------+------------------------------------------+

 rows in set (0.00 sec)
c702从服务器上操作
14、在c702服务器上更改mysql配置文件
vim /etc/my.cnf

[mysqld]

server-id=

log-bin=mysql-bin

#禁止mysql自动删除relaylog工能

relay_log_purge =

#mysql5.6已上的特性,开启gtid,必须主从全开

gtid_mode = on

enforce_gtid_consistency =

log_slave_updates =

更改完成后重启mysql

systemctl restart mysql
15、创建同步用户
[root@ c702 ~]# mysql -uroot -p123456

Warning: Using a password on the command line interface can be insecure.

Welcome to the MySQL monitor.  Commands end with ; or \g.

Your MySQL connection id is

Server version: 5.6.-log MySQL Community Server (GPL)

Copyright (c) , , Oracle and/or its affiliates. All rights reserved.

Oracle is a registered trademark of Oracle Corporation and/or its

affiliates. Other names may be trademarks of their respective

owners.

Type 'help;' or '\h' for help. Type '\c' to clear the current input statement.

mysql> grant replication slave on *.* to 'rep'@'10.0.0.%' identified by '';

Query OK,  rows affected (0.00 sec)

mysql> flush privileges;

Query OK,  rows affected (0.00 sec)
16、关闭复制功能,配置指向master,开启服务器复制状态,检查复制状态,出现俩个yes状态表示成功
mysql> stop slave;

Query OK,  rows affected,  warning (0.00 sec)

mysql> change master to

    -> master_host='10.0.0.12',

    -> master_user='rep',

    -> master_password='',

    -> master_log_file='mysql-bin.000002',

    -> master_log_pos=;

Query OK,  rows affected,  warnings (0.06 sec)

mysql> flush privileges;

Query OK,  rows affected (0.00 sec)

mysql> start slave;

Query OK,  rows affected (0.01 sec)

mysql> show slave status\G

*************************** . row ***************************

               Slave_IO_State: Waiting for master to send event

                  Master_Host: 10.0.0.12

                  Master_User: rep

                  Master_Port:

                Connect_Retry:

              Master_Log_File: mysql-bin.

          Read_Master_Log_Pos:

               Relay_Log_File: mysqld-relay-bin.

                Relay_Log_Pos:

        Relay_Master_Log_File: mysql-bin.

             Slave_IO_Running: Yes

            Slave_SQL_Running: Yes

              Replicate_Do_DB:

          Replicate_Ignore_DB:

           Replicate_Do_Table:

       Replicate_Ignore_Table:

      Replicate_Wild_Do_Table:

  Replicate_Wild_Ignore_Table:

                   Last_Errno:

                   Last_Error:

                 Skip_Counter:

          Exec_Master_Log_Pos:

              Relay_Log_Space:

              Until_Condition: None

               Until_Log_File:

                Until_Log_Pos:

           Master_SSL_Allowed: No

           Master_SSL_CA_File:

           Master_SSL_CA_Path:

              Master_SSL_Cert:

            Master_SSL_Cipher:

               Master_SSL_Key:

        Seconds_Behind_Master:

Master_SSL_Verify_Server_Cert: No

                Last_IO_Errno:

                Last_IO_Error:

               Last_SQL_Errno:

               Last_SQL_Error:

  Replicate_Ignore_Server_Ids:

             Master_Server_Id:

                  Master_UUID: f45fe1ec-53a4-11ea-899f-000c29d39f7e

             Master_Info_File: /var/lib/mysql/master.info

                    SQL_Delay:

          SQL_Remaining_Delay: NULL

      Slave_SQL_Running_State: Slave has read all relay log; waiting for the slave I/O thread to update it

           Master_Retry_Count:

                  Master_Bind:

      Last_IO_Error_Timestamp:

     Last_SQL_Error_Timestamp:

               Master_SSL_Crl:

           Master_SSL_Crlpath:

           Retrieved_Gtid_Set:

            Executed_Gtid_Set: fdcedb5b-53a4-11ea-899f-000c2927e658:-

                Auto_Position:

 row in set (0.00 sec)

mysql>
c703服务器
17、在c702服务器上更改mysql配置文件
vim /etc/my.cnf

[mysqld]

server-id=

log-bin=mysql-bin

#禁止mysql自动删除relaylog工能

relay_log_purge =

#mysql5.6已上的特性,开启gtid,必须主从全开

gtid_mode = on

enforce_gtid_consistency =

log_slave_updates =

更改完成后重启mysql

systemctl restart mysql
18、创建同步用户
[root@ c703 ~]# mysql -uroot -p123456

Warning: Using a password on the command line interface can be insecure.

Welcome to the MySQL monitor.  Commands end with ; or \g.

Your MySQL connection id is

Server version: 5.6.-log MySQL Community Server (GPL)

Copyright (c) , , Oracle and/or its affiliates. All rights reserved.

Oracle is a registered trademark of Oracle Corporation and/or its

affiliates. Other names may be trademarks of their respective

owners.

Type 'help;' or '\h' for help. Type '\c' to clear the current input statement.

mysql> grant replication slave on *.* to 'rep'@'10.0.0.%' identified by '';

Query OK,  rows affected (0.00 sec)

mysql> flush privileges;

Query OK,  rows affected (0.00 sec)
19、关闭复制功能,配置指向master,开启服务器复制状态,检查复制状态,出现俩个yes状态表示成功
mysql> stop slave;

Query OK,  rows affected (0.00 sec)

mysql> change master to

    -> master_host='10.0.0.12',

    -> master_user='rep',

    -> master_password='',

    -> master_log_file='mysql-bin.000002',

    -> master_log_pos=;

Query OK,  rows affected,  warnings (0.00 sec)

mysql> flush privileges;

Query OK,  rows affected (0.00 sec)

mysql> start slave;

Query OK,  rows affected (0.00 sec)

mysql> show slave status \G

*************************** . row ***************************

               Slave_IO_State: Waiting for master to send event

                  Master_Host: 10.0.0.12

                  Master_User: rep

                  Master_Port:

                Connect_Retry:

              Master_Log_File: mysql-bin.

          Read_Master_Log_Pos:

               Relay_Log_File: mysqld-relay-bin.

                Relay_Log_Pos:

        Relay_Master_Log_File: mysql-bin.

             Slave_IO_Running: Yes

            Slave_SQL_Running: Yes

              Replicate_Do_DB:

          Replicate_Ignore_DB:

           Replicate_Do_Table:

       Replicate_Ignore_Table:

      Replicate_Wild_Do_Table:

  Replicate_Wild_Ignore_Table:

                   Last_Errno:

                   Last_Error:

                 Skip_Counter:

          Exec_Master_Log_Pos:

              Relay_Log_Space:

              Until_Condition: None

               Until_Log_File:

                Until_Log_Pos:

           Master_SSL_Allowed: No

           Master_SSL_CA_File:

           Master_SSL_CA_Path:

              Master_SSL_Cert:

            Master_SSL_Cipher:

               Master_SSL_Key:

        Seconds_Behind_Master:

Master_SSL_Verify_Server_Cert: No

                Last_IO_Errno:

                Last_IO_Error:

               Last_SQL_Errno:

               Last_SQL_Error:

  Replicate_Ignore_Server_Ids:

             Master_Server_Id:

                  Master_UUID: f45fe1ec-53a4-11ea-899f-000c29d39f7e

             Master_Info_File: /var/lib/mysql/master.info

                    SQL_Delay:

          SQL_Remaining_Delay: NULL

      Slave_SQL_Running_State: Slave has read all relay log; waiting for the slave I/O thread to update it

           Master_Retry_Count:

                  Master_Bind:

      Last_IO_Error_Timestamp:

     Last_SQL_Error_Timestamp:

               Master_SSL_Crl:

           Master_SSL_Crlpath:

           Retrieved_Gtid_Set:

            Executed_Gtid_Set: 0033cbb6-53a5-11ea-899f-000c298eeea7:-

                Auto_Position:

 row in set (0.00 sec)
20、在三台服务器装MHA的依赖
yum -y install perl-dbd-mysql
yum -y install per-Config-Tiny epel-release perl-Log-Dispatch perl-Parallel-ForKManager perl-Time-HiRes
21、授权MHA管理用户(三台服务器执行同样的操作)
mysql> grant all privileges on *.* to mha@'10.0.0.%' identified by 'mha';

Query OK,  rows affected (0.00 sec)

mysql> flush privileges;

Query OK,  rows affected (0.00 sec)
22、安装MHA node节点
[root@ c7m01 ~]# ll

total

-rw-------.  root root   -- : anaconda-ks.cfg

-rw-r--r--   root root  -- : mha4mysql-manager-0.58-.el7.centos.noarch.rpm

-rw-r--r--   root root  -- : mha4mysql-node-0.58-.el7.centos.noarch.rpm

-rw-r--r--   root root   -- : mysql-community-release-el7-.noarch.rpm

-rw-r--r--   root root   -- : mysql-community-release-el7-.noarch.rpm.

-rw-r--r--   root root    -- : ssh.sh

[root@ c7m01 ~]# rpm -ivh mha4mysql-node-0.58-.el7.centos.noarch.rpm

Preparing...                          ################################# [%]

Updating / installing...

   :mha4mysql-node-0.58-.el7.centos ################################# [%]

[root@ c7m01 ~]#
在c703上执行
如果安装到错误的机器上可以撤销掉,否则后期vip漂移会出错
[root@ c7m01 ~]# rpm -qa |grep mha4mysql-manager-0.58-.el7.centos.noarch.rpm

[root@ c7m01 ~]# rpm -e mha4mysql-manager
23、安装管理MHA的管理节点
[root@ c703 ~]# ll

total

-rw-------.  root root   -- : anaconda-ks.cfg

-rw-r--r--   root root  -- : mha4mysql-manager-0.58-.el7.centos.noarch.rpm

-rw-r--r--   root root  -- : mha4mysql-node-0.58-.el7.centos.noarch.rpm

-rw-r--r--   root root   -- : mysql-community-release-el7-.noarch.rpm

-rw-r--r--   root root    -- : ssh.sh

[root@ c703 ~]# rpm -ivh mha4mysql-manager-0.58-.el7.centos.noarch.rpm

Preparing...                          ################################# [%]

Updating / installing...

   :mha4mysql-manager-0.58-.el7.cent################################# [%]
24、配置MHA
[root@ c703 ~]# mkdir -p /etc/mha

[root@ c703 ~]# mkdir -p /var/log/mha/app1

[root@ c703 ~]# vim /etc/mha/app1.cnf

[server default]

manager_log=/var/log/mha/app1/manager.log

manager_workdir=/var/log/mha/app1

master_binlog_dir=/var/lib/mysql #binlog的目录,如果说miysql的环境不一样,binlog位置不同,每台服务器的binlog的位置写在server标签里面即可

user=mha

password=mha

ping_interval=

repl_password=

repl_user=rep

ssh_user=root

[server1]

hostname=10.0.0.12

port=

[server2]

hostname=10.0.0.13

port=

[server3]

hostname=10.0.0.14

port=

ignore_fail=  #如果这个节点挂了,mha将不可用,加上这个参数,slave挂了一样可以用

no_master=  #从不将这台主机转换为master

#candidate_master= #如果候选master有延迟的话,relay日志超过100m,failover切换不能成功,加上此参数后会忽略延迟日志大小。

#check_repl_delay= #用防止master故障时,切换时slave有延迟,卡在那里切不过来

#注意这里的配置要把注释和空格全部删除
检查ssh
[root@ c703 ~]# masterha_check_ssh --conf=/etc/mha/app1.cnf

Fri Feb  ::  - [warning] Global configuration file /etc/masterha_default.cnf not found. Skipping.

Fri Feb  ::  - [info] Reading application default configuration from /etc/mha/app1.cnf..

Fri Feb  ::  - [info] Reading server configuration from /etc/mha/app1.cnf..

Fri Feb  ::  - [info] Starting SSH connection tests..

Fri Feb  ::  - [debug]

Fri Feb  ::  - [debug]  Connecting via SSH from root@10.0.0.12(10.0.0.12:) to root@10.0.0.13(10.0.0.13:)..

Fri Feb  ::  - [debug]   ok.

Fri Feb  ::  - [debug]  Connecting via SSH from root@10.0.0.12(10.0.0.12:) to root@10.0.0.14(10.0.0.14:)..

Fri Feb  ::  - [debug]   ok.

Fri Feb  ::  - [debug]

Fri Feb  ::  - [debug]  Connecting via SSH from root@10.0.0.13(10.0.0.13:) to root@10.0.0.12(10.0.0.12:)..

Fri Feb  ::  - [debug]   ok.

Fri Feb  ::  - [debug]  Connecting via SSH from root@10.0.0.13(10.0.0.13:) to root@10.0.0.14(10.0.0.14:)..

Fri Feb  ::  - [debug]   ok.

Fri Feb  ::  - [debug]

Fri Feb  ::  - [debug]  Connecting via SSH from root@10.0.0.14(10.0.0.14:) to root@10.0.0.12(10.0.0.12:)..

Fri Feb  ::  - [debug]   ok.

Fri Feb  ::  - [debug]  Connecting via SSH from root@10.0.0.14(10.0.0.14:) to root@10.0.0.13(10.0.0.13:)..

Fri Feb  ::  - [debug]   ok.

Fri Feb  ::  - [info] All SSH connection tests passed successfully.

[root@ c703 ~]#
这里放一个报错的
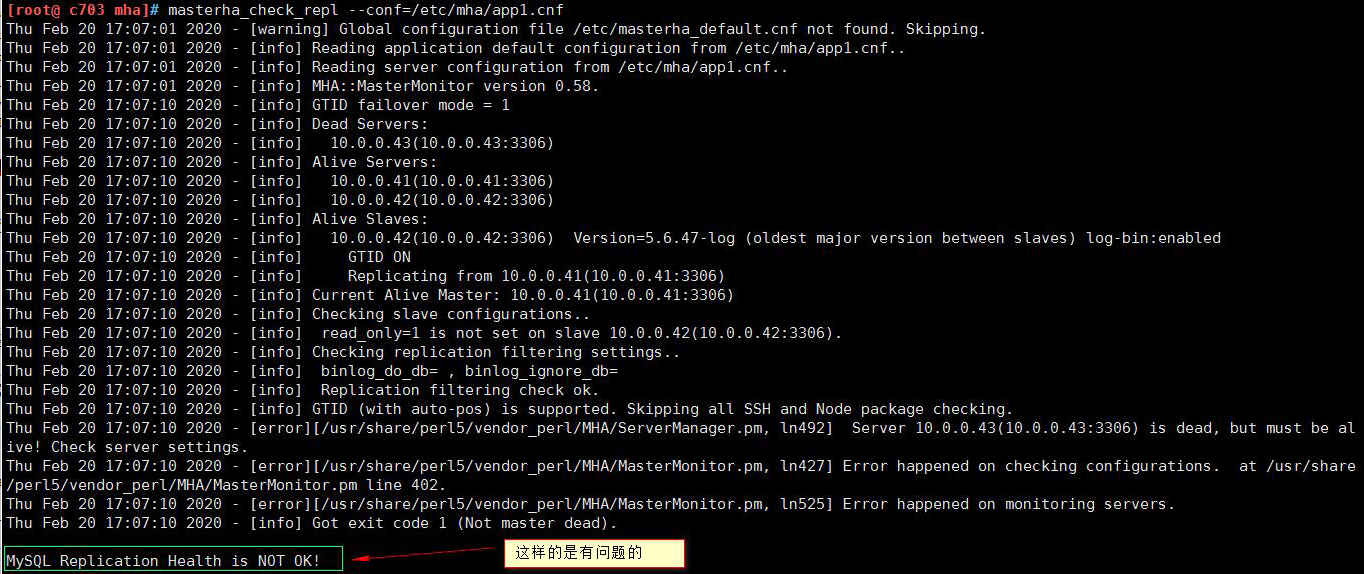
解决办法就是在三台服务器的mysql配置文件加一个跳过域名解析
skip-name-resolve
[root@ c703 ~]# masterha_check_repl --conf=/etc/mha/app1.cnf
25、启动MHA
[root@ c703 ~]# nohup masterha_manager --conf=/etc/mha/app1.cnf --remove_dead_master_conf --ignore_last_failover < /dev/null > /var/log/mha/app1/manager.log 2>&1 &
[1] 6041
[root@ c703 ~]# ps -ef |grep mha
root 6041 4852 0 14:37 pts/0 00:00:00 perl /usr/bin/masterha_manager --conf=/etc/mha/app1.cnf --remove_dead_master_conf --ignore_last_failover
root 6066 4852 0 14:38 pts/0 00:00:00 grep --color=auto mha
26、查看MHA状态
[root@ c703 ~]# masterha_check_status --conf=/etc/mha/app1.cnf

app1 (pid:) is running(:PING_OK), master:10.0.0.12
27、关闭MHA
[root@ c703 ~]# masterha_stop --conf=/etc/mha/app1.cnf

Stopped app1 successfully.

[]+  Exit                   nohup masterha_manager --conf=/etc/mha/app1.cnf --remove_dead_master_conf --ignore_last_failover < /dev/null > /var/log/mha/app1/manager.log >&
28、从库从新加入新生
[root@ c703 ~]# grep -i "CHANGE MASTER TO MASTER" /var/log/mha/app1/manager.log | tail -
29、测试MHA故障转移
停掉c7m01上的mysql 10.0.0.12
[root@ c7m01 ~]# systemctl stop mysql
30、在c703上查看slave的状态,发现master_host变成10.0.0.13
[root@ c703 ~]# mysql -uroot -p123456 -e 'show slave status\G';

Warning: Using a password on the command line interface can be insecure.

*************************** . row ***************************

               Slave_IO_State: Reconnecting after a failed master event read

                  Master_Host: 10.0.0.13

                  Master_User: rep

                  Master_Port:

                Connect_Retry:

              Master_Log_File: mysql-bin.

          Read_Master_Log_Pos:

               Relay_Log_File: mysqld-relay-bin.

                Relay_Log_Pos:

        Relay_Master_Log_File: mysql-bin.

             Slave_IO_Running: Connecting

            Slave_SQL_Running: Yes

              Replicate_Do_DB:

          Replicate_Ignore_DB:

           Replicate_Do_Table:

       Replicate_Ignore_Table:

      Replicate_Wild_Do_Table:

  Replicate_Wild_Ignore_Table:

                   Last_Errno:

                   Last_Error:

                 Skip_Counter:

          Exec_Master_Log_Pos:

              Relay_Log_Space:

              Until_Condition: None

               Until_Log_File:

                Until_Log_Pos:

           Master_SSL_Allowed: No

           Master_SSL_CA_File:

           Master_SSL_CA_Path:

              Master_SSL_Cert:

            Master_SSL_Cipher:

               Master_SSL_Key:

        Seconds_Behind_Master: NULL

Master_SSL_Verify_Server_Cert: No

                Last_IO_Errno:

                Last_IO_Error: error reconnecting to master 'rep@10.0.0.12:3306' - retry-time:   retries:

               Last_SQL_Errno:

               Last_SQL_Error:

  Replicate_Ignore_Server_Ids:

             Master_Server_Id:

                  Master_UUID: f45fe1ec-53a4-11ea-899f-000c29d39f7e

             Master_Info_File: /var/lib/mysql/master.info

                    SQL_Delay:

          SQL_Remaining_Delay: NULL

      Slave_SQL_Running_State: Slave has read all relay log; waiting for the slave I/O thread to update it

           Master_Retry_Count:

                  Master_Bind:

      Last_IO_Error_Timestamp:  ::

     Last_SQL_Error_Timestamp:

               Master_SSL_Crl:

           Master_SSL_Crlpath:

           Retrieved_Gtid_Set: f45fe1ec-53a4-11ea-899f-000c29d39f7e:-

            Executed_Gtid_Set: 0033cbb6-53a5-11ea-899f-000c298eeea7:-,

f45fe1ec-53a4-11ea-899f-000c29d39f7e:-

                Auto_Position:
31、查看c703的配置文件
[root@ c703 ~]# cat /etc/mha/app1.cnf

[server default]

manager_log=/var/log/mha/app1/manager.log

manager_workdir=/var/log/mha/app1

master_binlog_dir=/var/lib/mysql

user=mha

password=mha

ping_interval=

repl_password=

repl_user=rep

ssh_user=root

[server2]

hostname=10.0.0.13

port=

[server3]

hostname=10.0.0.14

port=

ignore_fail=

no_master=

#candidate_master=

#check_repl_delay=
当c7m01上的主库荡机之后,MHA会自动检查,发现主库mysql停机,立刻会把从库上提升为主库,然后另一台服务器会把mysql主从复制的master_host改为新提升的主库
32、MHA故障还原
先在c703上查看一下
[root@c703 ~]# grep "CHANGE MASTER TO MASTER" /var/log/mha/app1/manager.log | tail -

Fri Feb  ::  - [info]  All other slaves should start replication from here. Statement should be: CHANGE MASTER TO MASTER_HOST='10.0.0.12', MASTER_PORT=, MASTER_AUTO_POSITION=, MASTER_USER='rep', MASTER_PASSWORD='xxx';
33、在c7m01上执行
[root@c7m01 ~]# mysql -uroot -p123456 -e "CHANGE MASTER TO MASTER_HOST='10.0.0.13',MASTER_PORT=3306, MASTER_AUTO_POSITION=1,MASTER_USER='rep',MASTER_PASSWORD='123456';"
[root@c7m01 ~]# mysql -uroot -p123456 -e "start slave;"

[root@c7m01 ~]# mysql -uroot -p123456 -e "show slave status \G"
这个时候的MHA是一次性的,当12上的mysql荡掉之后,就会把13的mysql变成主库,当再次荡机之后,不会在发生改变
在c703上执行
34、修复mysql,将server1标签加入到app1的配置文件中
[root@ c703 ~]# cat /etc/mha/app1.cnf

[server default]

manager_log=/var/log/mha/app1/manager.log

manager_workdir=/var/log/mha/app1

master_binlog_dir=/var/lib/mysql

user=mha

password=mha

ping_interval=

repl_password=

repl_user=rep

ssh_user=root

[server1]

hostname=10.0.0.12

port=

[server2]

hostname=10.0.0.13

port=

[server3]

hostname=10.0.0.14

port=

ignore_fail=

no_master=

#candidate_master=

#check_repl_delay=
34、重新启动MHA
[root@ c703 ~]# nohup masterha_manager --conf=/etc/mha/app1.cnf --remove_dead_master_conf --ignore_last_failover < /dev/null > /var/log/mha/app1/manager.log >& &

[]
配置vip漂移,有俩种方式
第一种是keepalived的方式,管理虚拟ip的漂移
第二种是MHA自带脚本的方式,管理虚拟ip的漂移(这个漂移就是那个服务器的mysql库提升为主库,就漂移到那个上面,要根据binlog的最新slave方式提升)
35、MHA脚本方式
修改app1配置文件,添加
[root@ c703 ~]# vim /etc/mha/app1.cnf

[server default]

master_ip_failover_script=/usr/bin/master_ip_failover    #添加这一行
编写脚本
[root@ c703 ~]# vim /usr/bin/master_ip_failover #!/usr/bin/env perl use strict;
use warnings FATAL => 'all'; use Getopt::Long; my (
$command, $ssh_user, $orig_master_host, $orig_master_ip,
$orig_master_port, $new_master_host, $new_master_ip, $new_master_port
); my $vip = '10.0.0.100/24'; #这里的vip地址写一个与自己IP地址相同的IP段
my $key = '';
my $ssh_start_vip = "/sbin/ifconfig ens33:$key $vip"; #这里的网卡要看自己外网的外卡是不是ens33,不是的话要改成自己的外网网卡
my $ssh_stop_vip = "/sbin/ifconfig ens33:$key down"; GetOptions(
'command=s' => \$command,
'ssh_user=s' => \$ssh_user,
'orig_master_host=s' => \$orig_master_host,
'new_master_ip=s' => \$new_master_ip,
'new_master_port=i' => \$new_master_port,
); exit &main(); sub main { print "\n\nIN SCRIPT TEST====$ssh_stop_vip==$ssh_start_vip===\n\n"; if ( $command eq "stop" || $command eq "stopssh" ) { my $exit_code = ;
eval {
print "Disabling the VIP on old master: $orig_master_host \n";
&stop_vip();
$exit_code = ;
};
if ($@) {
warn "Got Error: $@\n";
exit $exit_code;
}
exit $exit_code;
}
elsif ( $command eq "start" ) { my $exit_code = ;
eval {
print "Enabling the VIP - $vip on the new master - $new_master_host \n";
&start_vip();
$exit_code = ;
};
if ($@) {
warn $@;
exit $exit_code;
}
exit $exit_code;
}
elsif ( $command eq "status" ) {
print "Checking the Status of the script.. OK \n";
exit ;
}
else {
&usage();
exit ;
}
} sub start_vip() {
`ssh $ssh_user\@$new_master_host \" $ssh_start_vip \"`;
}
sub stop_vip() {
return unless ($ssh_user);
`ssh $ssh_user\@$orig_master_host \" $ssh_stop_vip \"`;
} sub usage {
"Usage: master_ip_failover --command=start|stop|stopssh|status --orig_master_host=host --orig_master_ip=ip --orig_master_port=port --new_master_host=host --new_master_ip=ip --new_master_port=port\n";
}
36、给脚本加权限
[root@ c703 ~]# chmod +x /usr/bin/master_ip_failover
37、手动添加vip,绑定到主库的机子上,我这里是10.0.0.13
[root@ c702 ~]# ifconfig ens33: 10.0.0.100/

[root@ c702 ~]# ip a show ens33

: ens33: <BROADCAST,MULTICAST,UP,LOWER_UP> mtu  qdisc pfifo_fast state UP qlen

    link/ether :0c::d3:9f:7e brd ff:ff:ff:ff:ff:ff

    inet 10.0.0.13/ brd 10.0.0.255 scope global ens33

       valid_lft forever preferred_lft forever

    inet 10.0.0.100/ brd 10.0.0.255 scope global secondary ens33:

       valid_lft forever preferred_lft forever

    inet6 fe80::20c:29ff:fed3:9f7e/ scope link

       valid_lft forever preferred_lft forever
38、重启MHA
[root@ c703 ~]# masterha_stop --conf=/etc/mha/app1.cnf

Stopped app1 successfully.

[]+  Exit                   nohup masterha_manager --conf=/etc/mha/app1.cnf --remove_dead_master_conf --ignore_last_failover < /dev/null > /var/log/mha/app1/manager.log >&

[root@ c703 ~]# nohup masterha_manager --conf=/etc/mha/app1.cnf --remove_dead_master_conf --ignore_last_failover < /dev/null > /var/log/mha/app1/manager.log >& &

[]
模拟主库宕机vip飘移
在c702上操作
[root@ c702 ~]# systemctl stop mysql

[root@ c702 ~]# ip a show ens33

: ens33: <BROADCAST,MULTICAST,UP,LOWER_UP> mtu  qdisc pfifo_fast state UP qlen

    link/ether :0c::d3:9f:7e brd ff:ff:ff:ff:ff:ff

    inet 10.0.0.12/ brd 10.0.0.255 scope global ens33

       valid_lft forever preferred_lft forever

    inet6 fe80::20c:29ff:fed3:9f7e/ scope link

       valid_lft forever preferred_lft forever
这个时候vip已经漂移到另一台服务器上,将另一台服务器做为主库
查看c7m01上是否有vip漂移
[root@ c7m01 ~]# ip a show ens33

: ens33: <BROADCAST,MULTICAST,UP,LOWER_UP> mtu  qdisc pfifo_fast state UP qlen

    link/ether :0c:::e6: brd ff:ff:ff:ff:ff:ff

    inet 10.0.0.13/ brd 10.0.0.255 scope global ens33

       valid_lft forever preferred_lft forever

    inet 10.0.0.100/ brd 10.0.0.255 scope global secondary ens33:

       valid_lft forever preferred_lft forever

    inet6 fe80::20c:29ff:fe27:e658/ scope link

       valid_lft forever preferred_lft forever
当vip漂移到另一台服务器上表示成功,然后查看MHA的服务器上是否改变到另一台服务器上的master_host
[root@ c703 ~]# mysql -uroot -p123456 -e 'show slave status\G';

Warning: Using a password on the command line interface can be insecure.

*************************** . row ***************************

               Slave_IO_State: Waiting for master to send event

                  Master_Host: 10.0.0.12

                  Master_User: rep

                  Master_Port:

                Connect_Retry:

              Master_Log_File: mysql-bin.

          Read_Master_Log_Pos:

               Relay_Log_File: mysqld-relay-bin.

                Relay_Log_Pos:

        Relay_Master_Log_File: mysql-bin.

             Slave_IO_Running: Yes

            Slave_SQL_Running: Yes

              Replicate_Do_DB:

          Replicate_Ignore_DB:

           Replicate_Do_Table:

       Replicate_Ignore_Table:

      Replicate_Wild_Do_Table:

  Replicate_Wild_Ignore_Table:

                   Last_Errno:

                   Last_Error:

                 Skip_Counter:

          Exec_Master_Log_Pos:

              Relay_Log_Space:

              Until_Condition: None

               Until_Log_File:

                Until_Log_Pos:

           Master_SSL_Allowed: No

           Master_SSL_CA_File:

           Master_SSL_CA_Path:

              Master_SSL_Cert:

            Master_SSL_Cipher:

               Master_SSL_Key:

        Seconds_Behind_Master:

Master_SSL_Verify_Server_Cert: No

                Last_IO_Errno:

                Last_IO_Error:

               Last_SQL_Errno:

               Last_SQL_Error:

  Replicate_Ignore_Server_Ids:

             Master_Server_Id:

                  Master_UUID: fdcedb5b-53a4-11ea-899f-000c2927e658

             Master_Info_File: /var/lib/mysql/master.info

                    SQL_Delay:

          SQL_Remaining_Delay: NULL

      Slave_SQL_Running_State: Slave has read all relay log; waiting for the slave I/O thread to update it

           Master_Retry_Count:

                  Master_Bind:

      Last_IO_Error_Timestamp:

     Last_SQL_Error_Timestamp:

               Master_SSL_Crl:

           Master_SSL_Crlpath:

           Retrieved_Gtid_Set: fdcedb5b-53a4-11ea-899f-000c2927e658:-

            Executed_Gtid_Set: 0033cbb6-53a5-11ea-899f-000c298eeea7:-,

f45fe1ec-53a4-11ea-899f-000c29d39f7e:-,

fdcedb5b-53a4-11ea-899f-000c2927e658:-

                Auto_Position:

[]+  Done                    nohup masterha_manager --conf=/etc/mha/app1.cnf --remove_dead_master_conf --ignore_last_failover < /dev/null > /var/log/mha/app1/manager.log >&
这个时候MHA上app1配置文件里server2已经被诶剔除了
[root@ c703 ~]# cat /etc/mha/app1.cnf

[server default]

manager_log=/var/log/mha/app1/manager.log

manager_workdir=/var/log/mha/app1

master_binlog_dir=/var/lib/mysql

master_ip_failover_script=/usr/bin/master_ip_failover

password=mha

ping_interval=

repl_password=

repl_user=rep

ssh_user=root

user=mha

[server1]

hostname=10.0.0.12

port=

[server3]

hostname=10.0.0.14

ignore_fail=

no_master=

port=
这个时候开始修复,手动操作,将他恢复到之前的状态
[root@ c703 ~]# grep "CHANGE MASTER TO MASTER" /var/log/mha/app1/manager.log | tail -

Fri Feb  ::  - [info]  All other slaves should start replication from here. Statement should be: CHANGE MASTER TO MASTER_HOST='10.0.0.13', MASTER_PORT=, MASTER_AUTO_POSITION=, MASTER_USER='rep', MASTER_PASSWORD='xxx';
[root@c702 ~]#systemctl restart mysql
[root@c702 ~]# mysql -uroot -p123456 -e "CHANGE MASTER TO MASTER_HOST='10.0.0.12',MASTER_PORT=3306, MASTER_AUTO_POSITION=1,MASTER_USER='rep',MASTER_PASSWORD='123456';"
[root@c702 ~]# mysql -uroot -p123456 -e "start slave;"

[root@c702 ~]# mysql -uroot -p123456 -e "show slave status \G"

#重启MHA
nohup masterha_manager --conf=/etc/mha/app1.cnf --remove_dead_master_conf --ignore_last_failover < /dev/null > /var/log/mha/app1/manager.log 2>&1 &
mysql+MHA高可用 (一主双从)的更多相关文章
- MySQL MHA 高可用集群部署及故障切换
MySQL MHA 高可用集群部署及故障切换 1.概念 2.搭建MySQL + MHA 1.概念: a)MHA概念 : MHA(MasterHigh Availability)是一套优秀的MySQL高 ...
- 搭建MySQL MHA高可用
本文内容参考:http://www.ttlsa.com/mysql/step-one-by-one-deploy-mysql-mha-cluster/ MySQL MHA 高可用集群 环境: Linu ...
- Mysql MHA高可用集群架构
** 记得之前发过一篇文章,名字叫<浅析MySQL高可用架构>,之后一直有很多小伙伴在公众号后台或其它渠道问我,何时有相关的深入配置管理文章出来,因此,民工哥,也将对前面的各类架构逐一进行 ...
- MySQL mha 高可用集群搭建
[mha] MHA作为MySQL故障切换和主从提升的高可用软件,在故障切换过程中,MHA能做到在0~30秒之内自动完成数据库的故障切换操作,并且在进行故障切换的过程中,MHA能在最大程度上保证数据的一 ...
- mysql+MHA高可用
MHA(Master High Availability)目前在MySQL高可用方面是一个相对成熟的解决方案,它由日本DeNA公司youshimaton(现就职于Facebook公司)开发,是一套优秀 ...
- MySQL MHA高可用集群部署及故障切换
一.MHA概念MHA(MasterHigh Availability)是一套优秀的MySQL高可用环境下故障切换和主从复制的软件.MHA 的出现就是解决MySQL 单点的问题.MySQL故障切换过程中 ...
- mysql mha高可用架构的安装
MMM无法全然地保证数据的一致性,所以MMM适用于对数据的一致性要求不是非常高.可是又想最大程度的保证业务可用性的场景对于那些对数据一致性要求非常高的业务,非常不建议採用MMM的这样的高可用性架构.那 ...
- centos7 mysql+MHA高可用安装
https://dzone.com/articles/consul-proxysql-and-mysql-ha?utm_medium=feed&utm_source=feedpress.me& ...
- mysql MHA高可用测试
[环境介绍] 系统环境:Red Hat Enterprise Linux 7 + 5.7.18 + MHA version 0.57 [测试步骤:自动切换] 当前数据库状态: 系统 IP 主机名 备注 ...
随机推荐
- Python对城市距离自动化爬取【必学小型项目】
本地创建数据库,将 excel 数据存储到 city 表中,再取 | 湖北省 | 的所有地级市和县.县级市.区数据作为样表数据记录在样表中.利用 python 的 xlrd 包,定义 proc ...
- 096、Java中String类之手工入对象池操作
01.代码如下: package TIANPAN; /** * 此处为文档注释 * * @author 田攀 微信382477247 */ public class TestDemo { public ...
- php hash算法实现memcached分布式
一.概述Memcached和mysql一样,是一款客户端/服务器端(C/S)系统管理软件,有IP.端口,一旦启动,服务器就一直处于可用状态.Mysql是通过SQL语句管理“磁盘中”的文件,Memcac ...
- 今日份学习:初步的springboot
今日记录 今日份BUG清单 flyway的sql文件有两个下划线 __ , _ 是不可以的. 高版本的freemarker默认的扩展名变成了flth,而不是ftl 今日份用到的网址 1. freema ...
- systemctl常规应用
以samba为例——常用项 #systemctl start smb ——在smb服务没有启动的情况下启动这项服务. #systemctl restart smb ——在修该过相应的配 ...
- Day7 - D - The Euler function HDU - 2824
The Euler function phi is an important kind of function in number theory, (n) represents the amount ...
- haproxy+keepalive双主高可用实现负载均衡
转载自https://blog.51cto.com/3381847248/1977073 前面我已经介绍了haproxy结合keepalive做简单的双主高可用,如果不清楚的话,可以去我的上一 篇博客 ...
- python重要函数eval
1.参数会作为一个 Python 表达式(从技术上说是一个条件列表)被解析并求值 >>> x = 1 >>> eval('x+1') 2 2.去除字符串两边的引号 ...
- SQL计算字符串里的子字符串出现个数
在某个页面,需要显示每条记录中有几个图片文件.图片文件名列表存储在mysql表里的photo_files字段,文件名之间用一个空格分开.类似'images\rpt201503121.jpg image ...
- Essay Fail?可能是引用出了问题
新学期伊始,又有不少成功与雅思分手的学生们海外入学.本以为可以稍微喘口气,却发现漫天的essay接踵而至.因此,Hotessay小编为新瓜蛋子们特地准备了一期essay写作的干货.还不赶紧学起来,用到 ...