
coding++:maven根据不同的运行环境,打包不同的配置文件
1、使用maven管理项目中的依赖,非常的方便。同时利用maven内置的各种插件,在命令行模式下完成打包、部署等操作,可方便后期的持续集成使用。
2、但是每一个maven工程(比如web项目),开发人员在开发时,会使用一种配置文件,比如数据库配置,而测试环境可能使用另一种配置文件。
3、打包完成后,手动调整配置文件,工作重复度很高,因此查找方法,实现“maven根据不同的运行环境,打包不同的配置文件”的目的。
pom.xml中增加插件:
主要关注标红的插件maven-resources-plugin,以及标红的配置部分。
注意:目前经过测试,发现resources目录文件拷贝会在validation阶段之后compile阶段之前执行,为了保证指定环境的配置文件在resources目录拷贝之后执行,使用compile阶段;
overwrite设置为true,强制覆盖原有文件。
使用maven-resources-plugin插件,在compile阶段实现指定目录中配置文件的拷贝操作。
<build>

    <finalName>Lantech</finalName>

    <plugins>

        <plugin>

            <groupId>org.apache.maven.plugins</groupId>

            <artifactId>maven-compiler-plugin</artifactId>

            <version>3.1</version>

            <configuration>

                <source>${java.version}</source>

                <target>${java.version}</target>

                <encoding>UTF-8</encoding>

            </configuration>

        </plugin>

        <!-- 不同环境的配置文件选择 (也可忽略此插件:因为小编目前没发现有啥用)-->

        <plugin>

            <groupId>org.apache.maven.plugins</groupId>

            <artifactId>maven-resources-plugin</artifactId>

            <version>2.6</version>

            <executions>

                <execution>

                    <id>copy-resources</id>

                    <phase>compile</phase>

                    <goals>

                        <goal>copy-resources</goal>

                    </goals>

                    <configuration>

              <!-- 覆盖原有文件 -->

              <overwrite>true</overwrite>

                        <outputDirectory>${project.build.outputDirectory}</outputDirectory>

                        <!-- 也可以用下面这样的方式(指定相对url的方式指定outputDirectory) <outputDirectory>target/classes</outputDirectory> -->

                        <!-- 待处理的资源定义 -->

                        <resources>

                            <resource>

                                <!-- 指定resources插件处理哪个目录下的资源文件 -->

                                <directory>src/main/resources/${package.environment}</directory>

                                <filtering>false</filtering>

                            </resource>

                        </resources>

                    </configuration>

                    <inherited>true</inherited>

                </execution>

            </executions>

        </plugin>

    </plugins>

    <resources>

        <resource>

            <directory>src/main/java</directory>

            <includes>

                <include>**/*.properties</include>

                <include>**/*.xml</include>

            </includes>

            <filtering>true</filtering>

        </resource>

        <resource>

            <directory>src/main/resources</directory>

            <includes>

                <include>**/*.properties</include>

                <include>**/*.xml</include>

            </includes>

            <filtering>true</filtering>

        </resource>

    </resources>

</build>
pom.xml中增加profiles配置(必写)
使用profiles可为maven命令执行时,激活不同的变量,并依据此变量同上述的插件配合,完成指定目录中配置文件拷贝操作。
<profiles>

    <profile>

        <id>dev</id>

        <properties>

            <package.environment>dev</package.environment>

            <com.send.ip>39.105.100.186</com.send.ip>

        </properties>

    </profile>

    <profile>

        <id>test</id>

        <properties>

            <package.environment>test</package.environment>

            <com.send.ip>39.105.100.187</com.send.ip>

        </properties>

    </profile>

    <profile>

        <id>product</id>

        <!-- 是否默认 true表示默认-->

        <activation>

            <activeByDefault>true</activeByDefault>

        </activation>

        <properties>

            <package.environment>product</package.environment>

            <com.send.ip>39.105.100.189</com.send.ip>

        </properties>

</profile>
执行打包命令:
mvn clean package

mvn clean package -Pdev

mvn clean package -Ptest

mvn clean package -Pproduct
执行命令,指定-P参数,启用指定的profile。
项目中测试:
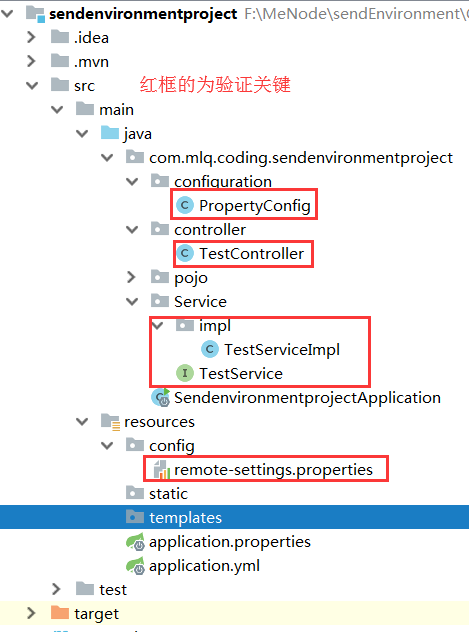
PropertyConfig:引入 *.properties 文件
package com.mlq.coding.sendenvironmentproject.configuration;

import org.springframework.context.annotation.Configuration;

import org.springframework.context.annotation.ImportResource;

import org.springframework.context.annotation.PropertySource;

@Configuration

@PropertySource(ignoreResourceNotFound = true, value = {"classpath:config/remote-settings.properties"})

//@ImportResource({"classpath:dubbo/*.xml"})

public class PropertyConfig {

}
TestController:访问测试
package com.mlq.coding.sendenvironmentproject.controller;

import com.mlq.coding.sendenvironmentproject.Service.TestService;

import org.springframework.beans.factory.annotation.Autowired;

import org.springframework.web.bind.annotation.RequestMapping;

import org.springframework.web.bind.annotation.RestController;

@RestController

public class TestController {

    @Autowired

    private TestService testService;

    @RequestMapping("/iptest")

    public void ipTest() {

        testService.show();

    }

}
TestService:测试接口
package com.mlq.coding.sendenvironmentproject.Service;

public interface TestService {

    void show();

}
TestServiceImpl:测试接口实现
package com.mlq.coding.sendenvironmentproject.Service.impl;

import com.mlq.coding.sendenvironmentproject.Service.TestService;

import org.springframework.beans.factory.annotation.Value;

import org.springframework.stereotype.Service;

@Service

public class TestServiceImpl implements TestService{

    //获取配置文件中的 ip

    @Value("${com.send.test.ip}")

    private String IP;

    @Override

    public void show() {

        System.out.println("返回参数为:{}"+IP);

    }

}
remote-settings.properties:获取不同环境下的 ip
############################################

# system config

############################################

# @com.send.ip@ 是在pom文件中配置的

com.send.test.ip=@com.send.ip@
coding++:maven根据不同的运行环境,打包不同的配置文件的更多相关文章
- maven根据不同的运行环境,打包不同的配置文件
使用maven管理项目中的依赖,非常的方便.同时利用maven内置的各种插件,在命令行模式下完成打包.部署等操作,可方便后期的持续集成使用. 但是每一个maven工程(比如web项目),开发人员在开发 ...
- maven根据不同的运行环境,打包不同的配置文件(转载)
使用maven管理项目中的依赖,非常的方便.同时利用maven内置的各种插件,在命令行模式下完成打包.部署等操作,可方便后期的持续集成使用. 但是每一个maven工程(比如web项目),开发人员在开发 ...
- Maven插件之portable-config-maven-plugin(不同环境打包)
在大型的项目组中,分不同的开发环境,测试环境,生产环境(说白了就是配置文件不同,或者数据源,或者服务器,或者数据库等);问题来了,如何使用Maven针对不同的环境来打包呢? Maven提供了Profi ...
- maven 通过 profile 设置多环境打包
maven 在设计之初就考虑到了业务代码和测试代码的分开存放.将业务代码默认存放在 src/main 下,将测试代码放在 src/test 下,然后在各自目录下再细分 java 与 res ...
- Maven 如何为不同的环境打包 —— 开发、测试和生产环境
在开发过程中,我们的软件会面对不同的运行环境,比如开发环境.测试环境.生产环境,而我们的软件在不同的环境中,有的配置可能会不一样,比如数据源配置.日志文件配置.以及一些软件运行过程中的基本配置,那每次 ...
- Vue项目根据不同运行环境打包项目
前提 项目是直接通过 vue-cli脚手架 生成的: 假设在项目开发中,分为三个环境 -- · 测试环境· 预生产环境· 生产环境 每个环境的接口地址都是不同的,而 vue-cli 给出的环境只有 d ...
- Maven根据不同的环境打包不同的配置
前言: 在开发过程中,我们的软件会面对不同的运行环境,比如开发环境.测试环境.生产环境,而我们的软件在不同的环境中,有的配置可能会不一样,比如数据源配置.日志文件配置等等. 那么就需要借助maven提 ...
- Spring Boot项目使用maven-assembly-plugin根据不同环境打包成tar.gz或者zip
spring-boot-assembly 在spring boot项目中使用maven profiles和maven assembly插件根据不同环境打包成tar.gz或者zip 将spring bo ...
- Maven适配多种运行环境的打包方案
项目从开发到部署会历经多个运行环境,如开发环境.测试环境和生产环境,不同环境中项目的配置文件通常也会不同,典型的如数据库连接配置.我们当然不希望每次部署打包前都去修改配置文件以适配环境,利用Maven ...
随机推荐
- 提高 Web开发性能的 10 个方法
随着网络的高速发展,网络性能的持续提高成为能否在芸芸App中脱颖而出的关键.高度联结的世界意味着用户对网络体验提出了更严苛的要求.假如你的网站不能做到快速响应,又或你的App存在延迟,用户很快就会移情 ...
- 微信Android自动播放视频(可交互,设置层级,无控制条,非X5)ffmpeg,jsmpeg.js,.ts视频
原料: ffmpeg : http://ffmpeg.zeranoe.com/builds/ win64 https://evermeet.cx/ffmpeg/ mac OS X 64 jsmp ...
- react-native app 屏幕适配方案(按照设计稿像素大小写就行)
import React, { Component,PropTypes } from 'react'; import { Dimensions,PixelRatio,Platform,StatusBa ...
- 《深入理解 Java 虚拟机》读书笔记:虚拟机字节码执行引擎
正文 执行引擎是 Java 虚拟机最核心的组成部分之一.在不同的虚拟机实现里,执行引擎在执行 Java 代码时可能会有解释执行(通过解释器执行)和编译执行(通过即时编译器产生本地代码执行)两种选择,也 ...
- iframe 父框架调用子框架的函数
1.父框架定义: <iframe name="mainframe" id="mainframe" width="100%" scrol ...
- burpsuit的安装和简单使用
一.burpsuit的环境搭建 Burp Suite可以说是Web安全工具中的瑞士军刀,打算写几篇Blog以一个小白的角度去学习Burp Suite(简称BP),会详细地说一下的用法,说明一下每一个部 ...
- 使用GUI工具Portainer.io管控Docker容器
背景 5年前容器技术扑面而来,如今已经成为面向云原生开发的基础架构,基于微服务的设计需要部署大量容器,同时强调了友好快速的管理容器. 是时候推荐一个轮子Portainer.io:提供GUI界面的容器管 ...
- 【Python】2.19学习笔记 成员运算符,身份运算符,运算符优先级
成员运算符 暂时不会用,等学链表时再补充 \(in\) 与 \(not in\) \(in\):如果在指定序列中找到指定值,则返回\(true\) \(not in\):如果在指定序列中找到指定值,则 ...
- Python - 面向对象(一)入门篇
Python里面有一句话:万物皆是对象 如何面向对象编程 设计类 创建类实例对象 实例对象调用方法 创建对象 在内存中为对象分配空间 调用初始化方法 __init__ 为对象初始化 对象创建后,内 ...
- DVWA Brute Force 解析
LOW 源代码如下: <?php if( isset( $_GET['Login'] ) ) { $user = $_GET['username']; $pass = $_GET['passwo ...