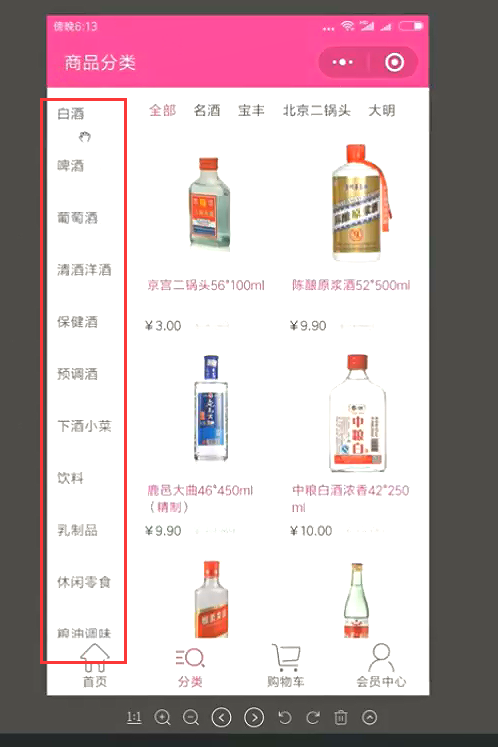
Flutter移动电商实战 --(23)分类页_左侧类别导航制作
自动生成dart类
https://javiercbk.github.io/json_to_dart/
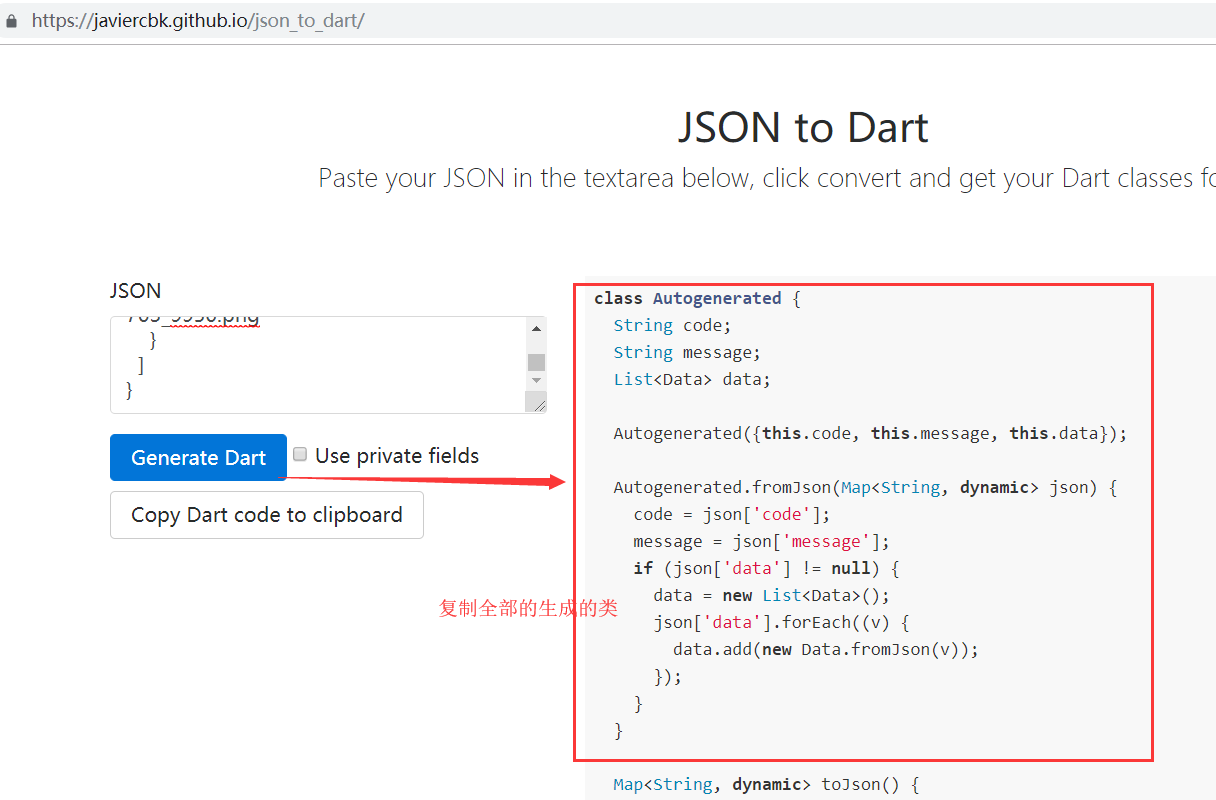
生成的代码
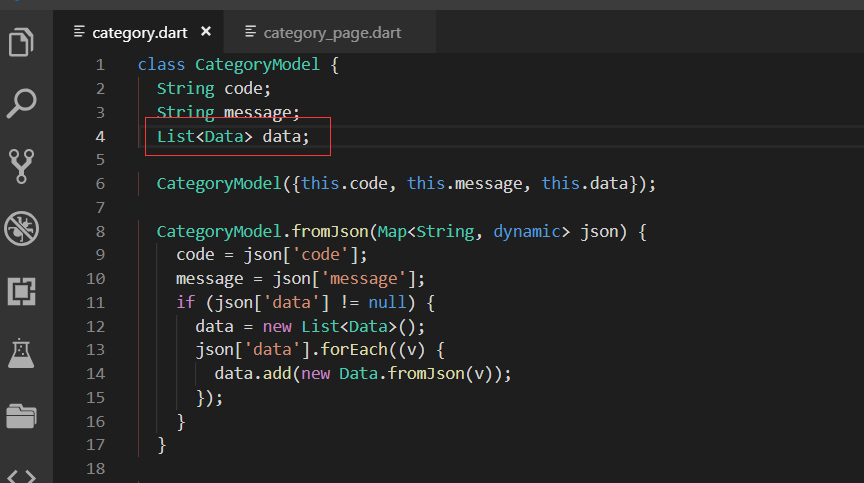
class Autogenerated {

  String code;

  String message;

  List<Data> data;

  Autogenerated({this.code, this.message, this.data});

  Autogenerated.fromJson(Map<String, dynamic> json) {

    code = json['code'];

    message = json['message'];

    if (json['data'] != null) {

      data = new List<Data>();

      json['data'].forEach((v) {

        data.add(new Data.fromJson(v));

      });

    }

  }

  Map<String, dynamic> toJson() {

    final Map<String, dynamic> data = new Map<String, dynamic>();

    data['code'] = this.code;

    data['message'] = this.message;

    if (this.data != null) {

      data['data'] = this.data.map((v) => v.toJson()).toList();

    }

    return data;

  }

}

class Data {

  String mallCategoryId;

  String mallCategoryName;

  List<BxMallSubDto> bxMallSubDto;

  Null comments;

  String image;

  Data(

      {this.mallCategoryId,

      this.mallCategoryName,

      this.bxMallSubDto,

      this.comments,

      this.image});

  Data.fromJson(Map<String, dynamic> json) {

    mallCategoryId = json['mallCategoryId'];

    mallCategoryName = json['mallCategoryName'];

    if (json['bxMallSubDto'] != null) {

      bxMallSubDto = new List<BxMallSubDto>();

      json['bxMallSubDto'].forEach((v) {

        bxMallSubDto.add(new BxMallSubDto.fromJson(v));

      });

    }

    comments = json['comments'];

    image = json['image'];

  }

  Map<String, dynamic> toJson() {

    final Map<String, dynamic> data = new Map<String, dynamic>();

    data['mallCategoryId'] = this.mallCategoryId;

    data['mallCategoryName'] = this.mallCategoryName;

    if (this.bxMallSubDto != null) {

      data['bxMallSubDto'] = this.bxMallSubDto.map((v) => v.toJson()).toList();

    }

    data['comments'] = this.comments;

    data['image'] = this.image;

    return data;

  }

}

class BxMallSubDto {

  String mallSubId;

  String mallCategoryId;

  String mallSubName;

  String comments;

  BxMallSubDto(

      {this.mallSubId, this.mallCategoryId, this.mallSubName, this.comments});

  BxMallSubDto.fromJson(Map<String, dynamic> json) {

    mallSubId = json['mallSubId'];

    mallCategoryId = json['mallCategoryId'];

    mallSubName = json['mallSubName'];

    comments = json['comments'];

  }

  Map<String, dynamic> toJson() {

    final Map<String, dynamic> data = new Map<String, dynamic>();

    data['mallSubId'] = this.mallSubId;

    data['mallCategoryId'] = this.mallCategoryId;

    data['mallSubName'] = this.mallSubName;

    data['comments'] = this.comments;

    return data;

  }

}
复制过来以后,改改类的名字
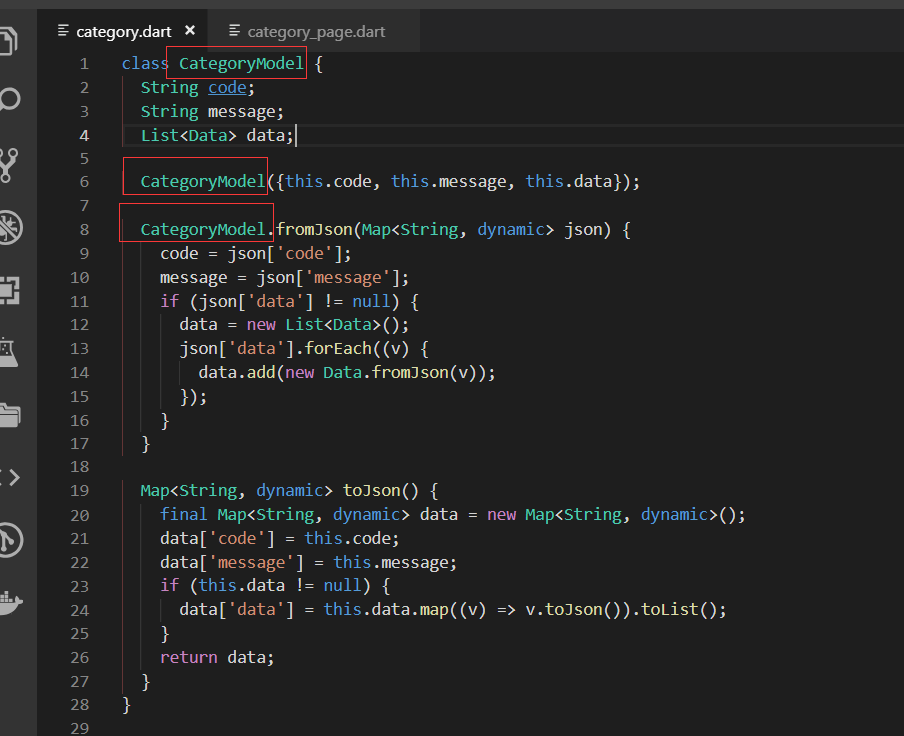
这里就是用我们新生成的model类
开始做左侧类别导航
快速生成动态类LeftCategoryNav

把获取接口数据的方法移动到 左侧导航内

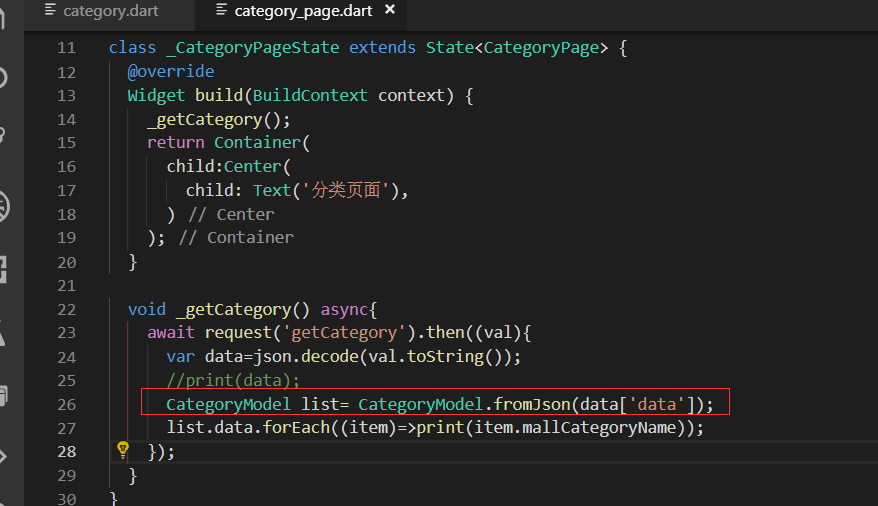
解析json的时候
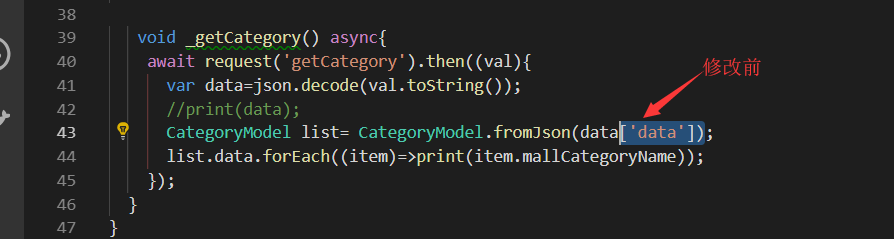
修改后
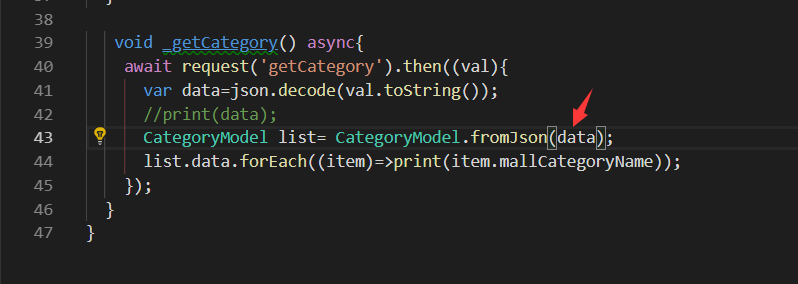
主要是因为我们生成的实体类里面也包含了 code、message、data这些。所以直接把data这个json对象转换成实体类CategoryModel就可以了。
声明一个变量List。因为我们是动态的widget所以需要用setState去赋值
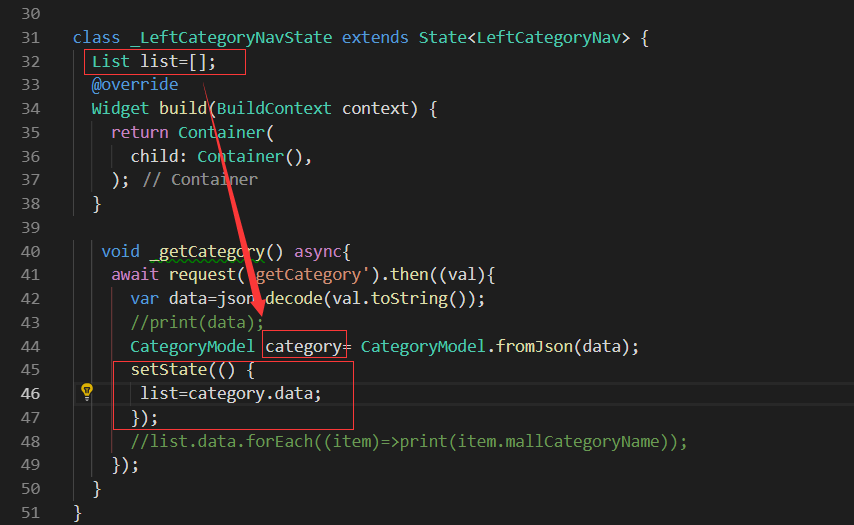
这样我们就把我们的list数据准备好了
布置页面
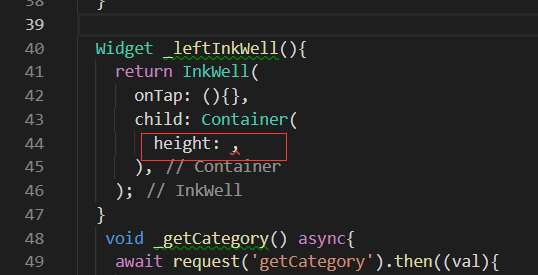
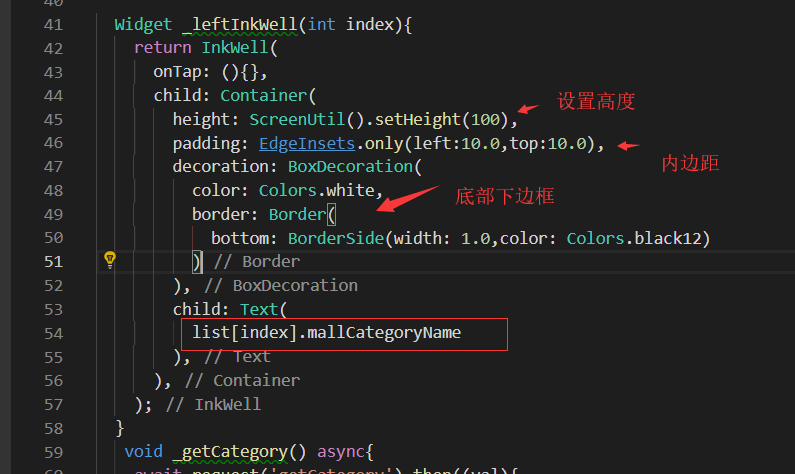
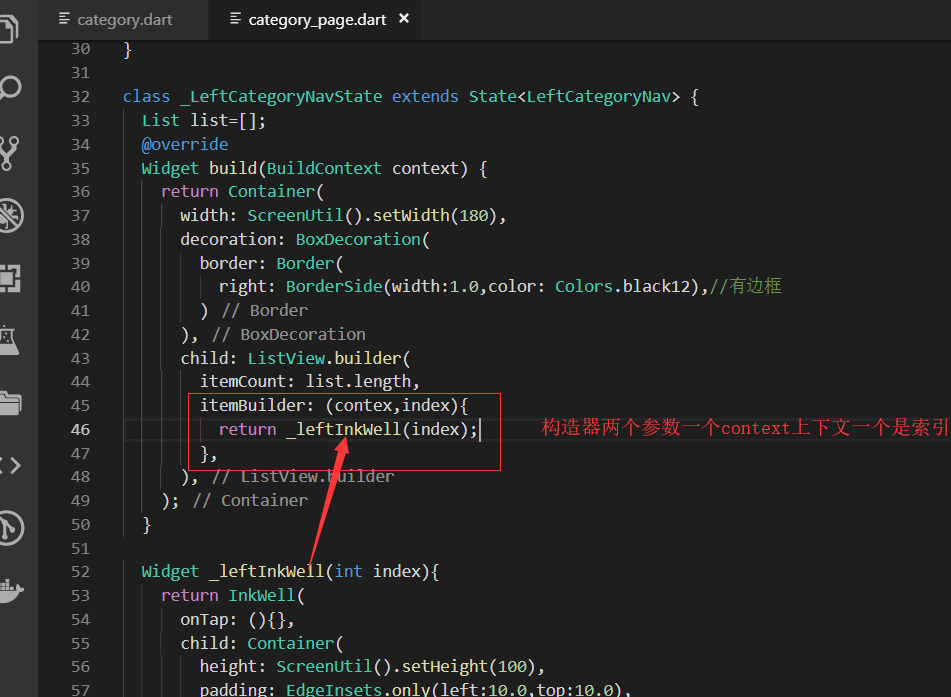
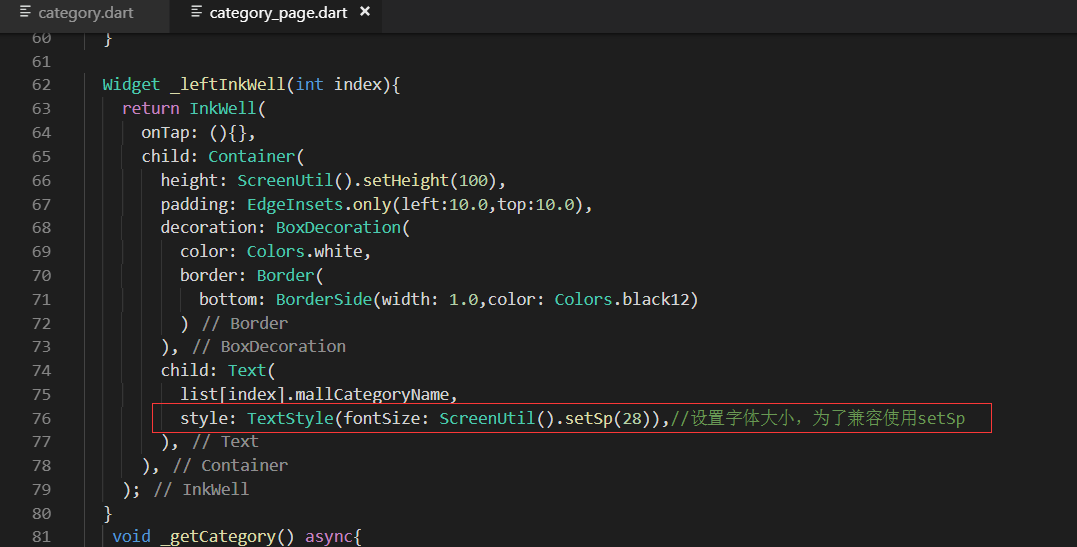
再定义一个内部的方法 返回InkWell部件
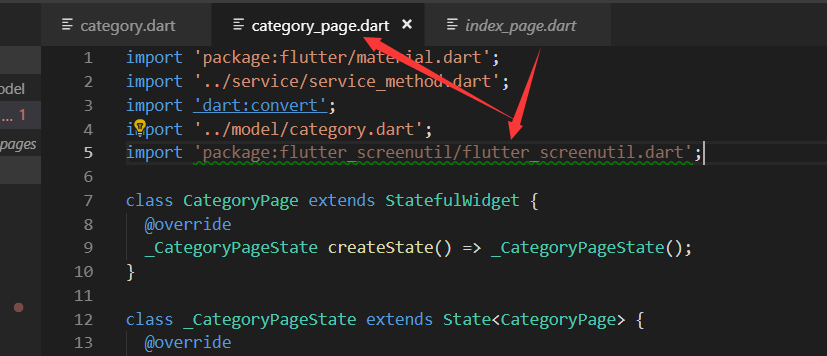
设置高度我们需要用到ScreenUtil的widget。从index_page里面把相关的引用复制过来。
import 'package:flutter_screenutil/flutter_screenutil.dart';
写LeftCategoryNav的build代码
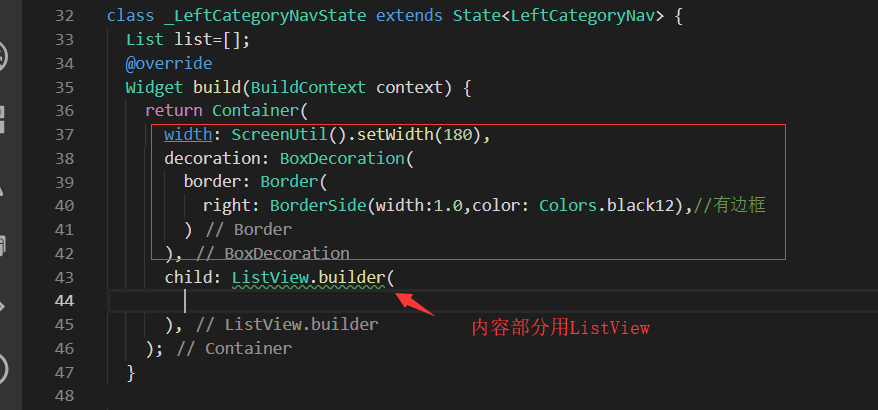
写build代码。用listView外层再套一个container,因为要右边有一个边
写主页面的build

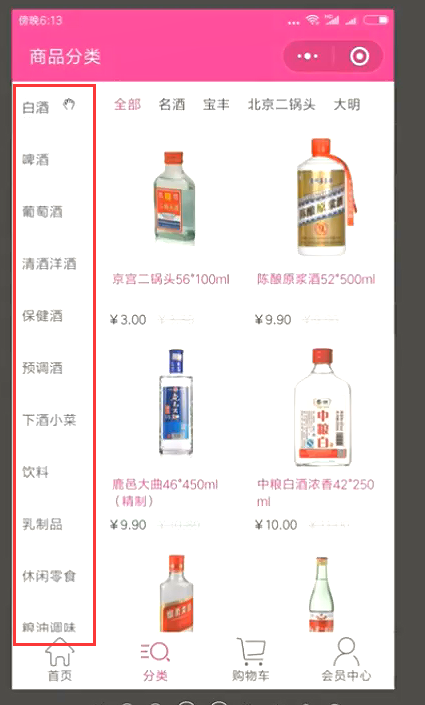
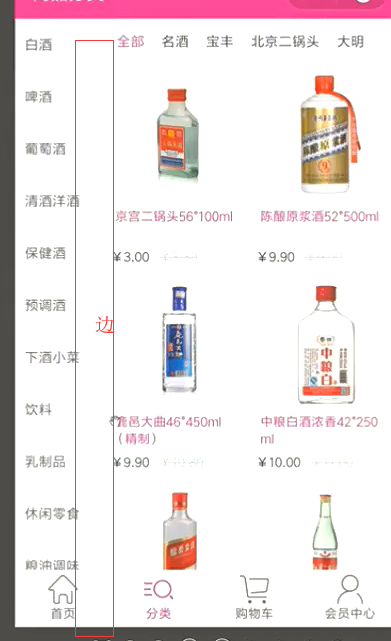
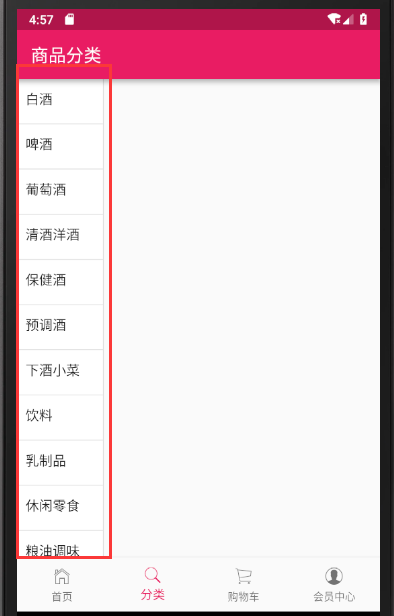
效果展示

最终代码
import 'package:flutter/material.dart';

import '../service/service_method.dart';

import 'dart:convert';

import '../model/category.dart';

import 'package:flutter_screenutil/flutter_screenutil.dart';

class CategoryPage extends StatefulWidget {

  @override

  _CategoryPageState createState() => _CategoryPageState();

}

class _CategoryPageState extends State<CategoryPage> {

  @override

  Widget build(BuildContext context) {

    //_getCategory();

    return Scaffold(

      appBar: AppBar(title: Text('商品分类'),),

      body: Container(

        child: Row(

          children: <Widget>[

            LeftCategoryNav()

          ],

        ),

      ),

    );

  }

}

//左侧大类导航

class LeftCategoryNav extends StatefulWidget {

  @override

  _LeftCategoryNavState createState() => _LeftCategoryNavState();

}

class _LeftCategoryNavState extends State<LeftCategoryNav> {

  List list=[];

  @override

  void initState() {

    super.initState();

    _getCategory();//请求接口的数据

  }

  @override

  Widget build(BuildContext context) {

    return Container(

      width: ScreenUtil().setWidth(180),

      decoration: BoxDecoration(

        border: Border(

          right: BorderSide(width:1.0,color: Colors.black12),//有边框

        )

      ),

      child: ListView.builder(

        itemCount: list.length,

        itemBuilder: (contex,index){

          return _leftInkWell(index);

        },

      ),

    );

  }

  Widget _leftInkWell(int index){

    return InkWell(

      onTap: (){},

      child: Container(

        height: ScreenUtil().setHeight(100),

        padding: EdgeInsets.only(left:10.0,top:10.0),

        decoration: BoxDecoration(

          color: Colors.white,

          border: Border(

            bottom: BorderSide(width: 1.0,color: Colors.black12)

          )

        ),

        child: Text(

          list[index].mallCategoryName,

          style: TextStyle(fontSize: ScreenUtil().setSp(28)),//设置字体大小,为了兼容使用setSp

        ),

      ),

    );

  }

   void _getCategory() async{

    await request('getCategory').then((val){

      var data=json.decode(val.toString());

      //print(data);

      CategoryModel category= CategoryModel.fromJson(data);

      setState(() {

       list=category.data;

      });

      //list.data.forEach((item)=>print(item.mallCategoryName));

    });

  }

}
.
Flutter移动电商实战 --(23)分类页_左侧类别导航制作的更多相关文章
- Flutter移动电商实战 --(40)路由_Fluro的全局注入和使用方法
路由注册到顶层,使每个页面都可以使用,注册到顶层就需要在main.dart中 main.dart注册路由 注入 onGenerateRoute是MaterialApp自带的路由配置项, 首页跳转到详细 ...
- Flutter移动电商实战 --(24)Provide状态管理基础
Flutter | 状态管理特别篇 —— Provide:https://juejin.im/post/5c6d4b52f265da2dc675b407?tdsourcetag=s_pcqq_aiom ...
- Flutter移动电商实战 --(21)分类页_类别信息接口调试
先解决一个坑 取消上面的GridVIew的回弹效果.就是在拖这个gridview的时候有一个滚动的效果 physics: NeverScrollableScrollPhysics(), 大R刷新后,点 ...
- Flutter移动电商实战 --(28)列表页_商品列表后台接口调试
主要调试商品列表页的接口 这个接口是最难的因为有大类.小类还有上拉加载 先配置接口 config/service_url.dart //const serviceUrl='http://test.ba ...
- Flutter移动电商实战 --(49)详细页_Stack制作底部工具栏
一直悬浮在最下面的 Stack层叠组件.里面用Row 可以横向布局 开始 stack如果想定位就要用position去定位. 修改return返回值的这个地方 大R刷新查看效果,可以看到固定的在左下角 ...
- Flutter移动电商实战 --(48)详细页_详情和评论的切换
增加切换的效果,我们主要是修改这个地方 这样我们的评论的内容就显示出来了 最终代码 details_web.dart import 'package:flutter/material.dart'; i ...
- Flutter移动电商实战 --(47)详细页_Flutter_html插件的使用
详情里面是hemlt和图片组成的,但是flutter是不支持html的所以需要其他插件 flutter webview plugin:这个不太好用 flutter_html:用这个插件 先解决之前一个 ...
- Flutter移动电商实战 --(46)详细页_自定义TabBar Widget
主要实现详情和评论的tab provide定义变量 自己做一个tab然后用provide去控制 定义两个变量来判断是左侧选中了还是右侧选中了.并定义一个方法来接受参数,修改是左侧还是右侧选中的状态值 ...
- Flutter移动电商实战 --(45)详细页_说明区域UI编写
pages/details_page/details_expain.dart 详情页面引用组件 效果展示: 最终代码: import 'package:flutter/material.dart'; ...
随机推荐
- linux下setsockopt函数的使用
1.closesocket(一般不会立即关闭而经历TIME_WAIT的过程)后想继续重用该socket:BOOL bReuseaddr=TRUE;setsockopt(s,SOL_SOCKET ,SO ...
- PrintWriter返回乱码的分析及解决
用response得到输出流,即response.getOuptStream(); 返回值为ServletOutputStream 对象,即JSP的out对象,要么用response得到输出对象Pri ...
- train loss相关问题
一.train loss 收敛慢,把learning_rate调高 二.train loss不下降: 1.观察数据中是否有异常样本或异常label导致数据读取异常2.调小初始化权重,以便使softma ...
- 一步一步pwn路由器之rop技术实战
前言 本文由 本人 首发于 先知安全技术社区: https://xianzhi.aliyun.com/forum/user/5274 这次程序也是 DVRF 里面的,他的路径是 pwnable/She ...
- 阿里云申请免费SSL证书,并配置到Tomcat,实现https访问
第一步:阿里云免费https证书安装 https://jingyan.baidu.com/article/fdffd1f8619481f3e98ca196.html 第二步:阿里云申请免费SSL证书 ...
- 001-官网安装openstack之-安装前基础环境准备
0.安装常用软件包(根据个人习惯安装需要的软件包) [root@localhost ~]# yum -y install wget vim ntp net-tools tree openssh 1.配 ...
- 2019HDU多校第三场 K subsequence——最小费用最大流
题意 给定一个 $n$ 个整数的数列,从中至多选取 $k$ 个上升子序列(一个元素最多被选一次),使得选取的元素和最大. 分析 考虑这个问题和经典网络流问题“最长不下降子序列”相似,我们考虑对这个建图 ...
- 浅谈JavaScript严格模式(use strict)
"use strict" 的目的是指定代码在严格条件下执行. 严格模式下你不能使用未声明的变量. 严格模式声明 严格模式通过在脚本或函数的头部添加 "use strict ...
- Shell 03 for while case 函数 中断及退出
一.for循环 1.脚本1,通过循环批量显示5个hello world ( in 1 2 3 4 5 ) 2.脚本2,通过循环批量显示10个hello world ( in {1..10} ...
- [Luogu] 贪婪大陆
https://www.luogu.org/problemnew/show/P2184 区间修改时只需修改区间端点的numl或numr值 区间查询x-y只需用1-y的numr - 1-(x - 1)的 ...