Install Percona XtraDb Cluster 5.6.20 on CentOS 6.5
http://blog.51cto.com/hj192837/1546149
You should have odd number of real nodes.
node #1
hostname: percona1
IP: 192.168.70.71
node #2
hostname: percona2
IP: 192.168.70.72
node #3
hostname: percona3
IP: 192.168.70.73
1. disable selinux and iptables
service iptables stop
chkconfig iptables off; chkconfig ip6tables off
setenforce 0
vi /etc/selinux/config
SELINUX=disabled
2. cat << EOF > /etc/yum.repos.d/iso.repo
[iso]
name=iso
baseurl=http://mirrors.sohu.com/centos/6.5/os/x86_64
enable=1
gpgcheck=0
EOF
cat << EOF > /etc/yum.repos.d/epel.repo
[epel]
name=epel
baseurl=http://mirrors.sohu.com/fedora-epel/6Server/x86_64
enable=1
gpgcheck=0
EOF
( or rpm -ivh http://www.percona.com/redir/downloads/percona-release/percona-release-0.0-1.x86_64.rpm )
cat << EOF > /etc/yum.repos.d/percona.repo
[percona]
name=percona
baseurl=file:///percona (http://repo.percona.com/centos/6Server/os/x86_64/)
enable=1
gpgcheck=0
EOF
3. yum -y install Percona-XtraDB-Cluster-56
on node 1:
vi /etc/my.cnf
[mysqld]
wsrep_provider=/usr/lib64/libgalera_smm.so
wsrep_cluster_address=gcomm://192.168.70.71,192.168.70.72,192.168.70.73
binlog_format=ROW
default_storage_engine=InnoDB
innodb_autoinc_lock_mode=2
wsrep_node_address=192.168.70.71
wsrep_sst_method=xtrabackup-v2
wsrep_cluster_name=my_centos_cluster
wsrep_sst_auth="sstuser:s3cret"
expire_logs_days=10
max_binlog_size=100M
# just for creating a NEW cluster
service mysql bootstrap-pxc
or
service mysql start --wsrep_new_cluster
or
service mysql start --wsrep-cluster-address="gcomm://"
or for CentOS 7
systemctl start mysql@bootstrap.service
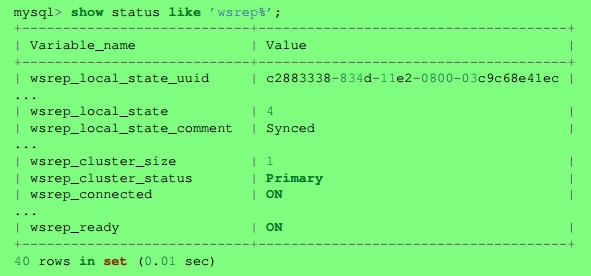
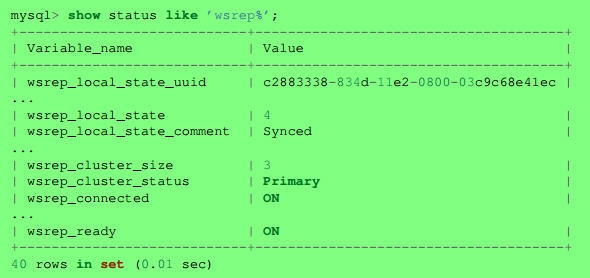
mysql -uroot
mysql> show status like 'wsrep%';
mysql> UPDATE mysql.user SET password=PASSWORD("Passw0rd") where user='root';
mysql> CREATE USER 'sstuser'@'localhost' IDENTIFIED BY 's3cret';
mysql> GRANT RELOAD, LOCK TABLES, REPLICATION CLIENT ON *.* TO 'sstuser'@'localhost';
mysql> FLUSH PRIVILEGES;
on node 2:
vi /etc/my.cnf
[mysqld]
wsrep_provider=/usr/lib64/libgalera_smm.so
wsrep_cluster_address=gcomm://192.168.70.71,192.168.70.72,192.168.70.73
binlog_format=ROW
default_storage_engine=InnoDB
innodb_autoinc_lock_mode=2
wsrep_node_address=192.168.70.72
wsrep_sst_method=xtrabackup-v2
wsrep_cluster_name=my_centos_cluster
wsrep_sst_auth="sstuser:s3cret"
expire_logs_days=10
max_binlog_size=100M
service mysql start

on node 3:
vi /etc/my.cnf
[mysqld]
wsrep_provider=/usr/lib64/libgalera_smm.so
wsrep_cluster_address=gcomm://192.168.70.71,192.168.70.72,192.168.70.73
binlog_format=ROW
default_storage_engine=InnoDB
innodb_autoinc_lock_mode=2
wsrep_node_address=192.168.70.73
wsrep_sst_method=xtrabackup-v2
wsrep_cluster_name=my_centos_cluster
wsrep_sst_auth="sstuser:s3cret"
expire_logs_days=10
max_binlog_size=100M
service mysql start
Ports:
Galera: 4567
SST: 4444
SST incremental port: 4568
MySQL: 3306
Notes: http://www.percona.com/blog/2014/09/01/galera-replication-how-to-recover-a-pxc-cluster/
在vmware workstation测试环境中,不可能mysql一直开机
1. on three nodes:
chkconfig mysql off
2. poweroff sequence: node3 > node2 > node1
3. poweron sequence: node1 > node2 > node3
4. on node1: service mysql bootstrap-pxc
on node2 and node3: service mysql start
HAproxy配置:
percona node1: 192.168.70.71
percona node2: 192.168.70.72
percona node3: 192.168.70.73
haproxy server 1: 192.168.70.12
haproxy server 2: 192.168.70.13
haproxy VIP: 192.168.70.10
on three percona nodes:
yum -y install xinetd
vi /etc/services
mysqlchk 6033/tcp # mysqlchk
vi /etc/xinetd.d/mysqlchk
# port = 9200
port = 6033
service xinetd start
If you want to use a different username or password for clustercheck, vi /usr/bin/clustercheck
On one percona node:
mysql -uroot -p
mysql> CREATE USER 'haproxy'@'192.168.70.12';
mysql> CREATE USER 'haproxy'@'192.168.70.13';
mysql> grant process on *.* to 'clustercheckuser'@'localhost' identified by 'clustercheckpassword!';
mysql> flush privileges;
On two haproxy server:
yum -y install mysql
vi /etc/haproxy/haproxy.cfg
defaults
# option httplog
# option http-server-close
# option forwardfor except 127.0.0.0/8
listen mysqld-status 192.168.70.10:3306
balance source
mode tcp
option tcpka
option mysql-check user haproxy
server MySQL1 192.168.70.71:3306 check weight 1
server MySQL2 192.168.70.72:3306 check weight 1
server MySQL2 192.168.70.73:3306 check weight 1
listen mysql-cluster 192.168.70.10:3306
mode tcp
balance source
option httpchk
server MySQL1 192.168.70.71:3306 check port 6033 inter 12000 rise 3 fall 3
server MySQL1 192.168.70.72:3306 check port 6033 inter 12000 rise 3 fall 3
server MySQL1 192.168.70.73:3306 check port 6033 inter 12000 rise 3 fall 3
service haproxy reload
Testing:
On one percona server:
mysql -uroot -p
mysql> grant all on *.* to root@'%' identified by 'password' with grant option;
from mysql client:
mysql -h 192.168.70.10 -uroot -p
使用innobackupex备份数据库:
mkdir -p /data/backups
full backup:
1. innobackupex --user=sstuser --password=s3cret /data/backups
restore full backup:
1. innobackupex --apply-log /data/backups/2014-09-08_11-03-56
2. service mysql stop; rm -rf /var/lib/mysql/*
3. innobackupex --copy-back /data/backups/2014-09-08_11-03-56
4. chown -R mysql:mysql /var/lib/mysql
5. service mysql start
Incremental backup:
1. full backup
innobackupex --user=sstuser --password=s3cret /data/backups
2. incremental one, based on full backup
innobackupex --user=sstuser --password=s3cret --incremental /data/backups --incremental-basedir=/data/backups/2014-09-08_11-20-51
3. incremental two, based on incremental one
innobackupex --user=sstuser --password=s3cret --incremental /data/backups --incremental-basedir=/data/backups/2014-09-08_11-28-56

restore incremental backup:
1. innobackupex --apply-log --redo-only /data/backups/2014-09-08_11-20-51
2. innobackupex --apply-log --redo-only /data/backups/2014-09-08_11-20-51 --incremental-dir=/data/backups/2014-09-08_11-28-56
3. innobackupex --apply-log /data/backups/2014-09-08_11-20-51 --incremental-dir=/data/backups/2014-09-08_11-31-53
Notes: --redo-only should be used when merging all incrementals except the last one.
4. innobackupex --apply-log /data/backups/2014-09-08_11-20-51
5. service mysql stop; rm -rf /var/lib/mysql/*
6. innobackupex --copy-back /data/backups/2014-09-08_11-20-51
7. chown -R mysql:mysql /var/lib/mysql
8. service mysql start
Install Percona XtraDb Cluster 5.6.20 on CentOS 6.5的更多相关文章
- 如何搭建Percona XtraDB Cluster集群
一.环境准备 主机IP 主机名 操作系统版本 PXC 192.168.244.146 node1 ...
- 使用percona xtradb cluster的IST方式添加新节点
使用percona xtradb cluster的IST(Incremental State Transfer)特性添加新节点,防止新节点加入时使用SST(State SnapShop Transfe ...
- Installing Percona XtraDB Cluster on CentOS
PXC简介 Percona XtraDB Cluster(简称PXC集群)提供了MySQL高可用的一种实现方法. 1.集群是有节点组成的,推荐配置至少3个节点,但是也可以运行在2个节点上. 2.每个节 ...
- 15、高可用 PXC(percona xtradb cluster) 搭建
安装环境: 集群名 pxc_lk 节点1: 192.168.1.20 节点2: 192.168.1.21 节点3: 192.168.1.22 所有节点安装 wget http://www.perc ...
- PXC(Percona XtraDB Cluster)集群的安装与配置
Percona XtraDB Cluster是针对MySQL用户的高可用性和扩展性解决方案,基于Percona Server .其包括了Write Set REPlication补丁,使用Galera ...
- mysql高可用之PXC(Percona XtraDB Cluster)
简介 Percona XtraDB Cluster是MySQL高可用性和可扩展性的解决方案,Percona XtraDB Cluster提供的特性如下: 1).同步复制,事务要么在所有节点提交或不提交 ...
- PXC5.7(Percona XtraDB Cluster)+HAproxy+Keepalived 集群部署
Percona-XtraDB-Cluster+Haproxy 搭建集群环境 环境准备及服务器信息: 配置防火墙 firewall-cmd --add-port=3306/tcp --permanent ...
- MySQL高可用方案-PXC(Percona XtraDB Cluster)环境部署详解
MySQL高可用方案-PXC(Percona XtraDB Cluster)环境部署详解 Percona XtraDB Cluster简称PXC.Percona Xtradb Cluster的实现是在 ...
- Percona XtraDB Cluster vs Galera Cluster vs MySQL Group Replication
Percona XtraDB Cluster vs Galera Cluster vs MySQL Group Replication Overview Galera Cluster 由 Coders ...
随机推荐
- 当vue 页面加载数据时显示 加载loading
参考:https://www.jianshu.com/p/104bbb01b222 Vue 页面加载数据之前增加 `loading` 动画 创建组件 1.新建 .vue 文件: src -> c ...
- 移动APP我们需要关注什么
移动APP关注的点比web或者PC上的程序更多 1.测试用例的设计 移动互联网的快节奏,要放弃传统的测试用例编写方式,不需要写详细的测试用例,采用罗列测试点的方式如思维导图,这样既节省时间又能够直观清 ...
- DC-2 靶机渗透测试
DC-2 靶机渗透测试 冲冲冲,好好学习. 本靶机核心内容"受限shell提权",知识点在另一篇文章中总结归纳了. 攻击机:kali 靶 机:DC-2 准备:在使用前需要在操作机的 ...
- [.NET大牛之路 005] .NET 的执行模型
.NET大牛之路 • 王亮@精致码农 • 2021.07.06 前面我们介绍 .NET 历史时讲过,微软基于 .NET Framework 重新设计并创造了跨平台的 .NET Core,目前已经发展到 ...
- user-agent随笔
常用的user-agent: 一.pc端的user-agent汇总,各大浏览器 1.safari 5.1 – MAC Mozilla/5.0 (Macintosh; U; Intel Mac OS X ...
- C++面向对象总结——虚指针与虚函数表
最近在逛B站的时候发现有候捷老师的课程,如获至宝.因此,跟随他的讲解又复习了一遍关于C++的内容,收获也非常的大,对于某些模糊的概念及遗忘的内容又有了更深的认识. 以下内容是关于虚函数表.虚函数指针, ...
- Mysql5.7.34 数据库源码编译安装
Mysql 数据库源码编译安装 MySQL是一个关系型数据库管理系统,关系型数据库是将数据保存在不同的表中,而非将所有数据放在一个大仓库内,这样就加快了速度并提高了灵活性.由于其体积小.速度快.总体拥 ...
- WPF按钮实现水波纹效果
xaml代码如下 <Button x:Class="UI.btn.ZButton" xmlns="http://schemas.microsoft.com/winf ...
- Linux引导过程和服务过程
目录 一.Linux操作系统引导过程 1.1.开机自检 1.2.MBR引导 1.3.GRUB菜单 1.4.加载Linux内核 1.5.init进程初始化 二.系统初始化进程 2.1.init进程 2. ...
- netty系列之:自定义编码和解码器要注意的问题
目录 简介 自定义编码器和解码器的实现 ReplayingDecoder 总结 简介 在之前的系列文章中,我们提到了netty中的channel只接受ByteBuf类型的对象,如果不是ByteBuf对 ...