[转贴]JAVA:RESTLET开发实例(二)使用Component、Application的REST服务
上一篇文章,我们介绍了基于JAX-RS的REST服务,本篇文章我们介绍不基于JAX-RS的模式。JAX-RS其实就是一个简单的 Application服务。和我们接下来介绍的Application基本一致,唯一不同的地方就是,不使用JAX-RS自动映射为xml。 restlet的一些基本概念可以参考上篇文章 RESTLET开发实例(一)基于JAX-RS的REST服务 的介绍,这里不再阐述。
一、基于ServerResource的REST,来实现JAX-RS中get方法。
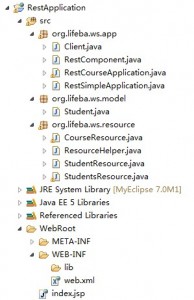
1、新建RestApplication Web工程。
然后把相应的restlet的lib下的全部jar加入工程引用中,然后在web.xml,加入如下配置:
<context-param>
<param-name>org.restlet.application</param-name>
<param-value>org.lifeba.ws.app.RestSimpleApplication</param-value>
</context-param>
<servlet>
<servlet-name>RestletServlet</servlet-name>
<servlet-class>org.restlet.ext.servlet.ServerServlet</servlet-class>
</servlet>
<servlet-mapping>
<servlet-name>RestletServlet</servlet-name>
<url-pattern>/*</url-pattern>
</servlet-mapping>
上面的配置和基于JAX-RS的配置一样的。
2、新建RestSimpleApplication对象。将应用程序和资源类绑定在一起,代码如下:
public class RestSimpleApplication extends org.restlet.Application{
@Override
public Restlet createInboundRoot() {
Router router = new Router(getContext());
router.attach("/student/{studentId}", StudentResource.class);
return router;
}
}
和JAX-RS不同主要有2个地方:
1)RestSimpleApplication直接扩展了Application对象,而不是JAX-RS中的JaxRsApplication对象。
2)重载了createInboundRoot通过attach方法绑定资源类,并且制定了访问路径。而JAX-RS中调用了this.add(new StudentApplication())来绑定资源类,并且不用指定访问路径,因为是在资源类中指定。
3、新建Student对象,代码如下:和JAX-RS的区别就是少了@XmlRootElement(name="Student")标注。
public class Student {
private int id;
private String name;
private int sex;
private int clsId;
private int age;
public int getId() {
return id;
}
public void setId(int id) {
this.id = id;
}
public String getName() {
return name;
}
public void setName(String name) {
this.name = name;
}
public int getSex() {
return sex;
}
public void setSex(int sex) {
this.sex = sex;
}
public int getClsId() {
return clsId;
}
public void setClsId(int clsId) {
this.clsId = clsId;
}
public int getAge() {
return age;
}
public void setAge(int age) {
this.age = age;
}
public String toString(){
return "Id:"+this.id+"\r\nName:"+this.name+"\r\nClass:"+
this.clsId+"\r\nSex:"+this.sex+"\r\nAge:"+this.age;
}
}
4、新建StudentResource类,该类扩展ServerResource类。代码如下:
public class StudentResource extends ServerResource{
private int id;
@Override
protected void doInit() throws ResourceException {
id = Integer.valueOf((String) getRequestAttributes().get("studentId"));
}
public Representation get(Representation entity) {
Student student = ResourceHelper.findStudent(id);
return new StringRepresentation(student.toString());
}
}
上面的代码实现的功能和JAX-RS中的下面的代码的功能一样,都是根据ID来获取对应的student信息。
@Path("{id}/xml")
@Produces("application/xml")
public Student getStudentXml(@PathParam("id") int id) {
return ResourceHelper.findStudent(id);
}
非JAX-RS模式的,扩展了ServerResource类,并且重载了doInit()方法用来获取传递过来的studentId占位符的值。因为没 有传递method方法,默认是调用@Get标注的无参方法,最后返回StringRepresentation对象(你也可以返回xml或json的 Representation对象)。
JAX-RS的也是类似,不过他的方法是带参数,并且返回一个Student对象(会根据@Produces("application/xml")自动封装xml数据)。
5、完成了上面的主要类得创建和编写,你就可以在tomcat中运行了,启动tomcat后,访问http://localhost:8085/RestApplication/student/1,你将看到下面界面:

二、实现更新、删除、添加(delete,put,post)及列表展示
1、上面的介绍,我们实现将JAX-RS中的get方法,用ServerResource方式的来实现。根据rest规范,对StudentResource,除了有get方法外,还有delete及put方法。
public Representation delete() {
int status = ResourceHelper.deleteStudent(id);
return new StringRepresentation(String.valueOf(status));
}
@Put
public Representation put(Representation entity)
throws ResourceException {
Form form = new Form(entity);
Student student = ResourceHelper.findStudent(id);
String name = form.getFirstValue("name");
int clsId = Integer.parseInt(form.getFirstValue("clsId"));
int sex = Integer.parseInt(form.getFirstValue("sex"));
student.setClsId(clsId);
student.setName(name);
student.setSex(sex);
return new StringRepresentation(String.valueOf(ResourceHelper.updateStudent(student)));
}
2、测试更新和删除:
1)通过页面修改用户资料
update.jsp页面中加入:
<form action="/RestApplication/student/1?method=put" method="post">
用户名:<input type="text" name="name"><br>
班级:<input type="text" name="clsId"><br>
性别:<input type="text" name="sex"><br>
<input type="submit" value="提交">
</form>
提交后访问,返回1表示修改成功。


访问http://localhost:8085/RestApplication/student/1就会看到名字已经修改了。

2)通过客户端删除用户资料。新建Client类,加入如下代码,执行成功返回1.
public void student_delete(){
try {
ClientResource client = new ClientResource("http://localhost:8085/RestApplication/student/1");
Representation representation =client.delete();
System.out.println(representation.getText());
} catch (Exception e) {
e.printStackTrace();
}
}
这个时候访问 http://localhost:8085/RestApplication/student/1 ,会提示错误。因为找不到这个1的用户。
3、添加一个student,及显示全部student信息
1)StudentResource资源,按照restlet的规范,包含了get put delete方法。所以添加一个student及显示全部student信息我们需要再加入一个资源类StudentsResource,代码如下:
public Representation get(Representation entity) {
StringBuilder sb = new StringBuilder();
Iterator it = ResourceHelper.students.keySet().iterator();
while(it.hasNext()){
sb.append(ResourceHelper.students.get(it.next()).toString()+"\r\n\r\n");
}
return new StringRepresentation(sb.toString());
}
public Representation post(Representation entity)
throws ResourceException {
Form form = new Form(entity);
String name = form.getFirstValue("name");
int clsId = Integer.parseInt(form.getFirstValue("clsId"));
int sex = Integer.parseInt(form.getFirstValue("sex"));
Student student = new Student();
student.setClsId(clsId);
student.setName(name);
student.setSex(sex);
ResourceHelper.maxId++;
int id = ResourceHelper.maxId;
student.setId(id);
return new StringRepresentation(String.valueOf(ResourceHelper.addStudent(student)));
}
添加了上面代码后,我们还要在RestSimpleApplication添加下面代码,指定下资源类StudentsResource的访问路径才可以。
router.attach("/student", StudentsResource.class);
2)首先我们添加一个id为2的student对象,client类中加入下面代码,执行成功后返回新添加的studentid:2。
public void student_post(){
try {
Form queryForm = new Form();
queryForm.add("name","steven3");
queryForm.add("clsId","201002");
queryForm.add("sex","2");
queryForm.add("age","12");
ClientResource client = new ClientResource("http://localhost:8085/RestApplication/student");
Representation representation =client.post(queryForm.getWebRepresentation());
System.out.println(representation.getText());
} catch (Exception e) {
e.printStackTrace();
}
}
访问http://localhost:8085/RestApplication/student 如下,返回了全部的student资料:
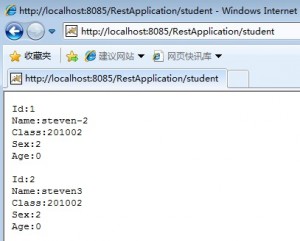
可以看到我们已经成功添加了一个2的student。
三、使用Component绑定多个Application
我们已经实现了一个student的application。里面包含了2个资源类(StudentResource和 StudentsResource)。如果我们加入一个course的资源类,我们可以按照上面的方式直接建立CourseResource,然后在 RestSimpleApplication中绑定下 router.attach("/course/{courseId}", CourseResource.class)。不过这样处理会把业务逻辑混在一起,并不是很好的方法。因此我们建立一个 RestCourseApplication,然后在这里绑定CourseResource类,来实现业务逻辑的分离。
RestCourseApplication代码如下:
public class RestCourseApplication extends org.restlet.Application{
@Override
public Restlet createInboundRoot() {
Router router = new Router(getContext());
router.attach("/course/{courseId}", CourseResource.class);
return router;
}
}
CourseResource代码如下:
public class CourseResource extends ServerResource{
private int id;
@Override
protected void doInit() throws ResourceException {
id = Integer.valueOf((String) getRequestAttributes().get("courseId"));
}
public Representation get(Representation entity) {
return new StringRepresentation("course id:"+id);
}
}
现在我们有2个Application了,web.xml中就不能使用org.restlet.application了,必须使用org.restlet.component。
<context-param>
<param-name>org.restlet.application</param-name>
<param-value>org.lifeba.ws.app.RestSimpleApplication</param-value>
</context-param>
把上面的代码改为:
<init-param>
<param-name>org.restlet.component</param-name>
<param-value>component</param-value>
</init-param>
新建RestComponent类,代码如下,因为必须执行路径,所以在访问的时候记得要带上对应的前缀。
public class RestComponent extends org.restlet.Component{
public RestComponent(){
getDefaultHost().attach("/a", new RestSimpleApplication());
getDefaultHost().attach("/b", new RestCourseApplication());
}
}
访问:http://localhost:8085/RestApplication/a/student

访问:http://localhost:8085/RestApplication/b/course/1

四、资源下载
[转贴]JAVA:RESTLET开发实例(二)使用Component、Application的REST服务的更多相关文章
- [转贴]JAVA :RESTLET开发实例(一)基于JAX-RS的REST服务
RESTLET介绍 Restlet项目为“建立REST概念与Java类之间的映射”提供了一个轻量级而全面的框架.它可用于实现任何种类的REST式系统,而不仅仅是REST式Web服务. Restlet项 ...
- [转贴]JAVA:RESTLET开发实例(三)基于spring的REST服务
前面两篇文章,我们介绍了基于JAX-RS的REST服务以及Application的Rest服务.这里将介绍restlet如何整合spring框架进行开发.Spring 是一个开源框架,是为了解决企业应 ...
- RESTLET开发实例(一)基于JAX-RS的REST服务
RESTLET介绍 Restlet项目为“建立REST概念与Java类之间的映射”提供了一个轻量级而全面的框架.它可用于实现任何种类的REST式系统,而不仅仅是REST式Web服务. Restlet项 ...
- RESTLET开发实例(三)基于spring的REST服务
http://www.lifeba.org/arch/restlet_spring_3.html 前面两篇文章,我们介绍了基于JAX-RS的REST服务以及Application的Rest服务.这里将 ...
- NDK 开发实例二(添加 Eigen库)
上一篇,我已经阐述了如何创建一个简单的NDK实例: NDK 开发实例一(Android.mk环境配置下) 在上一篇的基础上,我们来添加Eigen库,然后做一个简单实例. Eigen是一个高层次的C + ...
- RESTLET开发实例
1 前提 由于近期工作的需要,要把RESTLET应用到项目中,于是在网上参考了一些资料的基础上,实践了一个关于RESTLET接口的小例子. Restlet的思想是:HTTP客户端与HTTP服务器之间的 ...
- 【温故知新】Java web 开发(二)Servlet 和 简单JSP
系列一介绍了新建一个 web 项目的基本步骤,系列二就准备介绍下基本的 jsp 和 servlet 使用. (关于jsp的编译指令.动作指令.内置对象不在本文讨论范围之内) 1. 首先,在 pom. ...
- java web开发入门二(struts)基于eclispe
JavaBean JavaBean, 咖啡豆. JavaBean是一种开发规范,可以说是一种技术. JavaBean就是一个普通的java类.只有符合以下规定才能称之为javabean: 1)必须提 ...
- Spring Boot 使用IntelliJ IDEA创建一个web开发实例(二)
1. 创建一个Controller类 package com.example.demo; import org.springframework.web.bind.annotation.RequestM ...
随机推荐
- 使用的 SQL Server 版本不支持数据类型“datetime2”解决办法
不论下方提示什么数据格式有错误,一般都是entity生成的时候的问题.比如服务器上用的sql2005,自己用的2008. 解决方法: model层生成的model.edmx文件,用记事本打开, 将&l ...
- ACM——完数
完数 时间限制(普通/Java):1000MS/3000MS 运行内存限制:65536KByte 总提交:1930 测试通过:413 描述 自然数中,完数寥若晨 ...
- 学会用Reflector调试我们的MVC框架代码
我们知道,现在能调试.net程序通常有两个,第一个是ILSpy,还是一个是Reflector,这两个小反编译软件算是我们研究底层代码中所拥有的一把 锋利小尖刀~~~,比如你看到的ILSpy这样的界面图 ...
- MVC中的统一验证机制
using MvcApplication2.Models;using System;using System.Collections.Generic;using System.ComponentMod ...
- oracle输出多行多列数据
--方法一 匿名块中直接 dbms_output输出declare v_sql varchar2(200); v_cursor sys_refcursor; type v_type is ...
- oracle进制转换
h2 { margin-top: 0.46cm; margin-bottom: 0.46cm; direction: ltr; line-height: 173%; text-align: justi ...
- swift入门-day01
Swift 简介 简介 Swift 语言由苹果公司在 2014 年推出,用来撰写 OS X 和 iOS 应用程序 2014 年,在 Apple WWDC 发布 历史 2010 年 7 月,苹果开发者工 ...
- 04_XML_02_XML语法
[XML组成] 一个XMl文件分为以下几部分组成 * 文档说明 * 元素 * 属性 * CDATA区.特殊字符 * 处理指令(processing Instruction) [1.文档说明] * 最简 ...
- bzoj1068:[SCOI2007]压缩
思路:区间dp,设状态f[l][r][bo]表示区间[l,r]的答案,bo=1表示该区间可以放M也可以不放M,bo=0表示该区间不能放M,并且对于任意一个状态f,l和l-1之间均有一个M,于是就可以进 ...
- LAMP 环境 快速安装
(一)安装Apache 1.下载安装 1 2 3 4 5 6 7 8 9 10 11 12 13 14 15 16 17 yum install zlib-devel -y wget http://m ...