Android Studio 如何打JAR包(修订版)
AndroidStudio项目打包成jar
前言:在eclipse中我们知道如何将一个项目导出为jar包,现在普遍AndroidStuido开发,这里一步一步详加介绍AS项目打包成jar,jar和arr的使用
在这里先补充一下我在编译时遇到的问题:
① Android 打包jarUnable to start the daemon process.
解决办法:(这个问题百度有答案,这里直接写出来,免得大家再找)
②报错:Unsupported major.minor version 52.0 (jar包对不同JDK版本的兼容性问题:
③ 在下面的步骤配置中,build/intermediates/bundles/release/路径下没有release文件夹。
解决办法:

接下来按照下面的步骤就可以编译成功了。
一.作用:为了供其它项目使用,将项目打包成jar
二.步骤(AndroidStudio):
1.像平常一个样新建一个项目(步骤省略)
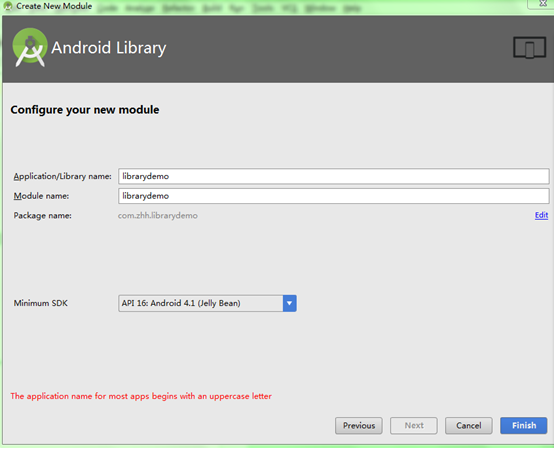
2.(在步骤1的基础上)点击File-->New-->New Module—>选择Android Library-->点击Next(如下图:)

定义好Library的工程名:librarydemo(如下图:)
创建完成:
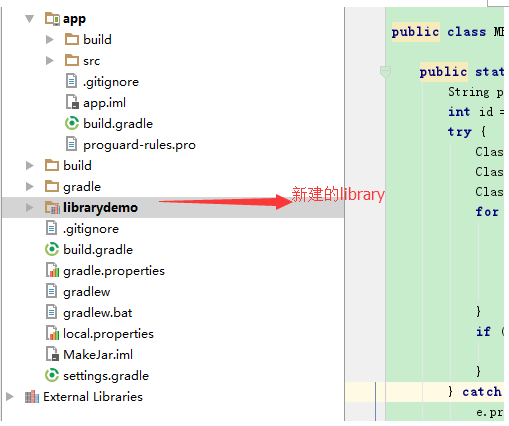
(步骤1建的)项目中会自动引入该Model (app下的build.gradle):(这个可以手动配置,在open moudle 配置依赖也可以)

3.生成jar:
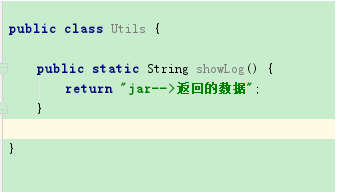
创建之前我先在librarydemo工程中建一个测试类,方便测试调用:
在librarydemo工程下的build.gradle中加上:
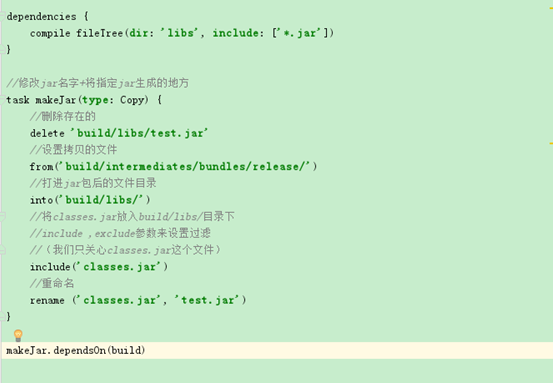
做如下操作:
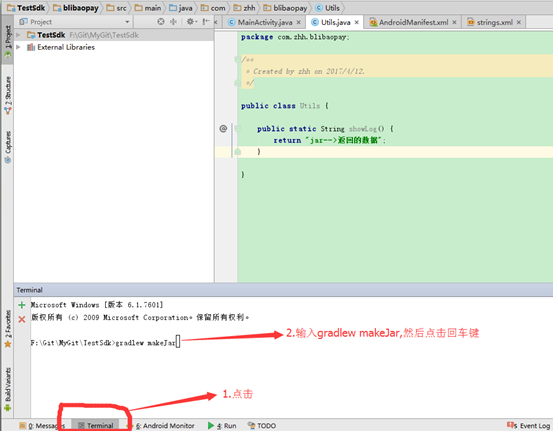
(注:你的as从来没有生成过jar,那么第一次就会很慢,会去下载一些文件)
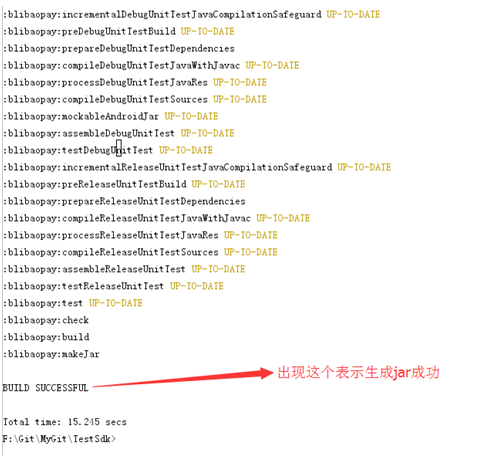
查看jar是否成功生成:

三、使用jar和arr:
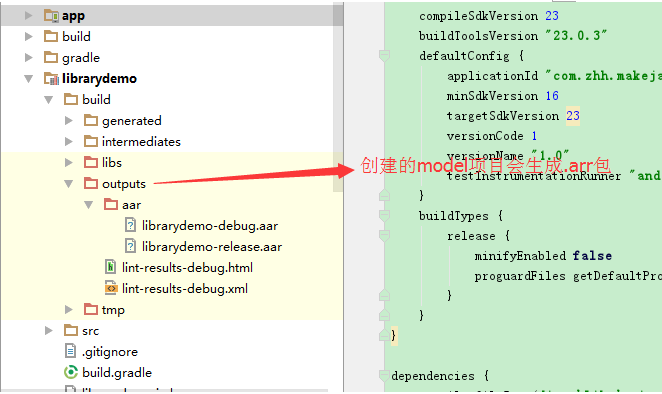
在AndroidStudio中,创建的Model项目下:
二者区别:
jar: 只包含了class文件与清单文件 ,不包含资源文件,如图片等所有res中的文件。
aar: 包含jar包和资源文件,如图片等所有res中的文件。
个人觉得还是用as提供的aar包比较好,编译完就生成了aar了,不用担心资源问题,
1. aar使用:
导入aar(jar一样):
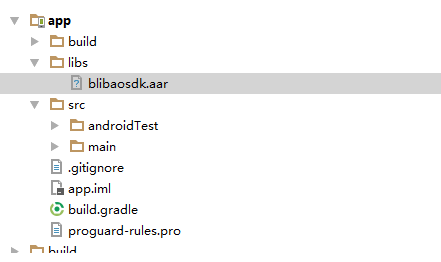
在app下的build.gradle中添加如下:
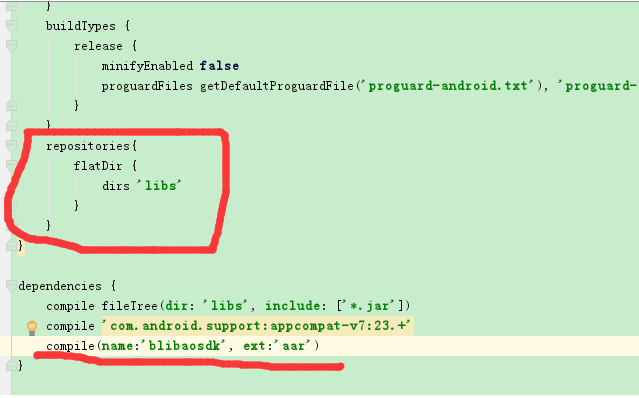
Sync Now一下,看
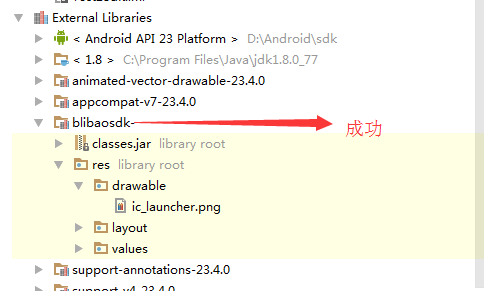
有资源文件和布局文件
2. jar导入:
导入jar(同arr一样)-->选中jar-->右键-->点击Add As Library-->点击Ok
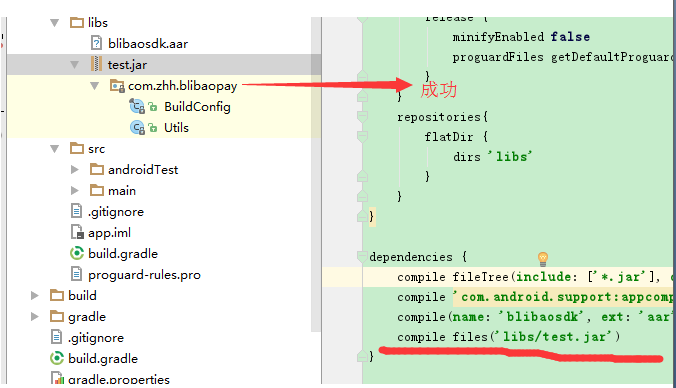
无资源文件
有人会想怎么把资源(图片,布局,string等)打进jar包呢?
例如:jar中有一个activity用到了布局文件和图片资源,那么怎么办呢?
解决如下:由于打包出来的jar只有源代码的.class 文件,不包含资源文件,我们就把jar包中用到的资源放到你使用
该jar的工程里面。然后通过反射即可,这里给出反射类:

public class MResource {
</span><span style="color:rgb(0,0,255);line-height:1.5;">public</span> <span style="color:rgb(0,0,255);line-height:1.5;">static</span> <span style="color:rgb(0,0,255);line-height:1.5;">int</span><span style="line-height:1.5;"> getIdByName(Context context, String className, String resName) {

    String packageName </span>=<span style="line-height:1.5;"> context.getPackageName();

    </span><span style="color:rgb(0,0,255);line-height:1.5;">int</span> id = 0<span style="line-height:1.5;">;

    </span><span style="color:rgb(0,0,255);line-height:1.5;">try</span><span style="line-height:1.5;"> {

        Class r </span>= Class.forName(packageName + ".R"<span style="line-height:1.5;">);

        Class[] classes </span>=<span style="line-height:1.5;"> r.getClasses();

        Class desireClass </span>= <span style="color:rgb(0,0,255);line-height:1.5;">null</span><span style="line-height:1.5;">;

        </span><span style="color:rgb(0,0,255);line-height:1.5;">for</span><span style="line-height:1.5;"> (Class cls : classes) {

            </span><span style="color:rgb(0,0,255);line-height:1.5;">if</span> (cls.getName().split("\\$")[1<span style="line-height:1.5;">].equals(className)) {

                desireClass </span>=<span style="line-height:1.5;"> cls;

                </span><span style="color:rgb(0,0,255);line-height:1.5;">break</span><span style="line-height:1.5;">;

            }

        }

        </span><span style="color:rgb(0,0,255);line-height:1.5;">if</span> (desireClass != <span style="color:rgb(0,0,255);line-height:1.5;">null</span><span style="line-height:1.5;">) {

            id </span>=<span style="line-height:1.5;"> desireClass.getField(resName).getInt(desireClass);

        }

    } </span><span style="color:rgb(0,0,255);line-height:1.5;">catch</span><span style="line-height:1.5;"> (Exception e) {

        e.printStackTrace();

    }

    </span><span style="color:rgb(0,0,255);line-height:1.5;">return</span><span style="line-height:1.5;"> id;

}


}
这里演示项目中打开jar中的activity的实例
这里给出jar中activity的代码:
public class JarActivity extends AppCompatActivity {
@Override

</span><span style="color:rgb(0,0,255);line-height:1.5;">protected</span> <span style="color:rgb(0,0,255);line-height:1.5;">void</span><span style="line-height:1.5;"> onCreate(@Nullable Bundle savedInstanceState) {

    </span><span style="color:rgb(0,0,255);line-height:1.5;">super</span><span style="line-height:1.5;">.onCreate(savedInstanceState);

    setContentView(MResource.getIdByName(</span><span style="color:rgb(0,0,255);line-height:1.5;">this</span>, "layout", "jar_layout"<span style="line-height:1.5;">));

    ImageView mPlayerLogo </span>= (ImageView) <span style="color:rgb(0,0,255);line-height:1.5;">this</span>.findViewById(MResource.getIdByName(<span style="color:rgb(0,0,255);line-height:1.5;">this</span><span style="line-height:1.5;">,

            </span>"id", "logo"<span style="line-height:1.5;">));

    mPlayerLogo.setImageResource(MResource.getIdByName(</span><span style="color:rgb(0,0,255);line-height:1.5;">this</span>, "drawable", "ic_launcher"<span style="line-height:1.5;">));

}


}
这里:利用反射根据资源名字获取资源ID加载布局+设置图片
在项目中打开jar的JarActivity的实现代码如下:
注:由于jar没有布局文件和资源文件,所以需要把布局(jar_layout)copy到项目中,aar则不需要
public class MainActivity extends AppCompatActivity {
@Override

</span><span style="color:rgb(0,0,255);line-height:1.5;">protected</span> <span style="color:rgb(0,0,255);line-height:1.5;">void</span><span style="line-height:1.5;"> onCreate(Bundle savedInstanceState) {

    </span><span style="color:rgb(0,0,255);line-height:1.5;">super</span><span style="line-height:1.5;">.onCreate(savedInstanceState);

    setContentView(R.layout.activity_main);

    findViewById(R.id.btn_jar).setOnClickListener(</span><span style="color:rgb(0,0,255);line-height:1.5;">new</span><span style="line-height:1.5;"> View.OnClickListener() {

        @Override

        </span><span style="color:rgb(0,0,255);line-height:1.5;">public</span> <span style="color:rgb(0,0,255);line-height:1.5;">void</span><span style="line-height:1.5;"> onClick(View v) {

            Intent intent </span>= <span style="color:rgb(0,0,255);line-height:1.5;">new</span><span style="line-height:1.5;"> Intent();

            intent.setClassName(getApplication(), </span>"com.zhh.librarydemo.JarActivity"<span style="line-height:1.5;">);

            startActivity(intent);

        }

    });

}


}
jar_layout布局:
<?xml version="1.0" encoding="utf-8"?>
<LinearLayout xmlns:android="http://schemas.android.com/apk/res/android"
android:layout_width="match_parent"
android:layout_height="match_parent"
android:orientation="vertical"><<span style="line-height:1.5;">ImageView
android:id</span>="@+id/logo"<span style="line-height:1.5;">
android:layout_width</span>="wrap_content"<span style="line-height:1.5;">
android:layout_height</span>="wrap_content" />
</LinearLayout>
在清单文件中注册:
<activity android:name="com.zhh.librarydemo.JarActivity"/>
Android Studio 如何打JAR包(修订版)的更多相关文章
- Android Studio 如何打JAR包
Android Studio 如何打JAR包 在eclipse中我们知道如何将一个项目导出为jar包,供其它项目使用. 在AS中可以通过修改gradle才处理. 我们新建一个项目MakeJar,在 ...
- Android Studio下导出jar包和aar包
Android Studio下导出jar包和aar包 jar包和aar包的区别 步骤 1. 创建Android工程 创建工程比较简单,不错复述 2. 创建一个Library(Module) 创建了一个 ...
- Android Studio导入第三方jar包或依赖工程的方法
Android Studio导入第三方jar包或依赖工程的方法 一 导入jar包的方法 1.打开自己的工程,将需要导入的jar包copy到libs文件夹下 2.在导入的jar包处单击菜单 Add ...
- Android Studio 怎样打JAR包
Android Studio 怎样打JAR包 在eclipse中我们知道怎样将一个项目导出为jar包,供其他项目使用. 在AS中能够通过改动gradle才处理. 我们新建一个项目MakeJar,在项目 ...
- Android Studio 导入系统 jar包
1.当前需要导入系统jar包的module所对应build.gradle中添加如下依赖: provided files('libs/classes-full-debug.jar') 也可以图形化设置: ...
- (转载) android studio library生成jar包和aar的方法总结
android studio library生成jar包和aar的方法总结 标签: android学习文档jar和aar的使用与生成gradle 2016-11-25 10:39 1782人阅读 评论 ...
- Android Studio下打jar包
在我们使用Eclipse时,我们常常使用的第三方类库文件大多都是jar包形式,用起来很方便.但是jar包只能打包class文件,对于Android UI类库而言,我们常常需要打包资源文件,对于界面不多 ...
- Eclipse / android studio 添加第三方jar包 步骤
eclipse 将第三方包放到libs文件夹后并没有引用. 基本步骤分为3步,具体介绍如下: 打开自己的Eclipse,在自己的Android工程上名上右键->Build Path ->C ...
- 关于Android Studio中第三方jar包的Javadoc绑定
原文地址:http://blog.csdn.net/a739697044/article/details/28116189 现在刚开始从Eclipse转用Android Studio,现在在尝试使 ...
随机推荐
- [D3] Build an Area Chart with D3 v4
Similar to line charts, area charts are great for displaying temporal data. Whether you’re displayin ...
- qemu 参数简介
参数 示例 说明 -hda -hda /data/windows.img 指定windows.img作为硬盘镜像 -cdrom -cdrom /data/windows.iso 指定windows.i ...
- 3D游戏《龙心传奇Dragona》全套完整源码
<龙心传奇Dragona>全套完整源码,<Dragona Online>也叫<龙心传奇>是一款3D中古奇幻风格网络游戏,描写叙述一个充满剑.魔法.恶魔和龙的魔法大陆 ...
- ping 本地端口
C:\Users\Administrator>netstat -ano | findstr 8001
- python3中numpy函数tile的用法
tile函数位于python模块 numpy.lib.shape_base中,他的功能是重复某个数组.比如tile(A,n),功能是将数组A重复n次,构成一个新的数组,我们还是使用具体的例子来说明问题 ...
- 【例题5-8 UVA - 400】Unix ls
[链接] 我是链接,点我呀:) [题意] 在这里输入题意 [题解] 设n个字符串中出现的最长的为len; 最后一列能容纳len个字符,然后前面的列能容纳len+2个字符. 每行最多60个字符. 按照这 ...
- swift开发网络篇—利用NSURLConnection GET请求和POST请求
一.GET请求和POST请求简单说明 @IBOutlet weakvar userName:UITextField! @IBOutletweakvar userPwd:UITextField! @IB ...
- [AngularJS NG-redux] Handle Asynchronous Operations with Middleware
Invariably the question that comes up when talking about Redux is how does one handle asynchronous o ...
- 排查一般MySQL性能问题
排查一般MySQL性能问题,通常要记录下面几项信息: 1.mysql> show processlist; 2.mysql> show engine innodb status\G 3.表 ...
- putty-gns3
hcl-cloud用的就是这个putty http://forum.gns3.net/topic5016.html File comment: Compiled PuTTY 0.62 for wind ...