轻量级应用开发之(02)UIView
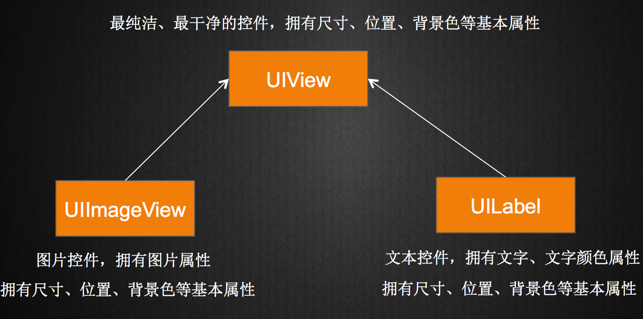
一 控件
1.屏幕上的所有UI元素都叫做控件(也有叫做视图、组件)比如按钮(UIButton)、文本(UILabel)都是控件.
2.控件的共同属性有哪些?
尺寸,位置,背景色
3. 苹果将控件的共同属性都抽取到父类UIView中
所有的控件最终都继承自UIView
UIButton、UILabel都继承自UIView(可以查看头文件验证)
二 UIView
1. UIView是所有控件的父控件。
2. 父控件和子控件
1)每个控件都是个容器,能容纳其他控件
2)内部小控件是大控件的子控件
3)大控件是内部小控件的父控件
3)每一个控制器(UIViewController)内部都有个默认的UIView属性
@property(nonatomic,retain) UIView *view;
控制器中管理的其他所有控件都是这个view的子控件(直接或者间接)
ViewDidLoad 方法
3.UIView的常用属性
@property(nonatomic,readonly) UIView *superview;

 获得自己的父控件对象

@property(nonatomic,readonly,copy) NSArray *subviews;

 获得自己的所有子控件对象

@property(nonatomic) NSInteger tag;

 控件的ID(标识),父控件可以通过tag来找到对应的子控件

@property(nonatomic) CGAffineTransform transform;

 控件的形变属性(可以设置旋转角度、比例缩放、平移等属性)
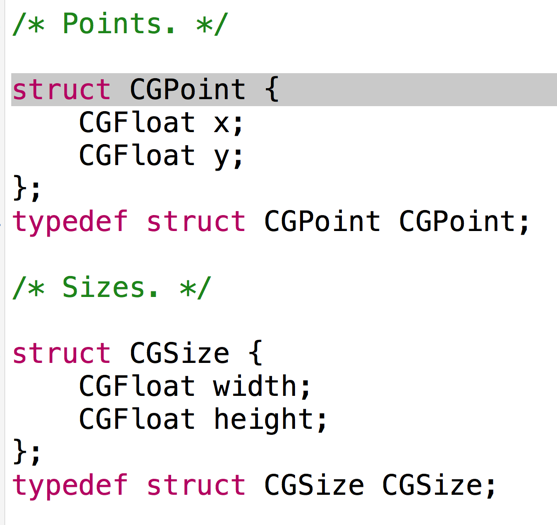
@property(nonatomic) CGRect frame;

 控件矩形框在父控件中的位置和尺寸(以父控件的左上角为坐标原点)

@property(nonatomic) CGRect bounds;

 控件矩形框的位置和尺寸(以自己左上角为坐标原点,所以bounds的x、y一般为0)

@property(nonatomic) CGPoint center;

 控件中点的位置(以父控件的左上角为坐标原点)
CGRect的数据结构如下:CGRets是个结构体。
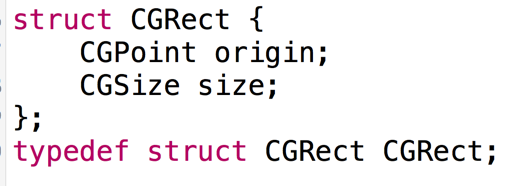
CGPoint表示UIView的坐标,CGSize表示UIView的宽度和高度。
4.UIView的常用方法
- (void)addSubview:(UIView *)view;

 添加一个子控件view

- (void)removeFromSuperview;

 从父控件中移除

- (UIView *)viewWithTag:(NSInteger)tag;

 根据一个tag标识找出对应的控件(一般都是子控件)

- (void)insertSubview:(UIView *)view atIndex:(NSInteger)index;

- (void)insertSubview:(UIView *)view aboveSubview:(UIView *)siblingSubview;

- (void)insertSubview:(UIView *)view belowSubview:(UIView *)siblingSubview;
三 UIKit坐标系
在UIKit中,坐标系的原点(0,0)在左上角,x值向右正向延伸,y值向下正向延伸。向右延伸,x值增加;向下延伸,y值增加。

例子1
 #import "ViewController.h"

 @interface ViewController ()

 @property (weak, nonatomic) IBOutlet UIView *redView;

 @end

 @implementation ViewController

 - (void)viewDidLoad {

     [super viewDidLoad];

     UIView * view = [[UIView alloc]init];

     view.backgroundColor = [UIColor blueColor];

     view.frame = CGRectMake(, , , );

     [self.redView addSubview:view];

 }

 @end
例子2
 #import "ViewController.h"

 @interface ViewController ()

 @property (weak, nonatomic) IBOutlet UIView *blueView;

 @end

 @implementation ViewController

 - (void)viewDidLoad {

     [super viewDidLoad];

 }

 - (void)touchesBegan:(NSSet<UITouch *> *)touches withEvent:(UIEvent *)event{

     UIView * redView = [[UIView alloc]init];

     redView.backgroundColor = [UIColor redColor];

     CGFloat w =  + arc4random_uniform();

     CGFloat h =  + arc4random_uniform();

     self.blueView.frame = CGRectMake(, , w, h);

 }

 @end
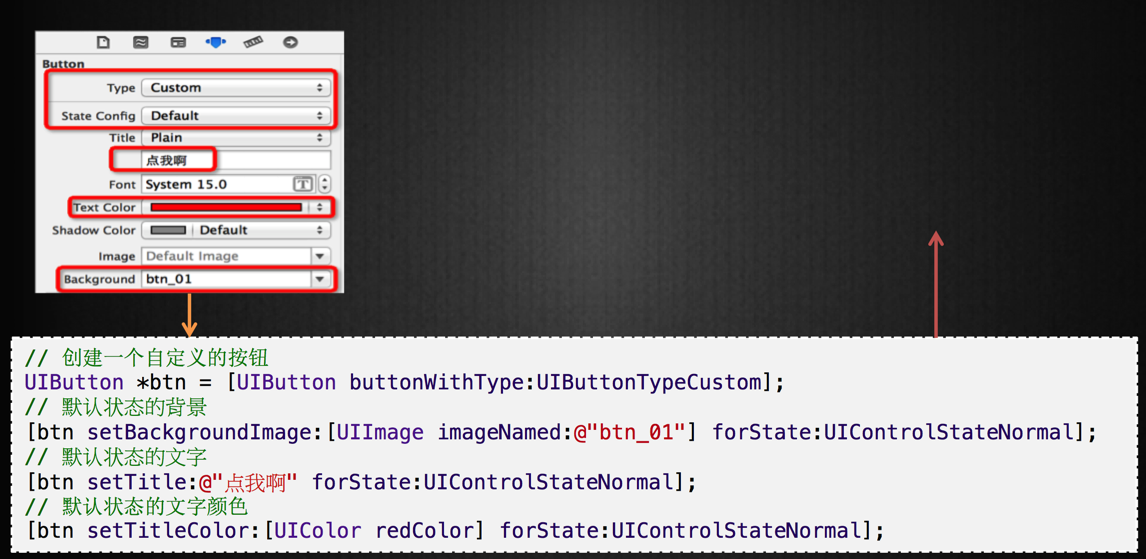
四 UIButton
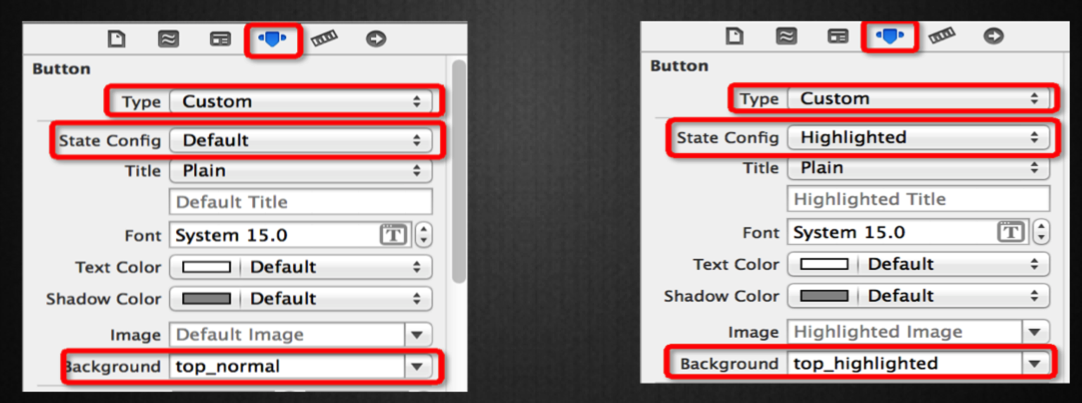
1.UIButton的状态
1)normal(普通状态)
默认情况(Default)
对应的枚举常量:UIControlStateNormal
2)highlighted(高亮状态)
按钮被按下去的时候(手指还未松开)
对应的枚举常量:UIControlStateHighlighted
3)disabled(失效状态,不可用状态)
如果enabled属性为NO,就是处于disable状态,代表按钮不可以被点击
对应的枚举常量:UIControlStateDisabled
2设置按钮的背景图片
设置按钮在不同状态下的背景图片
(为了保证高亮状态下的图片正常显示,必须设置按钮的type为custom)
3 Storyboard到代码的转换
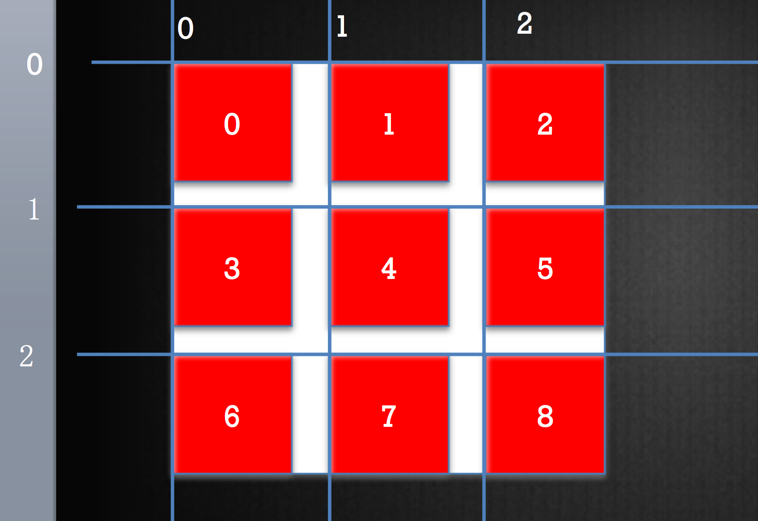
五 九宫格计算思路
#import "ViewController.h"
@interface ViewController ()
@end
@implementation ViewController
- (void)viewDidLoad {
[super viewDidLoad];
//代码创建添加按钮
UIButton * addBtn = [[UIButton alloc]init];
[addBtn setImage:[UIImage imageNamed:@"add"] forState:UIControlStateNormal];
addBtn.tag = ;
[addBtn setImage:[UIImage imageNamed:@"add_highlighted" ] forState:UIControlStateHighlighted];
addBtn.frame = CGRectMake(, , , );
[self.view addSubview:addBtn];
//代码创建删除按钮
UIButton * removeBtn = [[UIButton alloc]init];
removeBtn.frame = CGRectMake(, , , );
[removeBtn setImage:[UIImage imageNamed:@"remove"] forState: UIControlStateNormal];
[removeBtn setImage:[UIImage imageNamed:@"remove_highlighted"] forState:UIControlStateHighlighted];
removeBtn.tag = ;
[self.view addSubview:removeBtn];
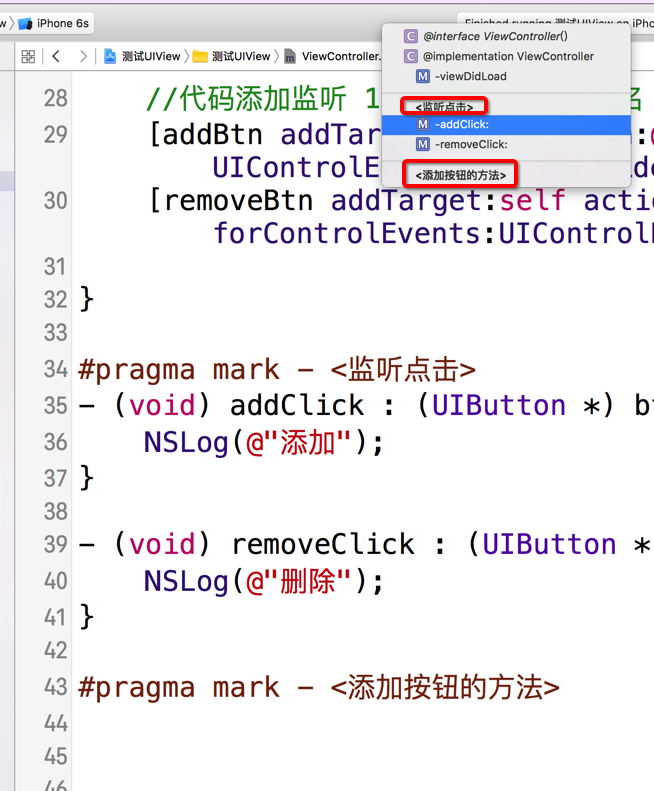
//代码添加监听 1. 监听者 2,方法名 3.什么事件
[addBtn addTarget:self action:@selector(addClick: ) forControlEvents: UIControlEventTouchUpInside];
[removeBtn addTarget:self action:@selector(removeClick:) forControlEvents:UIControlEventTouchUpInside];
}
- (void) addClick : (UIButton *) btn{
NSLog(@"添加");
}
- (void) removeClick : (UIButton *) btn{
NSLog(@"删除");
}
@end
对按钮进行封装:
 - (void)viewDidLoad {

     [super viewDidLoad];

     [self addBtnWithImage:@"add" highlightedImage:@"add_highlighted" disableImage:@"add_disabled" frame:CGRectMake(, , , ) action:@selector(addClick: )];

     [self addBtnWithImage:@"remove" highlightedImage:@"remove_highlighted" disableImage:@"remove_disabled" frame: CGRectMake(, , , ) action:@selector( removeClick: )];

 }

 - (void) addBtnWithImage:(NSString *)image highlightedImage: (NSString *)highlightedImage disableImage: (NSString *)disableImage

                    frame:(CGRect ) frame action:(SEL) action{

     UIButton * btn = [[UIButton alloc]init];

     btn.frame=  frame;

     [btn setImage:[UIImage imageNamed:image] forState: UIControlStateNormal];

     [btn setImage:[UIImage imageNamed:highlightedImage] forState:UIControlStateHighlighted];

     [btn setImage:[UIImage imageNamed: disableImage] forState:UIControlStateDisabled];

     [self.view addSubview:btn];

     [btn addTarget:self action:action forControlEvents: UIControlEventTouchUpInside];

 }
实现点击添加按钮的事件。
 - (void) addClick : (UIButton *) btn{

     //搞一个整体出来

     UIView * shopView = [[UIView alloc]init];

     shopView.frame = CGRectMake(, , , );

     shopView.backgroundColor = [UIColor redColor];

     //创建图片

     UIImageView * shop = [[UIImageView alloc]init];

     shop.image = [UIImage imageNamed:@"danjianbao"];

     shop.frame = CGRectMake(, , , );

     [shopView addSubview:shop];

     //创建文字

     UILabel *label = [[UILabel alloc]init];

     label.text = @"单肩背";

     label.frame = CGRectMake(, , , );

     label.textAlignment = NSTextAlignmentCenter ;

     label.font = [UIFont systemFontOfSize:];

     [shopView addSubview:label];

     [self.shopsView addSubview:shopView];

 }
经过优化后的按钮添加事件:
 - (void) addClick : (UIButton *) btn{

     //搞一个整体出来

     CGFloat shopW = ;

     CGFloat shopH = ;

     int cols = ;

     NSInteger index = self.shopsView.subviews.count;

     NSLog(@"index=%ld" , index );

     //计算X

     //计算间距= (shopView的宽度 - 列数 * 单元格宽度 ) / (列数 -1)

     CGFloat margin =  (self.shopsView.frame.size.width - cols * shopW) / (cols-);

     int col = index % cols;

     int marginH = ;

     CGFloat shopX = col * (shopW + margin);

     int row = index / cols;

     CGFloat shopY = row * (shopH + marginH);

     UIView * shopView = [[UIView alloc]init];

     shopView.frame = CGRectMake( shopX , shopY , , shopH);

     shopView.backgroundColor = [UIColor redColor];

     //创建图片

     UIImageView * shop = [[UIImageView alloc]init];

     shop.image = [UIImage imageNamed:@"danjianbao"];

     shop.frame = CGRectMake(, , , );

     [shopView addSubview:shop];

     //创建文字

     UILabel *label = [[UILabel alloc]init];

     label.text = @"单肩背";

     label.frame = CGRectMake(, , , );

     label.textAlignment = NSTextAlignmentCenter ;

     label.font = [UIFont systemFontOfSize:];

     [shopView addSubview:label];

     [self.shopsView addSubview:shopView];

 }
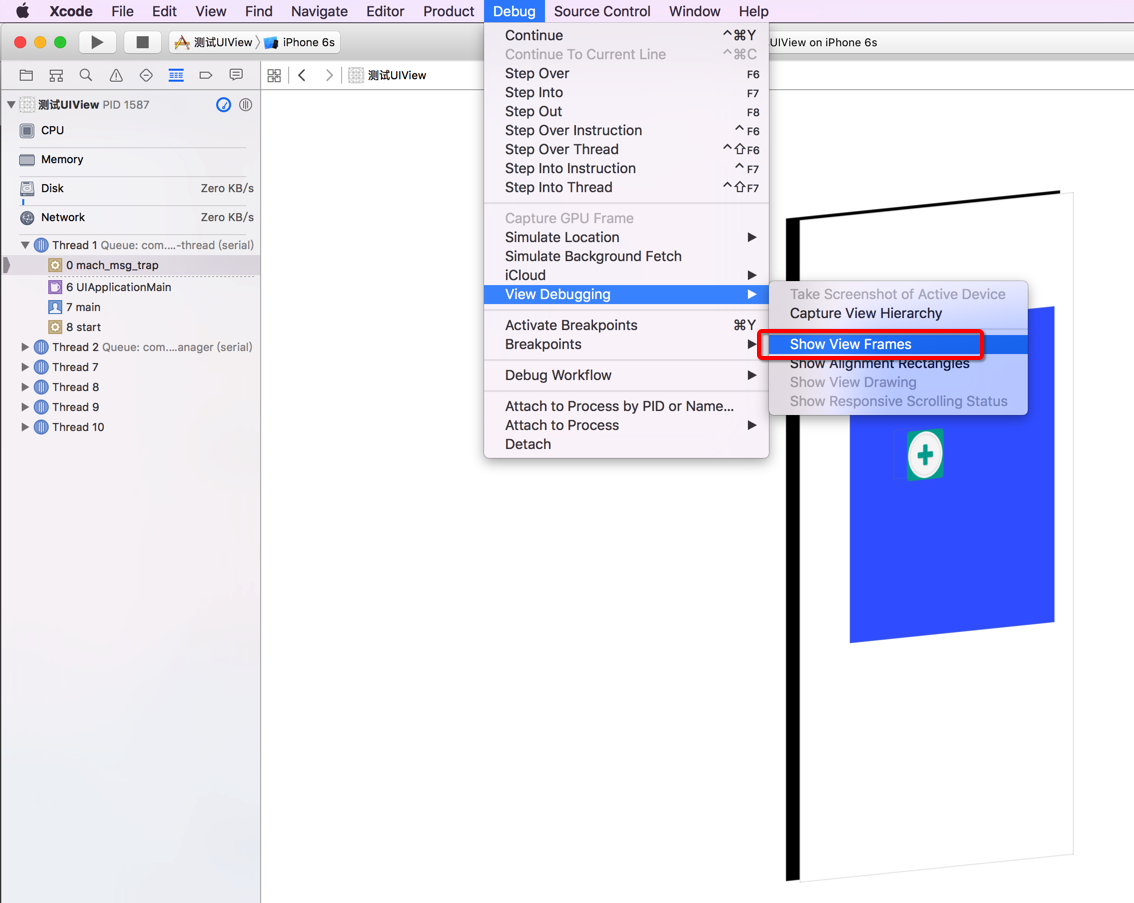
知识点:
1. 在调试app时,显示 View Frames.
Debug -> View Debugging -> Show View Frames
XCode 快捷按钮
command + shift + N 新建文件
XCode中编写注释:
#pragma mark - <添加按钮的方法>
#pragma mark - <监听点击>
OC 中 字符串格式化:
 int idx =  ;

 idx ++;

 NSString * indexStr = [NSString stringWithFormat:@"单肩背%d",idx];
轻量级应用开发之(02)UIView的更多相关文章
- 如何优雅的使用vue+vux开发app -02
如何优雅的使用vue+vux开发app -02 很明显这又是一个错误的示范,请勿模仿 使用动态组件实现保留状态的路由 <!DOCTYPE html> <html> <he ...
- 使用ionic与cordova(phonegap)进行轻量级app开发前的环境配置与打包安卓apk过程记录
前言 有人说:"如果你恨一个人,就让ta去接触cordova(phonegap)",这是因为这里面的水很深,坑很多,真让人不是一般地发狂.或许有幸运的人儿基本顺顺利利就配置完环境 ...
- 基于flask的轻量级webapi开发入门-从搭建到部署
基于flask的轻量级webapi开发入门-从搭建到部署 注:本文的代码开发工作均是在python3.7环境下完成的. 关键词:python flask tornado webapi 在python虚 ...
- 【IOS开发笔记02】学生管理系统
端到端的机会 虽然现在身处大公司,但是因为是内部创业团队,产品.native.前端.服务器端全部坐在一起开发,大家很容易做零距离交流,也因为最近内部有一个前端要转岗过来,于是手里的前端任务好像可以抛一 ...
- 【转载】利用jetty+Eclipse实现超轻量级web开发
之前一直使用maven的jetty插件.今天换种方式. 使用下面介绍的方式你只有一个java project就行. 开发环境更简单,debug也更方便,不需要remote debug的方式,jetty ...
- iOS开发之指定UIView的某几个角(小于4)为圆角
在iOS开发中,我们经常会遇到View设置圆角的问题,如果需要将UIView的4个角全部都为圆角,做法相当简单,只需设置其Layer的cornerRadius属性即可(项目需要使用QuartzCore ...
- [Intel Edison开发板] 02、Edison开发板入门
一.前言 Start from the link: 开始学习的链接 上面链接是官网的教程,按照教程可以开发板入门: 其中第一步是了解开发板,涉及到如何组装.如何连线.一些主要的接口简单介绍等信息: 第 ...
- Android快乐贪吃蛇游戏实战项目开发教程-02虚拟方向键(一)自定义控件概述
该系列教程概述与目录:http://www.cnblogs.com/chengyujia/p/5787111.html 一.自定义控件简介 在本项目中,无论是游戏主区域还是虚拟方向键都是通过自定义控件 ...
- 微信开发系列----02:实现POST请求响应
继续昨天的,现在我们的微信测试成功了,可以开发实现微信的各种功能,今天主要实现微信的简单交互,比如发送语音,图片,文本等请求,网站服务器发送对应的响应. 项目GitHub地址: https://gi ...
- 《Invert》开发日志02:游戏风格定型
声明:以下涉及到的<God of Light>.<Valiant Hearts : The Great War>.<Angry Birds 2>游戏截图均来自其Ap ...
随机推荐
- apply,call,bind的区别
apply.call 在 javascript 中,call 和 apply 都是为了改变某个函数运行时的上下文(context)而存在的,换句话说,就是为了改变函数体内部 this 的指向. Jav ...
- 11Spring_AOP编程(AspectJ)_概述
AspectJ 是一个框架 (第三方AOP框架 ),提供切面编程 ,编写一个Aspect 支持多个Advice和多个PointCut .对比前一种提到的传统的Aop编程,AspctJ更加的常用.Asp ...
- ruby on rails 里使用SideKiq 做后台任务
环境:ubuntu14.4,ruby2.1.5, rails4.2 一.新一个rais项目:rails new active_job --skip-bundle 进入项目文件夹: cd a ...
- ruby 元编程
一 对象模型 kernel Module Kernel.private_instance_methods.grep(/^pr/) private method 1 如果一个方法接收者不是你自己,一 ...
- 从log4j日志无缝迁移至logback
ogback对比log4j的有点在此就不赘述了. 由于在项目的原有代码中,大量的日志生成是通过log4j实现的,新的代码希望通过logback的方式生成日志,同时希望将老的代码在不修改的情况下直接将日 ...
- php基础24:数组range
<?php $numbers = range(1, 10); echo "<pre>"; var_dump($numbers); echo "</ ...
- Anaconda安装更新库
平台:win64+anaconda 1. 如何查看已安装的库 打开 Anaconda Command Prompt ,在命令提示符窗口中输入以下命令: pip list # 或者 conda list ...
- 【WEB API项目实战干货系列】- API登录与身份验证(三)
上一篇: [WEB API项目实战干货系列]- 接口文档与在线测试(二) 这篇我们主要来介绍我们如何在API项目中完成API的登录及身份认证. 所以这篇会分为两部分, 登录API, API身份验证. ...
- Django1.8教程——从零开始搭建一个完整django博客(一)
第一个Django项目将是一个完整的博客网站.它和我们博客园使用的博客别无二致,一样有分类.标签.归档.查询等功能.如果你对Django感兴趣的话,这是一个绝好的机会.该教程将和你一起,从零开始,搭建 ...
- Library not found for -lPods 解决方法
使用cocoapods 经常会遇到的问题. 1. Library not found for -lPods 2. Pods was rejected as an implicit dependency ...