centos7安装gitlab并汉化
一、基础环境准备
1.安装依赖包
 [root@gitlab-server ~]#yum install curl policycoreutils openssh-server openssh-clients postfix wget git patch -y

[root@gitlab-server ~]# systemctl start postfix
2.配置yum源(由于网络问题,国内用户,建议使用清华大学的镜像源进行安装)
[root@gitlab-server ~]# wget -O /etc/yum.repos.d/CentOS-Base.repo http://mirrors.aliyun.com/repo/Centos-7.repo

[root@gitlab-server ~]# wget -P /etc/yum.repos.d/ http://mirrors.aliyun.com/repo/epel-7.repo

[root@gitlab-server ~]#vim /etc/yum.repos.d/gitlab-ce.repo

[gitlab-ce]

name=gitlab-ce

baseurl=https://mirrors.tuna.tsinghua.edu.cn/gitlab-ce/yum/el7/

repo_gpgcheck=

gpgcheck=

enabled=

gpgkey=https://packages.gitlab.com/gpg.key

[root@gitlab-server ~]# yum clean all  && yum makecache
二、获取gitlab及汉化包
[root@gitlab-server ~]# wget https://mirrors.tuna.tsinghua.edu.cn/gitlab-ce/yum/el7/gitlab-ce-10.6.4-ce.0.el7.x86_64.rpm   #直接下载rpm包,因为测试发现无论是国外还是国内源速度都很感人

[root@gitlab-server ~]# git clone https://gitlab.com/xhang/gitlab.git -b v10.6.4-zh   #下载汉化包,汉化包和gitlab对应,如果是最新的,则不需要指定版本
三、安装gitlab
[root@gitlab-server ~]# yum localinstall gitlab-ce-10.6.-ce..el7.x86_64.rpm -y

[root@gitlab-server ~]# vim /etc/gitlab/gitlab.rb

 external_url 'http://192.168.0.104'  #修改为本机IP或者域名,重要

[root@gitlab-server ~]# gitlab-ctl reconfigure #配置并启动gitlab-ce

[root@gitlab-server ~]# gitlab-ctl status

[root@gitlab-server ~]# netstat -tnlp #查看端口,特别是80和8080,避免被其他程序占用
打开Web界面,首先需要配置管理员密码,密码不少于8位

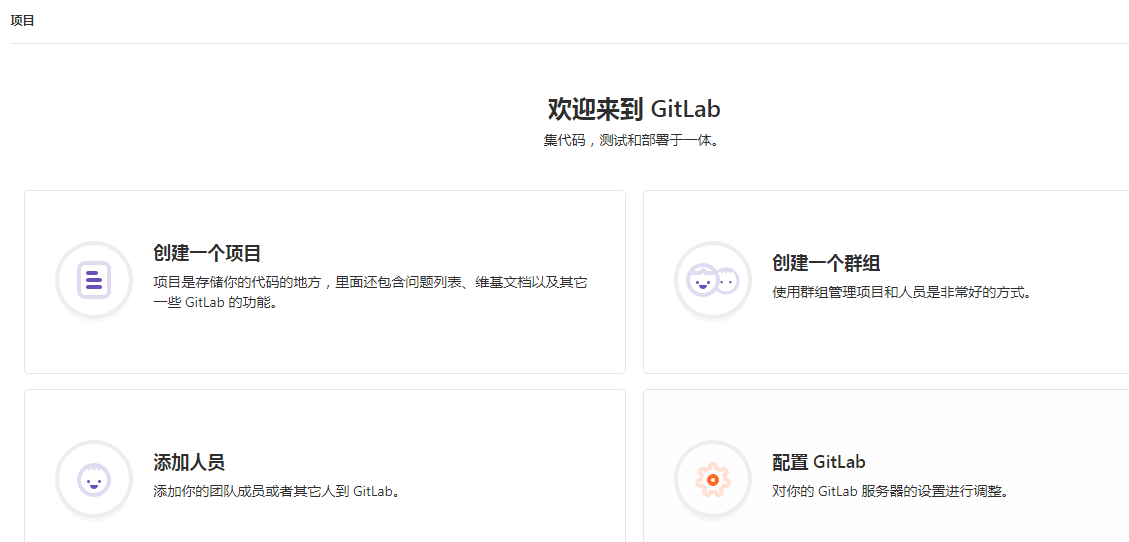
修改完成后,刷新页面出现登录和注册的页面,使用root用户和密码登录(生产环境应当关闭页面的注册功能)

登录后,语言为英文,不习惯可以使用汉化包进行汉化

四、安装汉化包
[root@gitlab-server ~]# gitlab-ctl stop #停止服务,否则会出错

[root@gitlab-server ~]# cd /root/gitlab

[root@gitlab-server gitlab]# git diff v10.6.4 v10.6.4-zh > ../10.6.-zh.diff #比较汉化标签和原标签,导出 patch 用的 diff 文件到/root下

[root@gitlab-server gitlab]# cd

[root@gitlab-server ~]# patch -d /opt/gitlab/embedded/service/gitlab-rails -p1 < 10.6.-zh.diff  #将10.6.4-zh.diff作为补丁更新到gitlab中

[root@gitlab-server ~]# gitlab-ctl reconfigure #重新配置gitlab

[root@gitlab-server ~]# gitlab-ctl start
刷新Web页面,查看是否汉化成功
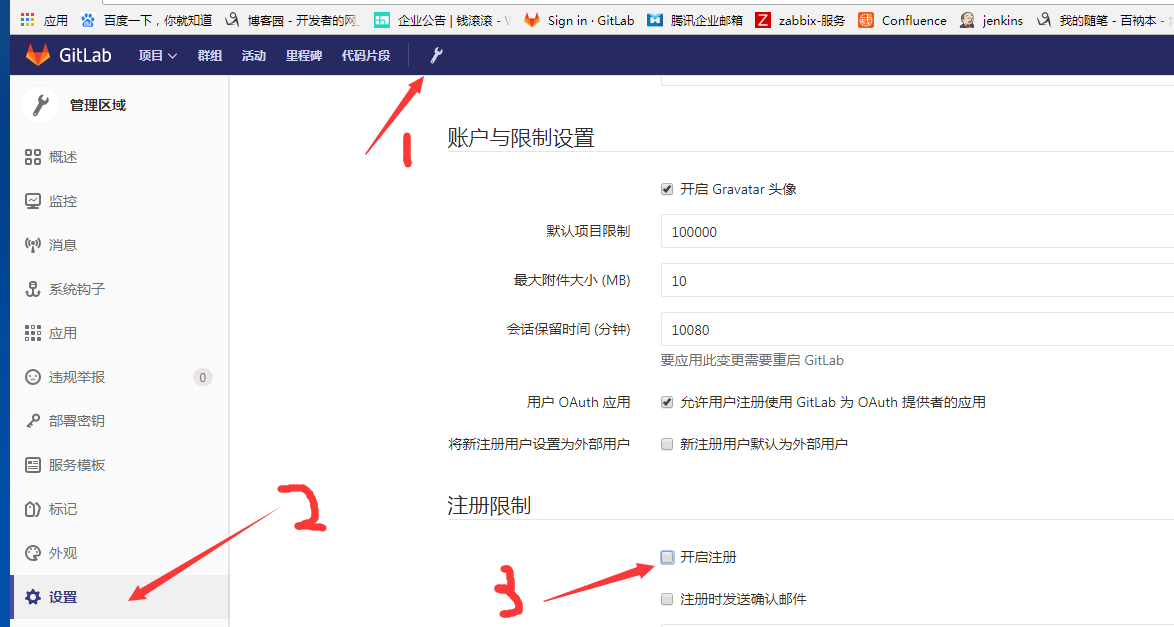
为了安全应当关闭用户注册的功能:
效果

只有登录界面啦!
其他:
生产环境gitlab的软硬件要求可以参考这篇文章:http://www.cnblogs.com/gnool/p/6128546.html
对git命令如果不是很熟悉,可以参照廖雪峰大神的文档 https://www.liaoxuefeng.com/wiki/0013739516305929606dd18361248578c67b8067c8c017b000
centos7安装gitlab并汉化的更多相关文章
- CentOS7安装GitLab、汉化及使用
同步首发:http://www.yuanrengu.com/index.php/20171112.html 一.GitLab简介 GitLab是利用Ruby On Rails开发的一个开源版本管理系统 ...
- CentOS7安装GitLab、汉化、邮箱配置及使用
同步首发:http://www.yuanrengu.com/index.php/20171112.html 一.GitLab简介 GitLab是利用Ruby On Rails开发的一个开源版本管理系统 ...
- CentOS7安装GitLab、汉化、邮箱配置及使用(转载)
同步首发: https://www.cnblogs.com/heyonggang/p/7778203.html http://www.yuanrengu.com/index.php/20171112. ...
- centos安装gitlab及汉化
GitLab 是一个用于仓库管理系统的开源项目,使用Git作为代码管理工具,并在此基础上搭建起来的web服务.今天,就记录一下centos部署gitlab及其汉化的操作方法. 1.下载安装 下载地址: ...
- CentOS7.5安装GitLab及汉化
一.GitLab英文版安装 1.下载gitlab安装包,然后安装 wget --content-disposition https://packages.gitlab.com/gitlab/gitla ...
- CentOS 7安装GitLab、汉化、配置邮件发送
1.更换国内yum源 1.1 备份 mv /etc/yum.repos.d/CentOS-Base.repo /etc/yum.repos.d/CentOS-Base.repo.backup 1.2 ...
- 安装gitlab并汉化
简介: GitLab是一个利用Ruby on Rails开发的开源应用程序,实现一个自托管的Git项目仓库,可通过Web界面进行访问公开的或者私人项目. 它拥有与GitHub类似的功能,能够浏览源代码 ...
- 快速安装 GitLab 并汉化
转载:http://www.jianshu.com/p/7a0d6917e009
- CentOs7安装gitlab(转!)
沧浪之水清兮,可以濯吾缨; 沧浪之水浊兮,可以濯吾足. ...
随机推荐
- RSA 加密算法 Java 公钥加密私钥解密 和 私钥加密公钥解密 的特点
package com.smt.cipher.unsymmetry; import org.apache.commons.codec.binary.Base64; import org.apache. ...
- php调用c#的dll(转)
这几天,一直在做DES ecb模式的加解密,刚用.net实现了加解密,完了由于需要又要转型成PHP代码,费了九牛二虎之力单独用PHP没能实现,结构看到一篇php直接调用c#里生成的.dll文件的方法, ...
- py-day1-2 python的循环语句
死循环: 条件循环: 练习 第一题: n = 1 while n < 11: if n == 7: pass else: print(n) n = n + 1 print('-----end-- ...
- locate命令详解
Linux locate命令 locate(locate) 命令用来查找文件或目录. locate命令要比find -name快得多,原因在于它不搜索具体目录,而是搜索一个数据库/var/lib/ml ...
- 排序算法<No.5>【堆排序】
算法,是系统软件开发,甚至是搞软件的技术人士的核心竞争力,这一点,我坚信不疑.践行算法实践,已经有一段时间没有practise了,今天来一个相对麻烦点的,堆排序. 1. 什么是堆(Heap) 这里说的 ...
- mig_7series DDR控制器的配置
mig_7series DDR控制器的配置
- C#代码覆盖率实践-vsinstr和OpenCover
C#代码覆盖率实践-vsinstr和OpenCover 标签: C#覆盖率Visual StudioOpenCover测试 2013-06-09 00:57 8149人阅读 评论(8) 收藏 举报 ...
- windebug 与 office Home
https://officecdn.microsoft.com/sg/492350f6-3a01-4f97-b9c0-c7c6ddf67d60/media/zh-CN/HomeStudentRetai ...
- python写xml及几个问题
python写xml的库和用法 几个问题: 1.乱码问题 设写入UTF-8编码 write函数增加encoding='utf-8' 2.空元素xml节点简写及完整写 write函数增加 short_e ...
- 【Graphite学习】系列学习文章-【转】
Graphite 系列 #2:Carbon 和 Whisper GRAPHITE SERIES #1: PROVISION HARDWARE GRAPHITE SERIES #2: CARBON &a ...