idea spring-boot gradle mybatis 搭建开发环境
使用工具idea 2017.2开发,gradle构建项目,使用的技术有spring-boot、mybatis
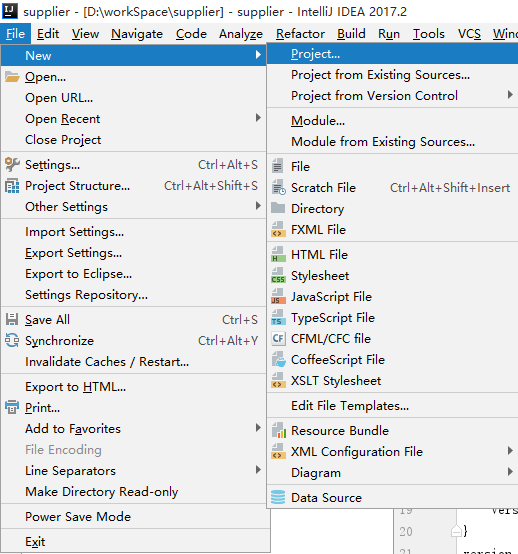
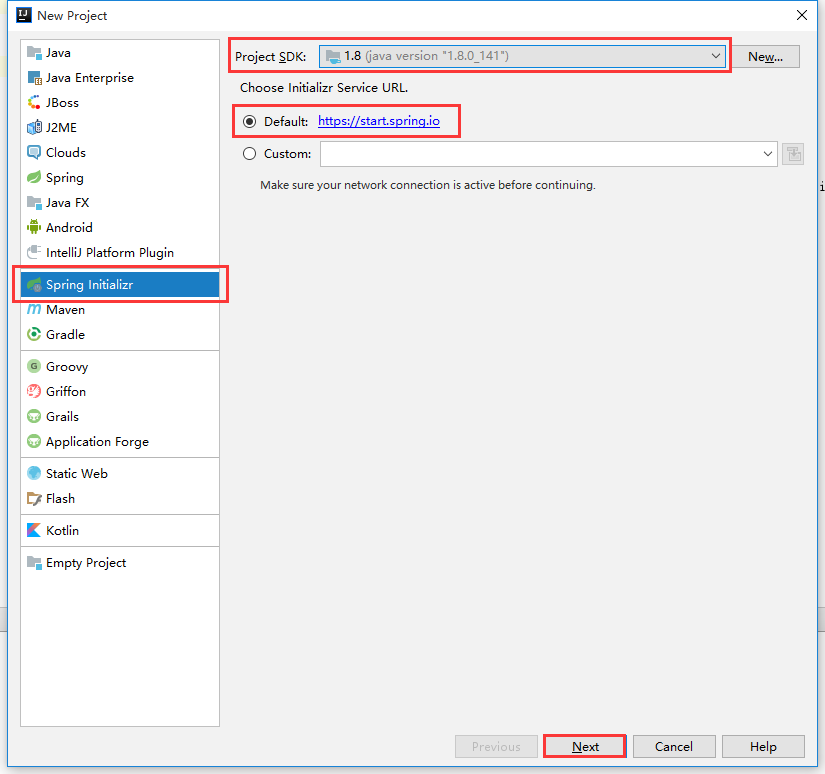
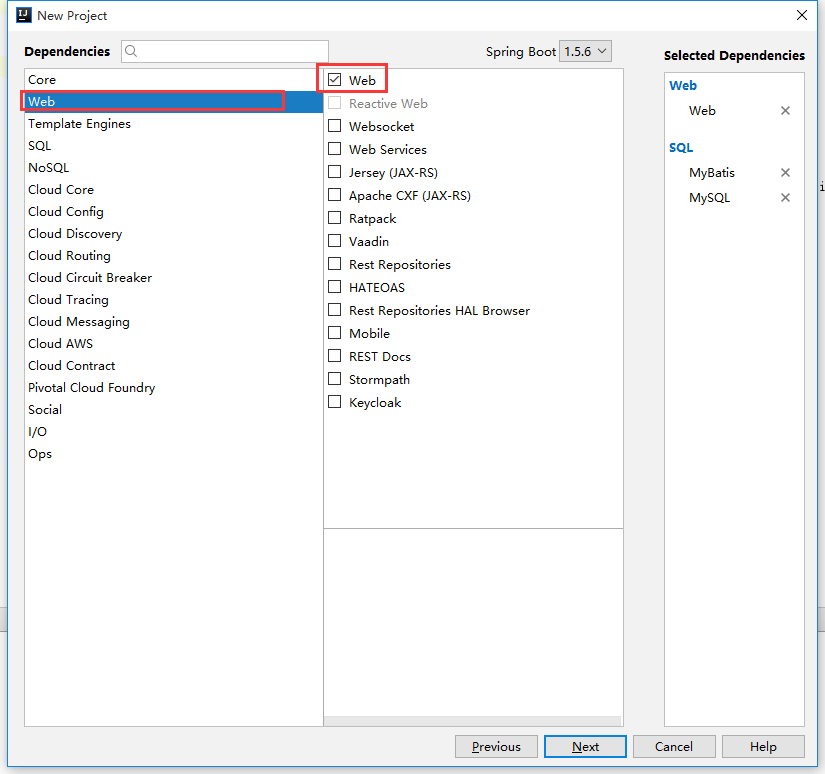
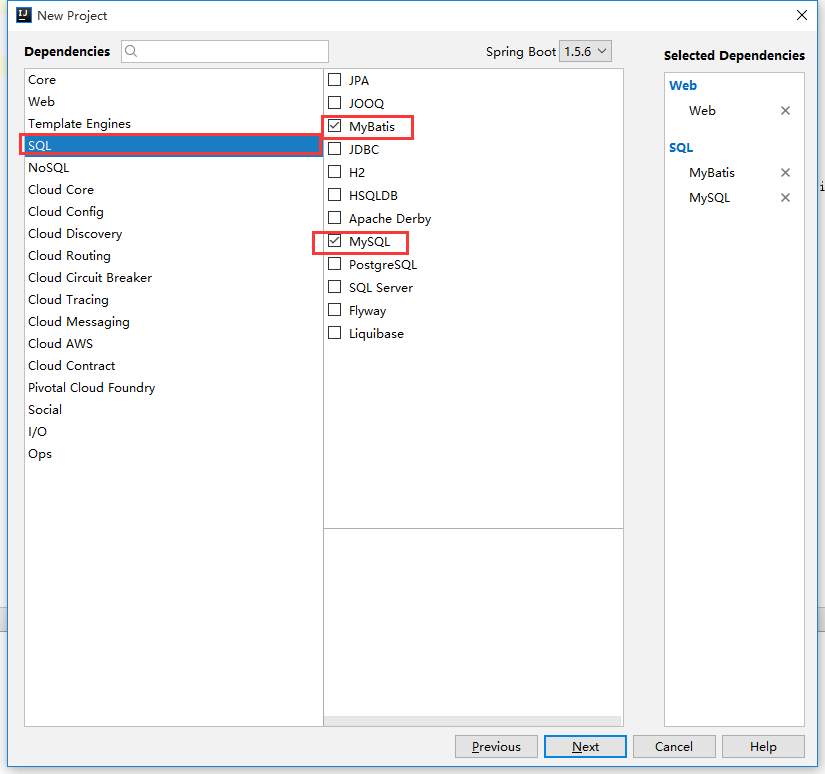
1、新建项目
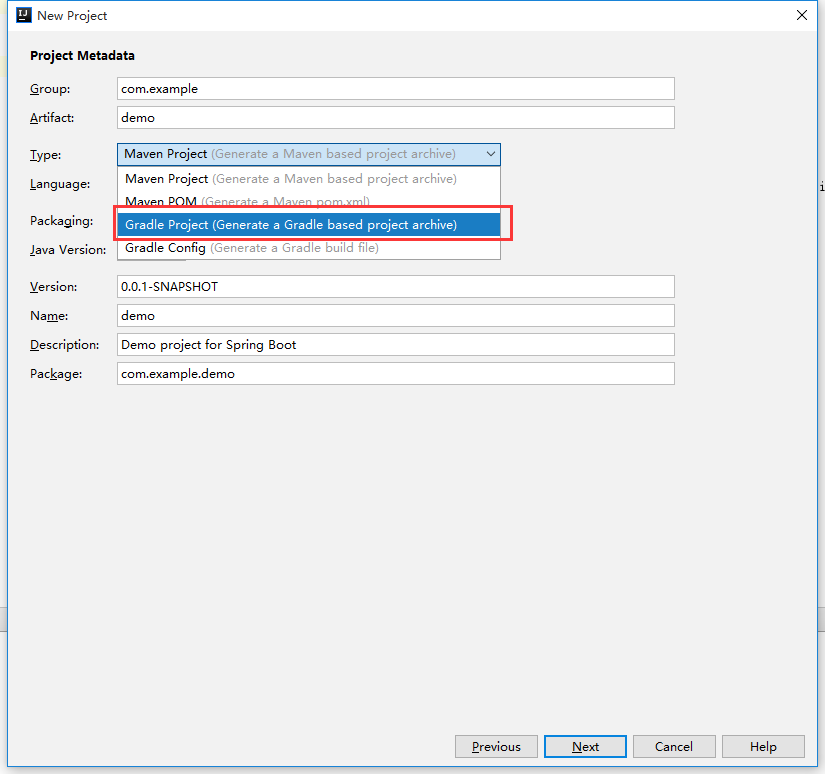

说明:1、src为源码路径,开发主要在src下
2、src/main/java下放java文件
3、src/main/resources下放配置文件
4、src/test/java下放test测试案例
5、build.gradle文件:gradle配置文件
2.配置build.gradle文件
buildscript { // 第三方插件
   ext {
      springBootVersion = '1.5.6.RELEASE'
   }
   repositories { // maven仓库地址
      maven{url 'http://xxxx/'} // 私库
      mavenCentral()
   }
   dependencies { // 依赖项
      classpath("org.springframework.boot:spring-boot-gradle-plugin:${springBootVersion}")
   }
}
buildscript中的声明是gradle脚本自身需要使用的资源
apply plugin: 'java' // java项目
apply plugin: 'eclipse' // eclipse开发环境构建,生成所需要的.project,.classpath等文件
apply plugin: 'org.springframework.boot'
jar {
    baseName = 'shop-supplier'
    version =  '1.0.0-SNAPSHOT'
}
version = '1.0.0-SNAPSHOT'
sourceCompatibility = 1.8
targetCompatibility = 1.8

repositories { // maven仓库地址
   maven{url '私服地址'}
   mavenCentral()
}

dependencies { // 依赖项
   // web thymeleaf
   compile('org.springframework.boot:spring-boot-starter-web')
   compile('org.springframework.boot:spring-boot-starter-thymeleaf')

   // test
   testCompile('org.springframework.boot:spring-boot-starter-test')

   //添加 google二维码
   compile 'com.google.zxing:core:3.2.0'
}
3.配置mybatis

mybatis-config.xml:mybatis配置文件
mybatis/mapper文件夹下时mybatis的mapper.xml文件
3.application.properties:项目配置文件,内容如下:
# 数据库配置
spring.datasource.url=jdbc:mysql://127.0.0.1:3306/dbname?useUnicode=true&characterEncoding=UTF-8&zeroDateTimeBehavior=round&transformedBitIsBoolean=true&autoReconnect=true&failOverReadOnly=false&allowMultiQueries=true
spring.datasource.username=root
spring.datasource.password=1
spring.datasource.driver-class-name=com.mysql.jdbc.Driver
# mybatis配置
mybatis.config-location=classpath:mybatis-config.xml // 配置文件位置
mybatis.typeAliasesPackage=com.my.domain // 实体类包
mybatis.mapper-locations=classpath:mybatis/mapper/*.xml // mapper文件位置
#log
logging.file=log.log
logging.level.com=info
logging.level.org=info
logging.level.com.my=debug
debug=true
logging.level.com.my.web = debug
4.mapper文件:
<?xml version="1.0" encoding="UTF-8"?>
<!DOCTYPE mapper PUBLIC "-//mybatis.org//DTD Mapper 3.0//EN" "http://mybatis.org/dtd/mybatis-3-mapper.dtd">
<mapper namespace="com.my.dao.xxxDao">
<!-- 通用结果集 -->
<resultMap id="BaseResultMap" type="com.my.domain.xxx">
<id column="id" property="id"/>
<result column="user_name" property="userName"/>
<result column="字段" property="属性"/>
</resultMap>
<!-- 插入 -->
<insert id="方法名" paramType="com.my.domain.实体类">
INSERT INTO 表名 (id, user_name) VALUES (#{属性id}, #{属性userName})
</insert>
<!-- 删除 -->
<delete ... >
<!-- 修改 -->
<update ... >
<!-- 查询 -->
<select ... >
</mapper>
5.mybatis-config.xml配置设置
<?xml version="1.0" encoding="UTF-8" ?>
<!DOCTYPE configuration PUBLIC "-//mybatis.org//DTD Config 3.0//EN" "http://mybatis.org/dtd/mybatis-3-config.dtd">
<configuration>
    <settings>
        <setting name="logImpl" value="SLF4J" />
    </settings>
</configuration>
6.main方法入口
@SpringBootApplication // 入口注解
@MapperScan("com.my.dao") // mybatis扫描路径
public class Application {
   public static void main(String[] args) {
      SpringApplication.run(Application.class, args);
   }
}
注解:1.controller注解:
@RestCotroller类前--返回json 等价于 @Controller类前 + @ResponseBody方法前
@RequestMapping(value = "/order" method = RequestMethod.GET)类前或方法前
@Valid入参对象前验证入参,参数后面跟BindingResult参数,接收验证信息
@NotNull @NotEmpty @Length @NotBlank @Min @Size @JsonFormat入参对象属性前
2.service:
@Service类前
@Transactional(rollbackFor = Exception.class)方法前
3.dao:
@Mapper类前
@Param参数前
定时器:
1.在main入口java注解@EnableScheduling
2.定时器java注解@Component
3.定时方法注解@Scheduled(cron = "秒 分 时 天 月 星期 年"
一个cron表达式有至少6个(也可能7个)有空格分隔的时间元素。
按顺序依次为
秒(0~59)
分钟(0~59)
小时(0~23)
天(月)(0~31,但是你需要考虑你月的天数)
月(0~11)
天(星期)(1~7 1=SUN 或 SUN,MON,TUE,WED,THU,FRI,SAT)
7.年份(1970-2099)
其中每个元素可以是一个值(如6),一个连续区间(9-12),一个间隔时间(8-18/4)(/表示每隔4小时),一个列表(1,3,5),通配符
idea spring-boot gradle mybatis 搭建开发环境的更多相关文章
- 使用intelliJ创建 spring boot + gradle + mybatis站点
Spring boot作为快速入门是不错的选择,现在似乎没有看到大家写过spring boot + gradle + mybatis在intellij下的入门文章,碰巧.Net同事问到,我想我也可以写 ...
- spring boot + gradle + mybatis
使用intelliJ创建 spring boot + gradle + mybatis站点 Spring boot作为快速入门是不错的选择,现在似乎没有看到大家写过spring boot + gr ...
- Spring boot Gradle项目搭建
Spring boot Gradle项目搭建 使用IDEA创建Gradle工程 操作大致为:File->new->Project->Gradle(在左侧选项栏中) 创 ...
- 详解Spring Boot集成MyBatis的开发流程
MyBatis是支持定制化SQL.存储过程以及高级映射的优秀的持久层框架,避免了几乎所有的JDBC代码和手动设置参数以及获取结果集. spring Boot是能支持快速创建Spring应用的Java框 ...
- Spring boot 整合 Mybatis + Thymeleaf开发web(二)
上一章我把整个后台的搭建和逻辑给写出来了,也贴的相应的代码,这章节就来看看怎么使用Thymeleaf模板引擎吧,Spring Boot默认推荐Thymeleaf模板,之前是用jsp来作为视图层的渲染, ...
- Spring Boot 使用Mybatis注解开发增删改查
使用逆向工程是遇到的错误 错误描述 org.apache.ibatis.binding.BindingException: Invalid bound statement (not found): c ...
- gradle ofbiz 16 开发环境搭建
原 gradle ofbiz 16 开发环境搭建 2017年02月13日 10:59:19 阅读数:2702 1.安装jdk 2.配置jdk环境变量 3.eclipse 安装svn 插件 4.svn下 ...
- mybatis:开发环境搭建--增删改查--多表联合查询(多对一)
什么是mybatisMyBatis是支持普通SQL查询,存储过程和高级映射的优秀持久层框架.MyBatis消除了几乎所有的JDBC代码和参数的手工设置以及结果集的检索.MyBatis使用简单的XML或 ...
- 如何在Eclipse中搭建MyBatis基本开发环境?(使用Eclipse创建Maven项目)
实现要求: 在Eclipse中搭建MyBatis基本开发环境. 实现步骤: 1.使用Eclipse创建Maven项目.File >> New >> Maven Project ...
随机推荐
- java中break和continue跳出指定循环(转载)
java中break和continue跳出指定循环 java中break和continue可以跳出指定循环,break和continue之后不加任何循环名则默认跳出其所在的循环,在其后加指定循环名,则 ...
- 29.Spring-基础.md
目录 1.目的和作用 [toc] 2.概念 2.1框架的设计 2.2控制反转 2.3AOP [toc] 3. 3.1Spring六大模块 [toc] 1.目的和作用 解决对象的创建和以及对象依赖关系的 ...
- 20.pipe
pipe相当于angular1里面的filter 做一些格式转换啊,或者从一个数组里面选取一个元素等等 只要你愿意可以定义很复杂的内容‘’ 我们先看看 angular2 里面自带的一些pipe 我们去 ...
- .net上的 jpa
还没试过,有空试试: NPersistence ORSQL
- Uni2D 入门 -- Atlas转载 http://blog.csdn.net/kakashi8841/article/details/17588095
转载csdnTexture Atlas 我为什么应该使用Texture Atlas? 使用Atlas是一个普遍的好做法,而且它有很多好处.当有某些需要在屏幕渲染的时候,它背后带来的是draw call ...
- 学JS的心路历程 - JS的Class
没错,你没有看错,虽然前面说JS是原型继承,但在ES6以后新增了class关键字!!! 不过底层实作仍然是以原型继承方式进行,所以基本上算是一个语法糖. 今天我们就来看一下如何使用吧! class 首 ...
- OCR技术浅探(转)
网址:https://spaces.ac.cn/archives/3785 OCR技术浅探 作为OCR系统的第一步,特征提取是希望找出图像中候选的文字区域特征,以便我们在第二步进行文字定位和第三步进行 ...
- 以root用户运行jenkins中shell命令 重要
以centOS系统为例,记录下修改Jenkins以root用户运行的方法. 修改Jenkins配置文件 # 打开配置文件vim /etc/sysconfig/jenkins# 修改$JENKINS_U ...
- 1.3.6、CDH 搭建Hadoop在安装之前(端口---DistCp使用的端口)
DistCp使用的端口 列出的所有端口都是TCP. 在下表中,每个端口的“ 访问要求”列通常是“内部”或“外部”.在此上下文中,“内部”表示端口仅用于组件之间的通信; “外部”表示该端口可用于内部或外 ...
- mysql limit语句
[mysql limit语句] 代码: SELECT * FROM table LIMIT 2 OFFSET 1; 比如这个SQL ,limit后面跟的是2条数据,offset后面是从第1条开始读取. ...