ios学习-控制按钮图片的走动和变换
一.项目要求:制作一个界面,通过点击按钮来控制头像(按钮)向上,向下,向左,向右移动,可以左旋转,右旋转,以及放大和缩小。


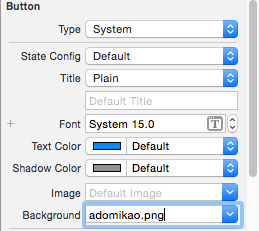
3.点击main.storyboard,在右下角拖9个Button控件到storyboard的相应位置

四.代码:
ViewController.h文件:
//
//  ViewController.h
//  控制按钮
//
//  Created by yongjianyu on 15/11/25.
//  Copyright (c) 2015年 yongjianyu. All rights reserved.
//

#import <UIKit/UIKit.h>

@interface ViewController : UIViewController
@property (weak, nonatomic) IBOutlet UIButton *btn;

- (IBAction)up:(id)sender;
- (IBAction)down:(id)sender;
- (IBAction)left:(id)sender;
- (IBAction)right:(id)sender;

- (IBAction)leftRotate:(id)sender;
- (IBAction)rightRotate:(id)sender;

- (IBAction)bigger:(id)sender;
- (IBAction)smaller:(id)sender;

@end
ViewController.m文件:
//
//  ViewController.m
//  控制按钮
//
//  Created by yongjianyu on 15/11/25.
//  Copyright (c) 2015年 yongjianyu. All rights reserved.
//

#import "ViewController.h"

@interface ViewController ()

@end

@implementation ViewController

- (void)viewDidLoad {
    [super viewDidLoad];
    // Do any additional setup after loading the view, typically from a nib.
}

- (void)didReceiveMemoryWarning {
    [super didReceiveMemoryWarning];
    // Dispose of any resources that can be recreated.
}

//向上移动按钮
- (IBAction)up:(id)sender {
    //动画(头部)
    [UIView beginAnimations:nil context:nil];
    //设置动画的时间
    [UIView setAnimationDuration:1.0];
    //OC语法规定,不允许直接修改某个对象中结构体属性的成员
    //先取出frame的值,赋值给中间变量
    CGRect tempFrame = _btn.frame;
    //修改y值
    tempFrame.origin.y -= 50;
    //重新给按钮的frame赋值
    _btn.frame = tempFrame;
    //动画(尾部)
    [UIView commitAnimations];
}
//向下移动按钮
- (IBAction)down:(id)sender {
    [UIView beginAnimations:nil context:nil];
    //设置动画持续时间为1.0秒
    [UIView setAnimationDuration:1.0];
    CGRect tempFrame = _btn.frame;
    tempFrame.origin.y += 50;
    _btn.frame = tempFrame;
    [UIView commitAnimations];

}
//向左移动按钮
- (IBAction)left:(id)sender {
    [UIView beginAnimations:nil context:nil];
    [UIView setAnimationDuration:1.0];
    CGRect tempFrame = _btn.frame;
    tempFrame.origin.x -= 50;
    _btn.frame = tempFrame;
    [UIView commitAnimations];

}
//向右移动按钮
- (IBAction)right:(id)sender {
    [UIView beginAnimations:nil context:nil];
    [UIView setAnimationDuration:1.0];
    CGRect tempFrame = _btn.frame;
    tempFrame.origin.x += 50;
    _btn.frame = tempFrame;
    [UIView commitAnimations];

}

//向左旋转按钮
- (IBAction)leftRotate:(id)sender {
    [UIView beginAnimations:nil context:nil];
    [UIView setAnimationDuration:1.0];
    //向左旋转PI/4
    _btn.transform = CGAffineTransformRotate(_btn.transform, - M_PI_4);
    [UIView commitAnimations];
}

//向右旋转按钮
- (IBAction)rightRotate:(id)sender {
    [UIView beginAnimations:nil context:nil];
    [UIView setAnimationDuration:1.0];
    _btn.transform = CGAffineTransformRotate(_btn.transform, + M_PI_4);
    [UIView commitAnimations];
}

//边长放大到原来的1.2倍
- (IBAction)bigger:(id)sender {
    [UIView beginAnimations:nil context:nil];
    [UIView setAnimationDuration:1.0];
    _btn.transform = CGAffineTransformScale(_btn.transform, 1.2, 1.2);
    [UIView commitAnimations];
}

//边长变为原来的0.8
- (IBAction)smaller:(id)sender {
    [UIView beginAnimations:nil context:nil];
    [UIView setAnimationDuration:1.0];
    _btn.transform = CGAffineTransformScale(_btn.transform, 0.8, 0.8);
    [UIView commitAnimations];
}

@end
五.代码重构
ViewController.h文件
#import <UIKit/UIKit.h>

@interface ViewController : UIViewController

- (IBAction)reset:(id)sender;

@property (weak, nonatomic) IBOutlet UIButton *btn;
- (IBAction)run:(id)sender;

- (IBAction)rotate:(id)sender;

- (IBAction)scale:(id)sender;
@end
ViewController.m文件
//
//  ViewController.m
//  Button
//
//  Created by yongjianyu on 15/11/22.
//  Copyright (c) 2015年 yongjianyu. All rights reserved.
//

#import "ViewController.h"
#define KDelta 50

@interface ViewController ()

@end

@implementation ViewController

- (void)viewDidLoad {
    [super viewDidLoad];
    // Do any additional setup after loading the view, typically from a nib.
}

- (void)didReceiveMemoryWarning {
    [super didReceiveMemoryWarning];
    // Dispose of any resources that can be recreated.
}

- (IBAction)run:(id)sender {
    //
    [UIView beginAnimations:nil context:nil];
    //
    [UIView setAnimationDuration:1.0];
    //
//    CGRect tempFrame = _btn.frame;
    CGPoint tempCenter= _btn.center;
    //
    NSInteger tag = [sender tag];
    //
    switch (tag) {
        case 1:
            //
//            tempFrame.origin.y -= KDelta;
            tempCenter.y -= KDelta;
            break;
        case 3:
            //
//            tempFrame.origin.y += KDelta;
            tempCenter.y += KDelta;
            break;
            //
        case 2:
//            tempFrame.origin.x += KDelta;
            tempCenter.x += KDelta;
            break;
            //
        case 4:
//            tempFrame.origin.x -= KDelta;
            tempCenter.x -= KDelta;
            break;

        default:
            break;
    }

    //
//    _btn.frame = tempFrame;
    _btn.center = tempCenter;
    //
    [UIView commitAnimations];

}

- (IBAction)rotate:(id)sender {
    [UIView beginAnimations:nil context:nil];
    [UIView setAnimationDuration:1.0];
    NSInteger tag = [sender tag];
    if (5==tag) {
        _btn.transform = CGAffineTransformRotate(_btn.transform, - M_PI_4);
    }else
          (_btn.transform = CGAffineTransformRotate(_btn.transform,+ M_PI_4));
    [UIView commitAnimations];
}

- (IBAction)scale:(id)sender {
    [UIView beginAnimations:nil context:nil];
    [UIView setAnimationDuration:1.0];
    NSInteger tag = [sender tag];
    if (7==tag) {
     _btn.transform = CGAffineTransformScale(_btn.transform, 1.2, 1.2);
    [UIView commitAnimations];
    }else{
        _btn.transform = CGAffineTransformScale(_btn.transform, 0.8, 0.8);
    }

}

- (IBAction)reset:(id)sender {
    [UIView beginAnimations:nil context:nil];
    [UIView setAnimationDuration:1.0];
    _btn.transform = CGAffineTransformIdentity;
    [UIView commitAnimations];
}
@end
六.用纯代码创建Button,创建UI界面
//
//  ViewController.m
//  02-通过代码创建按钮
//
//  Created by yongjianyu on 15/11/25.
//  Copyright (c) 2015年 yongjianyu. All rights reserved.
//

#import "ViewController.h"

@interface ViewController ()

@end

@implementation ViewController

- (void)viewDidLoad {
    [super viewDidLoad];
    // Do any additional setup after loading the view, typically from a nib.

    //头像
    UIButton *btn = [[UIButton alloc]init];
    btn.frame = CGRectMake(0, 0, 100, 100);
    CGFloat centerX = self.view.frame.size.width * 0.5;
    CGFloat centerY = self.view.frame.size.height * 0.25;
    btn.center = CGPointMake(centerX, centerY);
    UIImage *nomal = [UIImage imageNamed:@"adomikao.png"];
    [btn setBackgroundImage:nomal forState:UIControlStateNormal];
    [btn setTitle:@"Adomikao" forState:UIControlStateNormal];
    [btn setTitleColor:[UIColor whiteColor] forState:UIControlStateNormal];

    UIImage *hightlight = [UIImage imageNamed:@"adomikao1.png"];
    [btn setBackgroundImage:hightlight forState:UIControlStateHighlighted];
    [btn setTitle:@"yuyongjian" forState:UIControlStateHighlighted];
    [btn setTitleColor:[UIColor redColor] forState:UIControlStateHighlighted];

//    [btn addTarget:self action:@selector(btnClick:) forControlEvents:UIControlEventTouchUpInside];

    [self.view addSubview:btn];

    //向上
    UIButton *up = [[UIButton alloc]init];
    up.frame = CGRectMake(0, 0, 25, 25);
    CGFloat upCenterX = self.view.frame.size.width * 0.25;
    CGFloat upCenterY = self.view.frame.size.height * 0.625;
    up.center = CGPointMake(upCenterX, upCenterY);
    UIImage *upNomal = [UIImage imageNamed:@"up.png"];
    [up setBackgroundImage:upNomal forState:UIControlStateNormal];
    UIImage *upHightlight = [UIImage imageNamed:@"up1.jpg"];
    [up setBackgroundImage:upHightlight forState:UIControlStateHighlighted];
    [self.view addSubview:up];
    [up addTarget:self action:@selector(upClick:) forControlEvents:UIControlEventTouchUpInside];

    //向下
    UIButton *down = [[UIButton alloc]init];
    down.frame = CGRectMake(0, 0, 25, 25);
    CGFloat downCenterX = self.view.frame.size.width * 0.25;
    CGFloat downCenterY = self.view.frame .size.height * 0.875;
    down.center = CGPointMake(downCenterX, downCenterY);
    UIImage *downNormal = [UIImage imageNamed:@"down.png"];
    [down setBackgroundImage:downNormal forState:UIControlStateNormal];
    UIImage *downheight = [UIImage imageNamed:@"sown1.jpg"];
    [down setBackgroundImage:downheight forState:UIControlStateHighlighted];
    [self.view addSubview:down];

    //向左
    UIButton *left = [[UIButton alloc]init];
    left.frame = CGRectMake(0, 0, 25, 25);
    CGFloat leftCenterX = self.view.frame.size.width * 0.125;
    CGFloat leftCenterY = self.view.frame.size.height * 0.75;
    left.center = CGPointMake(leftCenterX, leftCenterY);
    UIImage *leftNormal = [UIImage imageNamed:@"left.png"];
    [left setBackgroundImage:leftNormal forState:UIControlStateNormal];
    UIImage *leftHighlight = [UIImage imageNamed:@"left1.jpg"];
    [left setBackgroundImage:leftHighlight forState:UIControlStateHighlighted];
    [self.view addSubview:left];

    //向右
    UIButton *right = [[UIButton alloc]init];
    right.frame = CGRectMake(0, 0, 25, 25);
    CGFloat rightCenterX = self.view.frame.size.width * 0.375;
    CGFloat rightcenterY = self.view.frame.size.height * 0.75;
    right.center = CGPointMake(rightCenterX, rightcenterY);
    UIImage *rightNormal = [UIImage imageNamed:@"right.png"];
    [right setBackgroundImage:rightNormal forState:UIControlStateNormal];
    UIImage *rightHighlight = [UIImage imageNamed:@"right1.jpg"];
    [right setBackgroundImage:rightHighlight forState:UIControlStateHighlighted];
    [self.view addSubview:right];

    //放大
    UIButton *big = [[UIButton alloc]init];
    big.frame = CGRectMake(0, 0, 25, 25);
    CGFloat bigCenterX = self.view.frame.size.width * 0.625;
    CGFloat bigCenterY = self.view.frame.size.height * 0.625;
    big.center = CGPointMake(bigCenterX, bigCenterY);
    UIImage *bigNormal = [UIImage imageNamed:@"plus.jpg"];
    [big setBackgroundImage:bigNormal forState:UIControlStateNormal];
    UIImage *bighighlight = [UIImage imageNamed:@"plus1.png"];
    [big setBackgroundImage:bighighlight forState:UIControlStateHighlighted];
    [self.view addSubview:big];

    //缩小
    UIButton *small = [[UIButton alloc]init];
    small.frame = CGRectMake(0, 0, 25, 25);
    CGFloat smallCenterX = self.view.frame.size.width * 0.875;
    CGFloat smallCenterY = self.view.frame.size.height * 0.625;
    small.center = CGPointMake(smallCenterX, smallCenterY);
    UIImage *smallNormal = [UIImage imageNamed:@"minus.png"];
    [small setBackgroundImage:smallNormal forState:UIControlStateNormal];
    UIImage *smallHighlight = [UIImage imageNamed:@"minus1.png"];
    [small setBackgroundImage:smallHighlight forState:UIControlStateHighlighted];
    [self.view addSubview:small];

    //向左旋转
    UIButton *leftRotate = [[UIButton alloc]init];
    leftRotate.frame = CGRectMake(0, 0, 25, 25);
    CGFloat leftRotateCenterX = self.view.frame.size.width * 0.625;
    CGFloat leftRotateCenterY = self.view.frame.size.height * 0.875;
    leftRotate.center = CGPointMake(leftRotateCenterX, leftRotateCenterY);
    UIImage *leftRotateNormal = [UIImage imageNamed:@"anticlockwise.jpg"];
    [leftRotate setBackgroundImage:leftRotateNormal forState:UIControlStateNormal];
    UIImage *leftRotateHighlight = [UIImage imageNamed:@"anticlokwise1.png"];
    [leftRotate setBackgroundImage:leftRotateHighlight forState:UIControlStateHighlighted];
    [self.view addSubview:leftRotate];

    //向右旋转
    UIButton *rightRotate = [[UIButton alloc]init];
    rightRotate.frame = CGRectMake(0, 0, 25, 25);
    CGFloat rightRotateCenterX = self.view.frame.size.width * 0.875;
    CGFloat rightRotateCenterY = self.view.frame.size.height * 0.875;
    rightRotate.center = CGPointMake(rightRotateCenterX, rightRotateCenterY);
    UIImage *rightRotateNormal = [UIImage imageNamed:@"clockwise.png"];
    [rightRotate setBackgroundImage:rightRotateNormal forState:UIControlStateNormal];
    UIImage *rightRotateHighlight = [UIImage imageNamed:@"clockwise1.png"];
    [rightRotate setBackgroundImage:rightRotateHighlight forState:UIControlStateHighlighted];
    [self.view addSubview:rightRotate];

}

-(void)upClick:(UIButton *)up{
    NSLog(@"------up");
    CGRect tempFrame = _btn.frame;
    tempFrame.origin.y -= 10;
    _btn.frame = tempFrame;

}

@end
ios学习-控制按钮图片的走动和变换的更多相关文章
- iOS学习-压缩图片(改变图片的宽高)
压缩图片,图片的大小与我们期望的宽高不一致时,我们可以将其处理为我们想要的宽高. 传入想要修改的图片,以及新的尺寸 -(UIImage*)imageWithImage:(UIImage*)image ...
- ios学习笔记图片+图片解释(c语言 oc语言 ios控件 ios小项目 ios小功能 swift都有而且笔记完整喔)
下面是目录其中ios文件夹包括了大部分ios控件的介绍和演示,swift的时完整版,可以学习完swift(这个看的是swift刚出来一周的视频截图,可能有点赶,但是完整),c语言和oc语言的也可以完整 ...
- 【原】iOS学习之图片拉伸处理(类似qq的气泡)
原理是拉伸里面的内容,将边保护起来 方法1: ①[image resizableImageWithCapInsets:UIEdgeInsetsMake(, , , )]; ②[image resiza ...
- ios 学习 广告图片轮播器
// // ViewController.m // 图片轮播器 // // Created by zjj on 15/5/23. // Copyright (c) 2015年 zjj. All rig ...
- [置顶] iOS学习笔记47——图片异步加载之EGOImageLoading
上次在<iOS学习笔记46——图片异步加载之SDWebImage>中介绍过一个开源的图片异步加载库,今天来介绍另外一个功能类似的EGOImageLoading,看名字知道,之前的一篇学习笔 ...
- iOS学习笔记31-从图册获取图片和视频
一.从图册中获取本地图片和视频 从图册中获取文件,我们使用的是UIImagePickerController,这个类我们在之前的摄像头中使用过,这里是链接:iOS学习笔记27-摄像头,这里我们使用的是 ...
- ios 学习线路(图片)(摘录)
iOS学习路线
- iOS学习——UIView的研究
在iOS开发中,我们知道有一个共同的基类——NSObject,但是对于界面视图而言,UIView是非常重要的一个类,UIView是很多视图控件的基类,因此,对于UIView的学习闲的非常有必要.在iO ...
- iOS学习——核心动画之Layer基础
iOS学习——核心动画之Layer基础 1.CALayer是什么? CALayer我们又称它叫做层.在每个UIView内部都有一个layer这样一个属性,UIView之所以能够显示,就是因为它里面有这 ...
随机推荐
- *HDU1829 并查集
A Bug's Life Time Limit: 15000/5000 MS (Java/Others) Memory Limit: 32768/32768 K (Java/Others)Tot ...
- URL重写无效
在IIS7或以上版本中使用urlrewriter时会出现无效的现像,这时候需要使用以下设置
- 在ubuntu 12.04 x64下编译hadoop2.4
自己编译hadoop:x64 1.安装依赖包 sudo apt-get install g++ autoconf automake libtool cmake zlib1g-dev pkg-confi ...
- Offline.js - 自动判断网络连接状态并提醒用户
http://www.cnblogs.com/lhb25/p/offline-js-alert-users-when-no-internet-connectivity.html 使用 jslint/j ...
- ajax 通用方法,从thinkphp中拔出来的
<?php /** * 设置页面输出的CONTENT_TYPE和编码 * @access public * @param string $type content_type 类型对应的扩展名 * ...
- Transferring Files to Your Instance with WinSCP
WinSCP is a GUI-based file manager for Windows that allows you to upload and transfer files to a rem ...
- JetBrains注册码计算(IntelliJ IDEA 15.0注册码激活)
安装前修改时间为2099年等很多年后的时间点,安装后选择免费试用30天,然后退出idea,把时间修改回来,这样就可以成功注册了 如果之前使用过授权服务器等激活方式,不弹出试用界面,请到C:\Users ...
- Source Insight 3.X utf8支持插件震撼发布
继上次SI多标签插件之后,因为公司内部编码改为utf8编码,因此特意做了这个Source Insight 3.X utf8插件. 下载地址:[点我] 安装说明: 解压msimg32.dll sihoo ...
- Qt在pro文件中加入带空格的路径(使用$$quote关键字)
LIBS += -L$$quote(C:\Program Files (x86)\Microsoft SDKs\Windows\v7.1A\Lib) INCLUDEPATH += $$quote(C: ...
- grafana + influxdb + telegraf , 构建性能监控平台
1.安装平台 1).grafana , 访问各类数据源 , 自定义报表.显示图表等等 , 用于提供界面监控 , 默认端口为3000 , 默认登陆信息admin wget https://grafana ...