如何使用 libtorch 实现 AlexNet 网络?
如何使用 libtorch 实现 AlexNet 网络?
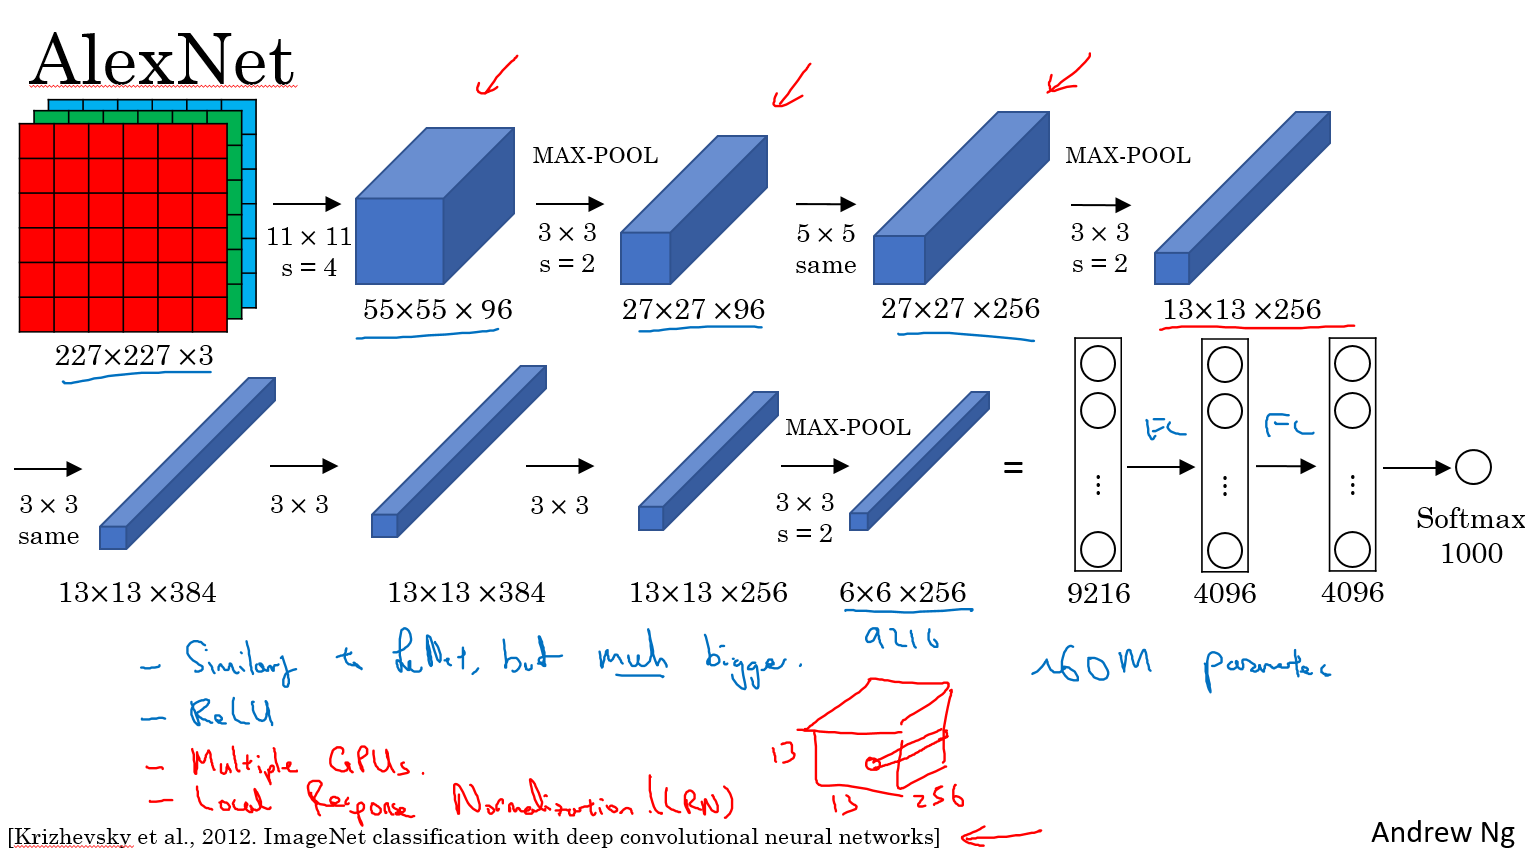
按照图片上流程写即可。输入的图片大小必须 227x227 3 通道彩色图片
// Define a new Module.

struct Net : torch::nn::Module {

	Net() {

		conv1 = torch::nn::Conv2d(torch::nn::Conv2dOptions(3, 96, { 11,11 }).stride({4,4}));

		conv2 = torch::nn::Conv2d(torch::nn::Conv2dOptions(96, 256, { 5,5 }).padding(2));

		conv3 = torch::nn::Conv2d(torch::nn::Conv2dOptions(256, 384, { 3,3 }).padding(1));

		conv4 = torch::nn::Conv2d(torch::nn::Conv2dOptions(384, 384, { 3,3 }).padding(1));

		conv5 = torch::nn::Conv2d(torch::nn::Conv2dOptions(384, 256, { 3,3 }).padding(1));

		fc1 = torch::nn::Linear(256*6*6,4096);

		fc2 = torch::nn::Linear(4096, 4096);

		fc3 = torch::nn::Linear(4096, 1000);

	}

	// Implement the Net's algorithm.

	torch::Tensor forward(torch::Tensor x) {

		x = conv1->forward(x);

		x = torch::relu(x);

		//LRN

		x = torch::max_pool2d(x, { 3,3 }, { 2,2 });

		x = conv2->forward(x);

		//LRN

		x = torch::relu(x);

		x = torch::max_pool2d(x, { 3,3 }, { 2,2 });

		x = conv3->forward(x);

		x = torch::relu(x);

		x = conv4->forward(x);

		x = torch::relu(x);

		x = conv5->forward(x);

		x = torch::relu(x);

		x = torch::max_pool2d(x, { 3,3 }, { 2,2 });

		x = x.view({ x.size(0),-1 });

		x = fc1->forward(x);

		x = torch::relu(x);

		x = torch::dropout(x,0.5,is_training());

		x = fc2->forward(x);

		x = torch::relu(x);

		x = torch::dropout(x, 0.5, is_training());

		x = fc3->forward(x);

		x = torch::log_softmax(x,1);

		return x;

	}

	// Use one of many "standard library" modules.

	torch::nn::Conv2d conv1{ nullptr };

	torch::nn::Conv2d conv2{ nullptr };

	torch::nn::Conv2d conv3{ nullptr };

	torch::nn::Conv2d conv4{ nullptr };

	torch::nn::Conv2d conv5{ nullptr };

	torch::nn::Linear fc1{ nullptr };

	torch::nn::Linear fc2{ nullptr };

	torch::nn::Linear fc3{ nullptr };

};
具体可参考这个
name: "AlexNet"

layer {

  name: "data"

  type: "Input"

  top: "data"

  input_param { shape: { dim: 10 dim: 3 dim: 227 dim: 227 } }

}

layer {

  name: "conv1"

  type: "Convolution"

  bottom: "data"

  top: "conv1"

  param {

    lr_mult: 1

    decay_mult: 1

  }

  param {

    lr_mult: 2

    decay_mult: 0

  }

  convolution_param {

    num_output: 96

    kernel_size: 11

    stride: 4

  }

}

layer {

  name: "relu1"

  type: "ReLU"

  bottom: "conv1"

  top: "conv1"

}

layer {

  name: "norm1"

  type: "LRN"

  bottom: "conv1"

  top: "norm1"

  lrn_param {

    local_size: 5

    alpha: 0.0001

    beta: 0.75

  }

}

layer {

  name: "pool1"

  type: "Pooling"

  bottom: "norm1"

  top: "pool1"

  pooling_param {

    pool: MAX

    kernel_size: 3

    stride: 2

  }

}

layer {

  name: "conv2"

  type: "Convolution"

  bottom: "pool1"

  top: "conv2"

  param {

    lr_mult: 1

    decay_mult: 1

  }

  param {

    lr_mult: 2

    decay_mult: 0

  }

  convolution_param {

    num_output: 256

    pad: 2

    kernel_size: 5

    group: 2

  }

}

layer {

  name: "relu2"

  type: "ReLU"

  bottom: "conv2"

  top: "conv2"

}

layer {

  name: "norm2"

  type: "LRN"

  bottom: "conv2"

  top: "norm2"

  lrn_param {

    local_size: 5

    alpha: 0.0001

    beta: 0.75

  }

}

layer {

  name: "pool2"

  type: "Pooling"

  bottom: "norm2"

  top: "pool2"

  pooling_param {

    pool: MAX

    kernel_size: 3

    stride: 2

  }

}

layer {

  name: "conv3"

  type: "Convolution"

  bottom: "pool2"

  top: "conv3"

  param {

    lr_mult: 1

    decay_mult: 1

  }

  param {

    lr_mult: 2

    decay_mult: 0

  }

  convolution_param {

    num_output: 384

    pad: 1

    kernel_size: 3

  }

}

layer {

  name: "relu3"

  type: "ReLU"

  bottom: "conv3"

  top: "conv3"

}

layer {

  name: "conv4"

  type: "Convolution"

  bottom: "conv3"

  top: "conv4"

  param {

    lr_mult: 1

    decay_mult: 1

  }

  param {

    lr_mult: 2

    decay_mult: 0

  }

  convolution_param {

    num_output: 384

    pad: 1

    kernel_size: 3

    group: 2

  }

}

layer {

  name: "relu4"

  type: "ReLU"

  bottom: "conv4"

  top: "conv4"

}

layer {

  name: "conv5"

  type: "Convolution"

  bottom: "conv4"

  top: "conv5"

  param {

    lr_mult: 1

    decay_mult: 1

  }

  param {

    lr_mult: 2

    decay_mult: 0

  }

  convolution_param {

    num_output: 256

    pad: 1

    kernel_size: 3

    group: 2

  }

}

layer {

  name: "relu5"

  type: "ReLU"

  bottom: "conv5"

  top: "conv5"

}

layer {

  name: "pool5"

  type: "Pooling"

  bottom: "conv5"

  top: "pool5"

  pooling_param {

    pool: MAX

    kernel_size: 3

    stride: 2

  }

}

layer {

  name: "fc6"

  type: "InnerProduct"

  bottom: "pool5"

  top: "fc6"

  param {

    lr_mult: 1

    decay_mult: 1

  }

  param {

    lr_mult: 2

    decay_mult: 0

  }

  inner_product_param {

    num_output: 4096

  }

}

layer {

  name: "relu6"

  type: "ReLU"

  bottom: "fc6"

  top: "fc6"

}

layer {

  name: "drop6"

  type: "Dropout"

  bottom: "fc6"

  top: "fc6"

  dropout_param {

    dropout_ratio: 0.5

  }

}

layer {

  name: "fc7"

  type: "InnerProduct"

  bottom: "fc6"

  top: "fc7"

  param {

    lr_mult: 1

    decay_mult: 1

  }

  param {

    lr_mult: 2

    decay_mult: 0

  }

  inner_product_param {

    num_output: 4096

  }

}

layer {

  name: "relu7"

  type: "ReLU"

  bottom: "fc7"

  top: "fc7"

}

layer {

  name: "drop7"

  type: "Dropout"

  bottom: "fc7"

  top: "fc7"

  dropout_param {

    dropout_ratio: 0.5

  }

}

layer {

  name: "fc8"

  type: "InnerProduct"

  bottom: "fc7"

  top: "fc8"

  param {

    lr_mult: 1

    decay_mult: 1

  }

  param {

    lr_mult: 2

    decay_mult: 0

  }

  inner_product_param {

    num_output: 1000

  }

}

layer {

  name: "prob"

  type: "Softmax"

  bottom: "fc8"

  top: "prob"

}
如何使用 libtorch 实现 AlexNet 网络?的更多相关文章
- AlexNet 网络详解及Tensorflow实现源码
版权声明:本文为博主原创文章,未经博主允许不得转载. 1. 图片数据处理 2. 卷积神经网络 2.1. 卷积层 2.2. 池化层 2.3. 全链层 3. AlexNet 4. 用Tensorflow搭 ...
- 第十六节,卷积神经网络之AlexNet网络实现(六)
上一节内容已经详细介绍了AlexNet的网络结构.这节主要通过Tensorflow来实现AlexNet. 这里做测试我们使用的是CIFAR-10数据集介绍数据集,关于该数据集的具体信息可以通过以下链接 ...
- 第十五节,卷积神经网络之AlexNet网络详解(五)
原文 ImageNet Classification with Deep ConvolutionalNeural Networks 下载地址:http://papers.nips.cc/paper/4 ...
- Caffe训练AlexNet网络,精度不高或者为0的问题结果
当我们使用Caffe训练AlexNet网络时,会遇到精度一值在低精度(30%左右)升不上去,或者精度总是为0,如下图所示: 出现这种情况,可以尝试使用以下几个方法解决: 1.数据样本量是否太少,最起码 ...
- 如何使用 libtorch 实现 LeNet 网络?
如何使用 libtorch 实现 LeNet 网络? LeNet 网络论文地址: http://yann.lecun.com/exdb/publis/pdf/lecun-01a.pdf
- AlexNet网络
AlexNet 中包含了比较新的技术点,首次在CNN中成功应用了 ReLu .Dropout和LRN等Trick. 1.成功使用了Relu作为CNN的激活函数,并验证其效果在较深的网络中超过了Sigm ...
- AlexNet网络的Pytorch实现
1.文章原文地址 ImageNet Classification with Deep Convolutional Neural Networks 2.文章摘要 我们训练了一个大型的深度卷积神经网络用于 ...
- 深入理解AlexNet网络
原文地址:https://blog.csdn.net/luoluonuoyasuolong/article/details/81750190 AlexNet论文:<ImageNet Classi ...
- pytorch实现AlexNet网络
直接上图吧 写网络就像搭积木
随机推荐
- mysql5.5和5.6版本间的坑
mysql 5.5 int类型 设置不为null,无填充,添加新数据会自动填充0 而5.6同样的配置新建数据没值时,不让添加 5.5 datetime 不能设置默认时间(可以通过某些复杂的方式,这里说 ...
- C - The C Answer (2nd Edition) - Exercise 1-2
/* Experiment to find out what happens when printf's argument string contains \c, where c is some ch ...
- am335x 无屏实现开关机程序
因测试需要加入开机次数记录,所以记录一下7816开关机是怎么做的 原理很简单,开机时判断一个记录文件是否存在,如果存在,运行一段代码,将记录开机次数文件的值读出来+1 代码如下: #include & ...
- php7 安装扩展
安装mongodb扩展 前提:安装好php7,位置:/usr/local/php 方法一: /usr/local/php7/bin/pecl install mongodb service php-f ...
- 欧拉函数 & 【POJ】2478 Farey Sequence & 【HDU】2824 The Euler function
http://poj.org/problem?id=2478 http://acm.hdu.edu.cn/showproblem.php?pid=2824 欧拉函数模板裸题,有两种方法求出所有的欧拉函 ...
- ERROR getting 'android:label' attribute: attribute is not a string value
这个的原因很多地方都有描述,原因多半是多国语言string.xml 有的有这个值, 有的没有. 关键是怎么定位? 实际上他报错的是当前处理的xml element有问题, 而出错的时候盖住了要处理的. ...
- 漫游Kafka实战篇之搭建Kafka运行环境(2)
接下来一步一步搭建Kafka运行环境. Step 1: 下载Kafka 点击下载最新的版本并解压. > tar -xzf kafka_2.9.2-0.8.1.1.tgz > cd kafk ...
- iOS TabBar添加阴影
效果图如下所示: 直接上代码 //移除顶部线条 self.tabBar.backgroundImage = [UIImage new]; self.tabBar.shadowImage = [UIIm ...
- Angular ViewChild
viewchild // 使用方法 git clone https://git.oschina.net/mumu-osc/learn-component.git cd learn-component ...
- WPF Expander控件(扩展面板)
这算是我比较喜欢的一个控件,以前在Winform中也常用类似的.它包装了一块内容,通过单击一个小箭头按钮可以显示或隐藏所包含的内容.在线帮助以及Web页面经常使用这种技术,因为既可以包含大量内容,而又 ...