
jprofiler9.1.1 安装与配置
一、安装部分
安装包:
1、jprofiler_linux_9_1_1.rpm
2、jprofiler_windows-x64_9_1_1.exe
- 需要注意的是,Linux 和 Windows 安装的版本号必须一致
在 Linux 安装 jprofiler9 完成;在 Windows 安装 jprofiler9 完成;--安装非常容易,在网上搜索一堆
二、配置部分
1、在 Win 中打开JP
1、Follow me:
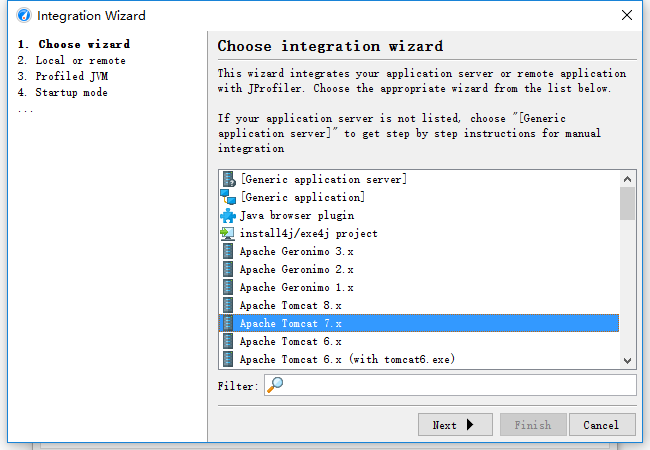
以下都是简单对照选择,看到什么像就选择:

3、Application Server:
查看系统、应用等所需要的相关信息可参考 -- http://www.cnblogs.com/snooper/p/8497170.html
4、Linux X86/AMD64

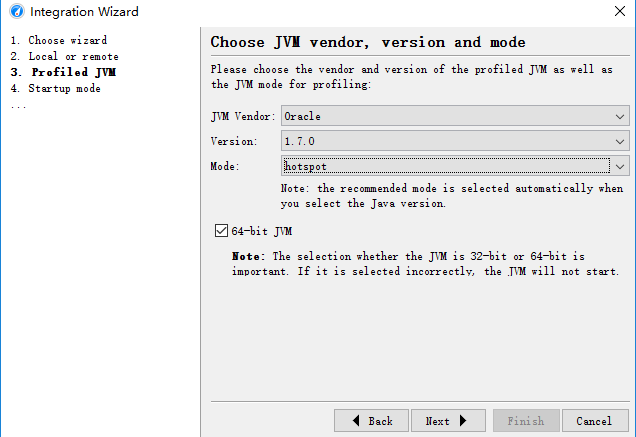
5、JVM vendor
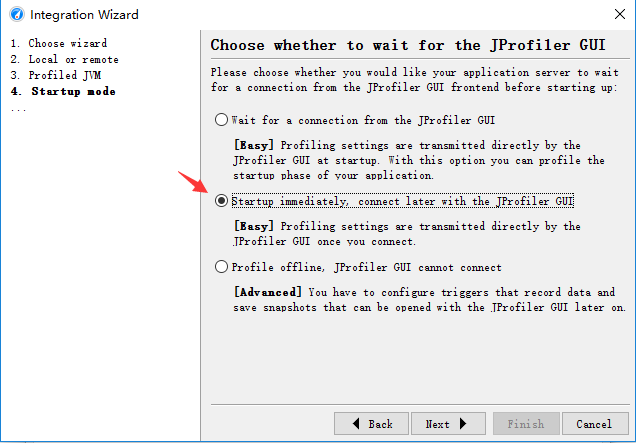
6、一会再连接
7、填写所需要监控的 Linux 服务器 IP地址(这里不需要填写端口)
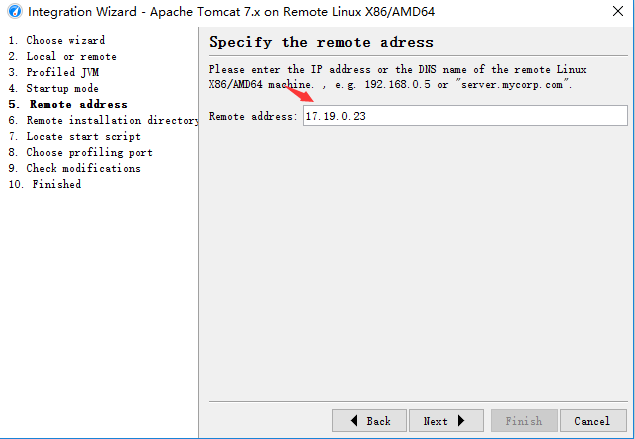
8、 找到 JP 在 Linux 中的安装路径
 [root@test1 bin]# whereis jprofiler

 jprofiler: /usr/local/bin/jprofiler /usr/local/jprofiler9.1 /opt/jprofiler9/bin/jprofiler.vmoptions /opt/jprofiler9/bin/jprofiler /opt/jprofiler9/bin/jprofiler.jar
填写 JP 在 Linux 中 正确的安装路径
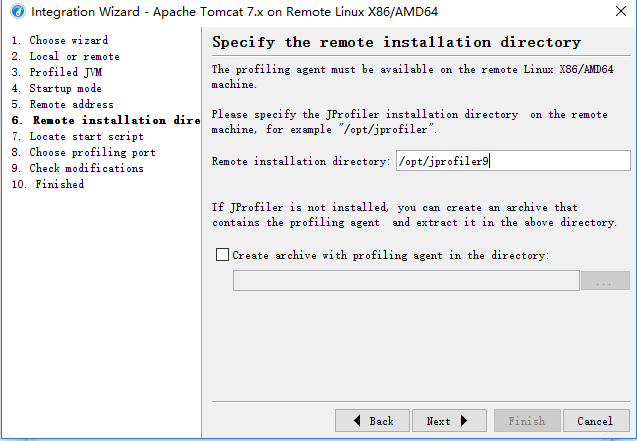
9、这里填写的是项目的启动脚本地址,也就是说,这得先将 Linux 服务器上的项目启动脚本下载到 Windows ,然后再指定:
记下这个路径,后面还会用到;
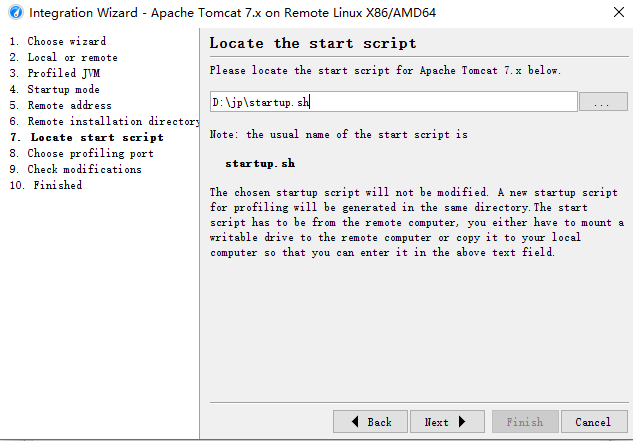
如下:/usr/local/tomcat/tomcat_jdt/bin/startup.sh 就是所需要的脚本文件,将其下载到 Windows ;
 [root@test1 ~]# cd /usr/local/tomcat/tomcat_jdt/bin/

 [root@test1 bin]# ll

 total 1952

 -rw-r--r--. 1 root root   26826 Jan 18  2017 bootstrap.jar

 -rw-r--r--. 1 root root   13007 Jan 18  2017 catalina.bat

 -rwxr-xr-x  1 root root   20963 Jul  6  2017 catalina.sh

 -rwxr-xr-x. 1 root root   20837 Jan 18  2017 catalina.sh.bak

 -rw-r--r--. 1 root root    1647 Jan 18  2017 catalina-tasks.xml

 -rw-r--r--. 1 root root   24283 Jan 18  2017 commons-daemon.jar

 -rw-r--r--. 1 root root  204944 Jan 18  2017 commons-daemon-native.tar.gz

 -rw-r--r--. 1 root root    2040 Jan 18  2017 configtest.bat

 -rwxr-xr-x. 1 root root    1922 Jan 18  2017 configtest.sh

 -rwxr-xr-x. 1 root root    7888 Jan 18  2017 daemon.sh

 -rw-r--r--. 1 root root    2091 Jan 18  2017 digest.bat

 -rwxr-xr-x. 1 root root    1965 Jan 18  2017 digest.sh

 -rw-r--r--. 1 root root 1159554 Jan 18  2017 EZHTTP.zip

 -rw-r--r--. 1 root root    3430 Jan 18  2017 setclasspath.bat

 -rwxr-xr-x. 1 root root    3547 Jan 18  2017 setclasspath.sh

 -rw-r--r--. 1 root root    2020 Jan 18  2017 shutdown.bat

 -rwxr-xr-x. 1 root root    1902 Jan 18  2017 shutdown.sh

 -rw-r--r--. 1 root root    2022 Jan 18  2017 startup.bat

 -rwxr-xr-x  1 root root    2159 Mar 10 17:47 startup_jprofiler.sh

 -rwxr-xr-x. 1 root root    1904 Jan 18  2017 startup.sh

 -rw-r--r--. 1 root root   38197 Jan 18  2017 tomcat-juli.jar

 -rw-r--r--. 1 root root  388787 Jan 18  2017 tomcat-native.tar.gz

 -rw-r--r--. 1 root root    4021 Jan 18  2017 tool-wrapper.bat

 -rwxr-xr-x. 1 root root    5024 Jan 18  2017 tool-wrapper.sh

 -rw-r--r--. 1 root root    2026 Jan 18  2017 version.bat

 -rwxr-xr-x. 1 root root    1908 Jan 18  2017 version.sh
10、默认
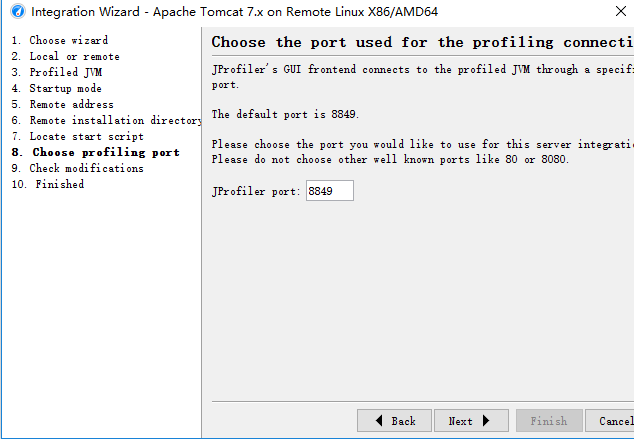
11、一会再启动
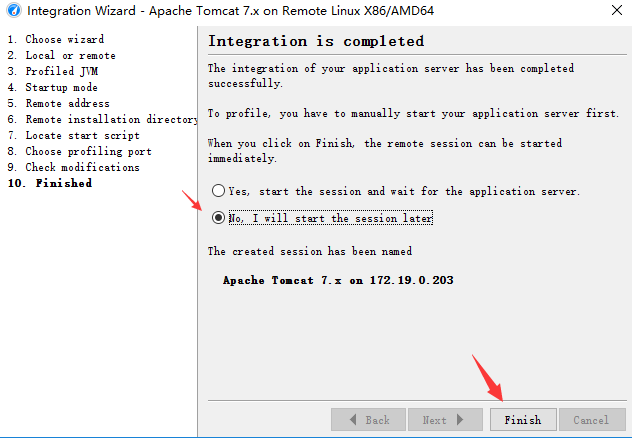
12、完成后,就会加出一项了
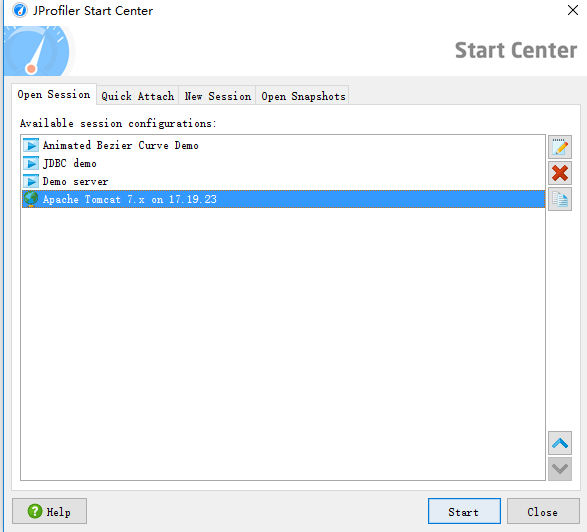
13、到此,配置完成;但尚未可以启动,还得继续:
14、打开本机 D:\jp 会看到生成了一个新的文件 startup_jprofiler.sh

15、将 startup_jprofiler.sh 上传到 Linux 服务器的项目应用的 /usr/local/tomcat/tomcat_jdt/bin 下,并授予可执行的权限
 [root@test1 bin]# cd /usr/local/tomcat/tomcat_jdt/bin

 [root@test1 bin]# chmod +x startup_jprofiler.sh
16、终极配置到此完成!
17、先关闭当前项目的 Tomcat ,然后 通过上传的脚本文件 startup_jprofiler.sh 来启动项目
  [root@test1 bin]# cd /usr/local/tomcat/tomcat_jdt/bin

  [root@test1 bin]# ./shutdown.sh

  [root@test1 bin]# ./startup_jprofiler.sh
18、在 jprofiler 点击 Start 启动吧
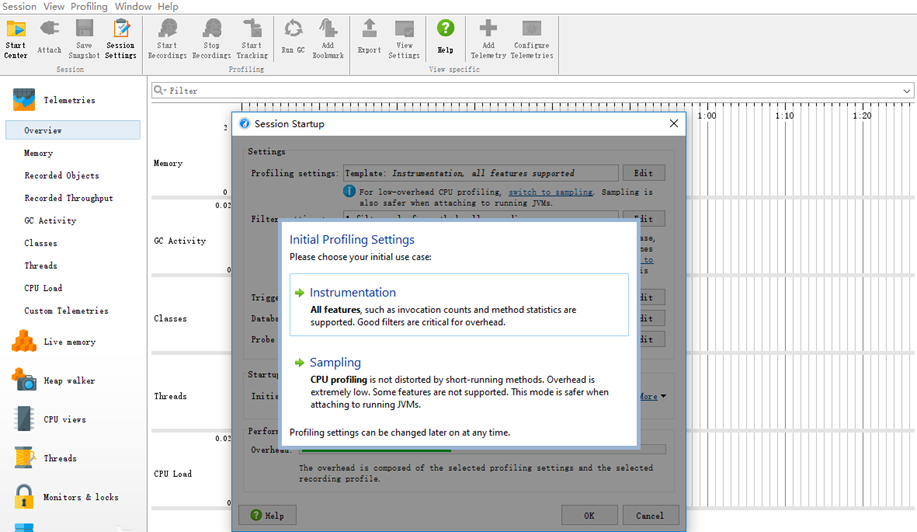
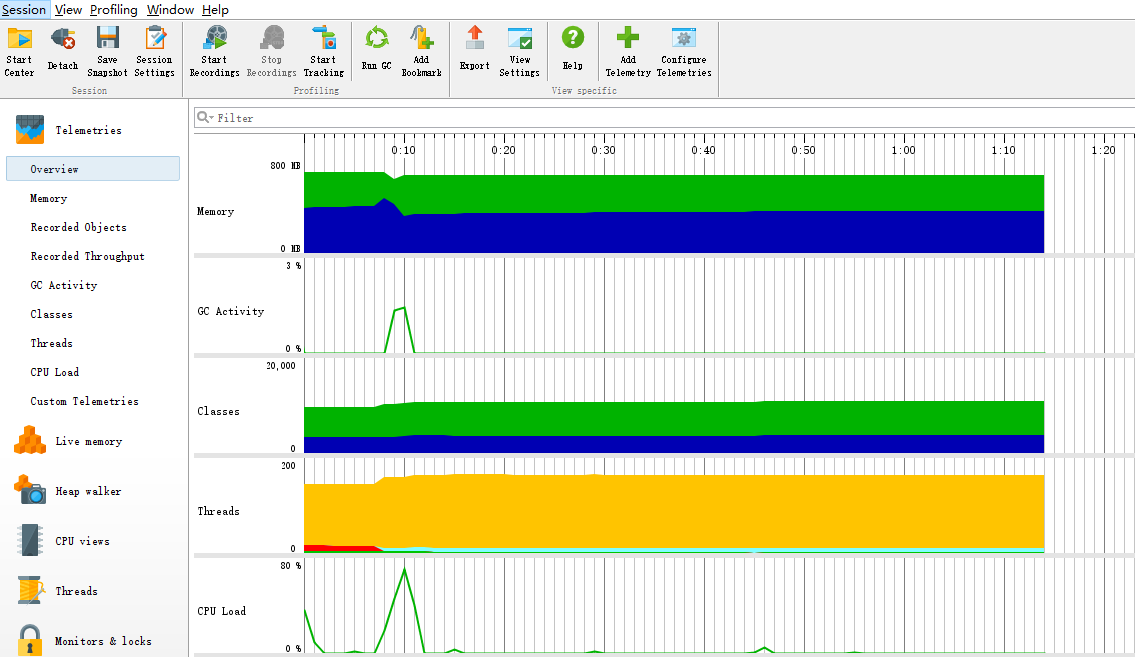
连接成功示例图
- 遇到的问题:
最容易遇到的问题是点击 Start 启动时,报错:
Could not find agent library /opt/jprofiler9/bin/linux-x86/libjprofilerti.so
解决方法:
cd /usr/local/tomcat/tomcat_jdt/bin/startup_jprofiler.sh
找到
 ...

 # The following lines have been added by the

 # application server integration wizard of JProfiler

 CATALINA_OPTS="-agentpath:/opt/jprofiler9/bin/linux-x86/libjprofilerti.so=port=8849,nowait $CATALINA_OPTS"

 export CATALINA_OPTS

 # end of modifications

 ...
将 linux-x86 修改为 linux-x64 ,修改完成后,应为:
 ...

 # The following lines have been added by the

 # application server integration wizard of JProfiler

 CATALINA_OPTS="-agentpath:/opt/jprofiler9/bin/linux-x86/libjprofilerti.so=port=8849,nowait $CATALINA_OPTS"

 export CATALINA_OPTS

 # end of modifications

 ...
再次连接,OK,成功。
jprofiler9.1.1 安装与配置的更多相关文章
- JDK安装与配置
JDK安装与配置 一.下载 JDK是ORACLE提供免费下载使用的,官网地址:https://www.oracle.com/index.html 一般选择Java SE版本即可,企业版的选择Java ...
- Node.js 教程 01 - 简介、安装及配置
系列目录: Node.js 教程 01 - 简介.安装及配置 Node.js 教程 02 - 经典的Hello World Node.js 教程 03 - 创建HTTP服务器 Node.js 教程 0 ...
- 烂泥:redis3.2.3安装与配置
本文由ilanniweb提供友情赞助,首发于烂泥行天下 想要获得更多的文章,可以关注我的微信ilanniweb 前一段时间写过一篇codis集群的文章,写那篇文章主要是因为当时的项目不支持redis自 ...
- mysql源码包手动安装、配置以及测试(亲测可行)
笔记编者:小波/qq463431476博客首页:http://www.cnblogs.com/xiaobo-Linux/ 记下这篇mysql笔记,望日后有用! redhat6采用centos yum源 ...
- 环境搭建系列-系统安装之centos 6.5安装与配置
按照国际惯例,系列目录先奉上: 系列一:系统安装之centos 6.5安装与配置 系列二:准备工作之Java环境安装 系列三:数据为先之MySQL读写集群搭建 系列四:谈分布式之RabbitMQ集群搭 ...
- ZooKeeper安装与配置
一. 单机安装.配置: 1. 下载zookeeper二进制安装包下载地址:http://apache.dataguru.cn/zookeeper/zookeeper-3.4.3/zookeeper-3 ...
- mac 下JDK 与 tomcat 的安装与配置
一.Mac下JDK的安装 1.先检测Mac是否已经安装过JDK,在终端中输入java 或者 javac 显示说明,表明已经安装过JDK,JDK版本查询终端键入java -version,终端会返回JD ...
- 烂泥:zabbix3.0安装与配置
本文由ilanniweb提供友情赞助,首发于烂泥行天下 想要获得更多的文章,可以关注我的微信ilanniweb 这个月又快过完了,最近也比较忙,没时间写文章,今天挤点时间把zabbix3.0安装与配置 ...
- Jenkins入门系列之——02第二章 Jenkins安装与配置
2014-12-08:已不再担任SCM和CI的职位,Jenkins的文章如无必要不会再维护. 写的我想吐血,累死了. 网页看着不爽的,自己去下载PDF.有问题请留言! Jenkins入门系列之——03 ...
随机推荐
- 请简单介绍一下Spring
Spring 是一个开源框架,是为了解决企业应用程序开发复杂性而创建的.框架的主要优势之一就是其分层架构,分层架构允许您选择使用哪一个组件,同时为 J2EE 应用程序开发提供集成的框架. Spring ...
- || and && 理解
逻辑或(||): 只要第一个值的布尔值为false,那么永远返回第二个值. 逻辑或属于短路操作,第一个值为true时,不再操作第二个值,且返回第一个值. 逻辑与(&&): 只要第一个值 ...
- ELKK 日志处理
http://blog.csdn.net/u010022051/article/details/54342357 在ELKK的架构中,各个框架的角色分工如下: ElasticSearch1.7.2:数 ...
- js琐碎知识点
1.javascript发展史 javascript首先由Netscape设计,为改善浏览器用户体验,名为liveScript, 网景公司被sun公司收购,为了宣传改名为javascript 后来su ...
- Spark Structured Streaming框架(2)之数据输入源详解
Spark Structured Streaming目前的2.1.0版本只支持输入源:File.kafka和socket. 1. Socket Socket方式是最简单的数据输入源,如Quick ex ...
- python内置方法补充bin
bin(x) 英文说明:Convert an integer number to a binary string. The result is a valid Python expression. I ...
- node路由访问,中间件返回数据
node路由访问,中间件返回数据 定义一个变量存放json数据,中间件接受数据 var responseData; router.use(function(req, res, next) { resp ...
- php数据结构课程---2、链表(php中 是如何实现单链表的(也就是php中如何实现对象引用的))
php数据结构课程---2.链表(php中 是如何实现单链表的(也就是php中如何实现对象引用的)) 一.总结 一句话总结: php是弱类型语言,变量即可表示数值,也可表示对象:链表节点的数据域的值就 ...
- 各数据库连接配置与maven依赖安装
maven用的比较多,所以自己去捣鼓了一下:以下是关于数据库配置的一块,把相关的内容张贴出来,以备不时之需 //MySql 配置文件(maven):pom.xml <dependency> ...
- WEB安全之Token浅谈
Token一般用在两个地方——防止表单重复提交.anti csrf攻击(跨站点请求伪造). 两者在原理上都是通过session token来实现的.当客户端请求页面时,服务器会生成一个随机数Token ...