使用C++调用pytorch模型(Linux)
前言
模型转换思路通常为:
- Pytorch -> ONNX -> TensorRT
- Pytorch -> ONNX -> TVM
- Pytorch -> 转换工具 -> caffe
- Pytorch -> torchscript(C++版本Torch)
我的模型是使用Pytorch1.0训练的,第三种方法应该是还不支持,没有对应层名字, 放弃. (以下是用方法3生成的网络结构图, 其中部分层名字和工具对应不上).
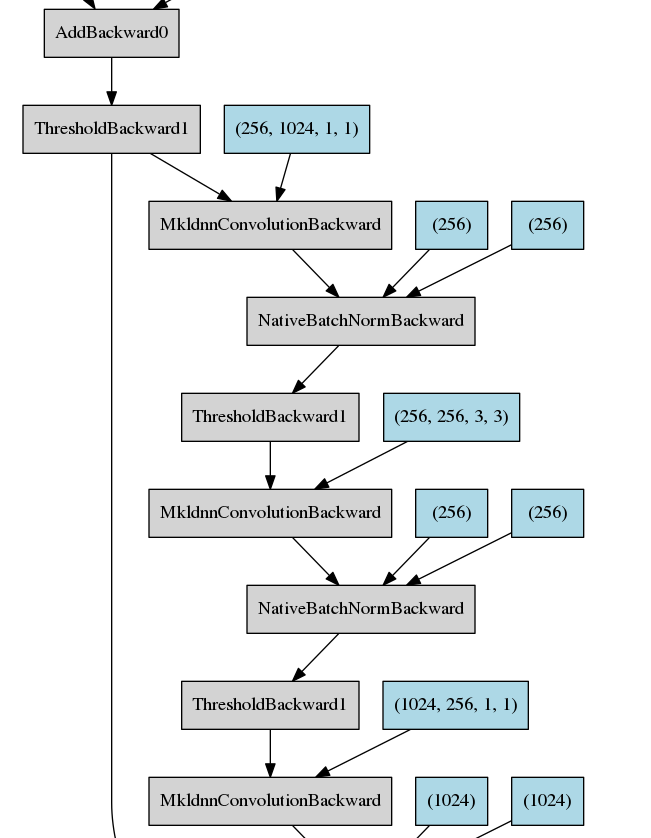
因此本文使用第4中方法,详细步骤分两步, 具体如下(目前资料少,坑很多)
1. pytorch模型转化为libtorch的torchscript模型 (.pth -> .pt)
首先, 在python中, 把模型转化成.pt文件
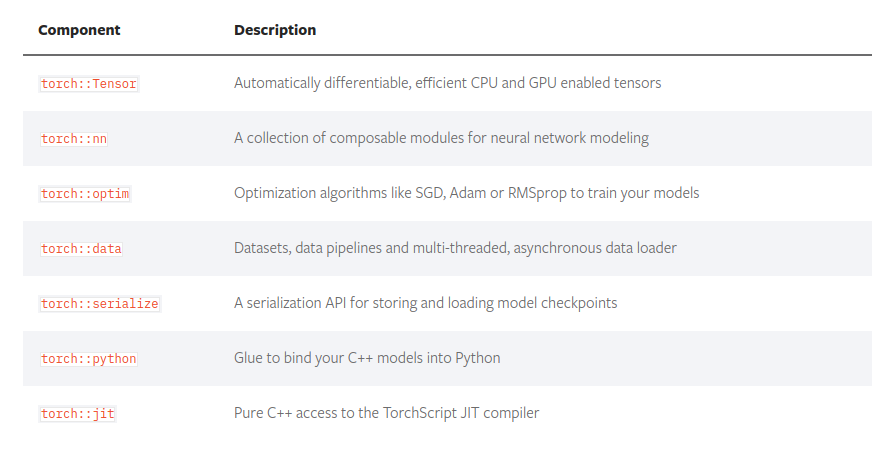
Pytorch官方提供的C++API名为libtorch,详细查看:
- LIBRARY API
- USING THE PYTORCH C++ FRONTEND
import torch

# An instance of your model.

from my_infer import BaseLine

model = BaseLine().model.cpu().eval()

# An example input you would normally provide to your model's forward() method.

example = torch.rand(1, 3, 256 , 128)

# Use torch.jit.trace to generate a torch.jit.ScriptModule via tracing.

traced_script_module = torch.jit.trace(model, example)

traced_script_module.save("demo/model.pt")
2. 使用libtorch调用torchscript模型
此处有一个大坑, opencv和torch可以单独使用, 但如果链接libtorch库以后, cv::imread提示未定义的应用. 所以使用了opencv2的图片读取方式, 然后再转成cv::Mat.
更新时间:2019/05/24
在更换libtorch版本后, cv:imread不再报错, 具体原因说不上来, 应该是之前的版本链接库时候出现矛盾什么的...
#include <iostream>

#include "torch/script.h"

#include "torch/torch.h"

#include "opencv2/core.hpp"

#include "opencv2/imgproc.hpp"

#include "opencv2/highgui.hpp"

#include <vector>

int main()

{

    //加载pytorch模型

    std::shared_ptr<torch::jit::script::Module> module = torch::jit::load("/home/zhuoshi/ZSZT/Geoffrey/opencvTest/m

    assert(module != nullptr);

    // 创建一个Tensor

    //std::vector<torch::jit::IValue> inputs;

    //inputs.emplace_back(torch::ones({1, 3, 256, 128}));

    //测试前向

    //at::Tensor output = module->forward(inputs).toTensor();

    //std::cout << output;

    // 转换为int8类型

    //vector<int16_t> feature(2048);

    //for (int i = 0;i<128;i++)

    //{

    // 转化成Float

    //int temp = output[0][i].item().toInt();

    //    if (temp != 0){

    //        temp = 1;

    //    }

    //    feature[i] = temp;

    //}

    //std::cout << feature;

    //读取图片

    IplImage* pmg = cvLoadImage("/home/zhuoshi/ZSZT/Geoffrey/opencvTest/test.jpg");

    cv::Mat image(pmg, true);

    //cv::Mat imageRGB = cv::cvtColor(image, imageRGB, cv::COLOR_BGR2RGB);

    cv::cvtColor(image, image, CV_BGR2RGB);

    //IplImage转换成Tensor

    cv::Mat img_float;

    image.convertTo(img_float, CV_32F, 1.0 / 255);

    cv::resize(img_float, img_float, cv::Size(256, 128));

    torch::Tensor tensor_image = torch::from_blob(img_float.data, {1, 3, 256, 128}, torch::kFloat32);

    //前向

    std::vector<torch::jit::IValue> input;

    input.emplace_back(tensor_image);

    at::Tensor output_image = module->forward(input).toTensor();

    //std::cout << output_image;

    //Tensor 转 array

    std::vector<float> feature(2048);

    for (int i=0; i<2048; i++){

    //    feature[i] = output_image[i]

        std::cout << output_image[0][i].item().toFloat();

    }

    return 0;

}
对应的CMakeLists.txt内容:
cmake_minimum_required(VERSION 2.8)

project(opencv_example_project)

SET(CMAKE_C_COMPILER g++)

add_definitions(--std=c++11)

# 指定libTorch位置

set(Torch_DIR /home/zhuoshi/ZSZT/Geoffrey/opencvTest/libtorch/share/cmake/Torch)

find_package(Torch REQUIRED)

find_package(OpenCV REQUIRED)

message(STATUS "OpenCV library status:")

message(STATUS "    version: ${OpenCV_VERSION}")

message(STATUS "    libraries: ${OpenCV_LIBS}")

message(STATUS "    include path: ${OpenCV_INCLUDE_DIRS}")

message(STATUS "    torch lib : ${TORCH_LIBRARIES} ")

include_directories(${OpenCV_INCLUDE_DIRS}

                    /home/zhuoshi/ZSZT/Geoffrey/opencvTest/libtorch/include

                    /home/zhuoshi/ZSZT/Geoffrey/opencvTest/libtorch/include/torch/csrc/api/include/

                    )

add_executable(main main.cpp)

# Link your application with OpenCV libraries

target_link_libraries(main ${OpenCV_LIBS} ${TORCH_LIBRARIES} )
运行结果如图:

更新时间: 2019/05/25, 更换libtorch版本后, cv::read可用, 这是新版本
#include <iostream>

#include "torch/script.h"

#include "torch/torch.h"

#include "opencv2/core.hpp"

#include "opencv2/imgproc.hpp"

#include "opencv2/highgui.hpp"

#include "opencv2/imgcodecs.hpp"

#include <vector>

int main()

{

    /* 配置参数 */

    std::vector <float> mean_ = {0.485, 0.456, 0.406};

    std::vector <float> std_ = {0.229, 0.224, 0.225};

    char path[] = "../test.jpg";

    // 读取图片

    cv::Mat image = cv::imread(path);

    if (image.empty())

        fprintf(stderr, "Can not load image\n");

    // 转换通道,

    cv::cvtColor(image, image, CV_BGR2RGB);

    cv::Mat img_float;

    image.convertTo(img_float, CV_32F, 1.0 / 255);

    // resize, 测试一个点数据

    cv::resize(img_float, img_float, cv::Size(256, 128));

    //std::cout << img_float.at<cv::Vec3f>(256, 128)[1] << std::endl;

    // 转换成tensor

    auto img_tensor = torch::from_blob(img_float.data, {1, 3, 256, 128}, torch::kFloat32);

    //img_tensor = img_tensor.permute({0,3,1,2});

    // tensor标准化

    for (int i = 0; i < 3; i++) {

        img_tensor[0][0] = img_tensor[0][0].sub_(mean_[i]).div_(std_[i]);

    }

    // 构造input

    //auto img_var = torch::autograd::make_variable(img_tensor, false); //tensor->variable会报错

    std::vector<torch::jit::IValue> inputs;

    inputs.emplace_back(img_tensor); //向容器中加入新的元素, 右值引用

    //加载pytorch模型

    std::shared_ptr<torch::jit::script::Module> module = torch::jit::load("../model/model_int.pt");

    assert(module != nullptr);

    //前向

    at::Tensor output_image = module->forward(inputs).toTensor();

    std::cout << output_image;

    return 0;

}

cv::Mat convertTo3Channels(cv::Mat binImg)

{

    cv::Mat three_channel = cv::Mat::zeros(binImg.rows, binImg.cols, CV_8UC3);

    std::vector<cv::Mat> channels;

    for (int i=0;i<3;i++)

    {

        channels.push_back(binImg);

    }

    merge(channels, three_channel);

    return three_channel;

}
对应CMakelist.txt文件:
cmake_minimum_required(VERSION 2.8)

# Define project name

project(opencv_example_project)

SET(CMAKE_C_COMPILER g++)

add_definitions(--std=c++11)

# 指定libTorch位置

set(Torch_DIR /home/geoffrey/CLionProjects/opencvTest/libtorch/share/cmake/Torch)

find_package(Torch REQUIRED)

message(STATUS "Torch library status:")

message(STATUS "    version: ${TORCH_VERSION}")

message(STATUS "    libraries: ${TORCH_LIBS}")

message(STATUS "    include path: ${TORCH_INCLUDE_DIRS}")

message(STATUS "    torch lib : ${TORCH_LIBRARIES} ")

# 指定OpenCV位置

#set(OpenCV_DIR /run/media/geoffrey/Timbersaw/Backup/other_package/opencv-4.0.0/build)

# set(OpenCV_DIR /opt/opencv2)

find_package(OpenCV  REQUIRED)

message(STATUS "OpenCV library status:")

message(STATUS "    version: ${OpenCV_VERSION}")

message(STATUS "    libraries: ${OpenCV_LIBS}")

message(STATUS "    include path: ${OpenCV_INCLUDE_DIRS}")

message(STATUS "    opencv lib : ${OpenCV_LIBRARIES} ")

# 包含头文件include

include_directories(${OpenCV_INCLUDE_DIRS} ${TORCH_INCLUDE_DIRS})

# 生成的目标文件(可执行文件)

add_executable(main main.cpp)

# 置需要的库文件lib

# set(OpenCV_LIBS opencv_core  opencv_highgui opencv_imgcodecs opencv_imgproc)

target_link_libraries(main  ${OpenCV_LIBS} ${TORCH_LIBRARIES}) #
参考资料
使用C++调用pytorch模型(Linux)的更多相关文章
- 使用C++调用并部署pytorch模型
1.背景(Background) 上图显示了目前深度学习模型在生产环境中的方法,本文仅探讨如何部署pytorch模型! 至于为什么要用C++调用pytorch模型,其目的在于:使用C++及多线程可以加 ...
- Pytorch模型量化
在深度学习中,量化指的是使用更少的bit来存储原本以浮点数存储的tensor,以及使用更少的bit来完成原本以浮点数完成的计算.这么做的好处主要有如下几点: 更少的模型体积,接近4倍的减少: 可以更快 ...
- JAVA中调用LevelDB用于Linux和Window环境下快速存储KV结构
一.简介 JAVA中调用LevelDB用于Linux和Window环境下快速存储KV结构 二.依赖 <!-- https://mvnrepository.com/artifact/org.fus ...
- (原)torch模型转pytorch模型
转载请注明出处: http://www.cnblogs.com/darkknightzh/p/7839263.html 目前使用的torch模型转pytorch模型的程序为: https://gith ...
- DEX-6-caffe模型转成pytorch模型办法
在python2.7环境下 文件下载位置:https://data.vision.ee.ethz.ch/cvl/rrothe/imdb-wiki/ 1.可视化模型文件prototxt 1)在线可视化 ...
- dede list调用 内容模型 附件
当我们在list列表页调用内容模型的附件时,会调用出来一个表,数据被包含在表格里面 下面修改这个表格 找到 templets>system>channel_addon.htm文件 < ...
- PyTorch模型加载与保存的最佳实践
一般来说PyTorch有两种保存和读取模型参数的方法.但这篇文章我记录了一种最佳实践,可以在加载模型时避免掉一些问题. 第一种方案是保存整个模型: 1 torch.save(model_object, ...
- 资源分享 | PyTea:不用运行代码,静态分析pytorch模型的错误
前言 本文介绍一个Pytorch模型的静态分析器 PyTea,它不需要运行代码,即可在几秒钟之内扫描分析出模型中的张量形状错误.文末附使用方法. 本文转载自机器之心 编辑:CV技 ...
- 从零搭建Pytorch模型教程(三)搭建Transformer网络
前言 本文介绍了Transformer的基本流程,分块的两种实现方式,Position Emebdding的几种实现方式,Encoder的实现方式,最后分类的两种方式,以及最重要的数据格式的介绍. ...
随机推荐
- [Usaco2005 Jan]Sumsets 求和
Description Farmer John commanded his cows to search for different sets of numbers that sum to a giv ...
- [BZOJ1453]Dface双面棋盘
Description Input Output Sample Input Sample Output HINT 线段树+并查集,暴力记录和更新一些信息,详情见代码注解. #include<cm ...
- 题解报告:poj 3061 Subsequence(前缀+二分or尺取法)
Description A sequence of N positive integers (10 < N < 100 000), each of them less than or eq ...
- 转】Nodejs对MongoDB模糊查询
原博文出自于: http://blog.fens.me/category/%E6%95%B0%E6%8D%AE%E5%BA%93/page/4/ 感谢! Posted: Jul 1, 2013 Tag ...
- 从java toBinaryString() 看计算机数值存储方式(原码、反码、补码)
一.toBinaryString 方法及其含义 1.1 方法说明 该方法位于java.lang.Integer类中 方法签名:public static String toBinaryString(i ...
- vue组件、数据解析的实现思想猜想与实践
Vue的全局组件,在注册后,可在全局范围内无限次使用,猜想是利用了闭包"可以保持形参"的特性,使初始化时的作用域得意保存,下面用原生js和部分jquery代码模拟了数据解析和组件渲 ...
- PAT甲级考前整理(2019年3月备考)之三,持续更新中.....
PAT甲级考前整理一:https://www.cnblogs.com/jlyg/p/7525244.html,主要讲了131题的易错题及坑点 PAT甲级考前整理二:https://www.cnblog ...
- Java集合框架源码(三)——arrayList
1. ArrayList概述: ArrayList是List接口的可变数组的实现.实现了所有可选列表操作,并允许包括 null 在内的所有元素.除了实现 List 接口外,此类还提供一些方法来操作内部 ...
- 洛谷P2863 [USACO06JAN]牛的舞会The Cow Prom
代码是粘的,庆幸我还能看懂. #include<iostream> #include<cstdio> #include<cmath> #include<alg ...
- python中break、continue 、exit() 、pass终止循环的区别
python中break.continue .exit() .pass区分 1.break:跳出循环,不再执行 Python break语句,就像在C语言中,打破了最小封闭for或while循环. b ...