Understanding Scroll Views 深入理解 scroll view 读书笔记
Understanding Scroll Views 深入理解 scroll view 读书笔记
It may be hard to believe, but a UIScrollView isn't much different than a standard UIView. Sure, the scroll view has a few more methods, but those methods are really just facades of existing UIView properties. Thus, most of the understanding of how a UIScrollView works comes from understanding UIView - specifically, the details of the two-step view rendering process.
Rasterization and Composition
The first part of the rendering process is known as rasterization. Rasterization simply means to take a set of drawing instructions and produce an image.
rasterization 简单的意思就是采用一些列绘图指令 并产生一个image。
UIButtons, for example, draw an image with a rounded rectangle and a title in the center. These images aren't drawn to the screen; instead, they are held onto by their view to be used during the next step.
Once each view has its rasterized image, these images are drawn on top of each other to produce one screen-sized image in a step called composition.
一旦view 有他的rasterized image,这些image绘制在屏幕上称为 composition 组合 。
The view hierarchy plays a big role in how composition occurs: a view's image is composited on top of its superview's image. Then, that composited image is composited on top of the super-superview's image, and so on. The view at the top of the hierarchy is the window and its composited image (which is a composite of every image in the view hierarchy) is what the user sees.
Conceptually, this idea of layering independent images on top of each other to produce a final, flat image should make sense, especially if you have used a tool like Photoshop before. We also have another article in this issue explaining in detail how pixels get onto the screen.
Now, recall that every view has a bounds and frame rectangle.
每个View都有一个bounds and frame
When laying out an interface, we deal with the frame rectangle of a view. This allows us to position and size the view. The frame and bounds of a view will commonly have the same size (though transforms can alter this), but their origin will usually differ.
frame和bounds的size可能相同,但是他们的origin 经常不同
Understanding how these two rectangles work is the key to understanding how UIScrollView works.
理解这两个rectangle 如何工作的,有助于理解UIScrollView
During the rasterization step, a view doesn't care about what is going to happen in the upcoming composition step.
在rasterizaiton 阶段,一个view并不关心如何组合。
That is to say, it doesn't care about its frame (which will be used to position the view's image) or its place in the view hierarchy (which will determine the order in which it is composited).
也就是说并不关心他的frame或在view视图中的位置。
The only thing a view cares about at this time is drawing its own content.
一个View在rasterization 阶段,唯一关系的是绘制它自己的内容。
This drawing occurs in each view's drawRect: method.
drawing 发生在每个drawRect:方法里面。
Before drawRect: is called, a blank image is created for the view to draw its content in.
This image's coordinate system is the bounds rectangle of the view.
在drawRect:方法调用之前,一个空白图片创建了,用来绘制view 的内容。
这个图片的坐标系就是View的bounds 矩形。
For nearly every view, the bounds rectangle's origin is {0, 0}.
几乎每个View,bounds rectangle 的origin是{0,0}
Thus, to draw something in the top-left corner of the rasterized image, you would draw at the origin of the bounds, the point {x:0, y:0}. To draw something in the bottom right corner of an image, you would draw at point {x:width, y:height}. If you draw outside of a view's bounds, that drawing is not part of the rasterized image and is discarded.

During the composition step, each view composites its rasterized image on top of its superview's image (and so on).
在组合阶段,每个view 组合它自己的rasterized image 在它的superview image的顶端。
A view's frame rectangle determines where the view's image is drawn on its superview's image - the origin of the frame indicates the offset between the top-left corner of the view's image and its superview's image.
frame 的origin 暗示着在view图片和它的superview的图片 的左上角之间的offset.
So, a frame origin of {x:20, y:15} will create a composited image where the view's image is drawn on top of its superview's image, shifted to the right 20 points and down 15 points. Because the frame and bounds rectangle of a view are always the same size, the image is composited pixel for pixel to its superview's image. This ensures there is no stretching or shrinking of the rasterized image.

Remember, we're talking about just one composite operation between a view and its superview. Once those two views are composited together, the resulting composite image is composited with the super-superview's image and so on: a snowball effect.
雪球效应
Think about the math behind compositing an image onto another. The top-left corner of a view's image is offset by its frame's origin and then drawn onto its superview's image:
CompositedPosition.x = View.frame.origin.x - Superview.bounds.origin.x;
CompositedPosition.y = View.frame.origin.y - Superview.bounds.origin.y;
Now, as we have said before, the origin of a view's bounds rectangle is typically just {0, 0}. Thus, when doing the math, we just drop out one of the values and we get:
正如我们之前说的,一个view的bounds rectangle 的origin 一般是{0,0}。
CompositedPosition.x = View.frame.origin.x;
CompositedPosition.y = View.frame.origin.y;
So, we can look at a few different frames and see how they would look:
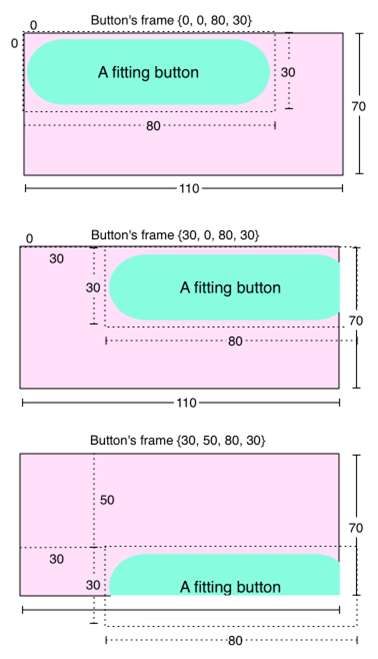
And this should make sense. We change the frame's origin of the button, and it changes its position relative to its lovely purple superview. Notice that if we move the button so that parts of it are outside of the bounds of the purple superview, those parts are clipped in the same way drawing during rasterization would be clipped. However, technically, because of how iOS handles compositing under the hood, you can have a subview render outside of its superview's bounds, but drawing during rasterization cannot occur outside of a view's bounds.
Scroll View's Content Offset
Now, what does all of this have to do with UIScrollView? Everything. Think about a way we could accomplish scrolling: we could have a view whose frame we change when we drag it. It accomplishes the same thing, right? If I drag my finger to the right, I increase the origin.x of the view I'm dragging and voila, scroll view!
The problem with that, of course, is that there are typically many views in a scroll view. To implement this panning feature, you would have to change the frames of every view every time the user moved his or her finger. But we're missing something. Remember that equation that we came up with to determine where a view composited its image onto its superview?
CompositedPosition.x = View.frame.origin.x - Superview.bounds.origin.x;
CompositedPosition.y = View.frame.origin.y - Superview.bounds.origin.y;
We dropped the Superview.bounds.origin values because they were always 0. But what if they weren't? What if, say, we used the same frames from the previous diagram, but we changed the purple view's bounds origin to something like {-30, -30}. We'd get this:

Now, the beauty of this is that every single subview of this purple view is shifted by the change to its bounds.
This is, in fact, exactly how a scroll view works when you set its contentOffset property: it changes the origin of the scroll view's bounds. In fact, contentOffset isn't even real! Its code probably looks like this:
当设置contentOffset 属性的时候,scroll view 如何工作的: 他改变了scroll view 的bounds 。实际上contentOffset 并不是真实存在的。也许它的代码如下:
- (void)setContentOffset:(CGPoint)offset
{
CGRect bounds = [self bounds];
bounds.origin = offset;
[self setBounds:bounds];
}
Notice that in the previous diagram, changing the bounds' origin enough moved the button outside of the composited image produced by the purple view and the button. This is just what happens when you scroll a scroll view enough so that a view disappears!
A Window into the World: Content Size
Now that the hard part is out of the way, let's look at another property of UIScrollView, contentSize.
The content size of a scroll view doesn't change anything about the bounds of a scroll view and therefore does not impact how a scroll view composites its subviews.
content size 不会改变scroll view 的 bounds,因此不会影响一个scroll view 是如何组成它的subviews 的。
Instead, the content size defines the scrollable area.
content size 定义了scrollable 区域。
By default, a scroll view's content size is a big, fat {w:0, h:0}.
默认情况下,scroll view 的content size是大 ,平的,{0,0}
Since there is no scrollable area, the user can't scroll, but the scroll view will still display all of the subviews that fit inside the scroll view's bounds.
因为没有可以scrollable 区域,用户不能scroll ,但是scroll view 仍然展示所有的子subviews .
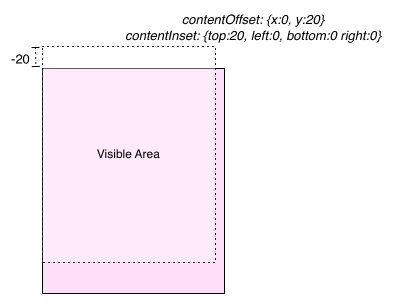
When the content size is set to be larger than the bounds of the scroll view, the user is allowed to scroll. You can think of the bounds of a scroll view as a window into the scrollable area defined by the content size:

When the content offset is {x:0, y:0}, the viewing window's top-left corner is in the top-left corner of the scrollable area. This is also the minimum value of the content offset; the user can't scroll to the left or above the scrollable area. There's nothing there!
The maximum value for the content offset is the difference between the content size and the scroll view's bounds' size. This makes sense; scrolling all the way to the bottom right, the user is stopped so that the bottom-right edge of the scrolling area is flush with the bottom-right edge of the scroll view's bounds. You could write the maximum content offset like this:
Objective-C
contentOffset.x = contentSize.width - bounds.size.width;
contentOffset.y = contentSize.height - bounds.size.height;
Tweaking the Window with Content Insets
The property contentInset can change the maximum and minimum values of the content offset to allow scrolling outside of the scrollable area.
contentInset 属性能够改变content offset 的最大值和最小值以允许 在scrollable area 以外滚动。
Its type is UIEdgeInsets, which consists of 4 numbers: {top, left, bottom, right}.
When you introduce an inset, you change the range of the content offset.
当你引入inset 的时候,你改变了content offset 的范围
For example, setting the content inset to have a value of 10 for its top value allows the content offset's y value to reach -10. This introduces padding around the scrollable area.
This may not seem very useful at first. In fact, why not just increase the content size? Well, you should avoid changing the content size of a scroll view unless you have to.
你应该尽量避免改变scroll view 的content size ,除非你必须改变。
To understand why, consider a table view (UITableView is a subclass of UIScrollView, so it has all of the same properties). The table view's scrollable area has been carefully calculated to fit each one of its cells snugly. When you scroll past the boundaries of the table view's first or last cells, the table view snaps the content offset back into place, so that the cells once again fit snugly in the scroll view's bounds.
Now, what happens when you want to implement pull to refresh using a UIRefreshControl? You can't put the UIRefreshControl within the scrollable area of the table view, otherwise, the table view would allow the user to stop scrolling halfway through the refresh control, and the top would snap to the top of the refresh control. Thus, you must put refresh control just above the scrollable area. This allows the content offset to snap back to the first row, not the refresh control.
But wait, if you initiate the pull-to-refresh mechanism by scrolling far enough, the table view does allow the content offset to snap refresh control into the scrollable area, and this is because of the table view's content inset. When the refresh action is initiated, the content inset is adjusted so that the minimum content offset includes the entirety of the refresh control. When the refresh completes, the content inset is returned to normalcy, the content offset follows suit, and none of the math required for determining the content size needs to be re-computed.
How can you use the content inset in your own code? Well, there is one great use for the it: when the keyboard is on the screen. Typically, you try to design a user interface that fits the screen snugly. When the keyboard appears on the screen, you lose a few hundred pixels of that space. All of the stuff underneath the keyboard is obscured.
Now, the scroll view's bounds haven't changed, and neither has its content size (nor should it).
现在scroll view 的bounds 没有改变,它的content size也没有。
But the user can't scroll the scroll view.但是 用户不能scroll 那个scroll view .Think about the equation from earlier: the maximum content offset is the difference between the content size and the bounds' size.
最大的content offset 与 content size 和bounds 's size 不同。
If they are equal, which they are in your snug interface that now has a keyboard messing up your day, the maximum content offset is {x:0, y:0}.
如果他们相等,最大的content offset 是{0,0}
The trick, then, is to put the interface in a scroll view. The content size of the scroll view remains fixed at the same size as the scroll view's bounds. When the keyboard appears on the screen, you set the bottom of the content inset equal to the height of the keyboard.
当键盘出现时,你设置content inset 的bottom 与 keyboard 相等。

This allows the maximum value of the content offset to show the area beyond the scrollable area. The top of the visible area is outside the bounds of the scroll view, and is therefore clipped (although it is also off the screen itself, so that doesn't matter too much).
Understanding Scroll Views 深入理解 scroll view 读书笔记的更多相关文章
- 《深入理解Android2》读书笔记(四)
接上篇<深入理解Android2>读书笔记(三) ActivityManagerService(AMS) 1.AMS由ActivityManagerNative(AMN)类派生,并实现Wa ...
- 《深入理解Android2》读书笔记(五)
接上篇<深入理解Android2>读书笔记(四) startActivity Am void run() throws RemoteException { try { printMessa ...
- 深入理解Java虚拟机 -- 读书笔记(1):JVM运行时数据区域
深入理解Java虚拟机 -- 读书笔记:JVM运行时数据区域 本文转载:http://blog.csdn.net/jubincn/article/details/8607790 本系列为<深入理 ...
- 《深入理解Android2》读书笔记(三)
接上篇<深入理解Android2>读书笔记(二) PackageManagerService PackageManagerService负责系统中Package的管理,应用程序的安装.卸载 ...
- 《深入理解Android2》读书笔记(七)
接上篇<深入理解Android2>读书笔记(六) 广播接受者 注册 ContextImpl @Override public Intent registerReceiver(Broadca ...
- 《深入理解Android2》读书笔记(八)
接上篇<深入理解Android2>读书笔记(七) AMS中的进程管理 AMS对进程的管理仅涉及两个方面 1.调节进程的调度优先级和调度策略 2.调节进程的oom值 调度优先级和调度策略 1 ...
- 《深入理解Android2》读书笔记(二)
接之前那篇<深入理解Android2>读书笔记(一) 下面几篇来分别详细分析 Binder类作为服务端的Bn的代表,BinderProxy类作为客户端的Bp的代表,BinderIntern ...
- 《深入理解bootstrap》读书笔记:第一章 入门准备
一.bootstrap框架简介 Bootstrap是最流行的前端开发框架. 什么是框架:开发过程的半成品. bootstrap具有以下重要特性: (1)完整的CSS样式插件 (2)丰富的预定义样式表 ...
- 《深入理解Android2》读书笔记(一)
2017-5-12 从今天开始估计有一段空闲时间,开始阅读<深入理解Android2>,并写读书笔记. 第一章搭建环境直接略过. 第二章是Binder,暂时略过 7大类服务包括:1.And ...
随机推荐
- 一步一步学Silverlight 2系列(12):数据与通信之WebClient
概述 Silverlight 2 Beta 1版本发布了,无论从Runtime还是Tools都给我们带来了很多的惊喜,如支持框架语言Visual Basic, Visual C#, IronRuby, ...
- VM 下安装ghost版系统
一.首先分区,并激活主分区 二.设置cd-rom的接口为IDE(这项看情况来设置,如果提示 "units specified don't exist, SHSUCDX can't insta ...
- 【字符串】BZOJ上面几个AC自动机求最为字串出现次数的题目
(一下只供自己复习用,目的是对比这几个题,所以写得不详细.需要细节的可以参考其他博主) [BZOJ3172:单词] 题目: 某人读论文,一篇论文是由许多(N)单词组成.但他发现一个单词会在论文中出现很 ...
- BZOJ_4423_[AMPPZ2013]Bytehattan_对偶图+并查集
BZOJ_4423_[AMPPZ2013]Bytehattan_对偶图+并查集 Description 比特哈顿镇有n*n个格点,形成了一个网格图.一开始整张图是完整的. 有k次操作,每次会删掉图中的 ...
- 为什么python2.7中用Process创建子进程的语句之前必须加#if
from multiprocessing import Process import os def run(name): print 'The child process '%s' (pid %d) ...
- auto_ptr智能指针
C++的auto_ptr所做的事情,就是动态分配对象以及当对象不再需要时自动执行清理. 使用std::auto_ptr,要#include <memory>.
- POJ3250【单调栈】
思路: 维护一个单调递增的栈,对于栈顶元素<=新值来说,那么后面的,我一定看不到了,pop掉以后,那么这时候的栈的大小就是我能看到的这个刚刚pop出去元素的个数. //#include < ...
- POJ1787 【完全背包+物品计数+路径输出】
题意: 有1,5,10,25四种硬币,给每种硬币的数量和要组合成的价值,求刚好达到价值时用的硬币最多,然后还要输出具体的用的数量 前言: 一开始是偶然看见了kuangbin爷的题解说是完全背包+路径, ...
- bzoj 3926: [Zjoi2015]诸神眷顾的幻想乡【SAM】
有一个显然的性质就是每个串一定在某个叶子为根的树中是一条直的链 然后因为SAM里是不会有相同状态的,所以以每个叶子为根dfs一遍,并且动态构造SAM(这里的节点u的last指向父亲),最后统计答案就是 ...
- spoj SUBLEX - Lexicographical Substring Search【SAM】
先求出SAM,然后考虑定义,点u是一个right集合,代表了长为dis[son]+1~dis[u]的串,然后根据有向边转移是添加一个字符,所以可以根据这个预处理出si[u],表示串u后加字符能有几个本 ...