
QML学习笔记(六)- 简单计时器和定时器
做一个简单的qml计时器和定时器,左键触发计时,右键触发定时
GitHub:八至
作者:狐狸家的鱼
左键点击按钮,触发计时器,中键可以暂停计时,同时如果要清零,再次点击左键。
右键打开时间输入与告警信息输入弹出窗口,时间输入有正则验证,只能输入数字,并且时间的:只能在英文半角下输入,如果时间和告警信息未输入,会弹出警告。
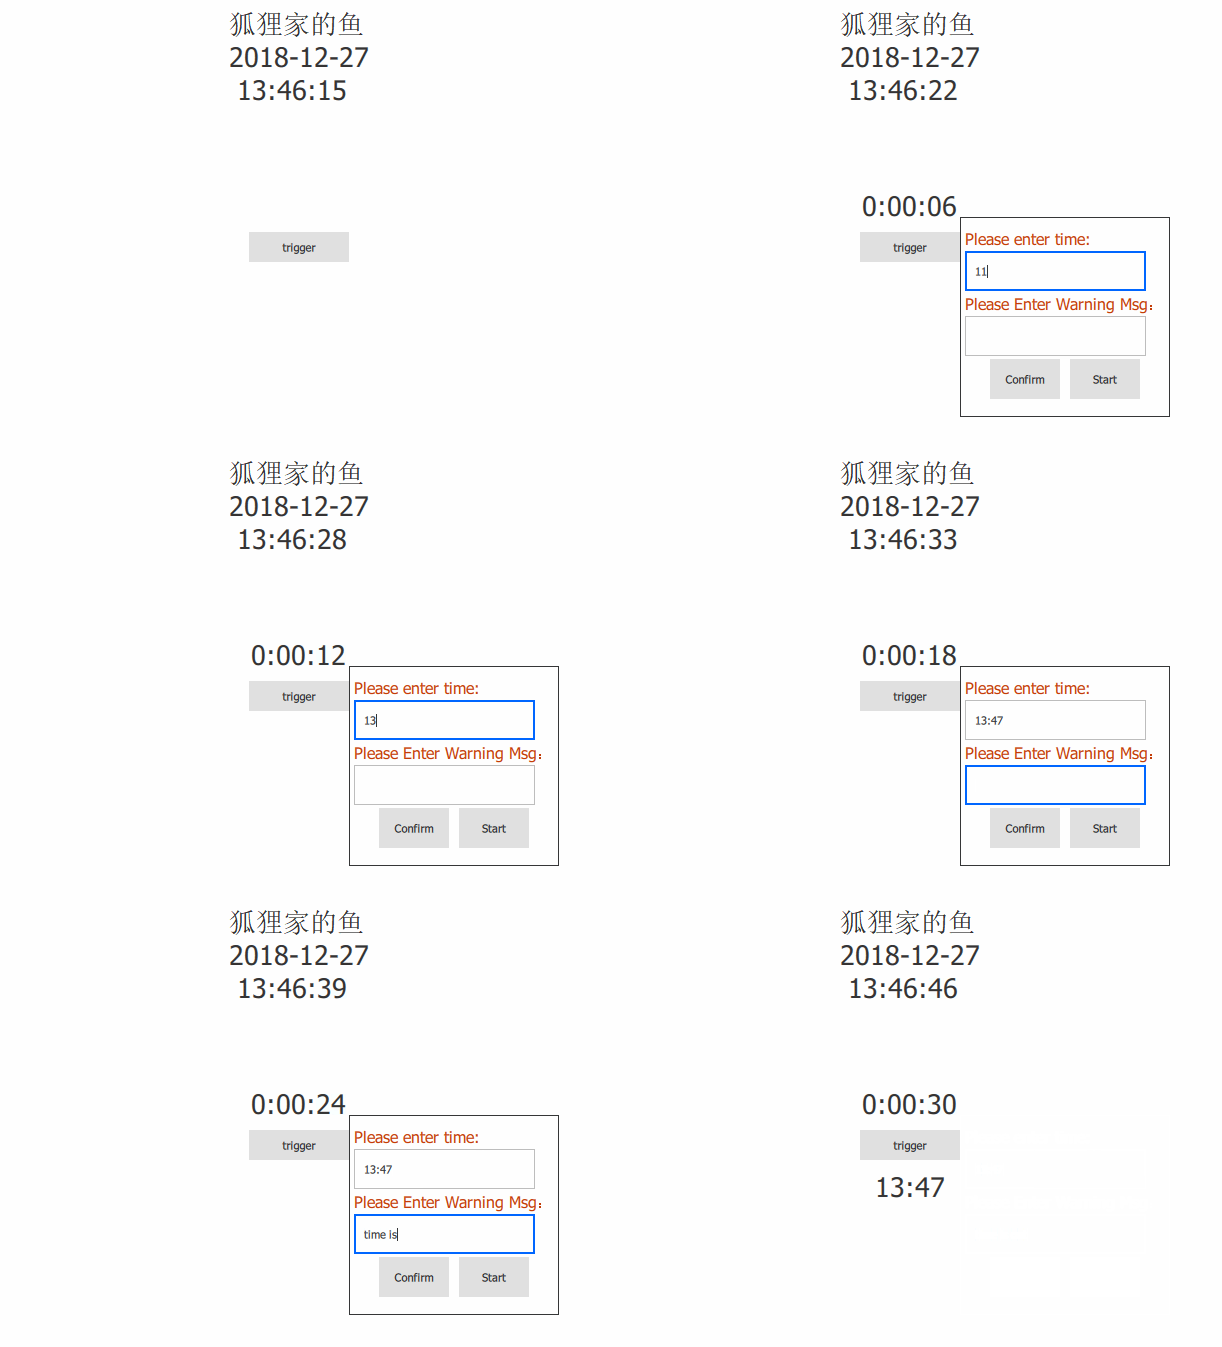
main.qml:
/*

author:狐狸家的鱼

date:20181226

*/

import QtQuick 2.10

import QtQuick.Window 2.10

import QtQuick.Controls 2.2

Window {

    visible: true

    width: 640

    height: 480

    title: qsTr("Hello World")

    property int initTime: 0

    property var totalSeconds_ipt    //timerIpt 总秒数

    property var totalSeconds_sys    //当前系统时间总秒数

    property var trigger_ipt

    property int count: 15           //倒计时开始秒数

    //秒转换为时分秒  用于计时

    function toTime(s){

        var time;

        if(s > -1){

            var hour = Math.floor(s/3600);

            var min = Math.floor((s/60)%60);

            var sec = initTime % 60;

            if(hour < 10){

                time = hour + ":";

            }

            if(min < 10){

                time += "0";

            }

            time += min + ":";

            if(sec < 10){

                time += "0";

            }

            time += sec.toFixed(0);

        }

        return time;

    }

    //时分秒转换为秒 用于定时

    function add_zero(temp){

        if(temp < 10) return "0" + temp;

    }

    function getCurDateS(){

        var date = new Date();

        var dateH = add_zero(date.getHours());

        var dateM = add_zero(date.getMinutes());

        var dateS = add_zero(date.getSeconds());

        totalSeconds_sys = dateH*3600 + dateM*60 + dateS*1;

        return totalSeconds_sys;

    }

    //计时器

    Timer{

        id:timer_1

        interval: 1000

        repeat: true

        triggeredOnStart: true //start()时触发

        onTriggered: {//触发器

            initTime++

            timeTex.text = toTime(initTime)

        }

    }

    //定时器

    Timer{

        id:timer_2

        interval: 1000

        repeat: true

        triggeredOnStart: true

        onTriggered: {

            getCurDateS()

            trigger_ipt = totalSeconds_ipt - totalSeconds_sys

            if(trigger_ipt === count){

                warnMsgPop.open();//告警窗口打开

                //warnMusic.play();//告警音乐播放

                count -= 1;

                if(count <= 0){

                    timer_2.stop();

                }

            }

        }

    }

    //触发按钮

    Button{

        id:triggerBtn

        width: 100

        height: 30

        anchors.centerIn: parent

        text: 'trigger'

        MouseArea{

            anchors.fill: parent

            acceptedButtons: Qt.LeftButton | Qt.MidButton | Qt.RightButton

            onClicked: {

                if(mouse.button == Qt.LeftButton){//左键触发计时器 & 清零

                    console.log("clicked LeftButton")

                    initTime = 0

                    timer_1.start()

                }

                if(mouse.button == Qt.MidButton){//中键停止计时器

                    console.log("clicked MidButton")

                    timer_1.stop()

                }

                if(mouse.button == Qt.RightButton){//右键触发定时器

                    console.log("clicked RightButton")

                    //timer_1.stop()

                    //timeTex.text = '' //计时清空

                    timeIptPop.open()

                }

            }

        }

    }

    Text{

        id:timeTex

        font.pointSize: 20

        anchors.bottom: triggerBtn.top

        anchors.bottomMargin: 10

        anchors.horizontalCenter: parent.horizontalCenter

        color: "#333"

    }

    Text{

        id:countDownTex

        font.pointSize: 20

        anchors.top: triggerBtn.bottom

        anchors.topMargin: 10

        anchors.horizontalCenter: parent.horizontalCenter

        color: "#333"

    }

    //弹出定时器时间输入和告警提示信息窗口

    Popup{

        id:timeIptPop

        width: 210

        height: 200

        x:triggerBtn.x + triggerBtn.width

        y:triggerBtn.y - triggerBtn.height/2

        TimeIpt{

            id:timeIptWin

            anchors.fill: parent

        }

    }

    WarnPop{//倒计时告警窗口

        id:warnMsgPop

        x:triggerBtn.x - triggerBtn.width

        y:triggerBtn.y

        width: 200

        height: 200

        warnText:timeIptWin.warnMsgInput + "\n" + (count <= 0 ? "End of countdown" : count)

    }

    //时间输入

    Connections{//弹出时间输入的确认按钮

        target: timeIptWin.confirmBtnArea

        onClicked:{

            var hhmmIpt = timeIptWin.timeInputText.replace(":","");

            var hhIpt_before = hhmmIpt.substring(0,2);

            var mmIpt_before = hhmmIpt.substring(2,4);

            var hhIpt_after = parseInt(hhIpt_before,10);

            var mmIpt_after = parseInt(mmIpt_before,10);

            console.log("转换前:",hhIpt_before,mmIpt_before);

            console.log("转换后:",hhIpt_after,mmIpt_after);

            totalSeconds_ipt = hhIpt_after * 3600 + mmIpt_after * 60;

            console.log("总秒数:",totalSeconds_ipt);

        }

    }

    Connections{//弹出时间输入的倒计时启动按钮链接

        target: timeIptWin.startBtnArea

        onClicked:{

            timeIptPop.close()

            timer_2.start()

        }

    }

    Connections{//告警窗口关闭  倒计时停止

        target: warnMsgPop.closeWarn

        onClicked:{

            timer_2.stop()

            warnMsgPop.close()

            count = 15

        }

    }

}
TimeIpt.qml
import QtQuick 2.0

import QtQuick.Window 2.3

import QtQuick.Layouts 1.3

import QtQuick.Controls 2.2

import QtQuick.Dialogs 1.1

Rectangle{//自定义时间输入窗口

   id:root

   property int txtFieldWidth: 100

   property int txtFieldHeight: 35

   property int btnWidth: 70

   property int btnHeight: 40

   property alias confirmBtnArea: confirmBtn

   property alias startBtnArea: startBtn

   property alias warnMsgInput: warnMsgInput.text

   property alias timeInputText: timerInputText.text

   width: parent.width

   height: parent.height

   ColumnLayout{

       spacing: 3

       anchors.horizontalCenter: parent.horizontalCenter

       Text{

           text: "Please enter time:"

           font.pointSize: 12

           color: "#C23B07"

       }

       TextField{

             id:timerInputText

             implicitWidth: root.width-5

             validator: RegExpValidator{regExp: /^(?:(?:[0-2][0-3])|(?:[0-1][0-9])):[0-5][0-9]$/}

             Keys.enabled: true

             Keys.onReturnPressed: {

                 if(timerInputText.text === ""){

                     hintTimeIpt.open()

                     timerInputText.focus = false

                 }else{

                     warnMsgInput.focus = true

                     countDownTex.text = timerInputText.text

                 }

             }

         }

       Text{//输入告警信息

           text:"Please Enter Warning Msg:"

           font.pointSize: 12

           color: "#C23B07"

       }

       TextField{

           id:warnMsgInput

           implicitWidth: root.width-5

           Keys.enabled: true

           Keys.onReturnPressed: {

               if(warnMsgInput.text === ""){

                   hintWarnIpt.open()

                   warnMsgInput.focus = false

               }

           }

       }

       Row{

           anchors.horizontalCenter: parent.horizontalCenter

           spacing: 10

           Button{//确认按钮

               id:confirmBtn

               width: btnWidth

               height: btnHeight

               text: "Confirm"

               onClicked: {

                   if(timerInputText.text === " " || warnMsgInput.text === ""){

                       hintTimeIpt.open()

                       timerInputText.focus = false

                       warnMsgInput.focus = false

                   }else{

                       countDownTex.text = timerInputText.text

                   }

               }

           }

           Button{//倒计时开始

               id:startBtn

               width: btnWidth

               height: btnHeight

               text: "Start"

           }

       }

   }

   WarnPop{

       id:hintTimeIpt

       x:root.x+root.width/3

       y:root.y

       warnText: "Please enter time!"

   }

   WarnPop{

       id:hintWarnIpt

       x:root.x+root.width/3

       y:root.y

       warnText: "Please enter Warning Message!"

   }

   Connections{

       target: hintTimeIpt.closeWarn

       onClicked:{

           hintTimeIpt.close()

       }

   }

   Connections{

       target: hintWarnIpt.closeWarn

       onClicked:{

           hintWarnIpt.close()

       }

   }

}
WarnPop.qml
import QtQuick 2.0

import QtQuick.Controls 2.2

Dialog{

    id:delDialog

    property alias warnText: warnText.text

    property alias closeWarn: confirm

    width: 120

    height: 160

    background: Rectangle{

        color: "#ECF0F1"

        anchors.fill: parent

    }

    header: Rectangle{

        width: delDialog.width

        height: 50

        border.color: "#ECF0F1"

        Image{

            width: 30

            height: 30

            anchors.centerIn: parent

            source: "qrc:/warning.png"

        }

    }

    contentItem: Rectangle{

        border.color: "#ECF0F1"

        color: "#ECF0F1"

        Text{

            id:warnText

            anchors.fill: parent

            anchors.centerIn: parent

            font.family: "Microsoft Yahei"

            text: ""

            wrapMode: Text.WordWrap

            verticalAlignment: Text.AlignVCenter

            horizontalAlignment: Text.AlignHCenter

        }

    }

    footer: Rectangle{

        width: delDialog.width

        height: 50

        border.color: "#ECF0F1"

        color: "#ECF0F1"

        Button{

            id:confirm

            width:  80

            height:  30

            anchors.centerIn: parent

            text:  "Confirm"

        }

    }

}
所用的图片是自己做的,可以在GitHub demo中找到源文件
QML学习笔记(六)- 简单计时器和定时器的更多相关文章
- Netty学习笔记(六) 简单的聊天室功能之WebSocket客户端开发实例
在之前的Netty相关学习笔记中,学习了如何去实现聊天室的服务段,这里我们来实现聊天室的客户端,聊天室的客户端使用的是Html5和WebSocket实现,下面我们继续学习. 创建客户端 接着第五个笔记 ...
- QML学习笔记(五)— 做一个简单的待做事项列表
做一个简单的QML待做事项列表,能够动态添加和删除和编辑数据 GitHub:八至 作者:狐狸家的鱼 本文链接:QML学习笔记(五)— 做一个待做事项列表 主要用到QML:ListView 效果 全部代 ...
- java之jvm学习笔记六-十二(实践写自己的安全管理器)(jar包的代码认证和签名) (实践对jar包的代码签名) (策略文件)(策略和保护域) (访问控制器) (访问控制器的栈校验机制) (jvm基本结构)
java之jvm学习笔记六(实践写自己的安全管理器) 安全管理器SecurityManager里设计的内容实在是非常的庞大,它的核心方法就是checkPerssiom这个方法里又调用 AccessCo ...
- 【opencv学习笔记六】图像的ROI区域选择与复制
图像的数据量还是比较大的,对整张图片进行处理会影响我们的处理效率,因此常常只对图像中我们需要的部分进行处理,也就是感兴趣区域ROI.今天我们来看一下如何设置图像的感兴趣区域ROI.以及对ROI区域图像 ...
- # go微服务框架kratos学习笔记六(kratos 服务发现 discovery)
目录 go微服务框架kratos学习笔记六(kratos 服务发现 discovery) http api register 服务注册 fetch 获取实例 fetchs 批量获取实例 polls 批 ...
- Spring Boot 学习笔记(六) 整合 RESTful 参数传递
Spring Boot 学习笔记 源码地址 Spring Boot 学习笔记(一) hello world Spring Boot 学习笔记(二) 整合 log4j2 Spring Boot 学习笔记 ...
- openresty 学习笔记六:使用session库
openresty 学习笔记六:使用session库 lua-resty-session 是一个面向 OpenResty 的安全和灵活的 session 库,它实现了 Secure Cookie Pr ...
- JSP学习笔记(三):简单的Tomcat Web服务器
注意:每次对Tomcat配置文件进行修改后,必须重启Tomcat 在E盘的DATA文件夹中创建TomcatDemo文件夹,并将Tomcat安装路径下的webapps/ROOT中的WEB-INF文件夹复 ...
- Learning ROS for Robotics Programming Second Edition学习笔记(六) indigo xtion pro live
中文译著已经出版,详情请参考:http://blog.csdn.net/ZhangRelay/article/category/6506865 Learning ROS for Robotics Pr ...
随机推荐
- [转帖]Windows平台卸载Oracle的办法
1.首先打开服务:选中此电脑->点击右键->选择管理->选择服务和应用程序->服务 在右边查看并停止以 oracle开头的服务(选中正在运行的以oracle开头的服务-> ...
- oracle常用函数案例
--INSTR函数 SELECT INSTR(' HELLO WORLD','H') FROM DUAL; --LTRIM RTRIM函数 SELECT LTRIM('*HELLO=','*') FR ...
- mysql [assword expired
mysql 5.6 在使用Navicat在其他机器上进行远程登录数据库时 会出现 password expired ,需要重新设置一下密码. SET PASSWORD FOR 'root'@'%' = ...
- Failed to execute goal org.apache.maven.plugins:maven-clean-plugin:2.5:clean (default-
Maven项目报错:Failed to execute goal org.apache.maven.plugins:maven-clean-plugin:2.5:clean (default-clea ...
- ps -aux返回超时的可能原因
在我的环境上出现了 ps -aux返回超时的问题. 执行到 ……root 19342 0.0 0.0 0 0 ? S< Mar12 0:00 [kworker/34:1H] 这里,然后就卡住了. ...
- Python OpenCV人脸识别案例
■环境 Python 3.6.0 Pycharm 2017.1.3 ■库.库的版本 OpenCV 3.4.1 (cp36) ■haarcascades下载 https://github.com/ope ...
- nginx worker_processes 配置
搜索到原作者的话:As a general rule you need the only worker with large number ofworker_connections, say 10,0 ...
- JMeter 连接 sql server
1.安装驱动 http://www.microsoft.com/zh-CN/download/details.aspx?id=11774 下载后解压后复制sqljdbc.jar到 “jmeter的安装 ...
- faster rcnn讲解很细
https://blog.csdn.net/bailufeiyan/article/details/50749694 https://www.cnblogs.com/dudumiaomiao/p/65 ...
- mobile deeplearning
框架: 腾讯ncnn https://github.com/Tencent/ncnn 百度mobile-deep-learning https://github.com/baidu/mobile-de ...