Keras实现CIFAR-10分类
仅仅为了学习Keras的使用,使用一个四层的全连接网络对MNIST数据集进行分类,网络模型各层结点数为:3072: : 1024 : 512:10;
使用50000张图片进行训练,10000张测试:
              precision    recall  f1-score   support

    airplane       0.61      0.69      0.65      1000

  automobile       0.69      0.67      0.68      1000

        bird       0.43      0.49      0.45      1000

         cat       0.40      0.32      0.36      1000

        dear       0.49      0.50      0.50      1000

         dog       0.45      0.48      0.47      1000

        frog       0.58      0.65      0.61      1000

       horse       0.63      0.60      0.62      1000

        ship       0.72      0.66      0.69      1000

       truck       0.63      0.58      0.60      1000

   micro avg       0.56      0.56      0.56     10000

   macro avg       0.56      0.56      0.56     10000

weighted avg       0.56      0.56      0.56     10000
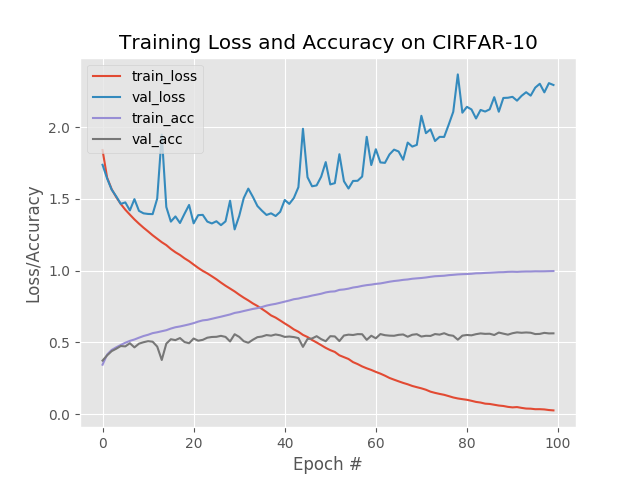
训练过程中,损失和正确率曲线:
可以看到,训练集的损失在一直降低,而测试集的损失出现大范围波动,并趋于上升,说明在一些epoch之后,出现过拟合;
训练集的正确率也在一直上升,并接近100%;而测试集的正确率达到50%就趋于平稳了;
代码:
#!/usr/bin/env python

# -*- coding: utf-8 -*-

# @Time : 19-5-9

"""

implement classification for CIFAR-10 with Keras

"""

__author__ = 'Zhen Chen'

# import the necessary packages

from sklearn.preprocessing import LabelBinarizer

from sklearn.metrics import classification_report

from keras.models import Sequential

from keras.layers import Dense

from keras.optimizers import SGD

from keras.datasets import cifar10

import matplotlib.pyplot as plt

import numpy as np

import argparse

# construct the argument parse and parse the arguments

parser = argparse.ArgumentParser()

parser.add_argument("-o", "--output", default="./Training Loss and Accuracy_CIFAR10.png")

args = parser.parse_args()

# load the training and testing data, scale it into the range [0, 1],

# then reshape the design matrix

print("[INFO] loading CIFAR-10 data...")

((trainX, trainY), (testX, testY)) = cifar10.load_data()

trainX = trainX.astype("float") / 255.0

testX = testX.astype("float") / 255.0

trainX = trainX.reshape((trainX.shape[0], 3072))

testX = testX.reshape((testX.shape[0], 3072))

# convert the labels from integers to vectors

lb = LabelBinarizer()

trainY = lb.fit_transform(trainY)

testY = lb.fit_transform(testY)

# initialize the label names for the CIFAR-10 dataset

labelNames = ["airplane", "automobile", "bird", "cat", "dear", "dog", "frog", "horse", "ship", "truck"]

# define the 2072-1024-512-10 architecture Keras

model = Sequential()

model.add(Dense(1024, input_shape=(3072,), activation="relu"))

model.add(Dense(512, activation="relu"))

model.add(Dense(10, activation="softmax"))

# train the model using SGD

print("[INFO] training network...")

sgd = SGD(0.01)

model.compile(loss="categorical_crossentropy", optimizer=sgd, metrics=["accuracy"])

H = model.fit(trainX, trainY, validation_data=(testX, testY), epochs=100, batch_size=32)

model.save_weights('SGD_100_32.h5')

# evaluate the network

print("[INFO] evaluating network...")

predictions = model.predict(testX, batch_size=32)

print(classification_report(testY.argmax(axis=1), predictions.argmax(axis=1), target_names=labelNames))

# plot the training losss and accuracy

plt.style.use("ggplot")

plt.figure()

plt.plot(np.arange(0, 100), H.history["loss"], label="train_loss")

plt.plot(np.arange(0, 100), H.history["val_loss"], label="val_loss")

plt.plot(np.arange(0, 100), H.history["acc"], label="train_acc")

plt.plot(np.arange(0, 100), H.history["val_acc"], label="val_acc")

plt.title("Training Loss and Accuracy on CIRFAR-10")

plt.xlabel("Epoch #")

plt.ylabel("Loss/Accuracy")

plt.legend()

plt.savefig(args.output)
Keras实现CIFAR-10分类的更多相关文章
- DL Practice:Cifar 10分类
Step 1:数据加载和处理 一般使用深度学习框架会经过下面几个流程: 模型定义(包括损失函数的选择)——>数据处理和加载——>训练(可能包括训练过程可视化)——>测试 所以自己写代 ...
- keras系列︱图像多分类训练与利用bottleneck features进行微调(三)
引自:http://blog.csdn.net/sinat_26917383/article/details/72861152 中文文档:http://keras-cn.readthedocs.io/ ...
- 【翻译】TensorFlow卷积神经网络识别CIFAR 10Convolutional Neural Network (CNN)| CIFAR 10 TensorFlow
原网址:https://data-flair.training/blogs/cnn-tensorflow-cifar-10/ by DataFlair Team · Published May 21, ...
- keras系列︱人脸表情分类与识别:opencv人脸检测+Keras情绪分类(四)
引自:http://blog.csdn.net/sinat_26917383/article/details/72885715 人脸识别热门,表情识别更加.但是表情识别很难,因为人脸的微表情很多,本节 ...
- [深度应用]·Keras实现Self-Attention文本分类(机器如何读懂人心)
[深度应用]·Keras实现Self-Attention文本分类(机器如何读懂人心) 配合阅读: [深度概念]·Attention机制概念学习笔记 [TensorFlow深度学习深入]实战三·分别使用 ...
- 【Python与机器学习】:利用Keras进行多类分类
多类分类问题本质上可以分解为多个二分类问题,而解决二分类问题的方法有很多.这里我们利用Keras机器学习框架中的ANN(artificial neural network)来解决多分类问题.这里我们采 ...
- Keras人工神经网络多分类(SGD)
import numpy as np import pandas as pd from keras.models import Sequential from keras.layers import ...
- keras 的svm做分类
SVC继承了父类BaseSVC SVC类主要方法: ★__init__() 主要参数: C: float参数 默认值为1.0 错误项的惩罚系数.C越大,即对分错样本的惩罚程度越大,因此在训练样本中准确 ...
- 【神经网络与深度学习】基于Windows+Caffe的Minst和CIFAR—10训练过程说明
Minst训练 我的路径:G:\Caffe\Caffe For Windows\examples\mnist 对于新手来说,初步完成环境的配置后,一脸茫然.不知如何跑Demo,有么有!那么接下来的教 ...
- keras调用预训练模型分类
在网上看到一篇博客,地址https://www.pyimagesearch.com/2017/03/20/imagenet-vggnet-resnet-inception-xception-keras ...
随机推荐
- gradle 添加依赖
files 添加libs下的 project 添加一个module compile 去下载一个
- ruby 正则表达式
Ruby学习笔记-正则表达式 Posted on 2011-11-29 17:55 Glen He 阅读(4998) 评论(0) 编辑 收藏 1.创建正则表达式 a) reg1 = /^[a-z]*$ ...
- linux 下 cat
[root@localhost Data]# cat << end > iptable> 3> 4> 5> > 6> end[root@local ...
- HBase存储方案设计
需求描述 将数据记录持久化存储在HBase中,需要支持如下功能: 支持高吞吐量读写操作,实时采集10,000条/秒: 支持动态添加字段: 支持服务端过滤: 支持部分字段修改. 设计方案 按列存储 优点 ...
- 各种 Spring-Boot-Starters系列 介绍
分类: JavaWeb后端(6) 目录(?)[+] 原文传送门:Spring Boot application starters ↑传送门里有各Spring-Boot-Starters ...
- American Heritage usaco
基础题,主要思路是找到根,然后分别递归即可: #include<iostream> #include<cstring> #include<string> #incl ...
- php 获取上上个月数据 使用 strtotime('-1 months')的一个bug
今天,使用php 日期函数处理数据,发现一个问题. 具体场景是这样的,我一直以为strtotime 格式化当前日期 或 指定日期可以找到对应的数据,比如我要查找上上个与的数据,因为我要获取当前时间的 ...
- springboot简单介绍
1.springboot简单介绍 微服务架构 Spring Boot 是由 Pivotal 团队提供的全新框架,其设计目的是用来简化新 Spring 应用的初始搭建以及开发过程. 该框架使用了特定的方 ...
- 分享知识-快乐自己:微服务的注册与发现(基于Eureka)
1):微服务架构 服务提供者.服务消费者.服务发现组件这三者之间的关系: 各个微服务在启动时,将自己的网络地址等信息注册到服务发现组件中,服务发现组件会存储这些信息. 服务消费者可从服务发现组件查询服 ...
- 发现eclipse红叉,查看markers发现Target runtime Apache Tomcat v8.0 is not defined
导入以前的项目(Markers中注意查看,就在console选项卡旁边),报以下错误,但不影响操作: Faceted Project Problem Target runtime Apa ...