Spring 4.x (一)
1 Spring是什么?
- Spring是一个开源框架
- Spring是为简化企业级应用开发而生的,使用Spring可以使得简单的JavaBean能够实现以前只有EJB才能实现的功能。
- Spring是一个IOC(DI)和AOP的容器。
- Spring的特点:
- 轻量级:Spring是非侵入性的。基于Spring开发的应用中对象可以不依赖Spring的API。
- 依赖注入
- 面向切面编程
- 容器:Spring是一个容器,因为它包含并且管理应用搞对象的生命周期。
- 框架:Spring实现了使用简单的组件配置组合成一个复杂的应用在Spring中可以使用xml和java朱姐组合这些对象。
- 一站式:在IOC和AOP的基础上可以整合各种企业应用的开源框架和优秀的第三方类库(Spring自身也提供了展现层的Spring MVC 和持久层的Spring JDBC)。
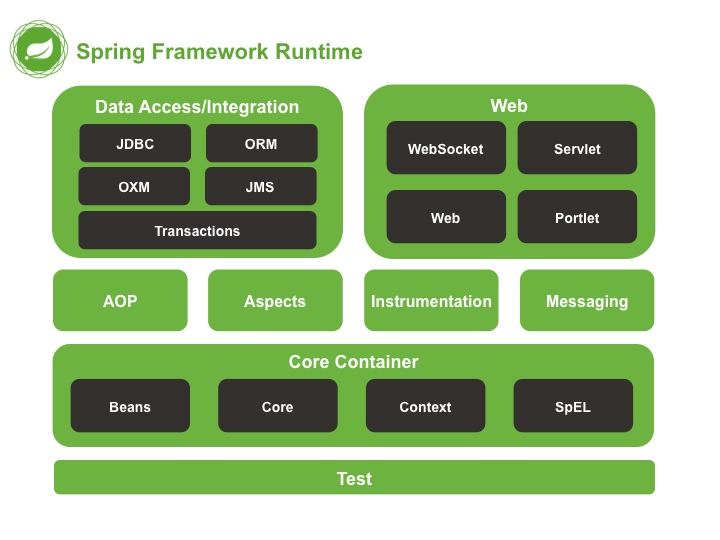
2 Spring的模块
3 传统的HelloWorld VS Spring的HelloWorld
- 传统式HelloWorld
- HelloWorld.java
package com.xuweiwei;

public class HelloWorld {
    private String name;

    public void setName(String name) {
        this.name = name;
    }

    public void hello(){
        System.out.println("你好:"+name);
    }
}
- HelloWorldTest.java
    @Test
    public void testHello(){
        HelloWorld helloWorld = new HelloWorld();
        helloWorld.setName("许威威");
        helloWorld.hello();

    }
- Spring式的HelloWorld
- HelloWorld.java
package com.xuweiwei;

public class HelloWorld {
    private String name;

    public void setName(String name) {
        this.name = name;
    }

    public void hello(){
        System.out.println("你好:"+name);
    }
}
- applicationContext.xml
<?xml version="1.0" encoding="UTF-8"?>
<beans xmlns="http://www.springframework.org/schema/beans"
       xmlns:xsi="http://www.w3.org/2001/XMLSchema-instance"
       xmlns:context="http://www.springframework.org/schema/context"
       xsi:schemaLocation="http://www.springframework.org/schema/beans http://www.springframework.org/schema/beans/spring-beans.xsd
       http://www.springframework.org/schema/context http://www.springframework.org/schema/context/spring-context-4.3.xsd">

    <bean id="helloWorld" class="com.xuweiwei.HelloWorld">
        <property name="name" value="许威威"/>
    </bean>

</beans>
- HelloWorldTest.java
    @Test
    public void testSpring(){
        //启动Spring容器
        ApplicationContext context = new ClassPathXmlApplicationContext("applicationContext.xml");
        HelloWorld helloWorld = (HelloWorld) context.getBean("helloWorld");
        helloWorld.hello();
    }
4 IOC和DI
- IOC:控制反转,反转资源获取的方向。其实,就是将创建对象的方式交给Spring。
- class A{} class B{ private A a; public void setA(A a){ this.a = a; } }
- 传统方式:组件向容器发送请求查找资源,作为回应,容器将返回资源。
A a = new A();
B b = new B();
b.setA(a);
- IOC方式:容器主动的将资源推送给它所管理的组件,组件所需要做的仅仅是选择一种合适的方式接受资源。
B b = (B)applicationContext.getBean("b");
- DI:依赖注入,组件以一些预先定义好的方式接受来自容器的资源注入。比如setter方法或构造方法等。
5 Spring容器
- 在Spring的IOC容器读取Bean配置创建Bean实例之前,必须对它进行实例化。只有在容器实例化之后,才可以从IOC容器中获取Bean实例使用。
- Spring提供了两种类型的IOC容器
- BeanFactory:IOC容器的基本实现。
- ApplicationContext:提供更多的高级特性,是BeanFactory的子类。
5.1 ApplicationContext
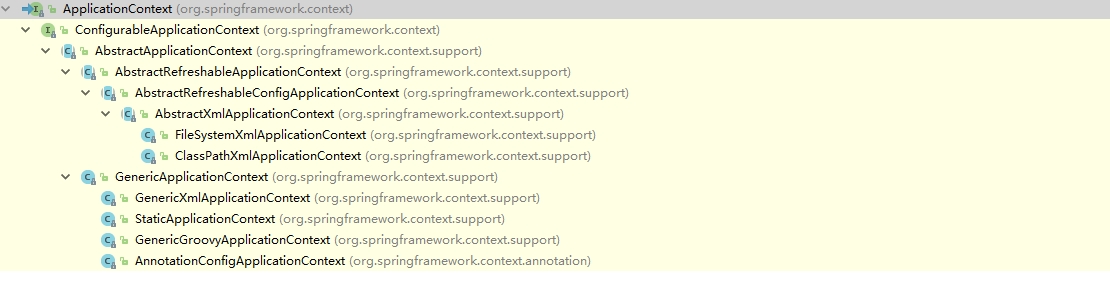
- ApplicationContext的两个主要实现类如下:
- FileSystemXmlApplicationContext:从文件系统中加载配置文件
- ClassPathXmlApplicationContext:从类路径下加载配置文件。
- ApplicationContext在初始化的上下文的时候就创建所有的单例Bean。
- WebApplicationContext是专门为WEB应用而准备的,它允许从相对于WEB根目录的路径中完成初始化。
6 配置Bean---基于XML方式
- 在xml文件中通过bean节点来配置bean
  <bean id="helloWorld" class="com.xuweiwei.HelloWorld">
        <property name="name" value="许威威"/>
    </bean>
- 在IOC容器中,id必须是唯一的,如果没有指定id,那么Spring容器会自动的将类名首字母小写作为Bean的id值。
- 依赖注入的方式:
- 属性注入
package com.xuweiwei;

public class HelloWorld {
    private String name;

    public void setName(String name) {
        this.name = name;
    }

    public void hello(){
        System.out.println("你好:"+name);
    }
}
<?xml version="1.0" encoding="UTF-8"?>
<beans xmlns="http://www.springframework.org/schema/beans"
       xmlns:xsi="http://www.w3.org/2001/XMLSchema-instance"
       xmlns:context="http://www.springframework.org/schema/context"
       xsi:schemaLocation="http://www.springframework.org/schema/beans http://www.springframework.org/schema/beans/spring-beans.xsd
       http://www.springframework.org/schema/context http://www.springframework.org/schema/context/spring-context-4.3.xsd">

    <bean id="helloWorld" class="com.xuweiwei.HelloWorld">
        <property name="name" value="许威威"/>
    </bean>

</beans>
   @Test
    public void testSpring(){
        //启动Spring容器
        ApplicationContext context = new ClassPathXmlApplicationContext("applicationContext.xml");
        HelloWorld helloWorld = (HelloWorld) context.getBean("helloWorld");
        helloWorld.hello();
    }
- 构造方法注入
package com.xuweiwei;

public class HelloWorld {
    private String name;

    public HelloWorld(){

    }
    public HelloWorld(String name){
        this.name = name;
    }

    public void setName(String name) {
        this.name = name;
    }

    public void hello(){
        System.out.println("你好:"+name);
    }
}
<?xml version="1.0" encoding="UTF-8"?>
<beans xmlns="http://www.springframework.org/schema/beans"
       xmlns:xsi="http://www.w3.org/2001/XMLSchema-instance"
       xmlns:context="http://www.springframework.org/schema/context"
       xsi:schemaLocation="http://www.springframework.org/schema/beans http://www.springframework.org/schema/beans/spring-beans.xsd
       http://www.springframework.org/schema/context http://www.springframework.org/schema/context/spring-context-4.3.xsd">

    <bean id="helloWorld" class="com.xuweiwei.HelloWorld">
        <constructor-arg index="0" value="许威威" type="java.lang.String"/>
    </bean>

</beans>
   @Test
    public void testSpring(){
        //启动Spring容器
        ApplicationContext context = new ClassPathXmlApplicationContext("applicationContext.xml");
        HelloWorld helloWorld = (HelloWorld) context.getBean("helloWorld");
        helloWorld.hello();
    }
- 工厂方法注入,很少使用
package com.xuweiwei;

public class HelloWorld {
    private String name;

    public HelloWorld(){

    }
    public HelloWorld(String name){
        this.name = name;
    }

    public void setName(String name) {
        this.name = name;
    }

    public void hello(){
        System.out.println("你好:"+name);
    }
}
package com.xuweiwei;

public class HelloWorldFactory {

    public static HelloWorld getInstance(){
        HelloWorld helloWorld = new HelloWorld();
        helloWorld.setName("许威威");
        return helloWorld;
    }
}
<?xml version="1.0" encoding="UTF-8"?>
<beans xmlns="http://www.springframework.org/schema/beans"
       xmlns:xsi="http://www.w3.org/2001/XMLSchema-instance"
       xmlns:context="http://www.springframework.org/schema/context"
       xsi:schemaLocation="http://www.springframework.org/schema/beans http://www.springframework.org/schema/beans/spring-beans.xsd
       http://www.springframework.org/schema/context http://www.springframework.org/schema/context/spring-context-4.3.xsd">

    <bean id="helloWorld" factory-method="getInstance" class="com.xuweiwei.HelloWorldFactory" ></bean>

</beans>
   @Test
    public void testSpring(){
        //启动Spring容器
        ApplicationContext context = new ClassPathXmlApplicationContext("applicationContext.xml");
        HelloWorld helloWorld = (HelloWorld) context.getBean("helloWorld");
        helloWorld.hello();
    }
- 实例工厂(很少使用)
package com.xuweiwei;

public class HelloWorld {
    private String name;

    public HelloWorld(){

    }
    public HelloWorld(String name){
        this.name = name;
    }

    public void setName(String name) {
        this.name = name;
    }

    public void hello(){
        System.out.println("你好:"+name);
    }
}
package com.xuweiwei;

public class HelloWorldNewInstanceFactory {

    public HelloWorld helloWorld(){
        HelloWorld helloWorld = new HelloWorld();
        helloWorld.setName("许威威");
        return helloWorld;
    }

}
<?xml version="1.0" encoding="UTF-8"?>
<beans xmlns="http://www.springframework.org/schema/beans"
       xmlns:xsi="http://www.w3.org/2001/XMLSchema-instance"
       xmlns:context="http://www.springframework.org/schema/context"
       xsi:schemaLocation="http://www.springframework.org/schema/beans http://www.springframework.org/schema/beans/spring-beans.xsd
       http://www.springframework.org/schema/context http://www.springframework.org/schema/context/spring-context-4.3.xsd">

    <bean id="helloWorldNewInstanceFactory" class="com.xuweiwei.HelloWorldNewInstanceFactory"></bean>

    <bean id="helloWorld" factory-bean="helloWorldNewInstanceFactory" factory-method="helloWorld"></bean>

</beans>
    @Test
    public void testSpring(){
        //启动Spring容器
        ApplicationContext context = new ClassPathXmlApplicationContext("applicationContext.xml");
        HelloWorld helloWorld = (HelloWorld) context.getBean("helloWorld");
        helloWorld.hello();
    }
- 属性注入的示例:
- 引用类型的注入:比如主人和猫
package com.xuweiwei;
//猫
public class Cat {
    private String name;

    public String getName() {
        return name;
    }

    public void setName(String name) {
        this.name = name;
    }
}
package com.xuweiwei;
//主人
public class Master {
    private String name;
    private Cat cat ;

    public String getName() {
        return name;
    }

    public void setName(String name) {
        this.name = name;
    }

    public Cat getCat() {
        return cat;
    }

    public void setCat(Cat cat) {
        this.cat = cat;
    }
}
<?xml version="1.0" encoding="UTF-8"?>
<beans xmlns="http://www.springframework.org/schema/beans"
       xmlns:xsi="http://www.w3.org/2001/XMLSchema-instance"
       xmlns:context="http://www.springframework.org/schema/context"
       xsi:schemaLocation="http://www.springframework.org/schema/beans http://www.springframework.org/schema/beans/spring-beans.xsd
       http://www.springframework.org/schema/context http://www.springframework.org/schema/context/spring-context-4.3.xsd">

    <!-- 创建猫的bean -->
    <bean id="cat" class="com.xuweiwei.Cat">
        <property name="name" value="helloKetty"/>
    </bean>

    <!-- 创建主人的bean -->
    <bean id="master" class="com.xuweiwei.Master">
        <property name="name" value="许威威"/>
        <property name="cat" ref="cat"/>
    </bean>

</beans>
    @Test
    public void testSpring(){
        //启动Spring容器
        ApplicationContext context = new ClassPathXmlApplicationContext("applicationContext.xml");
        Master master = (Master) context.getBean("master");
        System.out.println("猫的名称是:"+master.getCat().getName());
        System.out.println("猫的主人的名称是:"+master.getName());

    }
- 其它类型的注入:比如数组,Map等
package com.xuweiwei;

import java.util.*;

public class Person {
    private Integer id;
    private String name;
    private Integer[] nums;
    private List<String> list;
    private Set<String> set;
    private Map<String,Integer> map;
    private Properties properties;

    public Integer getId() {
        return id;
    }

    public void setId(Integer id) {
        this.id = id;
    }

    public String getName() {
        return name;
    }

    public void setName(String name) {
        this.name = name;
    }

    public Integer[] getNums() {
        return nums;
    }

    public void setNums(Integer[] nums) {
        this.nums = nums;
    }

    public List<String> getList() {
        return list;
    }

    public void setList(List<String> list) {
        this.list = list;
    }

    public Set<String> getSet() {
        return set;
    }

    public void setSet(Set<String> set) {
        this.set = set;
    }

    public Map<String, Integer> getMap() {
        return map;
    }

    public void setMap(Map<String, Integer> map) {
        this.map = map;
    }

    public Properties getProperties() {
        return properties;
    }

    public void setProperties(Properties properties) {
        this.properties = properties;
    }

    @Override
    public String toString() {
        return "Person{" +
                "id=" + id +
                ", name='" + name + '\'' +
                ", nums=" + Arrays.toString(nums) +
                ", list=" + list +
                ", set=" + set +
                ", map=" + map +
                ", properties=" + properties +
                '}';
    }
}
<?xml version="1.0" encoding="UTF-8"?>
<beans xmlns="http://www.springframework.org/schema/beans"
       xmlns:xsi="http://www.w3.org/2001/XMLSchema-instance"
       xmlns:context="http://www.springframework.org/schema/context"
       xsi:schemaLocation="http://www.springframework.org/schema/beans http://www.springframework.org/schema/beans/spring-beans.xsd
       http://www.springframework.org/schema/context http://www.springframework.org/schema/context/spring-context-4.3.xsd">

    <bean id="person" class="com.xuweiwei.Person">
        <property name="id" value="1"/>
        <property name="name">
            <value>许威威</value>
        </property>
        <property name="nums">
            <array>
                <value>1</value>
                <value>2</value>
                <value>3</value>
            </array>
        </property>
        <property name="list">
            <list>
                <value>哈哈</value>
                <value>呵呵</value>
            </list>
        </property>
        <property name="set">
            <set>
                <value>嘻嘻</value>
                <value>笨笨</value>
            </set>
        </property>
        <property name="map">
            <map >
                <entry key="许威威" value="1"></entry>
                <entry key="王伟" value="2"></entry>
            </map>
        </property>
        <property name="properties">
            <props >
                <prop key="helloWorld">你好世界</prop>
                <prop key="what">什么鬼?</prop>
            </props>
        </property>
    </bean>

</beans>
    @Test
    public void testSpring(){
        //启动Spring容器
        ApplicationContext context = new ClassPathXmlApplicationContext("applicationContext.xml");
        Person person = (Person) context.getBean("person");
        System.out.println(person);

    }
7 Bean的配置---基于注解
- 使用注解自动注入(DI)
package com.xuweiwei;

//猫
public class Cat {

    private String name;

    public String getName() {
        return name;
    }

    public void setName(String name) {
        this.name = name;
    }

    @Override
    public String toString() {
        return "Cat{" +
                "name='" + name + '\'' +
                '}';
    }
}
package com.xuweiwei;

import javax.annotation.Resource;

//主人
public class Master {
    private String name;
    @Resource(name = "cat")
    private Cat cat ;

    public String getName() {
        return name;
    }

    public void setName(String name) {
        this.name = name;
    }

    public Cat getCat() {
        return cat;
    }

    public void setCat(Cat cat) {
        this.cat = cat;
    }

    @Override
    public String toString() {
        return "Master{" +
                "name='" + name + '\'' +
                ", cat=" + cat +
                '}';
    }
}
<?xml version="1.0" encoding="UTF-8"?>
<beans xmlns="http://www.springframework.org/schema/beans"
       xmlns:xsi="http://www.w3.org/2001/XMLSchema-instance"
       xmlns:context="http://www.springframework.org/schema/context"
       xsi:schemaLocation="http://www.springframework.org/schema/beans http://www.springframework.org/schema/beans/spring-beans.xsd
       http://www.springframework.org/schema/context http://www.springframework.org/schema/context/spring-context-4.3.xsd">
    <!--
        配置注解
    -->
    <context:annotation-config></context:annotation-config>

    <bean id="cat" class="com.xuweiwei.Cat">
        <property name="name" value="helloketty"></property>
    </bean>

    <bean id="master" class="com.xuweiwei.Master">
        <property name="name" value="许威威"/>
    </bean>

</beans>
    @Test
    public void testSpring(){
        //启动Spring容器
        ApplicationContext context = new ClassPathXmlApplicationContext("applicationContext.xml");
        Master master = (Master) context.getBean("master");
        System.out.println(master);

    }
- 【注意】:@Resource是用来注入Bean,并且是根据bean的名称
- 使用@AutoWired和@Qualifier注解进行注入
package com.xuweiwei;

import org.springframework.beans.factory.annotation.Qualifier;

import javax.annotation.Resource;

//猫
public class Cat {

    private String name;

    public String getName() {
        return name;
    }
    @Qualifier("hello ketty")
    public void setName(String name) {
        this.name = name;
    }

    @Override
    public String toString() {
        return "Cat{" +
                "name='" + name + '\'' +
                '}';
    }
}
package com.xuweiwei;

import org.springframework.beans.factory.annotation.Autowired;
import org.springframework.beans.factory.annotation.Qualifier;

import javax.annotation.Resource;

//主人
public class Master {
    private String name;
    @Autowired
    @Qualifier("cat")
    private Cat cat ;

    public String getName() {
        return name;
    }

    public void setName(String name) {
        this.name = name;
    }

    public Cat getCat() {
        return cat;
    }

    public void setCat(Cat cat) {
        this.cat = cat;
    }

    @Override
    public String toString() {
        return "Master{" +
                "name='" + name + '\'' +
                ", cat=" + cat +
                '}';
    }
}
<?xml version="1.0" encoding="UTF-8"?>
<beans xmlns="http://www.springframework.org/schema/beans"
       xmlns:xsi="http://www.w3.org/2001/XMLSchema-instance"
       xmlns:context="http://www.springframework.org/schema/context"
       xsi:schemaLocation="http://www.springframework.org/schema/beans http://www.springframework.org/schema/beans/spring-beans.xsd
       http://www.springframework.org/schema/context http://www.springframework.org/schema/context/spring-context-4.3.xsd">
    <!--
        配置注解
    -->
    <context:annotation-config></context:annotation-config>

    <bean id="cat" class="com.xuweiwei.Cat">
        <property name="name" value="helloketty"/>
    </bean>

    <bean id="master" class="com.xuweiwei.Master">
        <property name="name" value="许威威"/>
    </bean>

</beans>
    @Test
    public void testSpring(){
        //启动Spring容器
        ApplicationContext context = new ClassPathXmlApplicationContext("applicationContext.xml");
        Master master = (Master) context.getBean("master");
        System.out.println(master);

    }
- 使用注解进行IOC和DI
package com.xuweiwei;

import org.springframework.stereotype.Component;

//猫
@Component("cat")
public class Cat {

    private String name ="hello ketty";

    @Override
    public String toString() {
        return "Cat{" +
                "name='" + name + '\'' +
                '}';
    }
}
package com.xuweiwei;

import org.springframework.beans.factory.annotation.Autowired;
import org.springframework.beans.factory.annotation.Qualifier;
import org.springframework.stereotype.Component;

//主人
@Component("master")
public class Master {
    private String name = "许威威";
    @Autowired
    @Qualifier("cat")
    private Cat cat ;

    public Cat getCat() {
        return cat;
    }

    public void setCat(Cat cat) {
        this.cat = cat;
    }

    @Override
    public String toString() {
        return "Master{" +
                "name='" + name + '\'' +
                ", cat=" + cat +
                '}';
    }
}
<?xml version="1.0" encoding="UTF-8"?>
<beans xmlns="http://www.springframework.org/schema/beans"
       xmlns:xsi="http://www.w3.org/2001/XMLSchema-instance"
       xmlns:context="http://www.springframework.org/schema/context"
       xsi:schemaLocation="http://www.springframework.org/schema/beans http://www.springframework.org/schema/beans/spring-beans.xsd
       http://www.springframework.org/schema/context http://www.springframework.org/schema/context/spring-context-4.3.xsd">

    <!--
        此注解会自动扫描包下的所有类,并为@Component注解的类自动创建对象

    -->

    <context:component-scan base-package="com.xuweiwei"/>

</beans>
    @Test
    public void testSpring(){
        //启动Spring容器
        ApplicationContext context = new ClassPathXmlApplicationContext("applicationContext.xml");
        Master master = (Master) context.getBean("master");
        System.out.println(master);

    }
8 软件三层开发--基于XML
- 实体类:Person.java
package com.xuweiwei.vo;

public class Person {
    private Integer id;
    private String name;

    public Integer getId() {
        return id;
    }

    public void setId(Integer id) {
        this.id = id;
    }

    public String getName() {
        return name;
    }

    public void setName(String name) {
        this.name = name;
    }
}
- DAO层:
- PersonDAO.java
package com.xuweiwei.dao;

import com.xuweiwei.vo.Person;

public interface PersonDAO {

    public void insertPersonInfo(Person person);
}
- PersonDAOImpl.java
package com.xuweiwei.dao.impl;

import com.xuweiwei.dao.PersonDAO;
import com.xuweiwei.vo.Person;

public class PersonDAOImpl implements PersonDAO {

    @Override
    public void insertPersonInfo(Person person) {
        System.out.println("保存个人信息");
    }
}
- Service层
- PersonService
package com.xuweiwei.service;

import com.xuweiwei.vo.Person;

public interface PersonService {

    public void savePersonInfo(Person person);
}
- PersonServiceImpl
package com.xuweiwei.service.impl;

import com.xuweiwei.dao.PersonDAO;
import com.xuweiwei.service.PersonService;
import com.xuweiwei.vo.Person;

public class PersonServiceImpl implements PersonService {

    private PersonDAO personDAO;

    public PersonDAO getPersonDAO() {
        return personDAO;
    }

    public void setPersonDAO(PersonDAO personDAO) {
        this.personDAO = personDAO;
    }

    @Override
    public void savePersonInfo(Person person) {
        personDAO.insertPersonInfo(person);
    }
}
- action层:PersonAction
package com.xuweiwei.action;

import com.xuweiwei.service.PersonService;
import com.xuweiwei.vo.Person;

public class PersonAction {

    private PersonService personService;

    public PersonService getPersonService() {
        return personService;
    }

    public void setPersonService(PersonService personService) {
        this.personService = personService;
    }

    public void add(){
        Person p  = new Person();
        personService.savePersonInfo(p);

    }
}
- applicationContext.xml
<?xml version="1.0" encoding="UTF-8"?>
<beans xmlns="http://www.springframework.org/schema/beans"
       xmlns:xsi="http://www.w3.org/2001/XMLSchema-instance"
       xmlns:context="http://www.springframework.org/schema/context"
       xsi:schemaLocation="http://www.springframework.org/schema/beans http://www.springframework.org/schema/beans/spring-beans.xsd
       http://www.springframework.org/schema/context http://www.springframework.org/schema/context/spring-context-4.3.xsd">

    <bean id="personDAO" class="com.xuweiwei.dao.impl.PersonDAOImpl"></bean>

    <bean id="personService" class="com.xuweiwei.service.impl.PersonServiceImpl">
        <property name="personDAO" ref="personDAO"/>
    </bean>

    <bean id="personAction" class="com.xuweiwei.action.PersonAction">
        <property name="personService" ref="personService"/>
    </bean>

</beans>
- 测试
package com.xuweiwei.test;

import com.xuweiwei.action.PersonAction;
import org.junit.Test;
import org.springframework.context.ApplicationContext;
import org.springframework.context.support.ClassPathXmlApplicationContext;

public class TestSave {

    @Test
    public void test(){
        ApplicationContext context = new ClassPathXmlApplicationContext("applicationContext.xml");
        PersonAction personAction = (PersonAction) context.getBean("personAction");
        personAction.add();
    }

}
9 软件三层开发---基于注解
- 实体类:Person.java
package com.xuweiwei.vo;

public class Person {
    private Integer id;
    private String name;

    public Integer getId() {
        return id;
    }

    public void setId(Integer id) {
        this.id = id;
    }

    public String getName() {
        return name;
    }

    public void setName(String name) {
        this.name = name;
    }
}
- DAO层
- PersonDAO
package com.xuweiwei.dao;

import com.xuweiwei.vo.Person;

public interface PersonDAO {

    public void insertPersonInfo(Person person);
}
- PersonDAOImpl
package com.xuweiwei.dao.impl;

import com.xuweiwei.dao.PersonDAO;
import com.xuweiwei.vo.Person;
import org.springframework.stereotype.Repository;

@Repository("personDAO")
public class PersonDAOImpl implements PersonDAO {

    @Override
    public void insertPersonInfo(Person person) {
        System.out.println("保存个人信息");
    }
}
- Service层
- PersonService
package com.xuweiwei.service;

import com.xuweiwei.vo.Person;

public interface PersonService {

    public void savePersonInfo(Person person);
}
- PersonServiceImpl
package com.xuweiwei.service.impl;

import com.xuweiwei.dao.PersonDAO;
import com.xuweiwei.service.PersonService;
import com.xuweiwei.vo.Person;
import org.springframework.stereotype.Service;

import javax.annotation.Resource;

@Service("personService")
public class PersonServiceImpl implements PersonService {

    @Resource(name = "personDAO")
    private PersonDAO personDAO;

    @Override
    public void savePersonInfo(Person person) {
        personDAO.insertPersonInfo(person);
    }
}
- action层:PersonAction
package com.xuweiwei.action;

import com.xuweiwei.service.PersonService;
import com.xuweiwei.vo.Person;
import org.springframework.stereotype.Controller;

import javax.annotation.Resource;

@Controller("personAction")
public class PersonAction {

    @Resource(name="personService")
    private PersonService personService;

    public void add(){
        Person p  = new Person();
        personService.savePersonInfo(p);

    }
}
- applicationContext.xml
<?xml version="1.0" encoding="UTF-8"?>
<beans xmlns="http://www.springframework.org/schema/beans"
       xmlns:xsi="http://www.w3.org/2001/XMLSchema-instance"
       xmlns:context="http://www.springframework.org/schema/context"
       xsi:schemaLocation="http://www.springframework.org/schema/beans http://www.springframework.org/schema/beans/spring-beans.xsd
       http://www.springframework.org/schema/context http://www.springframework.org/schema/context/spring-context-4.3.xsd">

    <context:component-scan base-package="com.xuweiwei"/>

</beans>
- 测试
    @Test
    public void test(){
        ApplicationContext context = new ClassPathXmlApplicationContext("applicationContext.xml");
        PersonAction personAction = (PersonAction) context.getBean("personAction");
        personAction.add();
    }
Spring 4.x (一)的更多相关文章
- 基于spring注解AOP的异常处理
一.前言 项目刚刚开发的时候,并没有做好充足的准备.开发到一定程度的时候才会想到还有一些问题没有解决.就比如今天我要说的一个问题:异常的处理.写程序的时候一般都会通过try...catch...fin ...
- 玩转spring boot——快速开始
开发环境: IED环境:Eclipse JDK版本:1.8 maven版本:3.3.9 一.创建一个spring boot的mcv web应用程序 打开Eclipse,新建Maven项目 选择quic ...
- Spring基于AOP的事务管理
Spring基于AOP的事务管理 事务 事务是一系列动作,这一系列动作综合在一起组成一个完整的工作单元,如果有任何一个动作执行失败,那么事务 ...
- [Spring]IoC容器之进击的注解
先啰嗦两句: 第一次在博客园使用markdown编辑,感觉渲染样式差强人意,还是github的样式比较顺眼. 概述 Spring2.5 引入了注解. 于是,一个问题产生了:使用注解方式注入 JavaB ...
- 学习AOP之透过Spring的Ioc理解Advisor
花了几天时间来学习Spring,突然明白一个问题,就是看书不能让人理解Spring,一方面要结合使用场景,另一方面要阅读源代码,这种方式理解起来事半功倍.那看书有什么用呢?主要还是扩展视野,毕竟书是别 ...
- 学习AOP之深入一点Spring Aop
上一篇<学习AOP之认识一下SpringAOP>中大体的了解了代理.动态代理及SpringAop的知识.因为写的篇幅长了点所以还是再写一篇吧.接下来开始深入一点Spring aop的一些实 ...
- 学习AOP之认识一下Spring AOP
心碎之事 要说知道AOP这个词倒是很久很久以前了,但是直到今天我也不敢说非常的理解它,其中的各种概念即抽象又太拗口. 在几次面试中都被问及AOP,但是真的没有答上来,或者都在面上,这给面试官的感觉就是 ...
- 为什么做java的web开发我们会使用struts2,springMVC和spring这样的框架?
今年我一直在思考web开发里的前后端分离的问题,到了现在也颇有点心得了,随着这个问题的深入,再加以现在公司很多web项目的控制层的技术框架由struts2迁移到springMVC,我突然有了一个新的疑 ...
- Spring之旅(2)
Spring简化Java的下一个理念:基于切面的声明式编程 3.应用切面 依赖注入的目的是让相互协作的组件保持松散耦合:而AOP编程允许你把遍布应用各处的功能分离出来形成可重用的组件. AOP面向切面 ...
- Spring之旅
Java使得以模块化构建复杂应用系统成为可能,它为Applet而来,但为组件化而留. Spring是一个开源的框架,最早由Rod Johnson创建.Spring是为了解决企业级应用开发的复杂性而创建 ...
随机推荐
- (1综述)从零开始的嵌入式图像图像处理(PI+QT+OpenCV)实战演练
从零开始的嵌入式图像图像处理(PI+QT+OpenCV)实战演练 1综述http://www.cnblogs.com/jsxyhelu/p/7907241.html2环境架设http://www.cn ...
- mongodb 的基本函数语法封装
//这个模块里面封装了所有对数据库的常用操作 var MongoClient = require('mongodb').MongoClient; var config = require(" ...
- 数据结构-堆(应用篇)之堆排序法-C和C++的实现
堆排序 关于堆的内容我们已经在上一节中了解了,本节中将给出一个堆的应用-堆排序. 关于堆的概念可以看上一节,入口:http://www.cnblogs.com/HongYi-Liang/p/78536 ...
- python爬虫之requests模块介绍
介绍 #介绍:使用requests可以模拟浏览器的请求,比起之前用到的urllib,requests模块的api更加便捷(本质就是封装了urllib3) #注意:requests库发送请求将网页内容下 ...
- laravel 生成 key
把 .env.example 文件 复制并重命名为 .env 文件 命令行运行 php artisan key:generate php artisan key:generate
- 51Nod 1080 两个数的平方和(数论,经典题)
1080 两个数的平方和 基准时间限制:1 秒 空间限制:131072 KB 分值: 5 难度:1级算法题 给出一个整数N,将N表示为2个整数i j的平方和(i <= j),如果 ...
- bzoj:1666: [Usaco2006 Oct]Another Cow Number Game 奶牛的数字游戏
Description 奶牛们又在玩一种无聊的数字游戏.输得很郁闷的贝茜想请你写个程序来帮她在开局时预测结果.在游戏的开始,每头牛都会得到一个数N(1<=N<=1,000,000).此时奶 ...
- Centos7环境搭建lnmp环境
[原创]编译安装lnmp环境 准备软件:nginx1.10.3+php-5.5.12+mariadb10.0.8(数据库在此使用的yum安装) 如果需要编译安装的可以给我留言,我后续再发布出来! 依赖 ...
- cin与cout详解
输入和输出并不是C++语言中的正式组成成分。C和C++本身都没有为输入和输出提供专门的语句结构。输入输出不是由C++本身定义的,而是在编译系统提供的I/O库中定义的。C++的输出和输入是用" ...
- 基于Echarts4.0实现旭日图
昨天Echarts4.0正式发布,随着4.0而来的是一系列的更新,挑几个主要的简单说明: 1.展示方面通过增量渲染技术(4.0+)ECharts 能够展现千万级的数据量 2.针对移动端优化,移动端小屏 ...