
VirtualBox: Resize a Fedora, CentOS, or Windows Dynamic Guest Virtual Disk (VDI) in VirtualBox
Here’s the scenario: you’ve set up Dynamically Allocated Storage for the hard drive on your Guest VM in VirtualBox and you’ve run out of space — even though your Actual Size is smaller
than the Virtual Size (this happened to me recently when my Virtual Size was 10 GB, and the Actual Size was only 5.55 GB… but my Guest OS was complaining that I didn’t have enough disk space to do an update.)
You thought that as long as the Actual Size was smaller than the Virtual Size, that still meant you have room on the disk… but you’d be wrong. That’s kind of like believing that as long as you have checks in your checkbook, you’ve still got money
in the bank. Ok, it’s not actually like that, and there are a lot of boring reasons why this happens… but you don’t really care about those. You just want to increase your disk space and get back
to work.
Just follow these three easy steps to resize your Dynamic VDI.
Assumptions
- First, we’re assuming that you’ve backed up your data, if it’s important. Remember, there are two types of data: data that’s backed up, and data that’s waiting to be lost. Backup your .vdi file
before going any further. - We’re assuming that your Guest OS is either Fedora or RHEL/CentOS (which have additional steps
for LVM below) or Windows. For any other setup, these instructions will probably still be helpful, but those are the two Guest systems
that this specifically applies to. - We’re assuming that you set up your VDI with Dynamically Allocated Storage. This will not work with fixed drives.
- If your Guest OS has Snapshots, we’re assuming you’re running a version of VirtualBox that is 4.3.* or later. This will not workwith
Snapshots prior to that release. I used version 4.3.12 when I wrote this. - We’re assuming that if you hose this up royally, you don’t know where I live… and that even if you do hose it up royally, you’ve followed Assumption #1. Seriously. Back
it up, yo!
For this example, I’ll expand an older Fedora 18 VDI I have on my system (because I already used these instructions to expand my Fedora 20 VDI… and therefore can’t take screenshots as I do it).
Note that we’re starting out with a Virtual Size of 20.00 GB and an Actual Size of 12.00 GB:
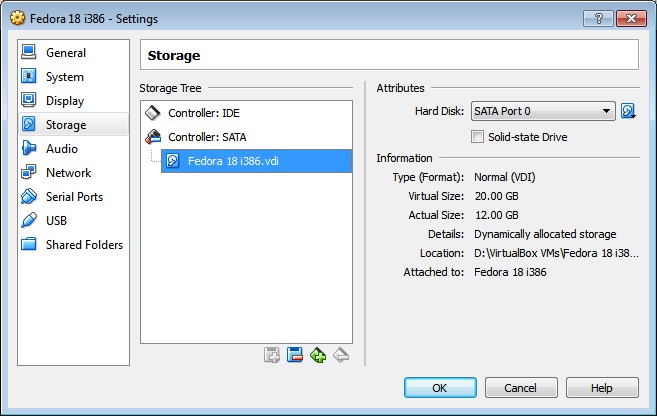
Starting Virtual Size for this VDI is 20.00 GB.
Before You Start: Shut Down your VM
You can’t do this process with the VM running. Shut it down so that its status appears as “Powered Off” in your VirtualBox Manager.
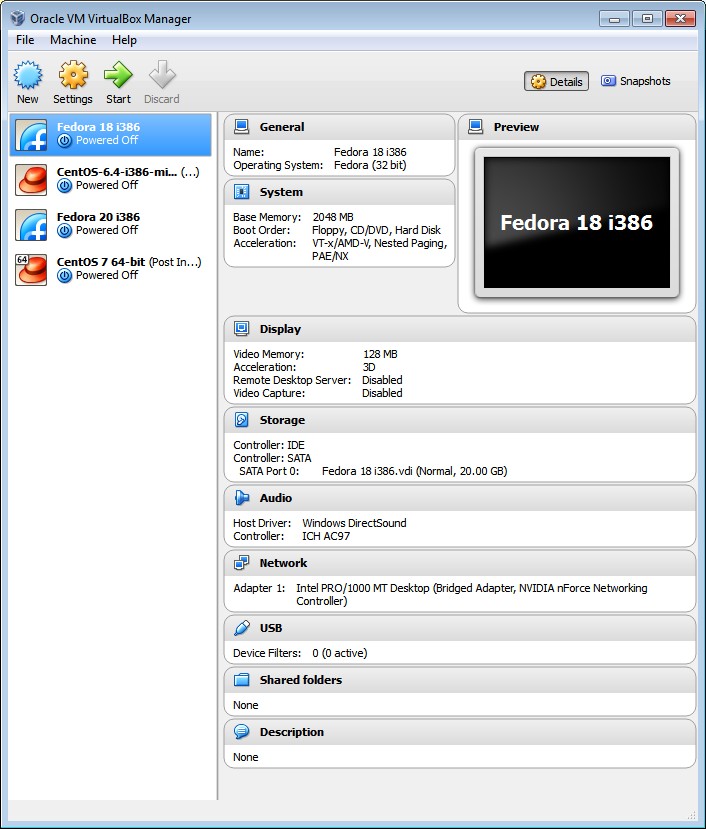
Make sure your VM is Powered Off, and not just Stopped.
Step 1: Enlarge the Virtual Disk from the Command Line with VBoxManage
Now that your VM powered is off, go to the command line on your Host machine (mine is a Windows box) and change into your VirtualBox directory (these examples are for Windows, but adjust accordingly if your host OS is Linux).
cd "C:\Program Files\Oracle\VirtualBox"
Decide what you’d like the new upper limit for your dynamically allocated VDI to be. Again, this won’t be the actual size of the VDI file on your Host’s drive (it will grow dynamically as you use more space in your Guest). Since mine started out
at 20 GB, I didn’t want to deal with this problem again for a long time (if ever), so I chose 40 GB. You can choose anything you like.
Now you’re ready to use the VBoxManage command to modify the max size of your virtual disk to 40 GB (40 x 1024 = 40960 MB) with:
VBoxManage modifyhd "C:\Users\Steve\VirtualBox VMs\Fedora 18\Fedora 18.vdi" --resize 40960
Make sure you use two dashes before the resize flag.
You’ll see progress output like this:
0%...10%...20%...30%...40%...50%...60%...70%...80%...90%...100%
Those folder names I used above are the default, but this screenshot shows that this works even if you keep your program and data files in non-default locations (like I do). Just launch the VBoxManage command from the folder where VirtualBox is
installed, and know the location of your VDI, and you’ll be fine.
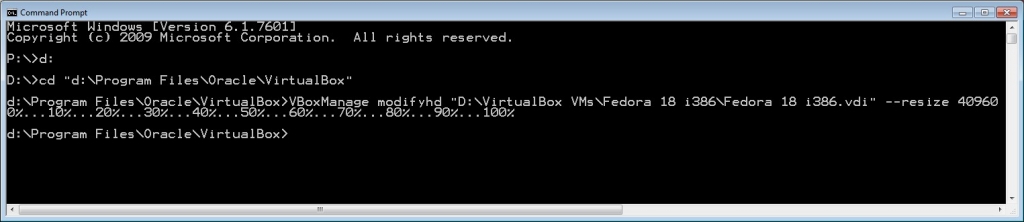
VBoxManage command resizes your VDI
The first part is done! You’ve just increased the virtual disk size, but your original partition is still the same size, so the next step is to expand your existing partition into the space you just created.
Step 2: Expand Your Existing Partition with GParted
If you’re the hard-core Linux command line type, there are ways to do this with fdisk, but I love me some GParted,
so that’s how I recommend you do it, too.
If you don’t have it already (and you really should), download the GParted
Live CD and save the .iso file somewhere on your Host’s hard drive.
Next, go into your VirtualBox Manager, select the VM, press Settings, then Storage, then find the IDE Controller and press
the icon for Add CD/DVD Device.
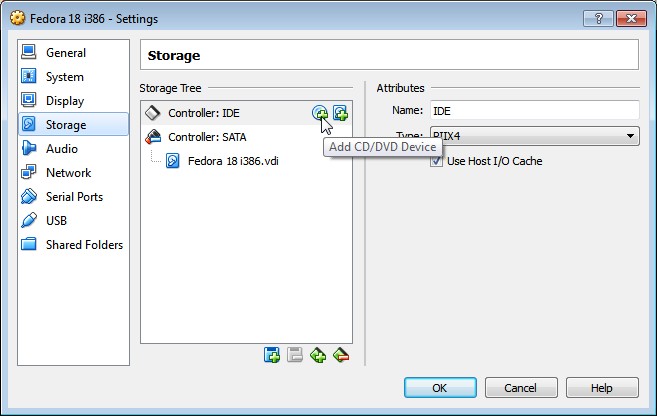
Add a CD device to your IDE Controller
Then press Choose disk.
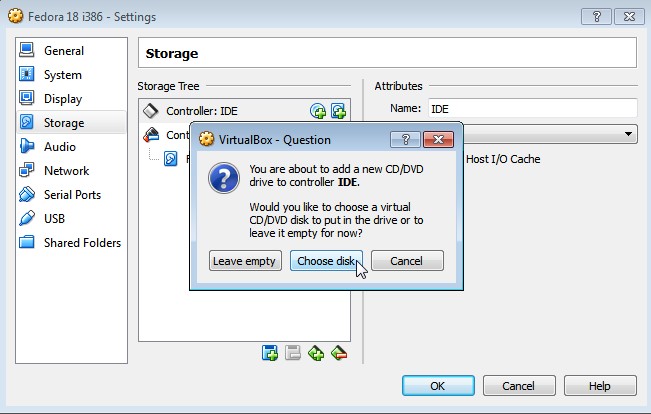
Choose disk
then select the GParted .iso file on your hard drive. When it appears in the Storage Tree, select it and press the Live
CD/DVD option under Attributes.
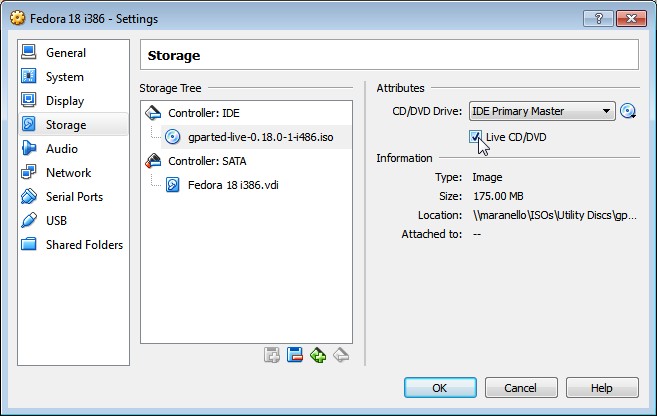
GParted Live CD is ready to boot!
Hit OK, and now you’re ready to fire up your VM. It should boot from the GParted Live CD .iso.
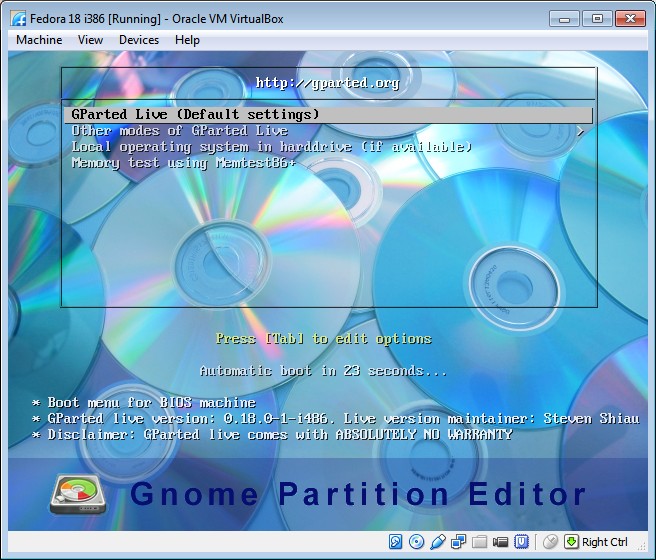
GParted Boot Screen
Just hit enter to choose all the default GParted boot options when they present themselves. Eventually, the desktop will appear and GParted will launch automagically.
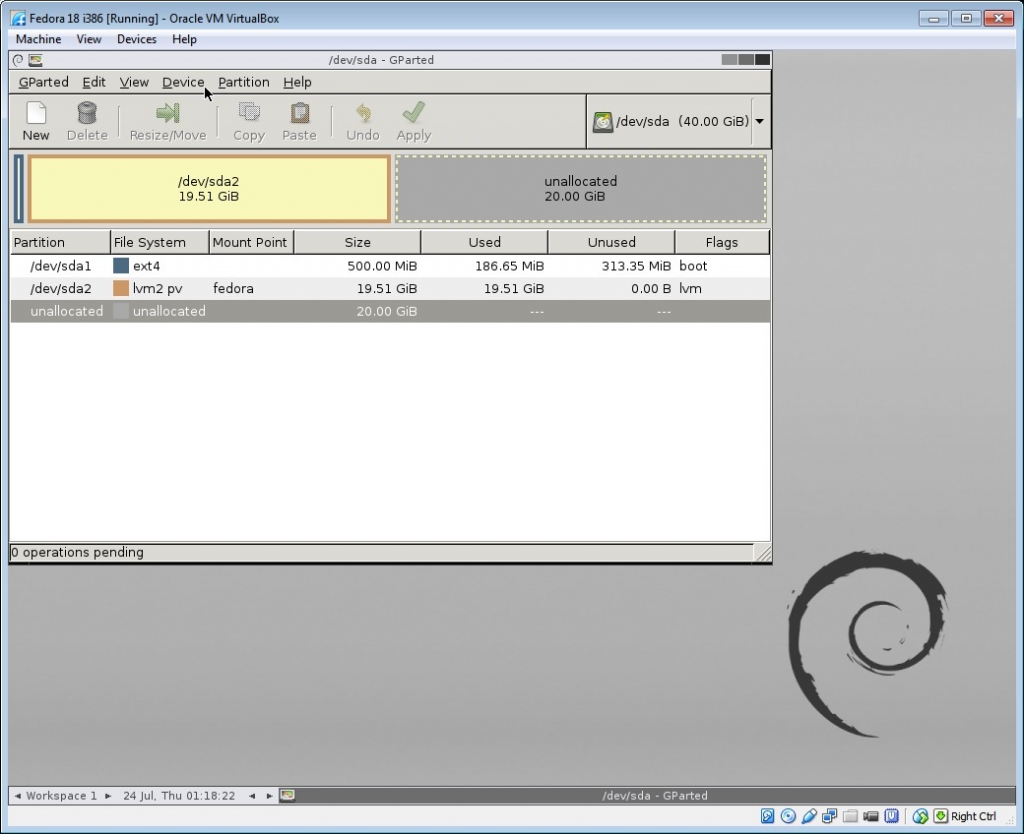
GParted Interface
On a Windows system, you’ll likely a small NTFS boot partition on /dev/sda1 and a larger NTFS partition on /dev/sda2.
With a default Fedora install (shown above), you’ll see a smallish (500MB is default) ext4 boot partition on /dev/sda1 and a larger LVM partition on /dev/sda2.
In both cases, you’ll see a bunch of unallocated space (which you created in Step 1) to the right of your data partition (which is almost certainly /dev/sda2). Select your data partition with
your mouse, then click the Resize/Move button in the toolbar.
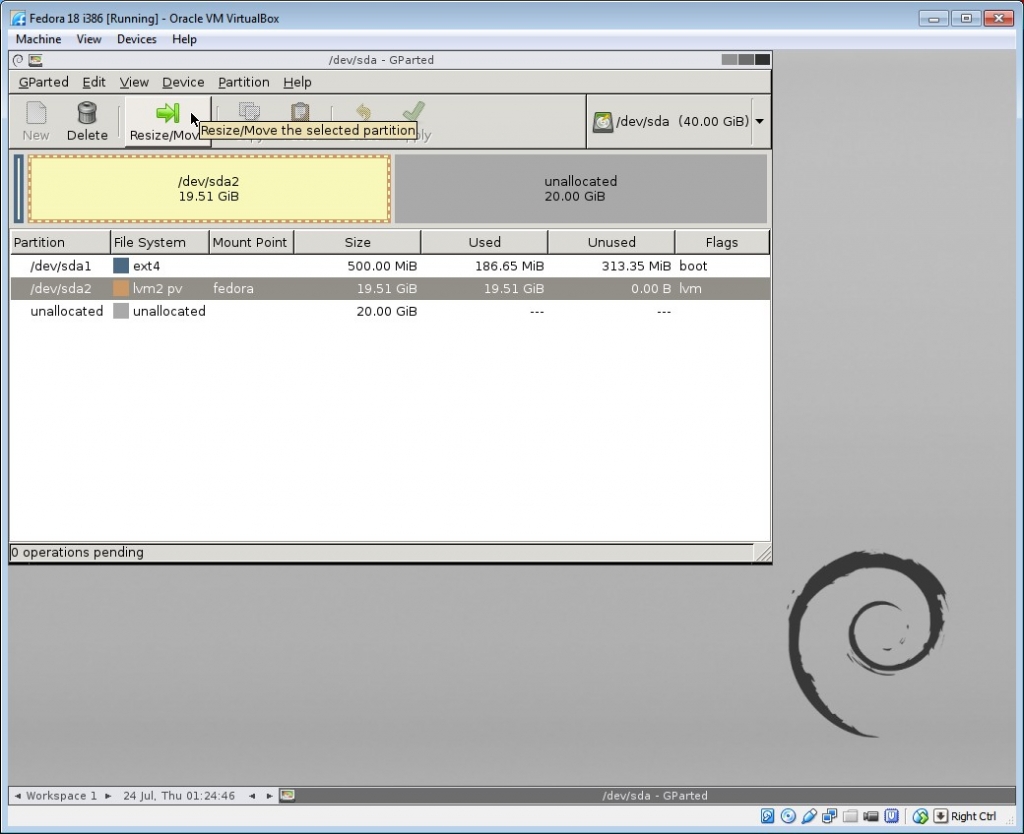
Select the partition and press Resize/Move
A new dialog box will open, where you can position your mouse near the black arrow on the side of the partition:
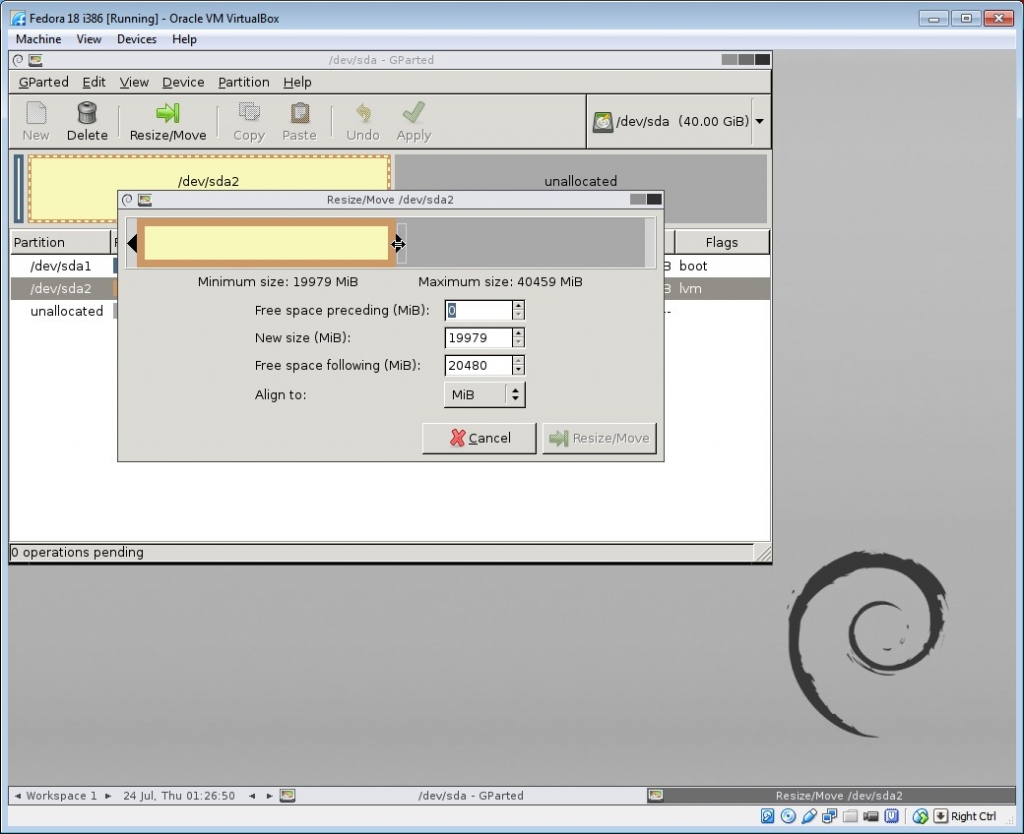
GParted Resize dialog
…then drag all the way to the right to the size of the partition all the way to the right until it takes up all the available space.
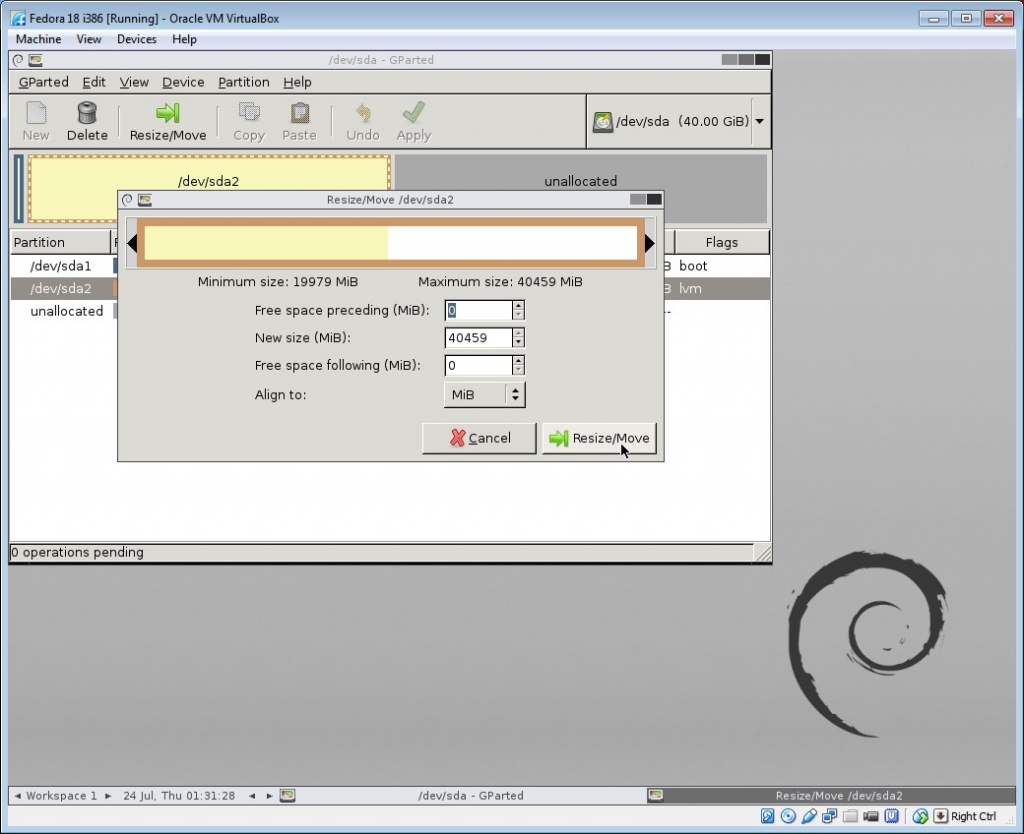
My, what a large partition you have!
Press the Resize/Move button in that dialog, which will return you to the main GParted window and show you the resized partition, and “1 operation pending” at the bottom of the window.
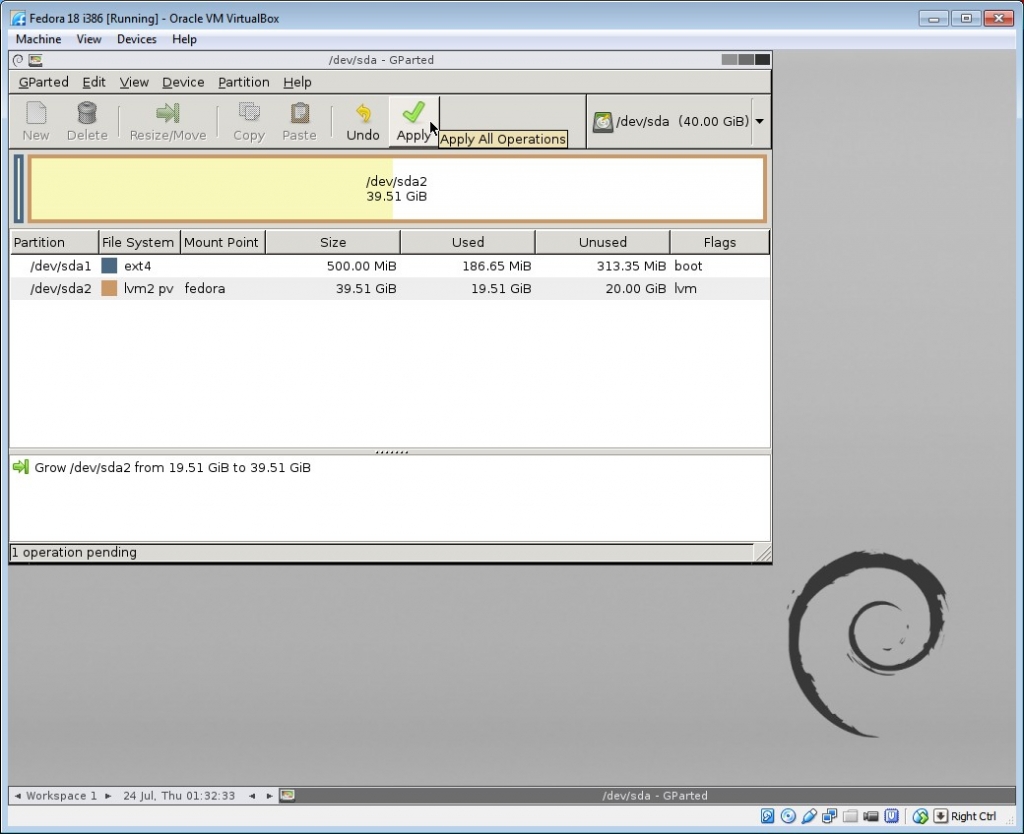
Resize operation is ready to be applied.
Click the Apply button on the toolbar, which will pop up a very scary dialog that warns you all about the nasty stuff that can happen, including LOSS of DATA. It also advises you
to backup your data before proceeding, but you don’t need to worry about that… because you already listened to me in Assumption #1 and backed it up, right? RIGHT?!?!?!?!?
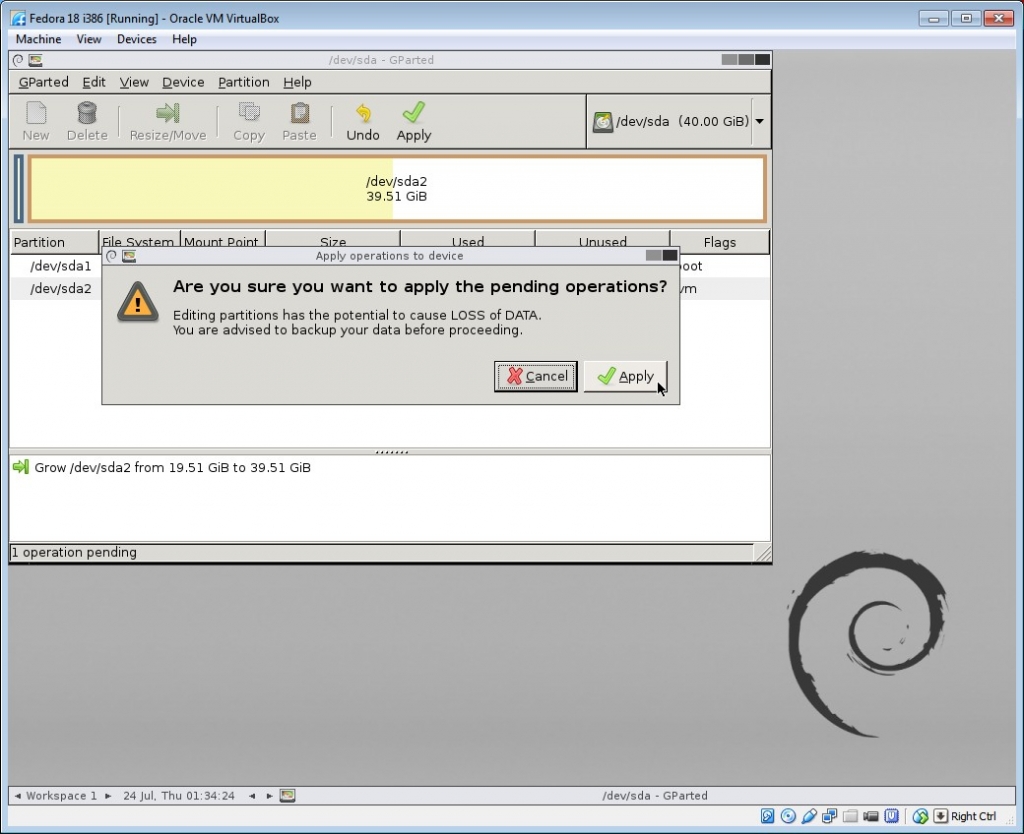
You’re feeling pretty fly because your data is already backed up.
Press the Apply to confirm, then you’ll get this dialog box that shows you the progress. It says it could take a long time, but it shouldn’t.
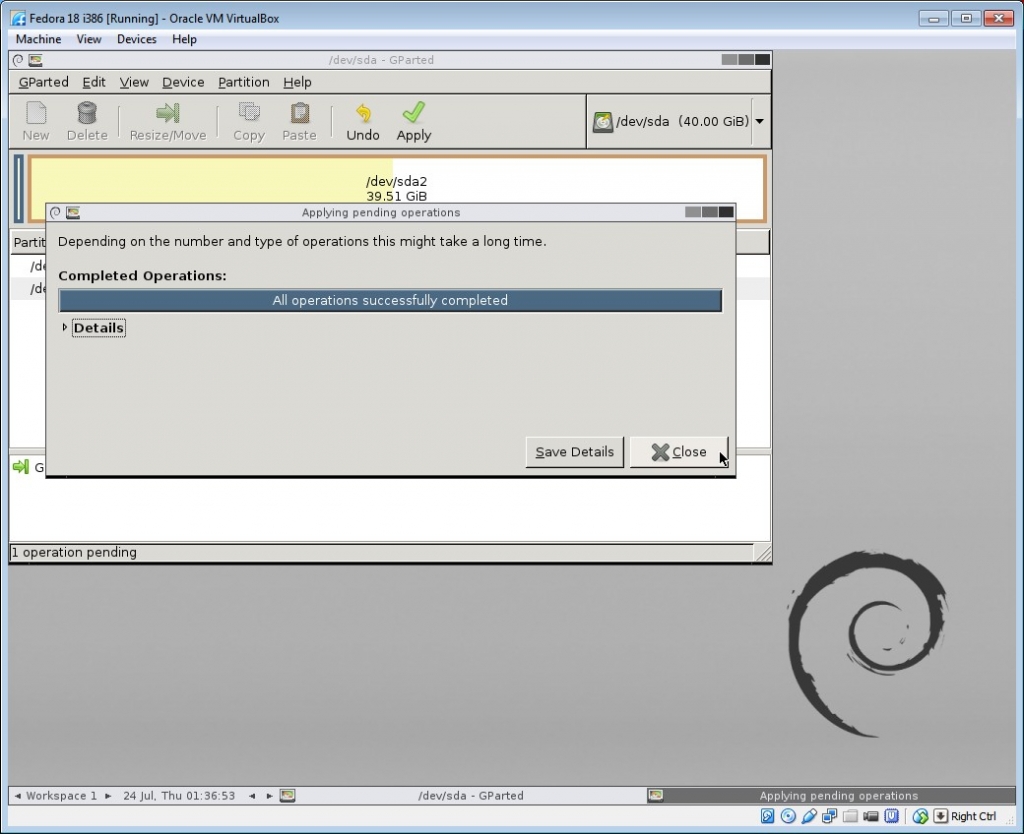
Operations completed!
Hit the Close button, then quit GParted by selecting the QParted menu item and Quit:
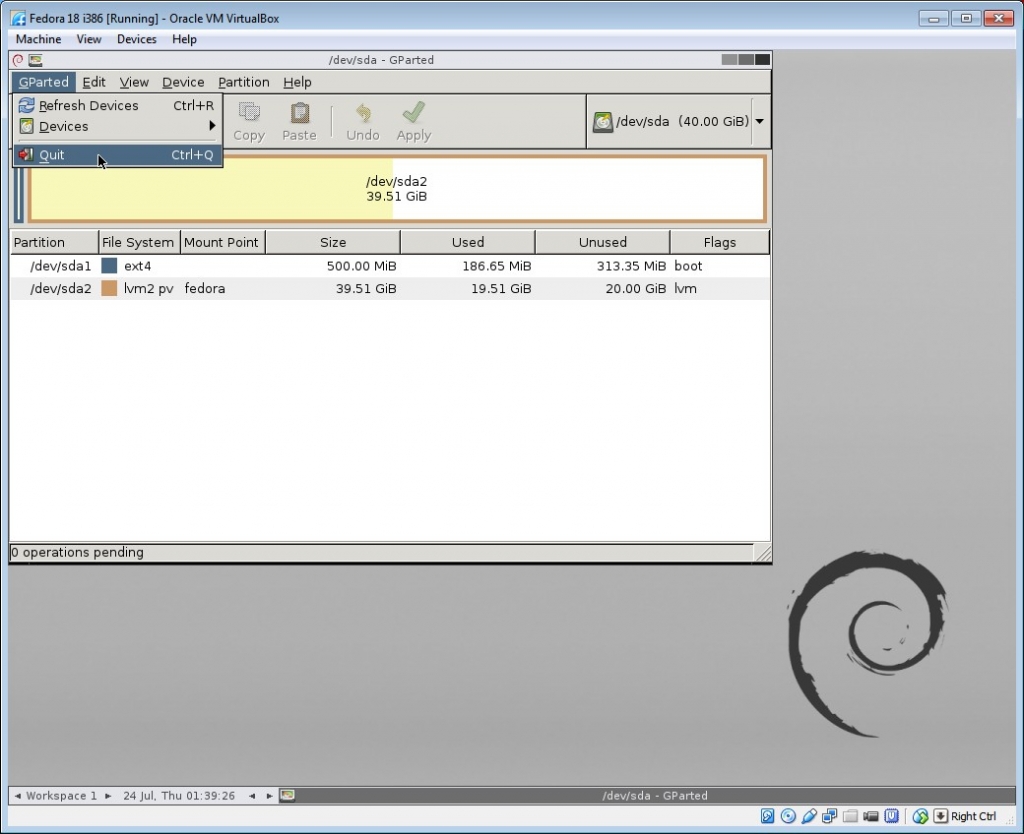
I quit you, GParted!
Then double-click hit the red Exit button on the desktop, choose Shutdown, and OK. Press ENTER when it prompts to halt the system, which will power off the VM.
Now you’re ready for the last step!
Step 3: Remove the GParted .iso and Restart Your Guest OS
From the VirtualBox Manager, go back into your VM’s settings, go to Storage, right-click the GParted .iso disk, then select Remove Attachment.
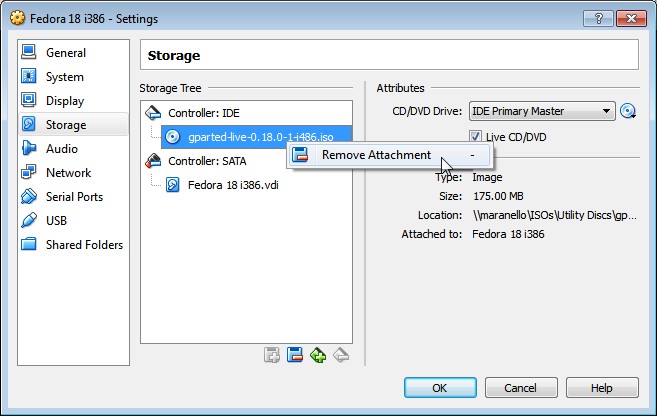
Remove the GParted disk
Confirm with Remove when it asks if you’re sure.
Now go back out and restart your virtual machine. It should boot back into the Guest OS.
If you’re running a Windows Guest, the file system should automatically recognize the larger partition on boot and run an automatic check on the file system to make sure everything is kosher. Don’t skip
this check. When it’s done, you should be able to use all your new space!
If you’re running a Fedora Guest, however, you have one more step. But since I promised only 3 easy steps, we’ll call it Step 3-And-A-Half.
Step 3-And-A-Half: Extend the Logical Volume into the Resized Partition (LVM Users Only)
By default, recent versions of Fedora and RHEL use LVM (logical volume manager), which requires an additional nudge to take advantage of your resized partition. From the Fedora command line, as root,
you can verify that the OS can see the resized partition by doing:
pvscan
You can see here that our resized partition is almost 40 GB:
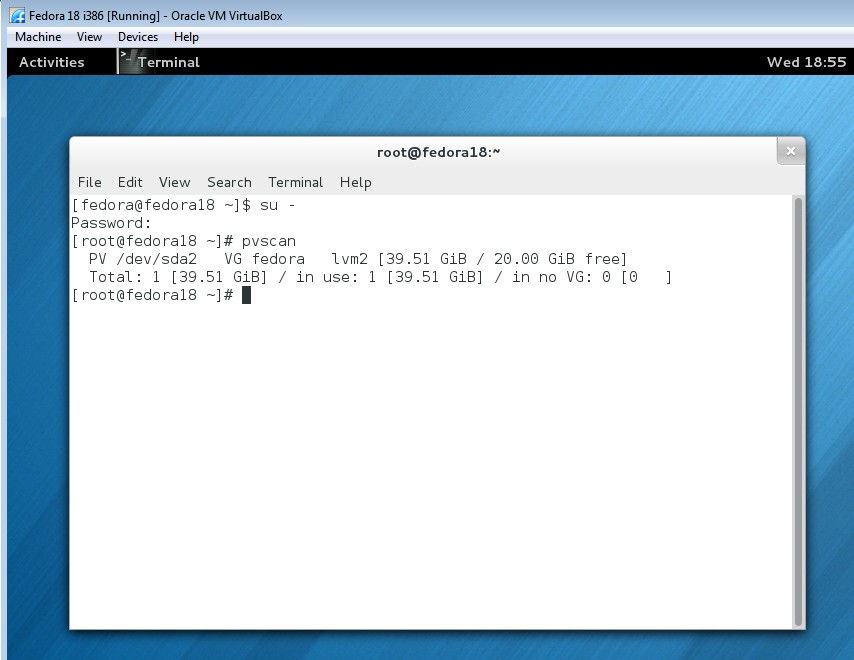
Fedora sees the resized partition… kinda…
but doing a df -h shows the /dev/mapper/fedora-root logical volume as 16 GB:
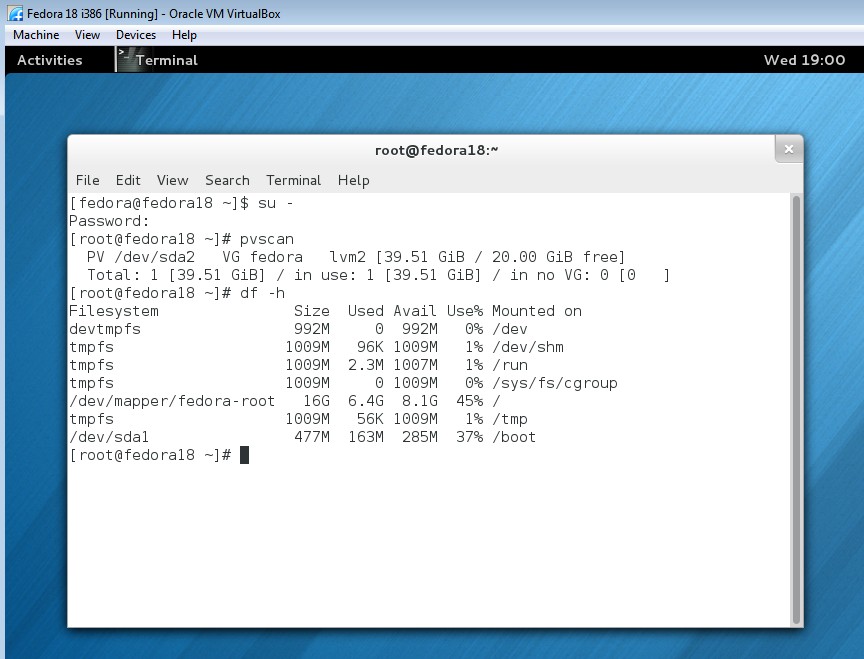
Hmm… something’s not right here…
Take note of your logical volume’s location (/dev/mapper/fedora-root in this example) when you do df -h, then force the LVM volume to take
up 100% of the available space on the partition with:
lvextend -l +100%FREE /dev/mapper/fedora-root
You should get a success message like this:
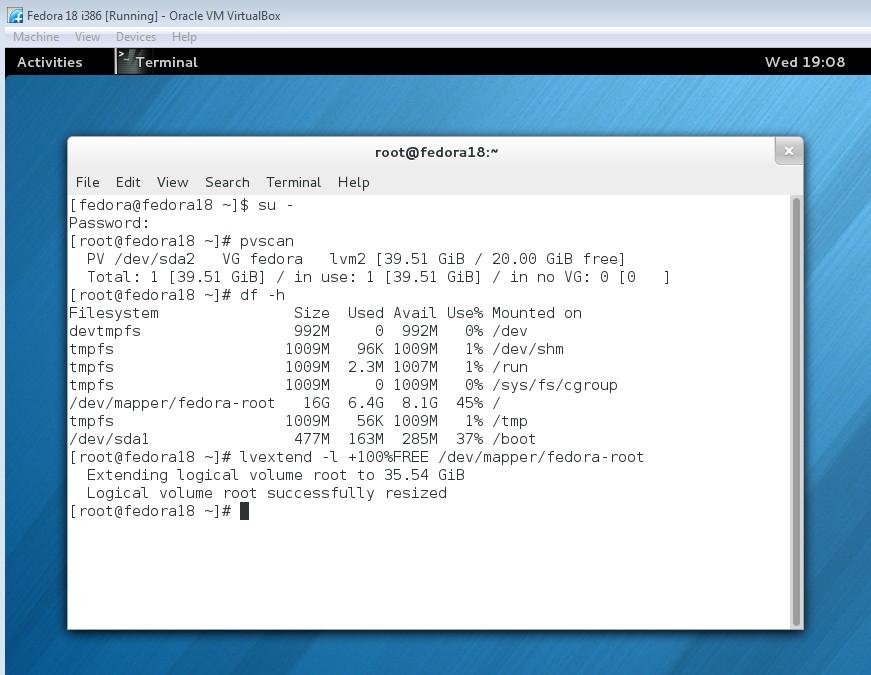
Logical volume extended!
Boom! You did it! Now do another df -h and see if you notice any difference:
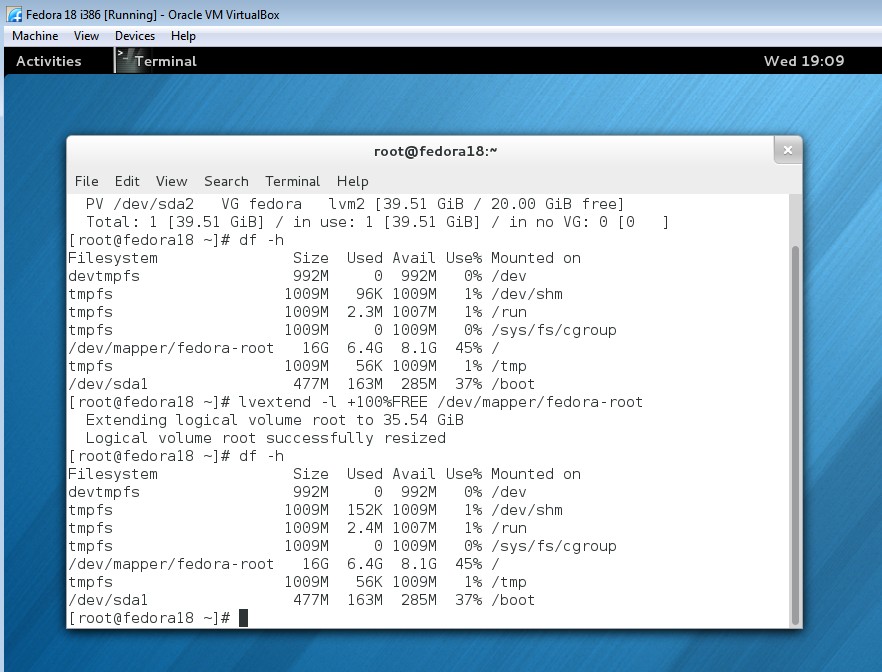
Why doesn’t it look different?
Wait a minute… that looks decidedly un-different! Did we do something wrong? No, you just need one more step. Run resize2fs on the fedora-root location
with:
resize2fs -p /dev/mapper/fedora-root
You should get a success message that says something like:
Filesystem at /dev/mapper/fedora-root is mounted on /; on-line resizing required
old_desc_blocks=1, new_desc_blocks=5
The filesystem on /dev/mapper/fedora-root is now XXXXXXX(Xk) blocks long.
Now do a df -h again and you should see the increased size of the root partition. Do a quick reboot and you should be all set!
And if you go back out and check the Storage settings of the VM in the VirtualBox Manager, we’ll see that the Virtual Size has now been doubled to 40.00 GB, which is exactly what we set out to do:
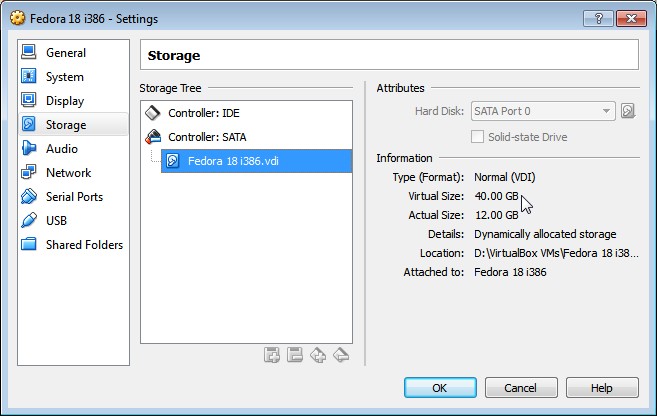
Virtual size doubled!
For CentOS7:
You should execute execute following command after above:
xfs_growfs /dev/centos/root
Copy from:
http://www.stevejenkins.com/blog/2014/07/resize-a-fedora-or-windows-dynamic-guest-virtual-disk-vdi-in-virtualbox-in-3-easy-steps/
VirtualBox: Resize a Fedora, CentOS, or Windows Dynamic Guest Virtual Disk (VDI) in VirtualBox的更多相关文章
- 【转】Virtualbox虚拟机配置安装CentOS 6.5图文教程
http://www.111cn.net/sys/CentOS/61709.htm 什么是Virtualbox? VirtualBox 是一款开源虚拟机软件(注:跟vmware差不多).Virtual ...
- 『实践』VirtualBox 5.1.18+Centos 6.8+hadoop 2.7.3搭建hadoop完全分布式集群及基于HDFS的网盘实现
『实践』VirtualBox 5.1.18+Centos 6.8+hadoop 2.7.3搭建hadoop完全分布式集群及基于HDFS的网盘实现 1.基本设定和软件版本 主机名 ip 对应角色 mas ...
- 在VirtualBox虚拟机中安装Centos操作系统怎么与本地XShell远程连接
问题: 在VirtualBox安装好了CentOS操作系统后,我们怎么才可以用XSell连接虚拟机中的CentOS呢? 答案: (1)在windows下用cmd--ipconfig查看VirtualB ...
- CentOS访问Windows共享文件夹的方法
CentOS访问Windows共享文件夹的方法 1 在地址栏中输入下面内容: smb://Windows IP/Share folder name,smb为Server Message Block协议 ...
- VMWARE + CENTOS在windows下配置cocos2d-x android开发环境
VMWARE + CENTOS在windows配置cocos2d-x android开发环境 之前使用cygwin在windows开发android,后来使用了c++11特性,在cygwin中更新工具 ...
- 通过virtualbox最小化安装centos 6.3后无法上网解决办法
通过virtualbox最小化安装centos 6.3后无法上网解决办法 1.设置virtualbox的网络连接方式,如下图使用桥接方式,桥接的网卡为宿主正在上网的网卡,现在我是通过无线来上网的,所以 ...
- CentOS 访问 Windows 共享目录
起因 由于公司的网络切换后,将所有的服务器都切换到了指定的网段(工作电脑在一个网络,服务器在另一个网络:这样一来,不同部门的 work stations 可以彼此访问,不同部门的服务器(servers ...
- virtualbox命令行共享CentOS目录
virtualbox命令行共享CentOS目录 1. 安装virtualbox增强工具 "右ctrl+c" 显示和隐藏virtualbox虚拟机的菜单栏. 在VirtualBo ...
- Linux (Redhat / Fedora / CentOS) 更改 hostname 的方式
Linux (Redhat / Fedora / CentOS) 更改 hostname 的方式 [蔡宗融個人網站]https://www.ichiayi.com/wiki/tech/linux_ho ...
随机推荐
- iOS 私有API调用
最近自己在做一个小程序,想实现一个一键设置手机壁纸的功能.但在iOS公开的API里找不到相关的方法,只能从私有API入手. 网上有不少教程,不过都不是很详细.从google和https://stack ...
- Java基础——字符串String
String类 1. String类位于java.lang包中,使用时无需导包. 2. 创建字符串的两种方式: ① 直接指定(字面量声明):String str = "abc"; ...
- 学习React系列(六)——更新dom细节于原理
React更新dom的依据: 1.不同类型的elements会产生不同的树 2.通过render方法中包含key属性的子元素,开发者可以示意哪些子元素可能是稳定的. 更新过程: 一.根元素类型不同:旧 ...
- tarjan——cogs 1298 通讯问题
1298. 通讯问题 ★ 输入文件:jdltt.in 输出文件:jdltt.out 简单对比 时间限制:1 s 内存限制:128 MB [题目描述] 一个篮球队有n个篮球队员,每个队员 ...
- [HAOI 2007]上升序列
Description 对于一个给定的S={a1,a2,a3,…,an},若有P={ax1,ax2,ax3,…,axm},满足(x1 < x2 < … < xm)且( ax1 < ...
- [NOIp 2017]逛公园
Description 策策同学特别喜欢逛公园.公园可以看成一张$N$个点$M$条边构成的有向图,且没有 自环和重边.其中1号点是公园的入口,$N$号点是公园的出口,每条边有一个非负权值, 代表策策经 ...
- [JSOI2007]字符加密
题目描述 喜欢钻研问题的JS 同学,最近又迷上了对加密方法的思考.一天,他突然想出了一种他认为是终极的加密办法:把需要加密的信息排成一圈,显然,它们有很多种不同的读法. 例如‘JSOI07’,可以读作 ...
- ●BZOJ 1934 [Shoi2007]Vote 善意的投票
题链: http://www.lydsy.com/JudgeOnline/problem.php?id=1934 题解: 题目有点迷. S向为1的点连边,为0的点向T连边,在有关系的两个点之间连双向边 ...
- poj 1113 凸包周长
Wall Time Limit: 1000MS Memory Limit: 10000K Total Submissions: 33888 Accepted: 11544 Descriptio ...
- 【Python系列】HDF5文件介绍
一个HDF5文件是一种存放两类对象的容器:dataset和group. Dataset是类似于数组的数据集,而group是类似文件夹一样的容器,存放dataset和其他group.在使用h5py的时候 ...