C#使用Aforge调用摄像头拍照
一、 新建一个Winform项目
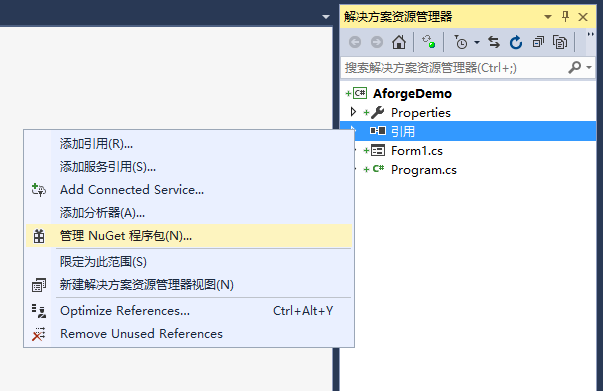
二、使用Nuget添加引用
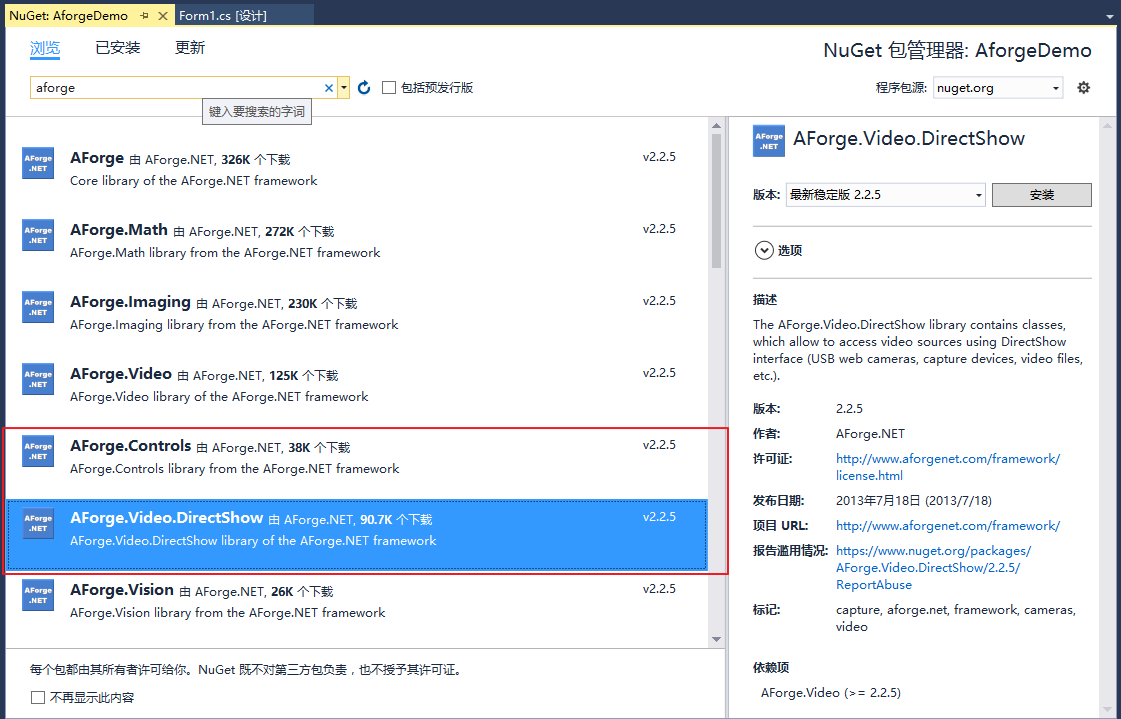
安装下图中红色框住的两个程序包
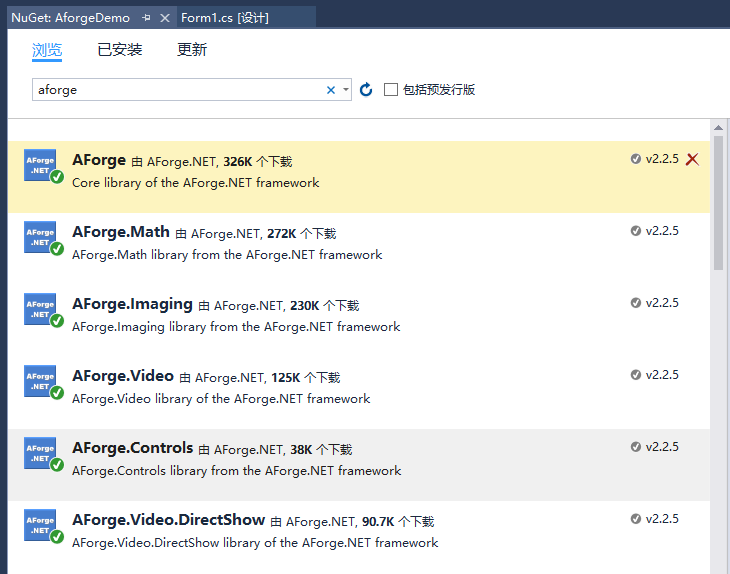
安装完后发现安装了如下图的程序包,这是因为上述两个程序包存在对其它程序包的依赖。
三、编写程序
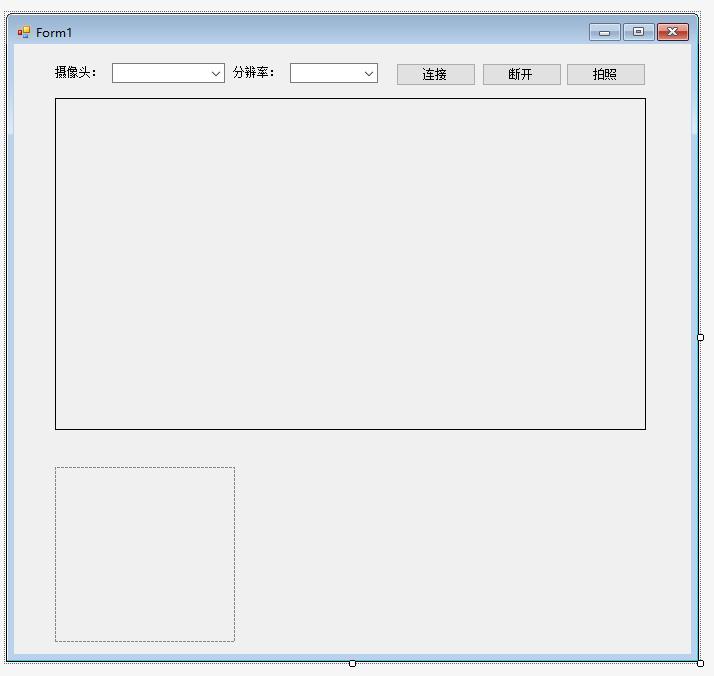
1. 窗体设计,摄像头是下拉列表(cmbCamera,控件命名,下同),虽然示例只用到一个摄像头,但是该Demo可用于多个摄像头间切换场景,分辨率是下拉列表(cmbResolution),列出摄像头所支持的分辨率,一个VideoSourcePlayer控件(vispShoot),一个PictureBox控件(picbPreview)。
2. 编写代码
using System;

using System.Collections.Generic;

using System.ComponentModel;

using System.Data;

using System.Drawing;

using System.Linq;

using System.Text;

using System.Windows.Forms;

using AForge.Video.DirectShow;

namespace AforgeDemo

{

    public partial class Form1 : Form

    {

        private FilterInfoCollection videoDevices;

        private VideoCaptureDevice videoDevice;

        private VideoCapabilities[] videoCapabilities;

        private VideoCapabilities[] snapshotCapabilities;

        public Form1()

        {

            InitializeComponent();

        }

        private void Form1_Load(object sender, EventArgs e)

        {

            videoDevices = new FilterInfoCollection(FilterCategory.VideoInputDevice);

            if (videoDevices.Count != )

            {

                foreach (FilterInfo device in videoDevices)

                {

                    cmbCamera.Items.Add(device.Name);

                }

            }

            else

            {

                cmbCamera.Items.Add("没有找到摄像头");

            }

            cmbCamera.SelectedIndex = ;

        }

        private void cmbCamera_SelectedIndexChanged(object sender, EventArgs e)

        {

            if (videoDevices.Count != )

            {

                videoDevice = new VideoCaptureDevice(videoDevices[cmbCamera.SelectedIndex].MonikerString);

                GetDeviceResolution(videoDevice);

            }

        }

        private void GetDeviceResolution(VideoCaptureDevice videoCaptureDevice)

        {

            cmbResolution.Items.Clear();

            videoCapabilities = videoCaptureDevice.VideoCapabilities;

            foreach (VideoCapabilities capabilty in videoCapabilities)

            {

                cmbResolution.Items.Add($"{capabilty.FrameSize.Width} x {capabilty.FrameSize.Height}");

            }

            cmbResolution.SelectedIndex = ;

        }

        private void btnConnect_Click(object sender, EventArgs e)

        {

            if (videoDevice != null)

            {

                if ((videoCapabilities != null) && (videoCapabilities.Length != ))

                {

                    videoDevice.VideoResolution = videoCapabilities[cmbResolution.SelectedIndex];

                    vispShoot.VideoSource = videoDevice;

                    vispShoot.Start();

                    EnableControlStatus(false);

                }

            }

        }

        private void EnableControlStatus(bool status)

        {

            cmbCamera.Enabled = status;

            cmbResolution.Enabled = status;

            btnConnect.Enabled = status;

            btnShoot.Enabled = !status;

            btnDisconnect.Enabled = !status;

        }

        private void btnDisconnect_Click(object sender, EventArgs e)

        {

            DisConnect();

            EnableControlStatus(true);

        }

        private void DisConnect()

        {

            if (vispShoot.VideoSource != null)

            {

                vispShoot.SignalToStop();

                vispShoot.WaitForStop();

                vispShoot.VideoSource = null;

            }

        }

        private void btnShoot_Click(object sender, EventArgs e)

        {

            Bitmap img = vispShoot.GetCurrentVideoFrame();

            picbPreview.Image = img;

        }

        private void Form1_FormClosing(object sender, FormClosingEventArgs e)

        {

            DisConnect();

        }

    }

}
3. 测试

附上窗体设计代码:
namespace AforgeDemo

{

    partial class Form1

    {

        /// <summary>

        /// 必需的设计器变量。

        /// </summary>

        private System.ComponentModel.IContainer components = null;

        /// <summary>

        /// 清理所有正在使用的资源。

        /// </summary>

        /// <param name="disposing">如果应释放托管资源,为 true;否则为 false。</param>

        protected override void Dispose(bool disposing)

        {

            if (disposing && (components != null))

            {

                components.Dispose();

            }

            base.Dispose(disposing);

        }

        #region Windows 窗体设计器生成的代码

        /// <summary>

        /// 设计器支持所需的方法 - 不要修改

        /// 使用代码编辑器修改此方法的内容。

        /// </summary>

        private void InitializeComponent()

        {

            this.label1 = new System.Windows.Forms.Label();

            this.cmbCamera = new System.Windows.Forms.ComboBox();

            this.label2 = new System.Windows.Forms.Label();

            this.cmbResolution = new System.Windows.Forms.ComboBox();

            this.vispShoot = new AForge.Controls.VideoSourcePlayer();

            this.picbPreview = new System.Windows.Forms.PictureBox();

            this.btnConnect = new System.Windows.Forms.Button();

            this.btnDisconnect = new System.Windows.Forms.Button();

            this.btnShoot = new System.Windows.Forms.Button();

            ((System.ComponentModel.ISupportInitialize)(this.picbPreview)).BeginInit();

            this.SuspendLayout();

            //

            // label1

            //

            this.label1.AutoSize = true;

            this.label1.Location = new System.Drawing.Point(, );

            this.label1.Name = "label1";

            this.label1.Size = new System.Drawing.Size(, );

            this.label1.TabIndex = ;

            this.label1.Text = "摄像头:";

            //

            // cmbCamera

            //

            this.cmbCamera.FormattingEnabled = true;

            this.cmbCamera.Location = new System.Drawing.Point(, );

            this.cmbCamera.Name = "cmbCamera";

            this.cmbCamera.Size = new System.Drawing.Size(, );

            this.cmbCamera.TabIndex = ;

            this.cmbCamera.SelectedIndexChanged += new System.EventHandler(this.cmbCamera_SelectedIndexChanged);

            //

            // label2

            //

            this.label2.AutoSize = true;

            this.label2.Location = new System.Drawing.Point(, );

            this.label2.Name = "label2";

            this.label2.Size = new System.Drawing.Size(, );

            this.label2.TabIndex = ;

            this.label2.Text = "分辨率:";

            //

            // cmbResolution

            //

            this.cmbResolution.FormattingEnabled = true;

            this.cmbResolution.Location = new System.Drawing.Point(, );

            this.cmbResolution.Name = "cmbResolution";

            this.cmbResolution.Size = new System.Drawing.Size(, );

            this.cmbResolution.TabIndex = ;

            //

            // vispShoot

            //

            this.vispShoot.Location = new System.Drawing.Point(, );

            this.vispShoot.Name = "vispShoot";

            this.vispShoot.Size = new System.Drawing.Size(, );

            this.vispShoot.TabIndex = ;

            this.vispShoot.Text = "videoSourcePlayer1";

            this.vispShoot.VideoSource = null;

            //

            // picbPreview

            //

            this.picbPreview.Location = new System.Drawing.Point(, );

            this.picbPreview.Name = "picbPreview";

            this.picbPreview.Size = new System.Drawing.Size(, );

            this.picbPreview.SizeMode = System.Windows.Forms.PictureBoxSizeMode.Zoom;

            this.picbPreview.TabIndex = ;

            this.picbPreview.TabStop = false;

            //

            // btnConnect

            //

            this.btnConnect.Location = new System.Drawing.Point(, );

            this.btnConnect.Name = "btnConnect";

            this.btnConnect.Size = new System.Drawing.Size(, );

            this.btnConnect.TabIndex = ;

            this.btnConnect.Text = "连接";

            this.btnConnect.UseVisualStyleBackColor = true;

            this.btnConnect.Click += new System.EventHandler(this.btnConnect_Click);

            //

            // btnDisconnect

            //

            this.btnDisconnect.Enabled = false;

            this.btnDisconnect.Location = new System.Drawing.Point(, );

            this.btnDisconnect.Name = "btnDisconnect";

            this.btnDisconnect.Size = new System.Drawing.Size(, );

            this.btnDisconnect.TabIndex = ;

            this.btnDisconnect.Text = "断开";

            this.btnDisconnect.UseVisualStyleBackColor = true;

            this.btnDisconnect.Click += new System.EventHandler(this.btnDisconnect_Click);

            //

            // btnShoot

            //

            this.btnShoot.Enabled = false;

            this.btnShoot.Location = new System.Drawing.Point(, );

            this.btnShoot.Name = "btnShoot";

            this.btnShoot.Size = new System.Drawing.Size(, );

            this.btnShoot.TabIndex = ;

            this.btnShoot.Text = "拍照";

            this.btnShoot.UseVisualStyleBackColor = true;

            this.btnShoot.Click += new System.EventHandler(this.btnShoot_Click);

            //

            // Form1

            //

            this.AutoScaleDimensions = new System.Drawing.SizeF(6F, 12F);

            this.AutoScaleMode = System.Windows.Forms.AutoScaleMode.Font;

            this.ClientSize = new System.Drawing.Size(, );

            this.Controls.Add(this.btnShoot);

            this.Controls.Add(this.btnDisconnect);

            this.Controls.Add(this.btnConnect);

            this.Controls.Add(this.picbPreview);

            this.Controls.Add(this.vispShoot);

            this.Controls.Add(this.cmbResolution);

            this.Controls.Add(this.cmbCamera);

            this.Controls.Add(this.label2);

            this.Controls.Add(this.label1);

            this.Name = "Form1";

            this.Text = "Form1";

            this.FormClosing += new System.Windows.Forms.FormClosingEventHandler(this.Form1_FormClosing);

            this.Load += new System.EventHandler(this.Form1_Load);

            ((System.ComponentModel.ISupportInitialize)(this.picbPreview)).EndInit();

            this.ResumeLayout(false);

            this.PerformLayout();

        }

        #endregion

        private System.Windows.Forms.Label label1;

        private System.Windows.Forms.ComboBox cmbCamera;

        private System.Windows.Forms.Label label2;

        private System.Windows.Forms.ComboBox cmbResolution;

        private AForge.Controls.VideoSourcePlayer vispShoot;

        private System.Windows.Forms.PictureBox picbPreview;

        private System.Windows.Forms.Button btnConnect;

        private System.Windows.Forms.Button btnDisconnect;

        private System.Windows.Forms.Button btnShoot;

    }

}
C#使用Aforge调用摄像头拍照的更多相关文章
- AForge调用摄像头拍照时设置分辨率
简单记录下AForge2.2.5.0版本调用摄像头拍照时设置分辨率的方法. FilterInfo info = _videoDevices[0];//获取第一个摄像头 _cameraDevice = ...
- C# - VS2019调用AForge库实现调用摄像头拍照功能
前言 作为一名资深Delphi7程序员,想要实现摄像头扫描一维码/二维码功能,发现所有免费的第三方库都没有简便的实现办法,通用的OpenCV或者ZXing库基本上只支持XE以上的版本,而且一维码的识别 ...
- android: 调用摄像头拍照
很多应用程序都可能会使用到调用摄像头拍照的功能,比如说程序里需要上传一张图片 作为用户的头像,这时打开摄像头拍张照是最简单快捷的.下面就让我们通过一个例子来学 习一下,如何才能在应用程序里调用手机的摄 ...
- vue实现PC端调用摄像头拍照人脸录入、移动端调用手机前置摄像头人脸录入、及图片旋转矫正、压缩上传base64格式/文件格式
进入正题 1. PC端调用摄像头拍照上传base64格式到后台,这个没什么花里胡哨的骚操作,直接看代码 (canvas + video) <template> <div> &l ...
- Cordova - 使用Cordova开发iOS应用实战4(调用摄像头拍照,并编辑)
使用Cordova可以很方便的通过js代码来使用设备摄像头拍照,只需把camera插件添加进来即可. 一,添加camera插件 首先我们要在“终端”中进入工程所在的目录,然后运行如下命令: 1 cor ...
- 【MediaKit】WPF项目中 调用摄像头拍照的开发包
今天遇到一个 人事的项目,项目中需要调用摄像头给员工照相.如何解决这个问题呢? 介绍一个开发包给你,MediaKit.论坛里头的人都说好,但是黑兔觉得大家好才是真的好.你不妨试试~ 第一步:添加WPF ...
- 使用js调用摄像头拍照
在一些浏览器里已经可以使用web api调用摄像头功能了. 基于此可以经行拍照摄像功能,网上找了些资料,然后实现了简单的拍照功能 演示地址 bingxl.cn/webrtc.html 代码 <! ...
- html5中调用摄像头拍照
方法: getCamera: 获取摄像头管理对象 对象: Camera: 摄像头对象 CameraOption: JSON对象.调用摄像头的參数 PopPosition: JSON对象,弹出拍照或摄像 ...
- android ——调用摄像头拍照和相册
先在布局文件中加入两个按钮和一个图片控件 <?xml version="1.0" encoding="utf-8"?> <LinearLayo ...
随机推荐
- 阿里架构师的工作总结:Spring Cloud在架构演进中起到的作用
Spring Cloud作为一套微服务治理的框架,几乎考虑到了微服务治理的方方面面,本篇主要解答这两个问题:Spring Cloud在微服务的架构中都做了哪些事情?Spring Cloud提供的这些功 ...
- Alienware-15-R3 装Ubuntu 16.04.3 LTS
前言:Alienware-15-R3默认安装的系统是win10.现在卸载win0,装Ubuntu 16.04.3 LTS. 一.下载Ubuntu 16.04.3 LTS镜像文件,下载地址:https: ...
- 函数isNaN() parseFloat() parseInt() Math对象
isNaN() 定义和用法 isNaN() 函数用于检查其参数是否是非数字值. isNaN(x) x 是特殊的非数字值 NaN(或者能被转换为这样的值) console.log(isNaN(NaN)) ...
- 关于 Nginx 配置 WebSocket 400 问题
今天把项目升级了 asp.net core 到 2.1 的版本,使用了 signalr 的功能,由于阿里云不支持 websocket 协议,所以使用了 nginx 代理方式来解决,后续就报了一个登陆 ...
- 常用的.NET开源项目(转)
Json.NET http://json.codeplex.com/ Json.Net是一个读写Json效率比较高的.Net框架.Json.Net 使得在.Net环境下使用Json更加简单.通过Lin ...
- salesforce零基础学习(八十八)项目中的零碎知识点小总结(二)
通过做项目以及群里面的一些大神的聊天,总结一下关于项目中的两个知识点,以后当做参考. 一. 在custom setting中配置集成接口信息后刷sandbox的问题 我们做项目时,经常会遇见和其他平台 ...
- easyui combobox下拉列表的多选值
html: <input id="cc" class="easyui-combobox" value="" data-options= ...
- Java可以像Python一样方便爬去世间万物
前言: 之前在大二的时候,接触到了Python语言,主要是接触Python爬虫那一块 比如我们常用的requests,re,beautifulsoup库等等 当时为了清理数据和效率,还专门学了正则表达 ...
- 运行 svgatest 显示 mmap /dev/zero Permission denied 解决办法
答案是我在这个网站上找到的: 执行 xset dpms force off 命令就可以解决掉这个问题. 再次运行 svgatest 程序,得到了预期的结果,perfect!
- C++ 日期 & 时间
C++ 标准库没有提供所谓的日期类型.C++ 继承了 C 语言用于日期和时间操作的结构和函数. 为了使用日期和时间相关的函数和结构,需要在 C++ 程序中引用 头文件. 有四个与时间相关的类型:clo ...